
Hey friends, Fotini here!
If you’re anything like me, you’re a sucker for chalkboards… I mean, do those ever go out of style? Jessica’s entryway chalkboard decorated for Christmas and this Easter Chalkboard and Valentine’s chalkboard are “goals!”
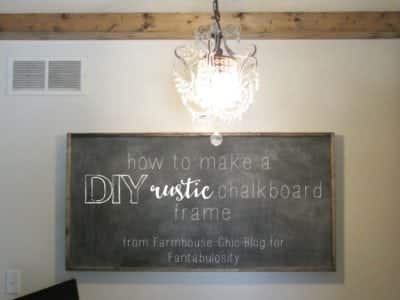
A chalkboard is one of my favorite ways to add instant charm to any space! The possibilities are endless since you can constantly change your designs, themes, and seasons. So, today I’m sharing how to make your own DIY rustic chalkboard frame! Yippee 🙂
How to Make
We headed to Lowe’s for this project and:
- Bought 2 spruce pine-fir furring strips that measure 1 inch X 3 inch X 8 foot, 2 spruce pine furring strips that measure 1 inch X 2 inch x 8 foot and sanded plywood that measures 3 foot X 5 foot. Begin by making your frame.
- Take your plywood and lay flat, measure the thicker furring strips to cover all sides, make cut marks where needed, remove your plywood for later. Cut using a miter box.
- Nail each piece into place using your nail tool. Now, you have your frame!
- Take the thinner furring strip and measure the same length of all sides of frame, mark and cut, creating a smaller frame. Make sure the smaller frame is plush with the bottom of one side. Nail into place.
- You will have about an inch lip on the top side of your frame and this is where the chalkboard will rest.
- You’re ready to stain your frame! I used a dark walnut and love the richness it gives the wood.
- Take your piece of plywood and spray it with an even coat of chalkboard paint. I use spray paint because it’s easy to handle. Allow enough drying time in between each coat, but give the wood a heavy 3 coats. Allow the entire piece to dry overnight.
- To attach your chalkboard to your frame, use wood glue on the top of the small frame and press plywood into place. Allow something heavy to sit on it for at least 5 hours. To activate the chalkboard effect, take a regular piece of chalk and simply brush it over the entire face. And you’re done!
I just love how this piece fits in my office! It doesn’t even have to have anything on it and it’s beautiful! So, what do you think?
Cleaning a Chalkboard
If you’ve ever struggled cleaning the chalk or chalk marker off of your chalkboard, you won’t believe what I used to get chalk marker off of our chalkboard! Since sharing this tip, hundreds of other people have had success with it too!
More DIY
Then while you have the supplies out, this DIY farmhouse coat rack would look amazing! Then, wouldn’t this book page wreath or making a vase out of wine bottle, look AMAZING next to this too? If you love wall art, make sure you see this DIY Wall art idea too!
Or, we loved gluing a puzzle that we put together, to frame and hang on the wall too!
Or here are some other great DIY ideas for you to consider:


Leave a Reply