

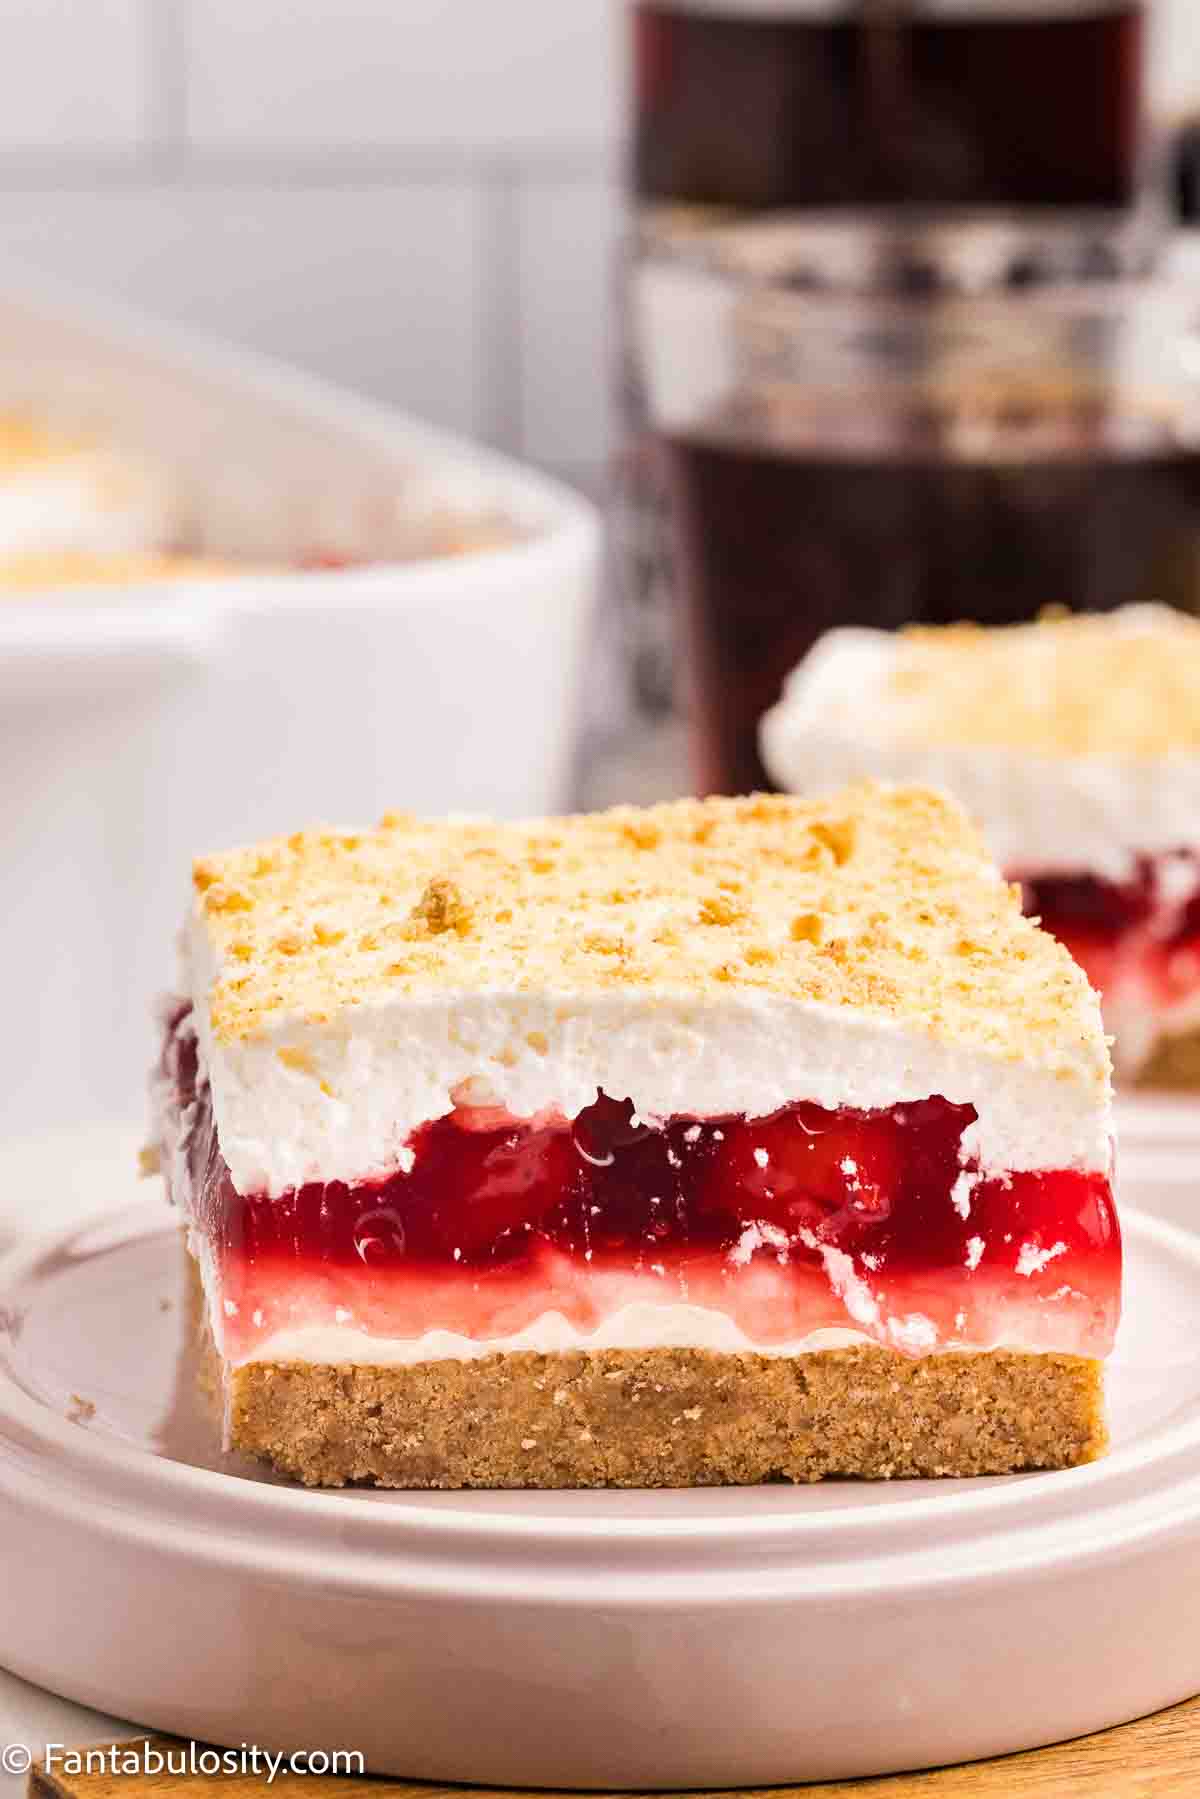
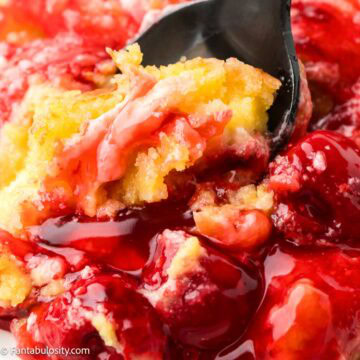
Cherry Yum Yum is a classic no-fuss layered dessert made with a buttery pecan graham cracker crust, sweet cream cheese filling, cherry pie topping, and fluffy homemade whipped cream. It's the kind of nostalgic 9×13 dessert that always disappears first at potlucks, holidays, and family dinners.
A Classic Church-Cookbook Dessert That Never Goes Out of Style
Some desserts just have that unmistakable church cookbook energy, and Cherry Yum Yum is one of them. It's simple, familiar, and incredibly dependable, right along with this No-Bake Cherry Pie and this No-Bake Oreo Dessert.
You get a lightly toasted graham cracker-pecan crust, a fluffy cream cheese layer, sweet cherry pie filling, and clouds of homemade whipped cream on top.
It's also one of those desserts that looks impressive when sliced but requires surprisingly little effort. The layers set up beautifully in the refrigerator, making it perfect for make-ahead gatherings like holidays, potlucks, and Sunday dinners. If you grew up around vintage recipe cards and community cookbooks, this dessert probably feels instantly familiar.
FAQs
Cherry Yum Yum is a vintage layered dessert made in a 9×13 pan with a graham cracker crust, sweetened cream cheese filling, cherry pie topping, and whipped cream. It's sometimes called a "lush dessert" or "dessert delight."
Yes. In fact, it's better that way. Chilling the dessert overnight allows the layers to fully set, making it easier to slice and serve.
Store it covered in the refrigerator for up to 4 days.
It's not recommended. Freezing can change the texture of the whipped cream and cream cheese layer once thawed.
Yes. The dessert will still be delicious with only vanilla extract. The almond extract simply enhances the cherry flavor.
Absolutely. You'll need about 2 ¼ cups of graham cracker crumbs if using pre-crushed crumbs.
Ingredients
Pecan Graham Cracker Crust
- Graham cracker sheets – Create the sweet, buttery base of the dessert while also providing structure.
- Pecans – Add richness, texture, and a lightly toasted nutty flavor to the crust.
- Granulated sugar – Lightly sweetens the crust and balances the buttery flavor.
- Salted butter, melted – Binds the crust together while adding classic buttery flavor.
- Salt (optional) – Only needed if using unsalted butter to balance the sweetness.
Cream Cheese Layer
- Block cream cheese – Creates a thick, creamy, stable middle layer. Full-fat cream cheese works best for structure.
- Powdered sugar – Sweetens the layer while keeping the texture smooth and fluffy.
- Vanilla extract – Adds warmth and depth to the filling.
- Almond extract – Enhances the cherry flavor beautifully. A little goes a long way.
Cherry Layer
Cherry pie filling – Adds bright color, sweetness, and that classic cherry flavor.
Whipped Cream Topping
- Heavy whipping cream – Whips into a light, airy topping that balances the richness of the dessert.
- Powdered sugar – Sweetens and stabilizes the whipped cream.
- Vanilla extract – Adds a touch of flavor and warmth.
Garnish
Graham cracker crumbs
Sprinkled on top for texture and a hint of crunch.

Instructions
Make the crust
Preheat the oven. Pulse the pecans in a food processor until finely chopped. Transfer them to a bowl and set aside.

Add the graham crackers to the processor and pulse into crumbs. Return the pecans to the processor along with the sugar. If using unsalted butter, add salt.

Pulse briefly to combine. Add melted butter and pulse until the mixture comes together.

Press the crumb mixture firmly into a 9×13 baking dish to form an even crust. Bake until lightly golden and fragrant.

Allow the crust to cool completely before continuing.
Make the Cream Cheese Layer
In a mixing bowl, beat the cream cheese until completely smooth.

Add powdered sugar, vanilla extract, and almond extract. Beat until well combined.

Increase the mixer speed slightly and beat for several minutes until the mixture becomes light and fluffy.
Spread the cream cheese mixture evenly over the cooled crust, making sure it reaches all the edges of the pan.

Add the Cherry Layer
Spoon the cherry pie filling evenly across the cream cheese layer. Spread gently without pressing down to keep the layers distinct.
Make the Whipped Topping
In a chilled bowl, whip the heavy cream until soft peaks form.
Add powdered sugar and vanilla extract, then continue whipping until stiff peaks form and the whipped cream holds its shape.
Spread the whipped cream evenly over the cherry layer.

Chill and Serve
Cover and refrigerate for several hours or overnight until fully set.
Just before serving, sprinkle graham cracker crumbs over the top.
Slice, serve, and enjoy.

Tips
- Let the crust cool completely before adding the cream cheese layer so the filling stays thick and smooth. I’ve popped my crust in the freezer to speed things up if needed.
- Beat the cream cheese thoroughly to remove any lumps before adding other ingredients.
- Mixing the cream cheese layer for a few extra minutes creates a noticeably lighter, fluffier texture.
- Chilling overnight produces the cleanest slices and the most defined layers.
- Wipe your knife clean between cuts for picture-perfect servings.

More Vintage Recipes
- Westhaven Cake is an old-fashioned chocolate cake made with softened dates that’s topped with a warm fudge icing.
- Cowboy Pasta Salad is hearty and flavor-packed, made with smoky BBQ dressing, sausage, bacon, beans, and cheese.
- Shoofly Cake is an old-fashioned molasses cake with a tender base and crumbly topping that’s baked in a simple 9×13 pan.
- Old Fashioned Salmon Patties are ready in under an hour, using canned salmon.
Recipe

Cherry Yum Yum
Video
Ingredients
Pecan Graham Cracker Crust
- 18 graham cracker sheets 2 ¼ cups crumbs 2 packets
- 1 cup whole pecans
- ¼ cup granulated sugar
- ¾ cup salted butter melted
- **½ teaspoon salt only if using unsalted butter
Cream Cheese Layer
- 16 ounces block cream cheese softened
- 1 ½ cups powdered sugar
- 1 teaspoon vanilla extract
- ¼ teaspoon almond extract
Cherry Layer
- 2 – 21 ounce cans of cherry pie filling
Whipped Cream Topping
- 2 cups heavy whipping cream cold
- ½ cup powdered sugar
- 1 teaspoon vanilla extract
Garnish
- 2-3 tablespoons graham crackers 1-2 cracker sheets, optional
Instructions
Make the Crust
- Preheat oven to 350 degrees F.
- In the bowl of your food processor, add the pecans. Pulse to create finely cut pecans. Place them in a bowl and set aside.
- Add the graham cracker sheets to the bowl of your food processor. Pulse to create crumbs.
- Add the pecans back into the bowl of your food processor, followed by the granulated sugar. If using unsalted butter, add ½ teaspoon of salt to the mixture. Pulse to mix together.
- Add the melted butter, pulsing until the mixture comes together.
- Turn the crumb mixture into a 9×13 baking dish. Press firmly.
- Bake for 8-10 minutes until lightly golden and fragrant.
- Cool completely before heading to the next step. About 45 minutes.
Cream Cheese Layer
- To a mixing bowl, add the cream cheese. Beat until completely smooth.
- Add the 1 ½ cups of powdered sugar, 1 teaspoon vanilla extract, and almond extract.
- Beat until well combined.
- Set your mixer to medium and beat the mixture for 3 minutes until light and fluffy.
- Spread evenly over the cooled crust, making sure to touch the edges of the pan.
Cherry Layer
- Spoon the cherry pie filling evenly over the cream cheese layer. Spreading gently without pressing it down (this helps create clean layers).
Whipped Cream Topping
- In a chilled bowl, whip the heavy cream to soft peaks.
- Add the remaining powdered sugar and vanilla extract.
- Continue to whip to stiff and smooth peaks.
- Spread evenly over the cherry layer.
- Cover and refrigerate for at least 4 hours to overnight (recommended).
- Lightly sprinkle the remaining graham cracker crumbs over the whipped cream layer before serving, if desired.
Notes
- Mixing the cream cheese layer for a few extra minutes creates a noticeably lighter, fluffier texture.
- I’ve put my crust in the freezer to speed up the cooling process, if pressed for time.
- Chilling overnight produces the cleanest slices and the most defined layers.
Nutrition
Nutritional information is based on third-party calculations and should be considered estimates. Actual nutritional content will vary with brands used, measuring methods, portion sizes and more.
Laura Weger says
Can I use already ground pecan?
Jessica says
Sure! Just one less step for you!