

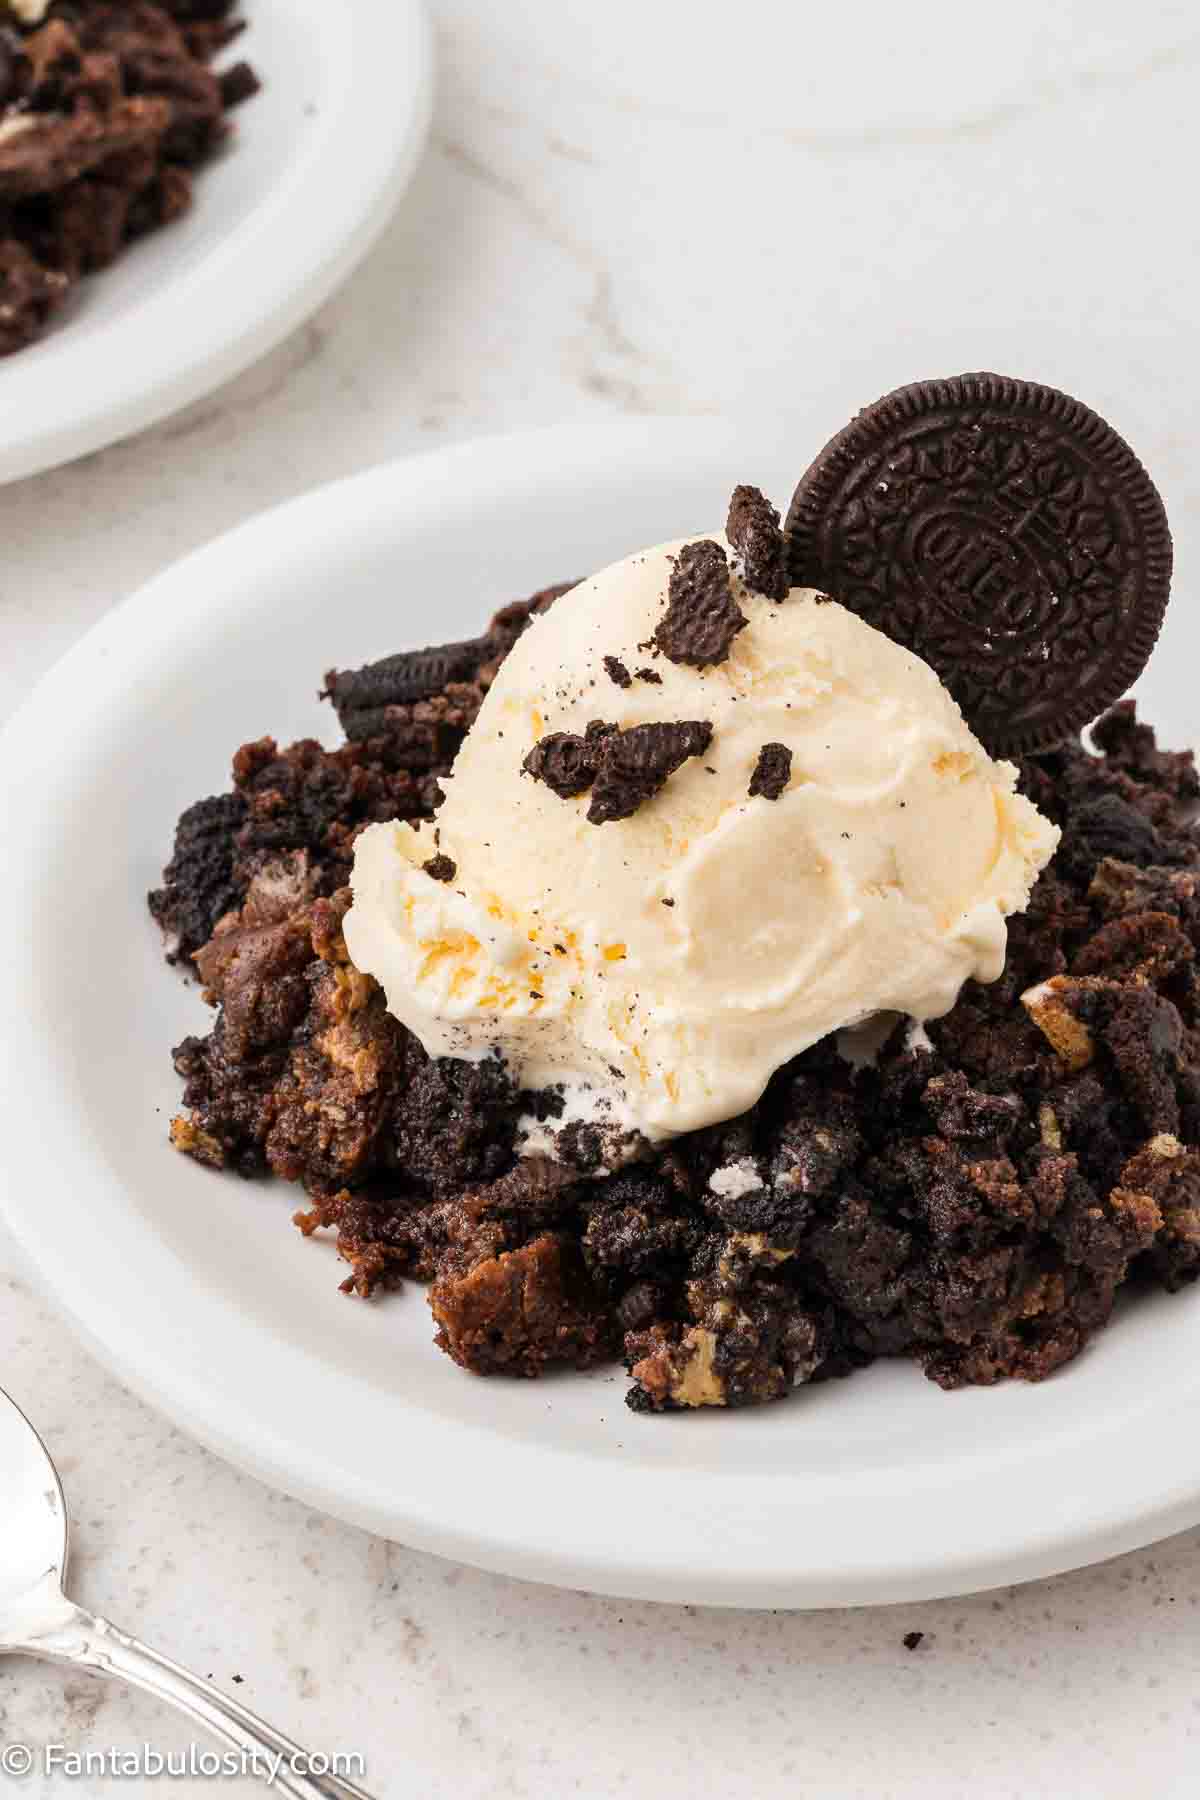
If you need a dessert that feels indulgent without feeling fussy, this Oreo Dump Cake delivers every time. It's simple, and comes out rich, gooey, and completely irresistible.
If you enjoy this kind of dessert, you'll find more favorites in my dump cake dessert roundup.
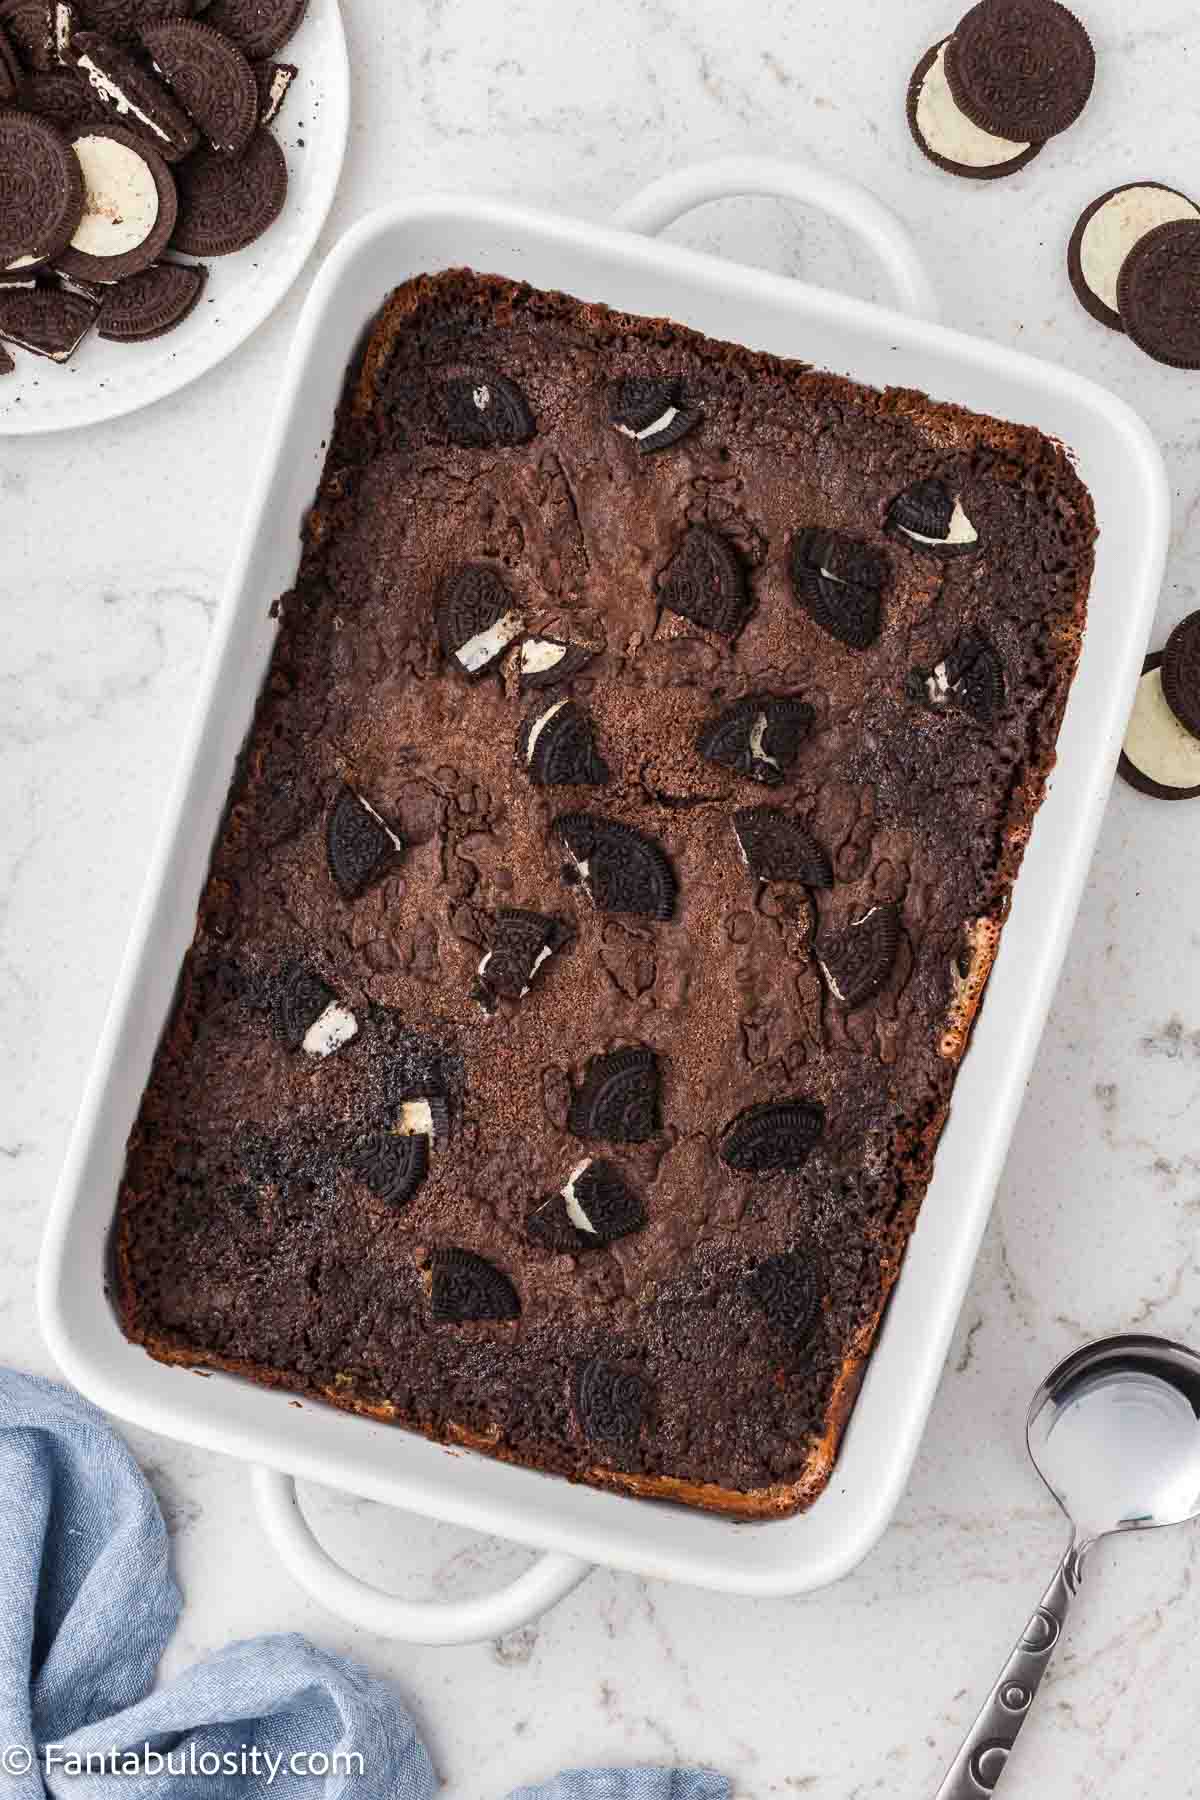
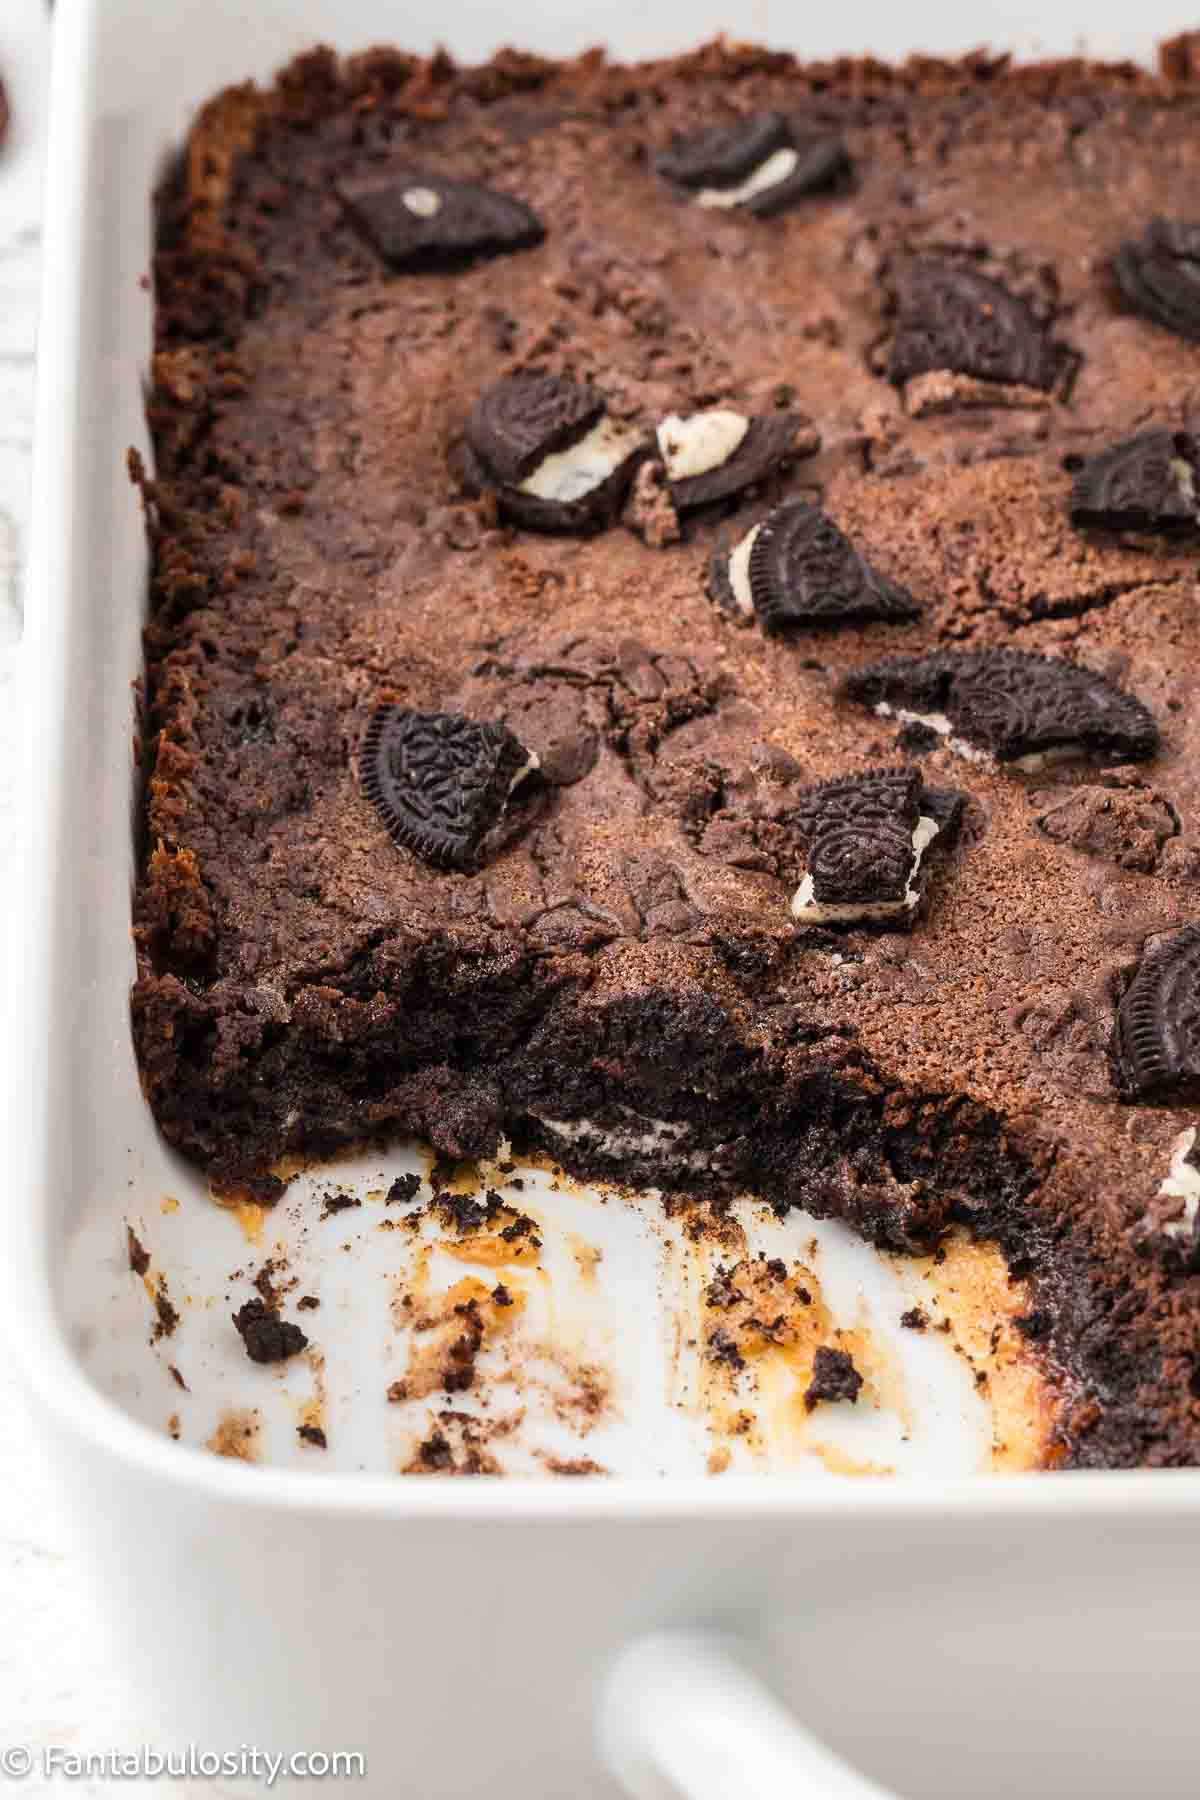
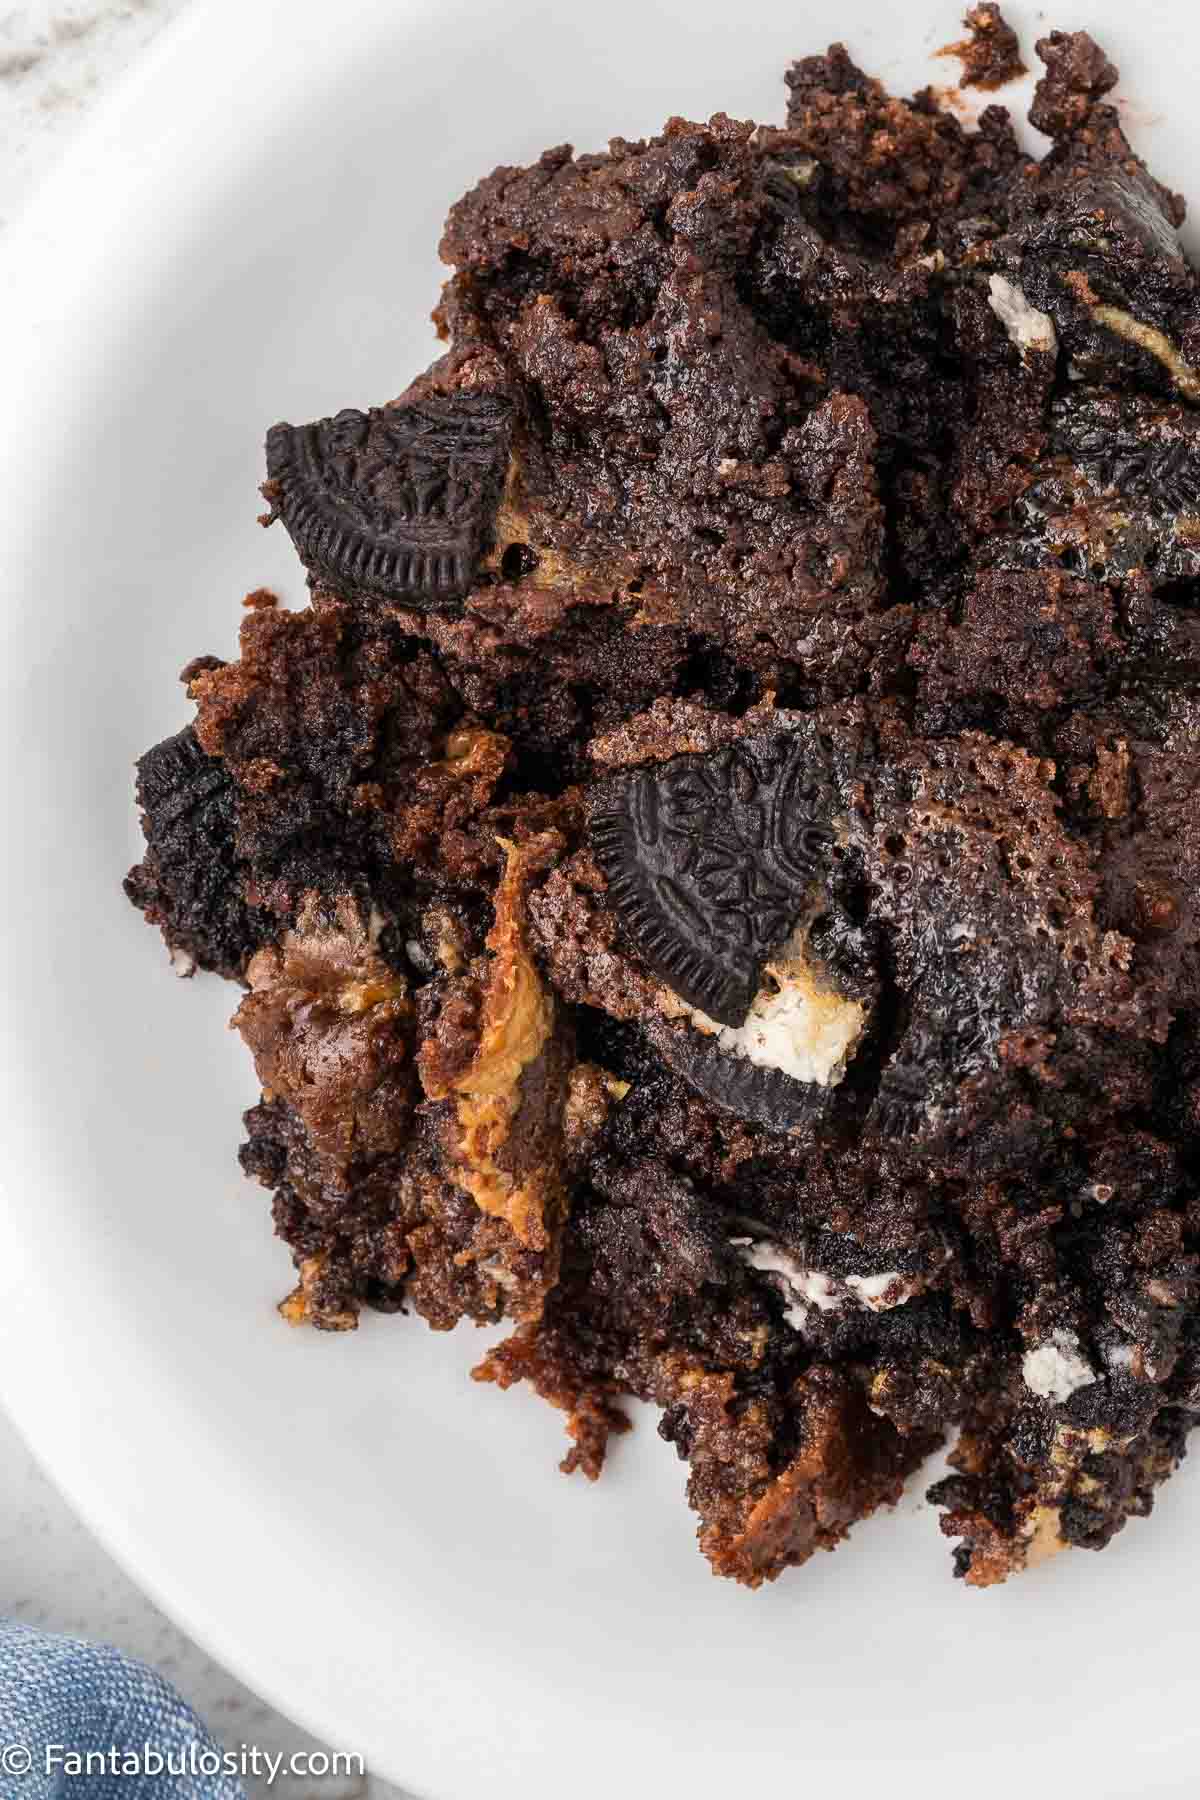
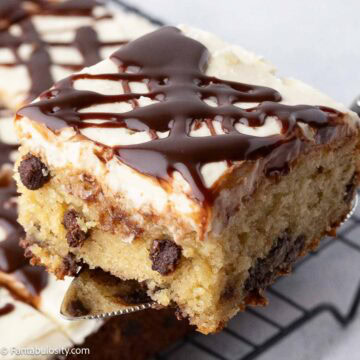
Whole Oreo cookies form the base, creating a soft cookie crust as they bake. Sweetened condensed milk and whipped topping melt together into a creamy center, while chocolate cake mix and butter turn into a lightly crisp, fudgy top. It's a classic dump cake with a cookies-and-cream twist that always gets people asking for the recipe.
Why You'll Love This Recipe
- No mixing bowls or complicated steps
- Uses whole Oreos for an easy cookie crust
- Rich, gooey center with a chocolatey topping
- Perfect for potlucks, holidays, or casual gatherings
- Easy to scoop and serve with ice cream
Ingredients (with Notes)
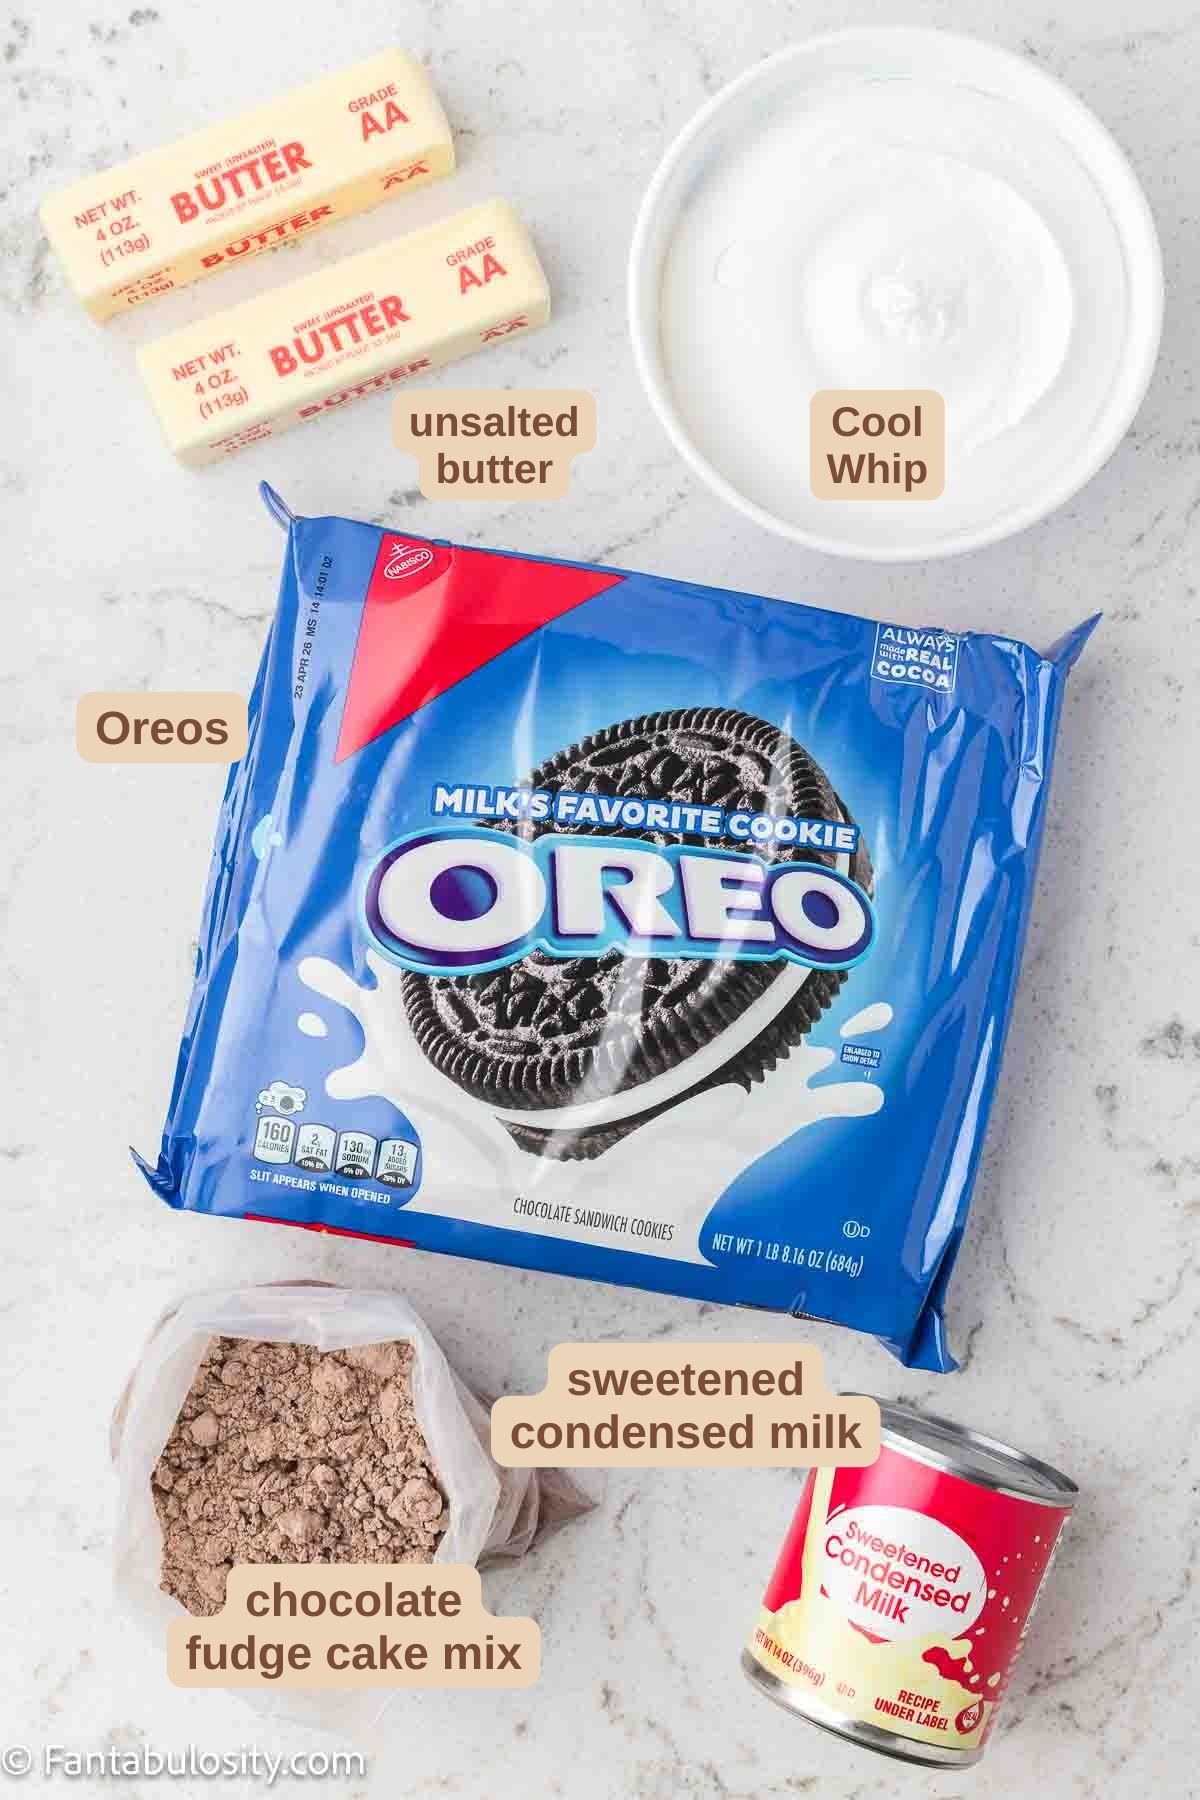
- Oreo cookies
These create both the bottom crust and the topping. Using whole cookies on the bottom gives the cake structure and helps it hold together when serving. - Sweetened condensed milk
This adds sweetness and moisture, creating the signature gooey dump cake texture as it bakes. - Frozen whipped topping (thawed)
Forms a creamy middle layer that keeps the cake soft and rich without any mixing. - Chocolate fudge cake mix
Bakes into a tender chocolate topping once the butter is absorbed. Chocolate fudge mix adds extra richness, but any chocolate cake mix will work. - Unsalted butter (melted)
Essential for turning the dry cake mix into a baked, cake-like layer. Pouring it evenly ensures the topping bakes properly.
Instructions
Preheat the oven to 350°F and lightly coat a 9×13-inch baking dish with nonstick cooking spray.
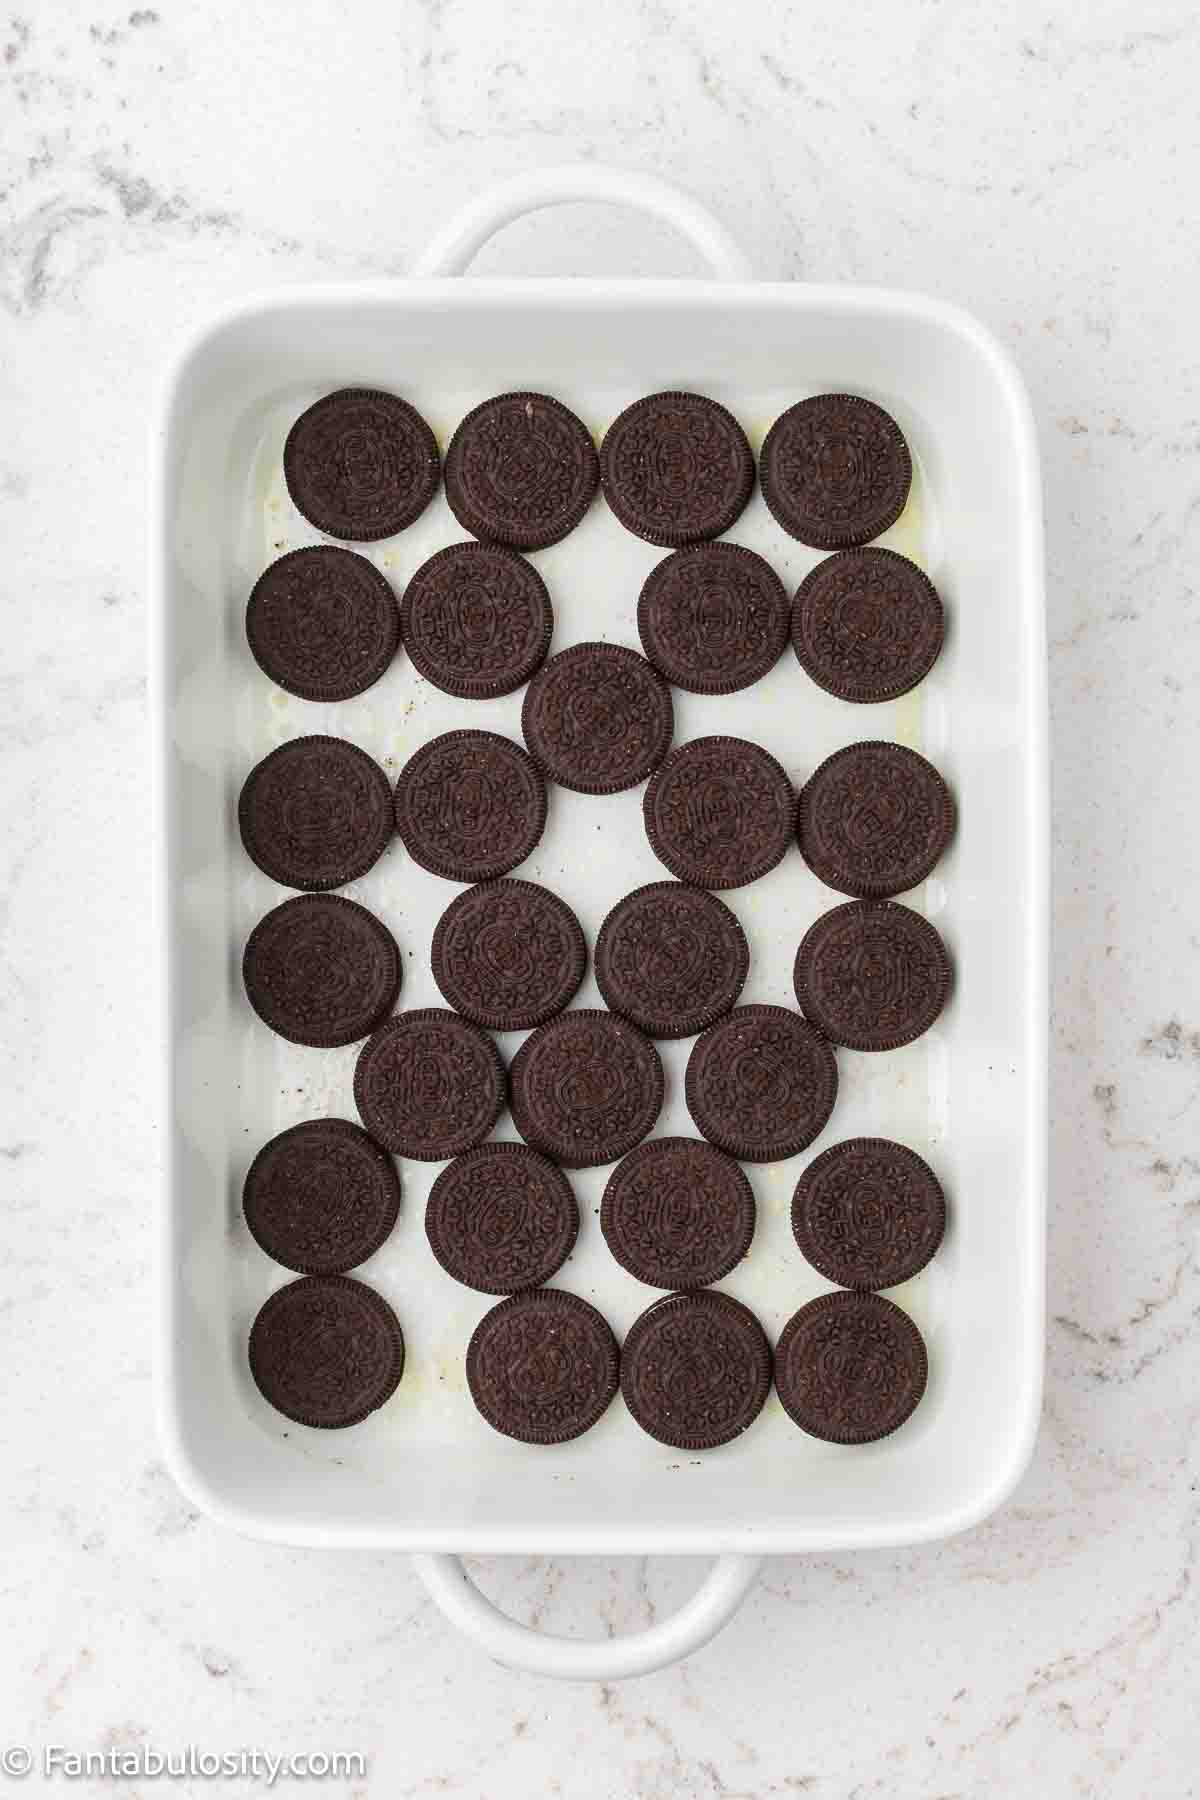
Open the Oreo package and line whole cookies in a single layer across the bottom of the dish, filling the surface edge to edge.
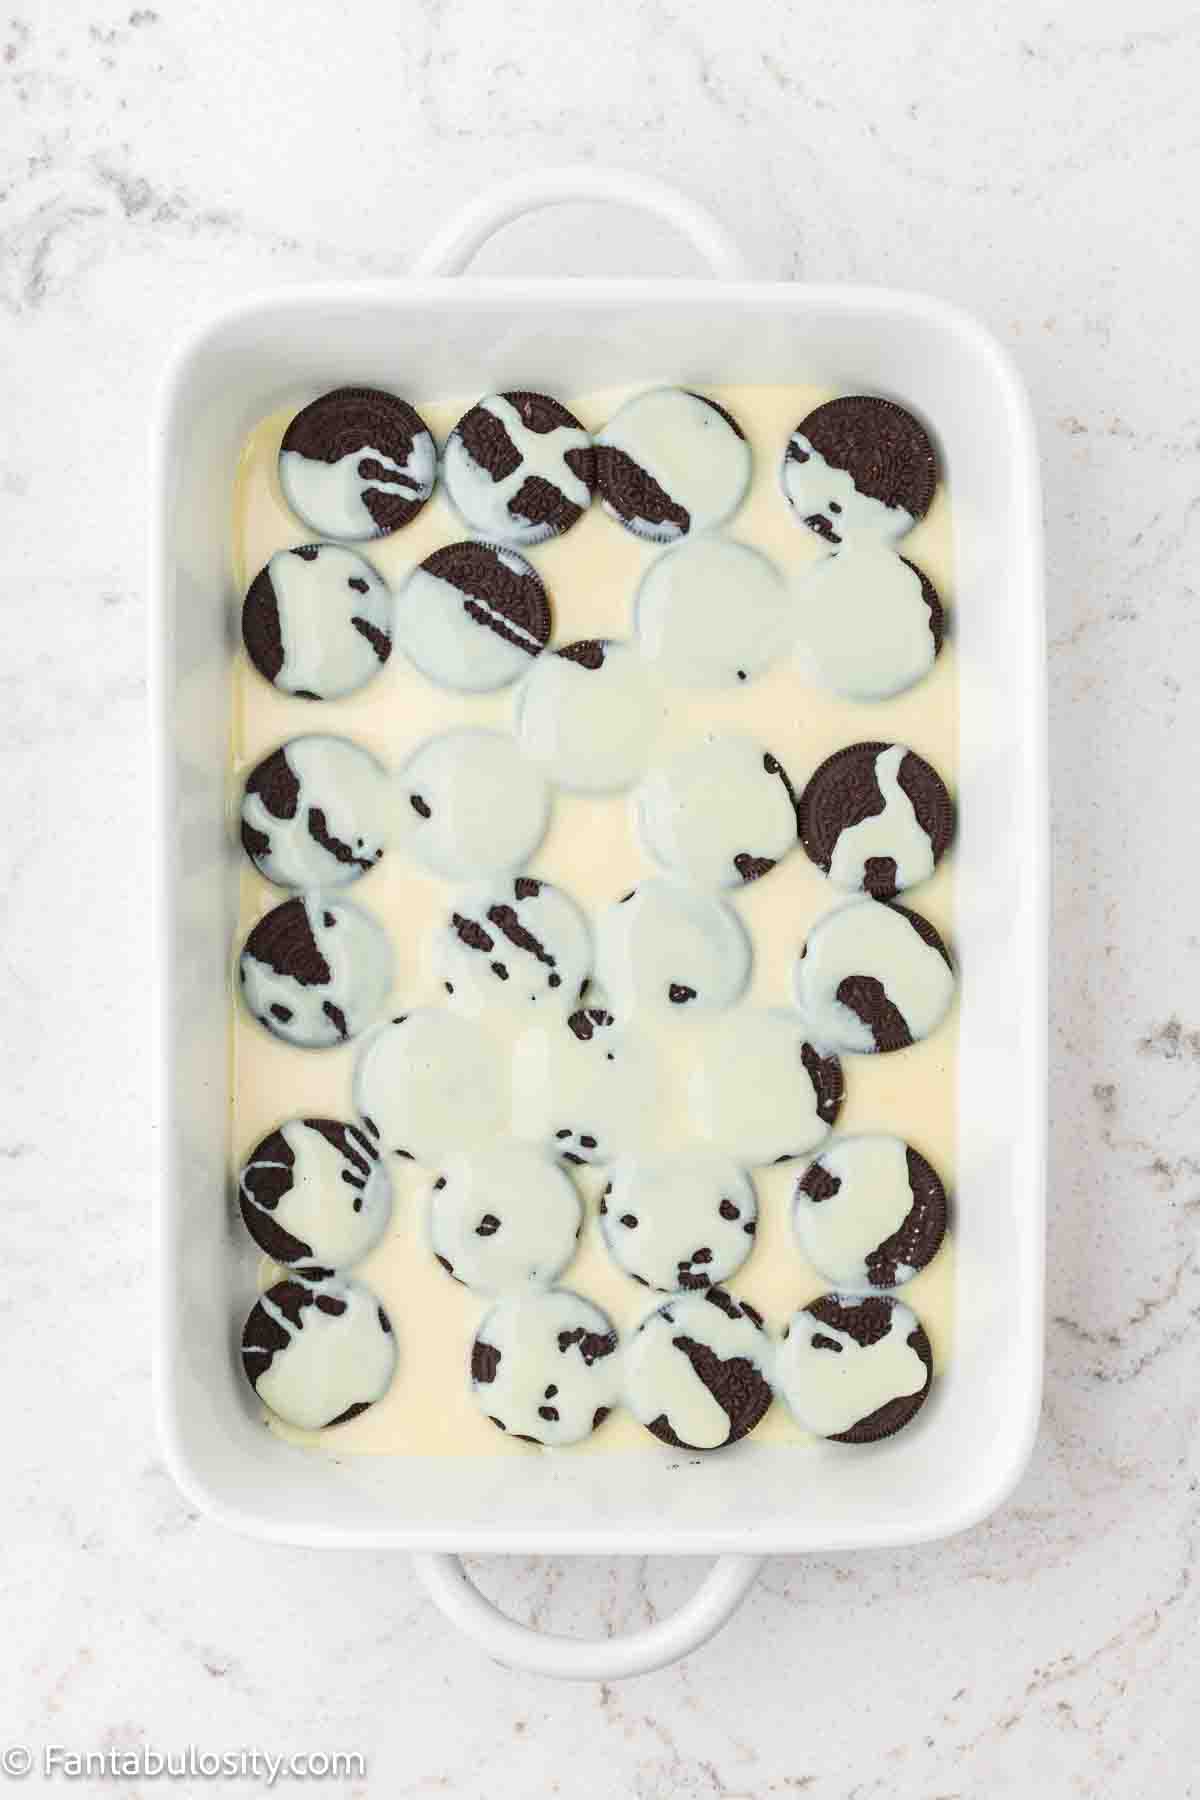
Slowly pour the sweetened condensed milk over the Oreo layer, drizzling it as evenly as possible.
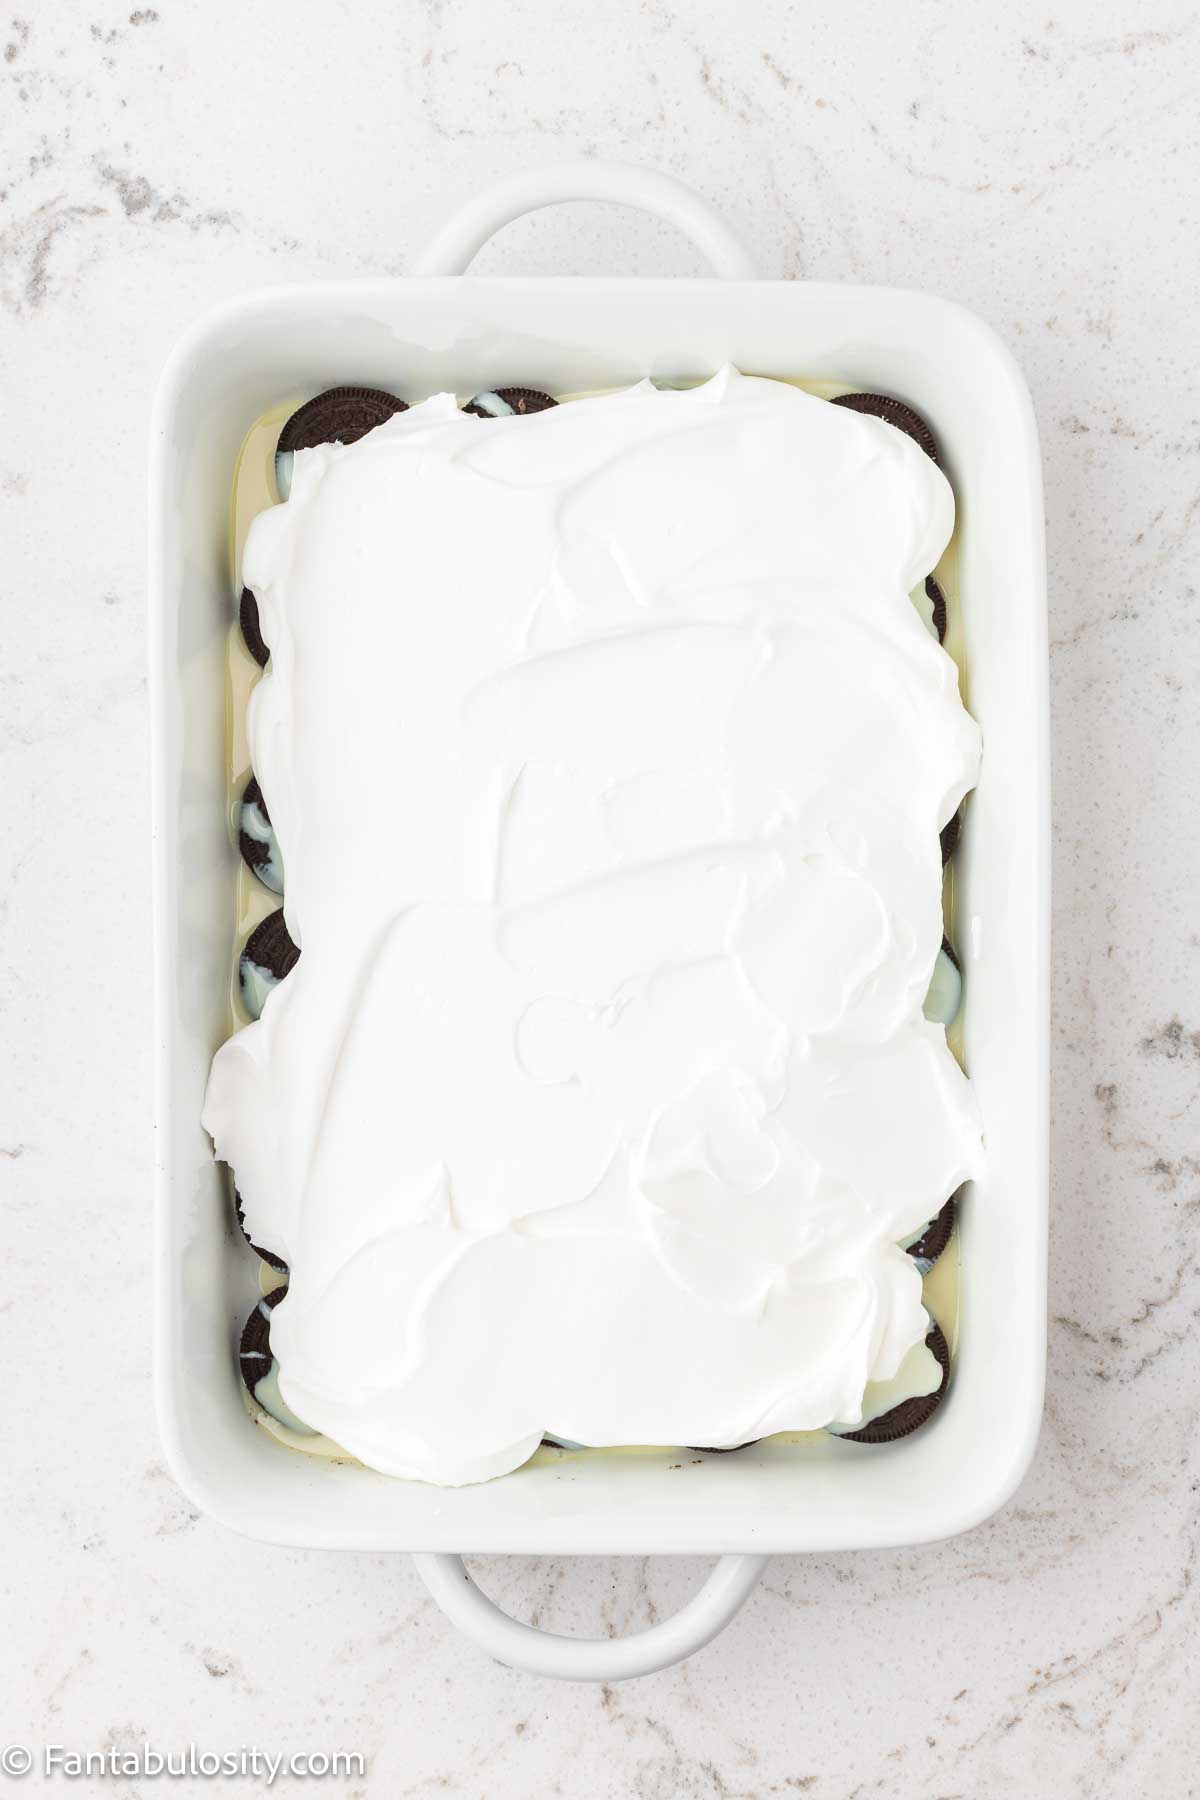
Spoon the whipped topping over the condensed milk and gently spread it into an even layer without mixing the layers.
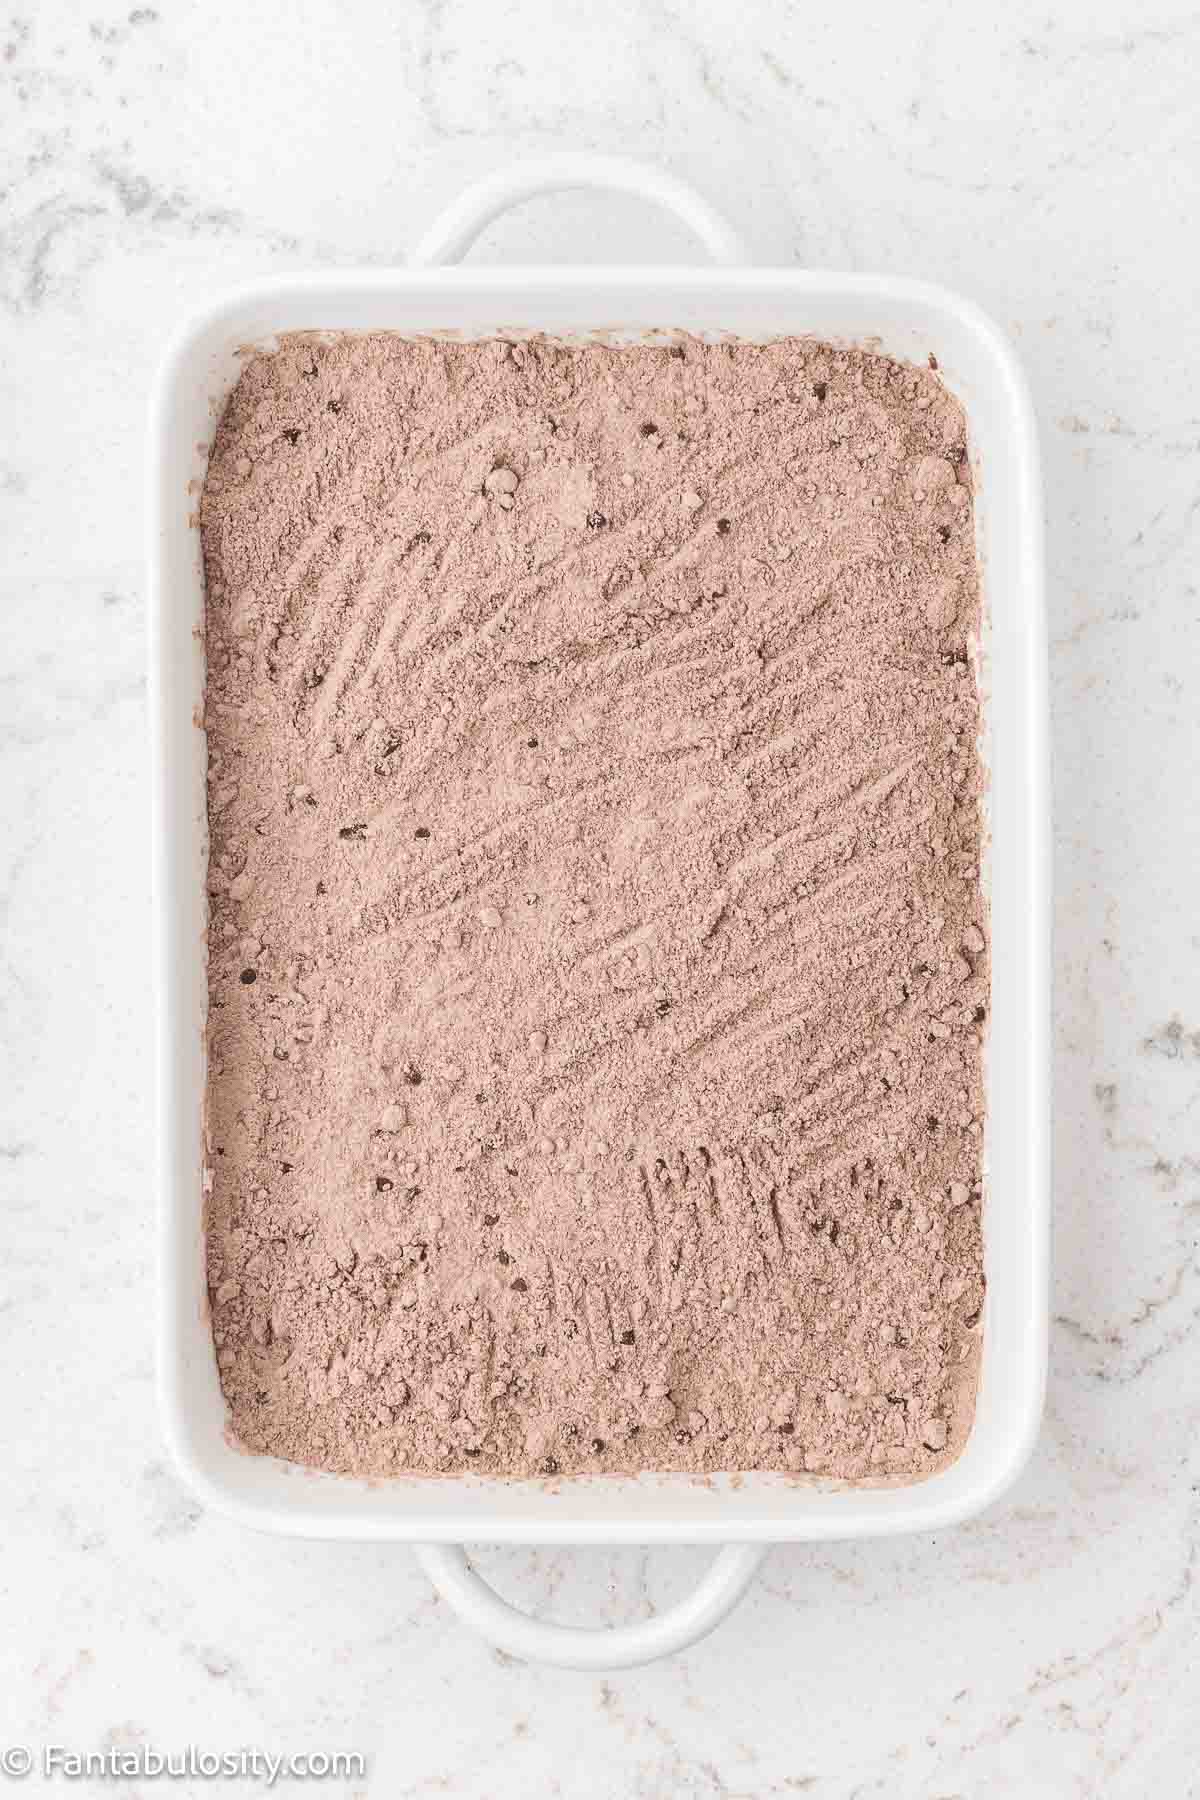
Sprinkle the chocolate cake mix evenly over the whipped topping. Lightly rake it with a fork to distribute it, but do not stir.
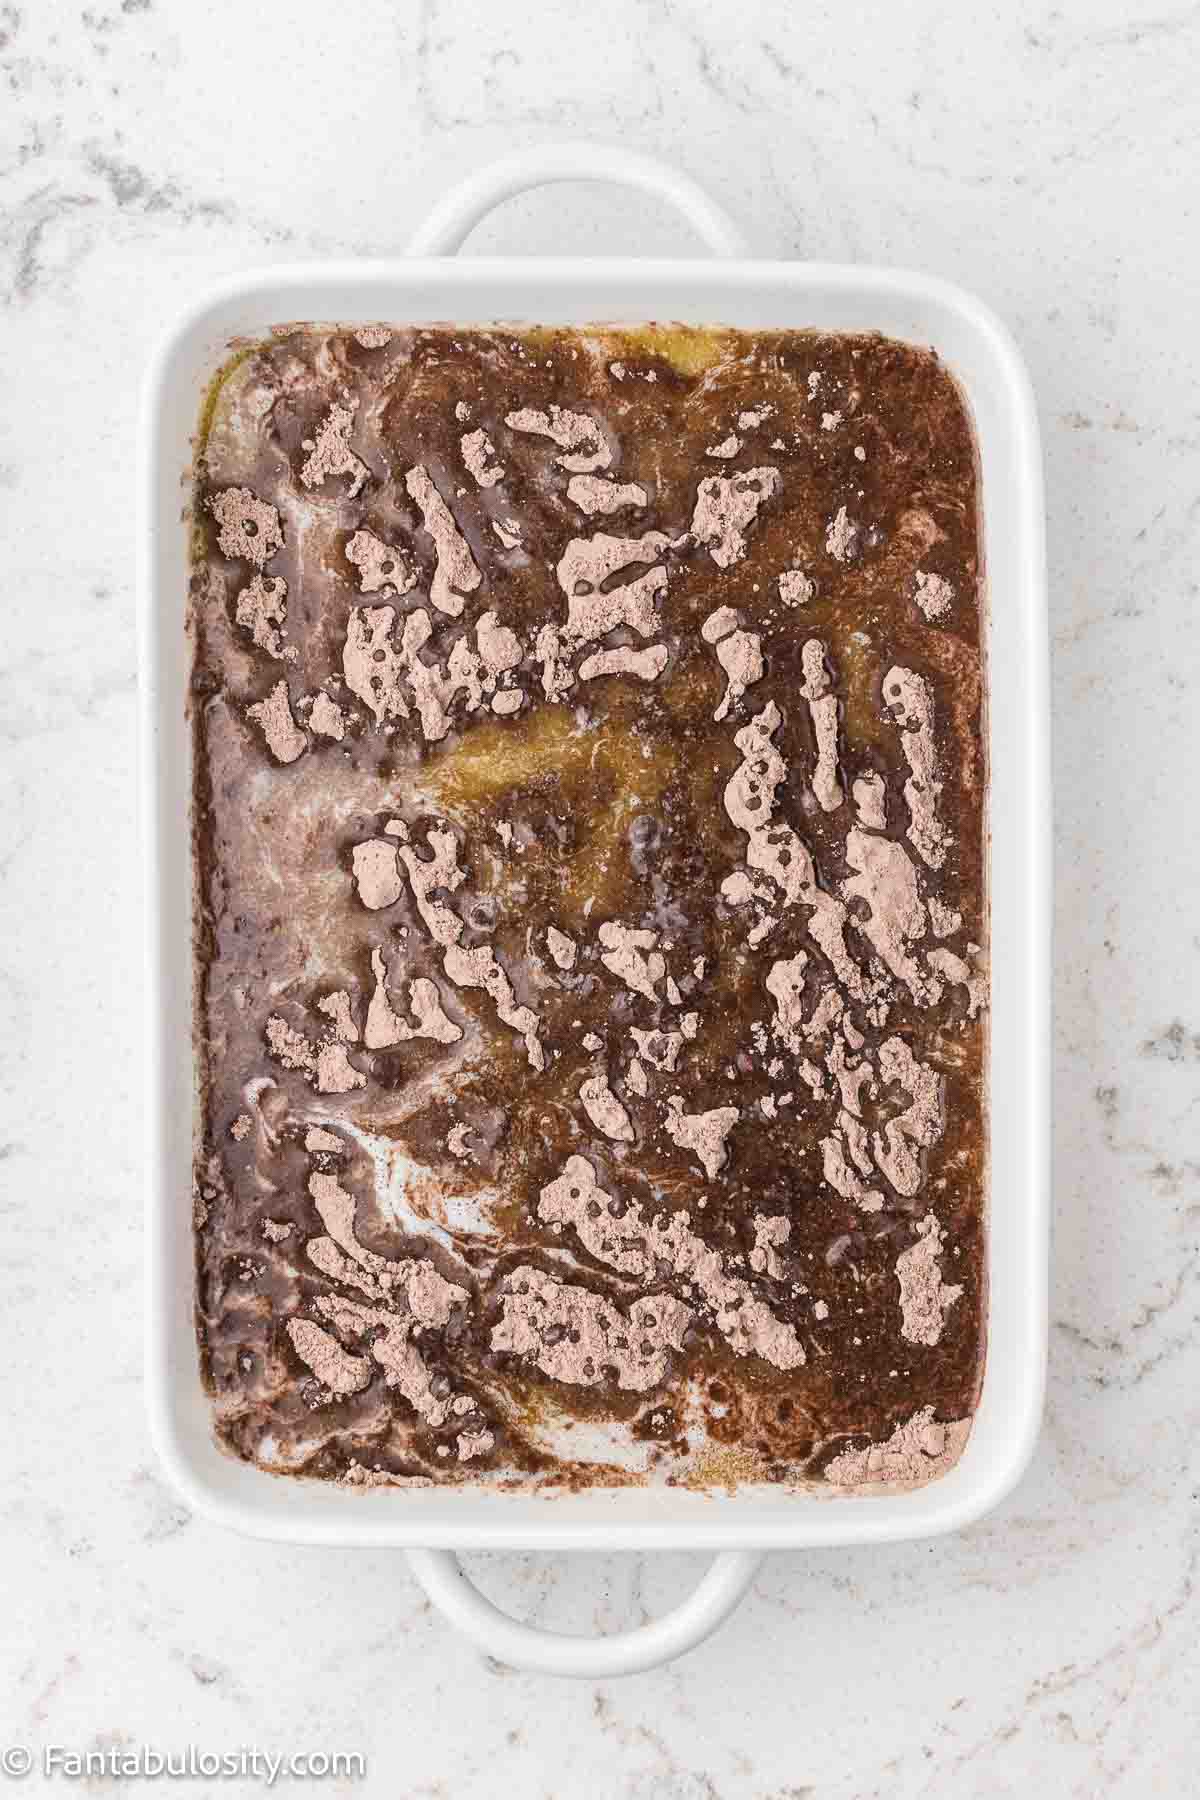
Slowly pour the melted butter over the cake mix, moving back and forth to cover as much of the surface as possible. If you see any dry spots, drizzle a little extra butter over those areas.
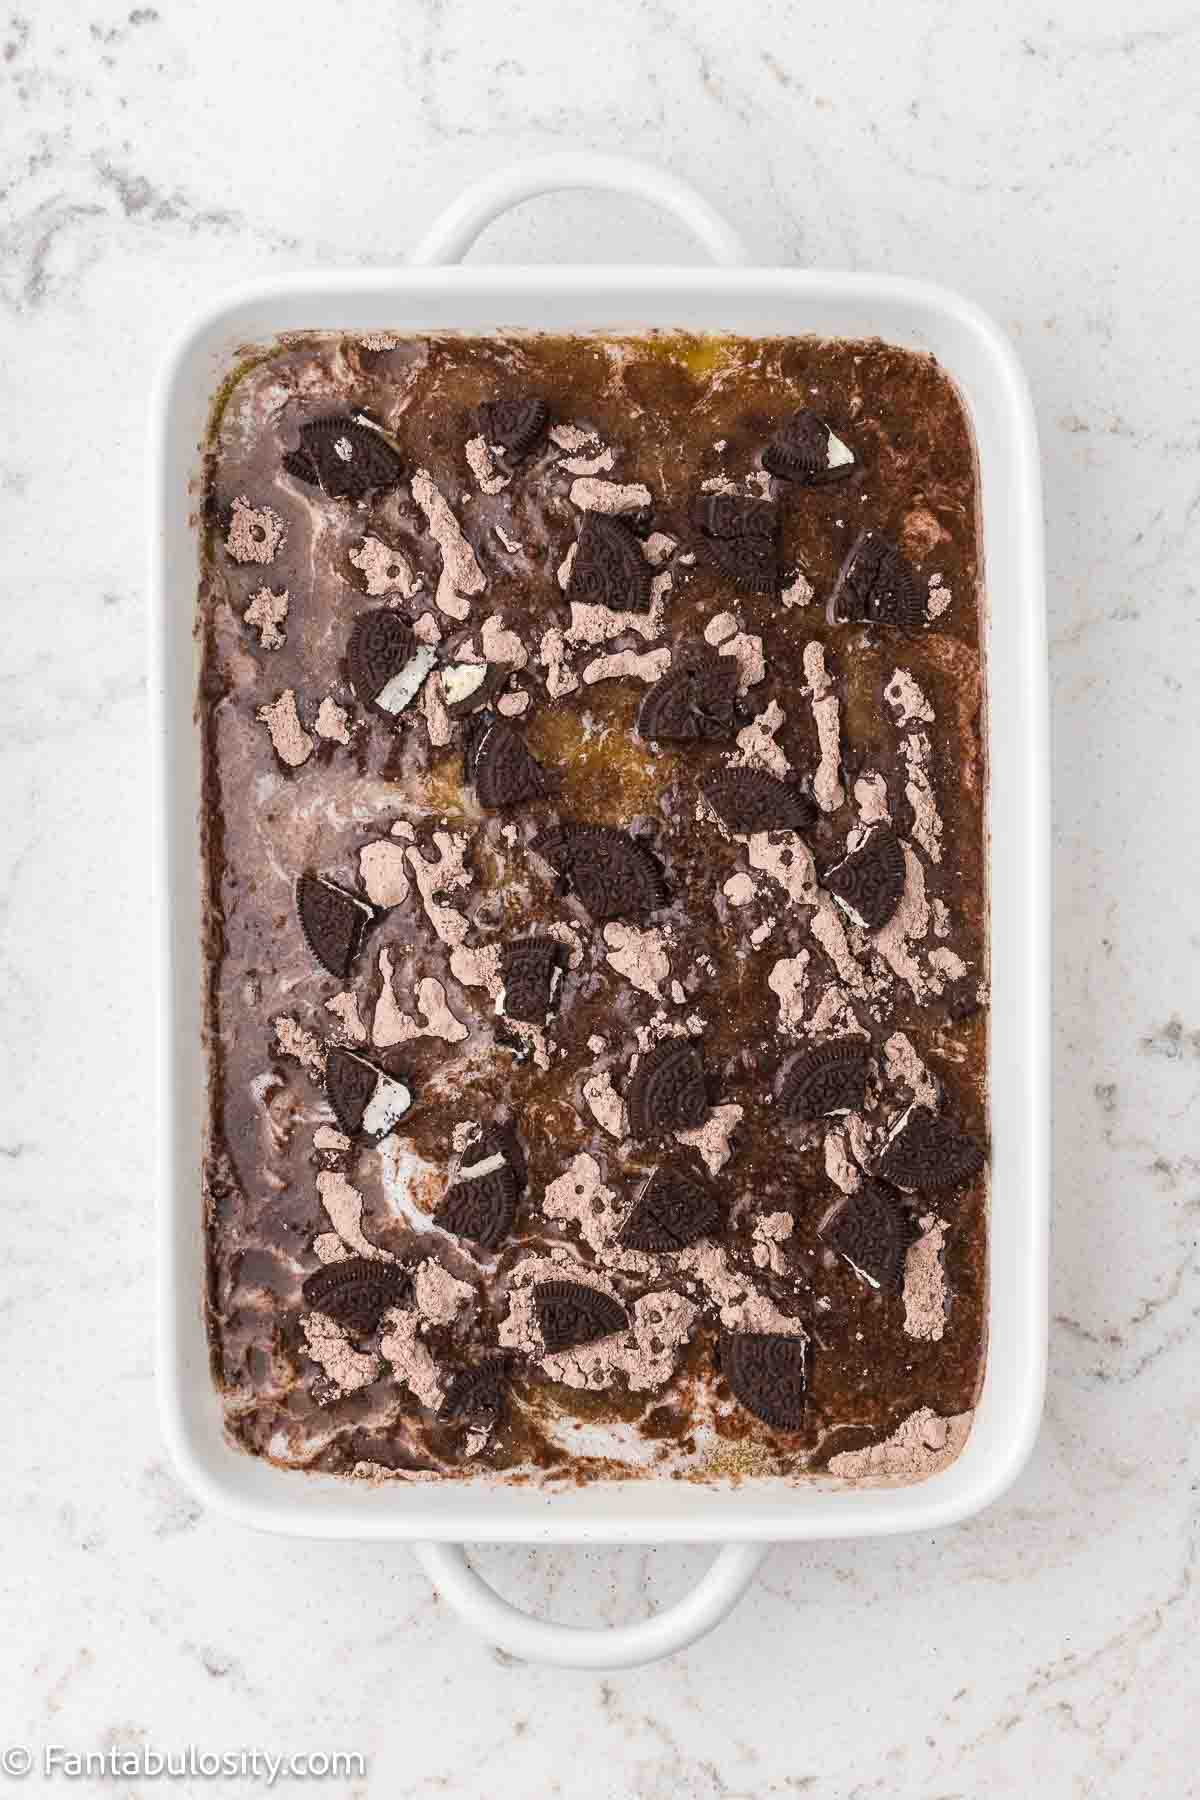
Roughly chop some of the remaining Oreos and scatter them evenly over the top.
Bake for 35 to 40 minutes, until the top is set and lightly crisp and the edges are bubbling. Let the cake cool for about 10 minutes before serving.
Scoop or slice and serve with ice cream or whipped cream, and garnish with extra Oreo pieces if desired. For an even more decadent dessert, serve it in these chocolate waffle cone bowls.
Tips & Notes
A glass or light-colored ceramic baking dish works best because it heats gently and helps the layers bake evenly without overbrowning.
Lining the bottom with whole Oreos creates a sturdier base that holds together better when scooping.
Pour the melted butter slowly and evenly to prevent dry, powdery spots in the cake mix. Sometimes I’ll even slightly press down after pouring the butter on to make sure the cake mix soaks in that butter, but don’t mix them.
FAQs
Yes. Chocolate fudge cake mix gives the richest flavor, but any chocolate cake mix can be used.
This usually happens when the butter was not poured evenly over the cake mix. Make sure all dry spots are moistened so the topping can fully bake.
Yes. You can bake it earlier in the day and refrigerate it. Let it sit out for about 10 to 15 minutes before serving so the layers soften again.
Storage & Freezing
This Oreo Dump Cake can sit at room temperature for up to 2 hours during serving. After that, refrigerate any leftovers.
Stored in the refrigerator, it will stay fresh for up to 4 days. Cover the pan tightly, and let servings sit out for 10 to 15 minutes before eating so the layers soften again.
Serving Suggestions
Serve warm with vanilla ice cream for a classic pairing, or top with freshly whipped cream for a lighter finish. It's also perfectly acceptable to serve this straight from the pan with a spoon.
If you're looking for more desserts that work well for sharing, you'll find my favorite potluck desserts here.
Recipe

Oreo Dump Cake
Video
Ingredients
- 24 ounce package Oreo cookies divided
- 14 ounce can sweetened condensed milk
- 8 ounce tub frozen whipped topping thawed
- 15.25 ounce box chocolate fudge cake mix
- 1 cup unsalted butter 2 sticks, melted
Instructions
- Preheat oven to 350°F and lightly coat a 9×13-inch baking dish with nonstick cooking spray.
- Open the 24-ounce package of Oreos and line the cookies in a single layer across the bottom of the baking dish, filling the surface with whole cookies edge to edge.
- Pour the entire 14-ounce can of sweetened condensed milk in slow ribbons over the Oreo layer, covering the cookies as evenly as possible.
- Spoon the thawed 8-ounce tub of whipped topping over the condensed milk layer, then gently spread it into an even layer without mixing the layers.
- Sprinkle (1) 15.25-ounce box of chocolate fudge cake mix evenly across the whipped topping layer. Gently rake it with a fork to make sure it is evenly distributed. Do not stir.
- Pour 1 cup melted unsalted butter over the entire cake mix layer, slowly and evenly, moving back and forth to cover as much of the dry surface as possible. Check the surface for any dry areas of cake mix and drizzle a little extra melted butter over those spots so they can bake evenly and fully absorb.
- Roughly chop some of the remaining Oreos in the package and scatter them evenly over the top of the melted butter layer.
- Bake for 35-40 minutes, or until the top is set and lightly crisp, and the edges are bubbly.
- Cool for 10 minutes to allow the layers to firm up slightly.
- Scoop or slice into portions. Serve with ice cream or fresh whipped cream and garnish with a few more chopped Oreo cookies. ENJOY!
Notes
Nutrition
Nutritional information is based on third-party calculations and should be considered estimates. Actual nutritional content will vary with brands used, measuring methods, portion sizes and more.

Sara Saucier says
Sounds WONDERFUL – love love love the fact that it’s soooo EASY ‼️
Jessica says
Oh good! I’m so glad, thank you!