

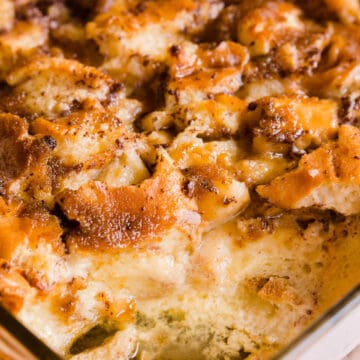
A collection of vintage dessert recipes must include this buttermilk pie recipe. With only 8 simple ingredients, most of which are pantry staples, this pie recipe is ready in less than an hour.
This recipe is one of my go-to desserts for a potluck, especially when you need something dependable.

Jessica’s Recipe Notes
- Ease: This pie is simple, and great for beginners.
- Taste & Texture: Much like my egg custard pie, this has a smooth, custard filling, with a slightly tangy flavor due to the buttermilk.
- Top Tip: Allow at least an hour for the buttermilk pie to cool before serving.
Perfect for the holidays or anytime of year, this old-fashioned pie looks beautiful sitting on the dessert table next to other holiday-favorite pies like this pecan pie, sweet potato pie and this no-bake chocolate pie.
It’s also a great recipe to make as a dessert for a church potluck or family get-together, as crowds seem to love vintage recipes. Another nostalgic Southern favorite is this traditional Sock It to Me Cake with its cinnamon pecan swirl.
Jump to:

Ingredients for Buttermilk Pie Recipe
Here are a few notes on some of the key ingredients to make this buttermilk pie recipe. See the recipe card below for exact measurements.

- Pre-Made Pie Crust: I love a shortcut in the kitchen, and I often use storebought pie crust. But if you love a homemade take on this recipe, my buttery pie crust recipe is a great option.
- Granulated Sugar: Adds a sweet contrast to the tangy flavor of the buttermilk.
- Salted Butter: If you are only able to get unsalted butter, just add a pinch of salt.
- All-Purpose Flour: This helps thicken the batter of the pie so it sets and firms.
- Buttermilk: Such a powerful ingredient in baked desserts, to add moisture. It’s the secret ingredient in my banana bread recipe too.
- Nutmeg: This spice helps add flavor, depth and gives the pie a warm tone.
If you have leftover buttermilk, you may also love to make this chocolate bread and these blueberry buttermilk muffins.
How to Make Buttermilk Pie
Here’s an overview of how to make this recipe. You can scroll down to the recipe card for the full instructions.


First, preheat the oven to 350°F.
Next, place your premade pie crust into your pie pan and crimp the edges. Then, in a large mixing bowl, whisk together the granulated sugar, all-purpose flour, eggs, melted butter, buttermilk, vanilla extract, and nutmeg.


Next, pour your buttermilk filling into your pie crust, and bake for 40 to 45 minutes until the custard has set.
Allow the pie to cool for an hour before serving.

How to Serve Buttermilk Pie
When the pie has fully cooled, it can be served alone or it’s also delicious with a dollop of whipped cream on top, with ice cream, fruit, or your favorite drizzle or vanilla sauce.
You can also warm the pie back up in the microwave for 10-15 seconds if you prefer a warm slice of buttermilk pie.
How to Store This Buttermilk Pie Recipe
Leftover buttermilk pie should be stored tightly covered or in an airtight container in the refrigerator for up to 3 days.
To freeze, wrap the whole pie in plastic wrap and then a layer of aluminum foil. If you want to take it further, place it in an extra-large Ziploc bag and freeze it for up to 3 months. Thaw in the refrigerator overnight before serving.

Recipe FAQs
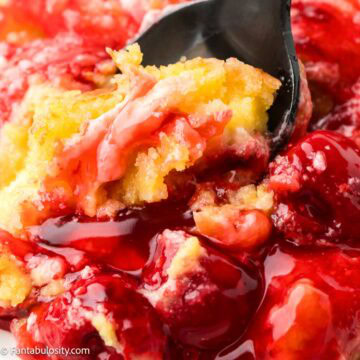
Buttermilk pie has a bit of a crust on the top. To get a good clean cut, take a large, serrated knife and score the crust. Do not cut all the way through the pie; just mark the slices and cleanly break the top crust for the slices. Then, take a paring knife or a straight blade and slice the rest of the way through each cut, getting the bottom crust. Be sure to wipe the blade between each slice to keep the cuts looking clean.
If you notice that the edges of your pie are starting to get too brown but your pie still needs some more cooking time, you can use one of two options to help with this. One is that you can make a ring around the crust with aluminum foil, or you can use a pie ring that will fit perfectly over the edges of your pie and protect it from burning.
If you want to make your pie a little less sweet and a little tangier, then reduce your sugar by ¼ of a cup and add a touch more buttermilk.
To tell if your pie is done, the edges will be golden, and the center will be set but still slightly jiggly. The custard will continue to firm up as it cools. Remember that just because you pull it out of the oven does not immediately stop the cooking process, and with custards, it is easy to overcook them if you wait until they are fully set while in the oven.
More Vintage Dessert Recipes


Did you make this? I’d be so grateful if you left a “star” rating below to let me know what you thought! Then, the next time you need a quick and easy recipe, come back to Fantabulosity to browse all of my easy recipes!
Recipe

Buttermilk Pie
Equipment
- Large mixing bowl
- Whisk
- Measuring cups and spoons
Ingredients
- 1 pie crust my homemade pie crust or store-bought
- 1¼ cup granulated sugar
- 3 tablespoons all-purpose flour
- 3 large eggs
- ½ cup salted butter melted
- 1 cup buttermilk
- 2 teaspoons vanilla extract
- 1 pinch nutmeg
Instructions
- Preheat oven to 350°F.
- Place your premade 1 pie crust into your pie pan and crimp the edges.
- In a large mixing bowl, whisk together the 1¼ cup granulated sugar, 3 tablespoons all-purpose flour, 3 large eggs, ½ cup salted butter, 1 cup buttermilk, 2 teaspoons vanilla extract, and 1 pinch nutmeg.
- Pour your buttermilk filling into your pie crust.
- Bake for 40 to 45 minutes until the custard has set.
- Allow the pie to cool for an hour before serving.
Notes
- How can I keep the edges of my pie from burning?
If you notice that the edges of your pie are starting to get too brown but your pie still needs some more cooking time, you can make a ring around the crust with aluminum foil, or you can use a pie ring that will fit perfectly over the edges of your pie and protect it from burning. - Can I make this pie a little less sweet?
Yes, you can reduce your sugar by ¼ of a cup and add a touch more buttermilk. - How can I tell if my pie is done?
The edges will be golden, and the center will be set but still slightly jiggly. The custard will continue to firm up as it cools. Remember that just because you pull it out of the oven does not immediately stop the cooking process, and with custards, it is easy to overcook them if you wait until they are fully set while in the oven.
Nutrition
Nutritional information is based on third-party calculations and should be considered estimates. Actual nutritional content will vary with brands used, measuring methods, portion sizes and more.
Shirley Armstrong says
♥️ IT!! GOOD GOOD!!🥧🥰
Jessica says
Awww, that’s fantastic, Shirley! I’m so glad that you liked it, thank you!