
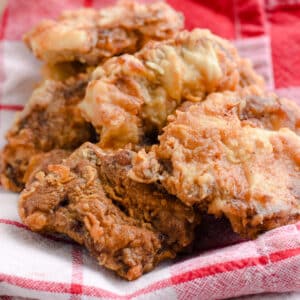
You’ll never want to cook deer meat any other way when you find out how to make this venison backstrap recipe!
Frying deer meat is our family’s favorite way to enjoy venison, however, if a fried version isn’t what you prefer, you will enjoy this deer steak on the stovetop, grilled venison steak and marinade or even a pan-fried deer steak!

Why You’ll Love This Recipe
If you’re not a fan of a gamey taste, you’ll ESPECIALLY love this recipe because of the way this venison is cooked. However, even if you don’t mind the deer meat flavor, frying it is still one of the most popular recipes because of how delicious it really is!
Jump to:
How to Slice Deer Tenderloin
My dad (the king of frying deer meat), swears that the key to creating the BEST fried deer meat, depends on how it’s sliced. He was nice enough to let me grab a quick video while he was cutting it, so you can see just how he does it! (So make sure to watch the video here in this post!)
Tip for tender deer meat: He said cutting it against the grain, can make it much more tender. Plus, for a really tough deer, you can even take your knife and gently tap each piece after you cut it, to tenderize it.
Ingredients
For this recipe, it doesn’t take a lot and they’re all simple ingredients that you probably already have on hand!
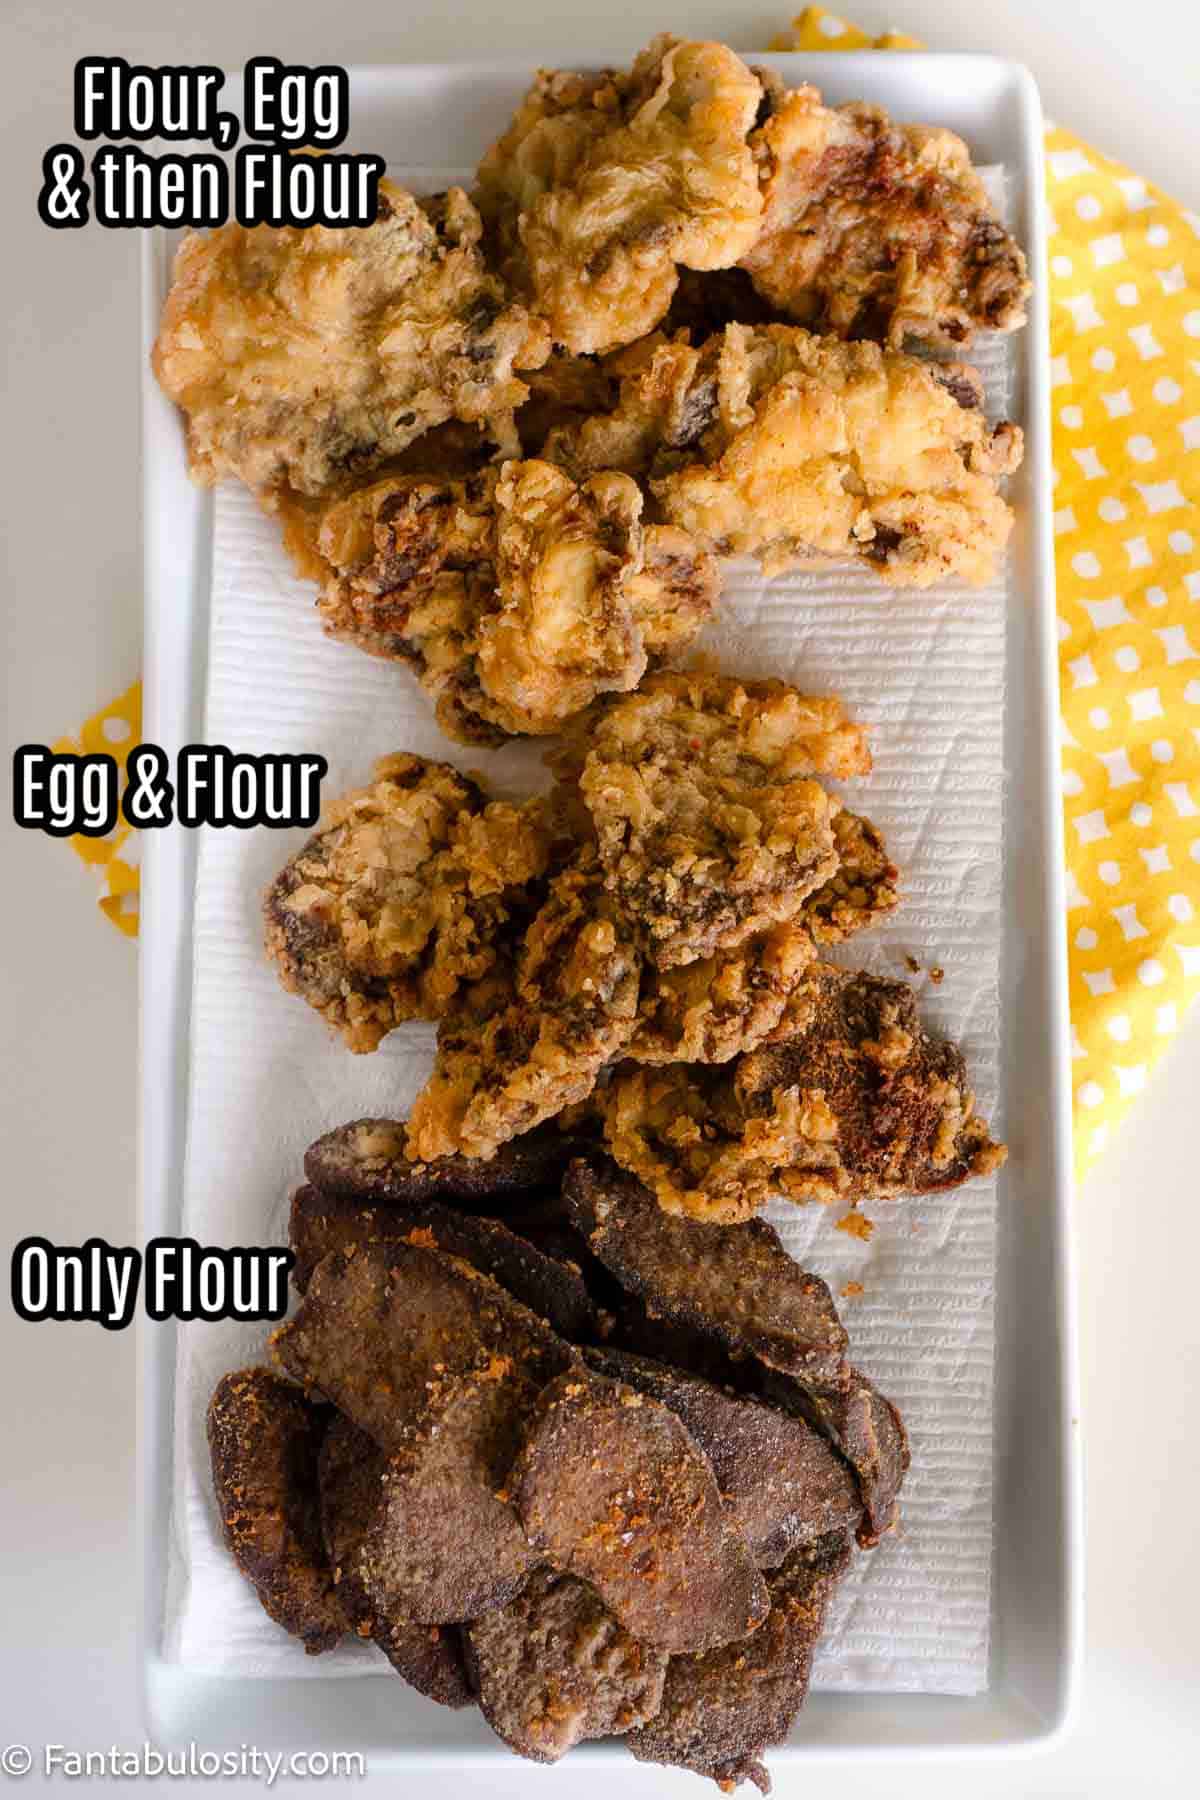
** See below which breading type you prefer, and how to make each type.
For very light breading:
- 1-2 pounds deer meat tenderloin and/or backstrap, sliced in to ¼ inch slices
- 2 Tablespoons salt, for soaking
- 2 Tablespoons salt, for flour breading + additional to taste after fried
- 2 cups water
- 3 cups flour
- 2 cups vegetable oil
- Greek seasoning, optional
For heavier breading:
All the above, plus 3-4 eggs.
How to Make Venison Backstrap with Light Breading
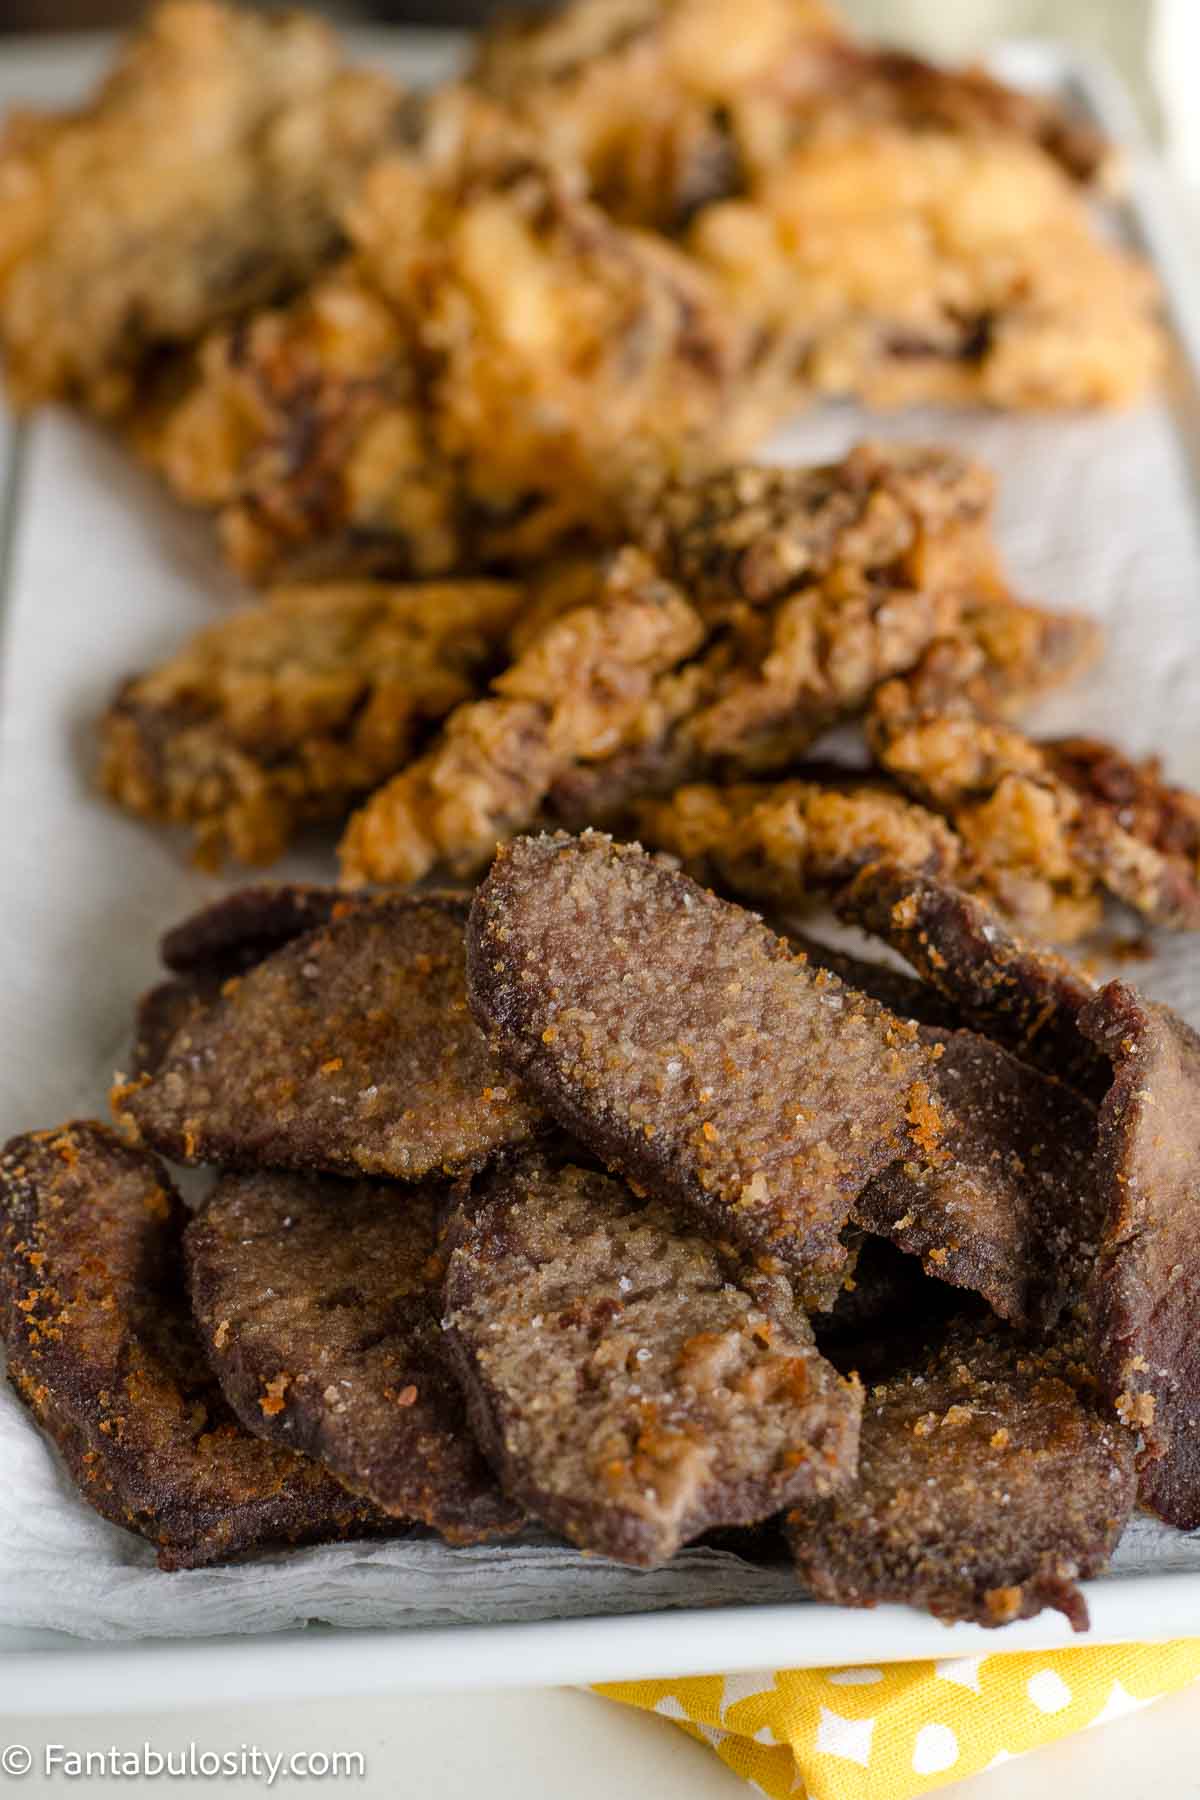
(Darker deer meat, with only flour.)
- In a bowl, mix together water and 2 tablespoon salt. Soak sliced deer meat in salt water overnight if you’re able, or at least an hour.
- Heat vegetable oil in a skillet over medium heat to 325 degrees. (My favorite to use is my Lodge Cast Iron Skillet )
- Remove deer meat from refrigerator, and discard salt water (It may be best to leave it sit out for 15 minutes or so, so you won’t be frying very cold meat in hot oil.)
- Pat the deer meat dry, with paper towels (UPDATE: We left the deer meat wet the other night, and dipped it in flour, and woah… that wasn’t too shabby. So it’s up to you!)
- Mix flour and 2 tablespoon salt, in a ziptop bag or a separate bowl/plate for coating
- Coat deer meat in flour/salt mixture
- Place the coated deer meat pieces into the heated vegetable oil. (To test the oil’s temperature, sprinkle a bit of flour in the oil to see if it bubbles. If it bubbles, it’s ready. However, be careful not to get the oil too hot, so it doesn’t splatter and burn you when adding the deer meat.)
- Flip deer meat after a few minutes when the underside is golden-brown. (Approx. 3 minutes)
- Cook on the alternate side until cooked through and there is no sign of undercooked meat. (We’ve been playing around with this recipe, and if you like a crunchy breading on your deer meat, cook it a bit longer until it reaches the desired “crunch,” you prefer.)
- Inside of fully cooked meat will be gray/brown, with no sign of red.
- Remove deer meat from pan, on to plate/dish covered with paper towels to drain oil.
- OPTIONAL: We LOVE sprinkling Greek Seasoning on the fried deer meat after it is fried for optimal flavor!
How to Make Venison Backstrap with Heavier Breading:
- In a bowl, mix together water and 2 tablespoon salt. Soak sliced deer meat in salt water overnight if you’re able, or at least an hour.
- Heat vegetable oil in a skillet over medium heat to 325 degrees. (My favorite to use is my Lodge Cast Iron Skillet )
- Remove deer meat from refrigerator, and discard salt water (It may be best to leave it sit out for 15 minutes or so, so you won’t be frying very cold meat in hot oil.)
- Pat the deer meat dry, with paper towels (UPDATE: We left the deer meat wet the other night, and dipped it in flour, and woah… that wasn’t too shabby. So it’s up to you!)
- Mix flour and 2 tablespoon salt, in a ziptop bag or a separate bowl/plate for coating.
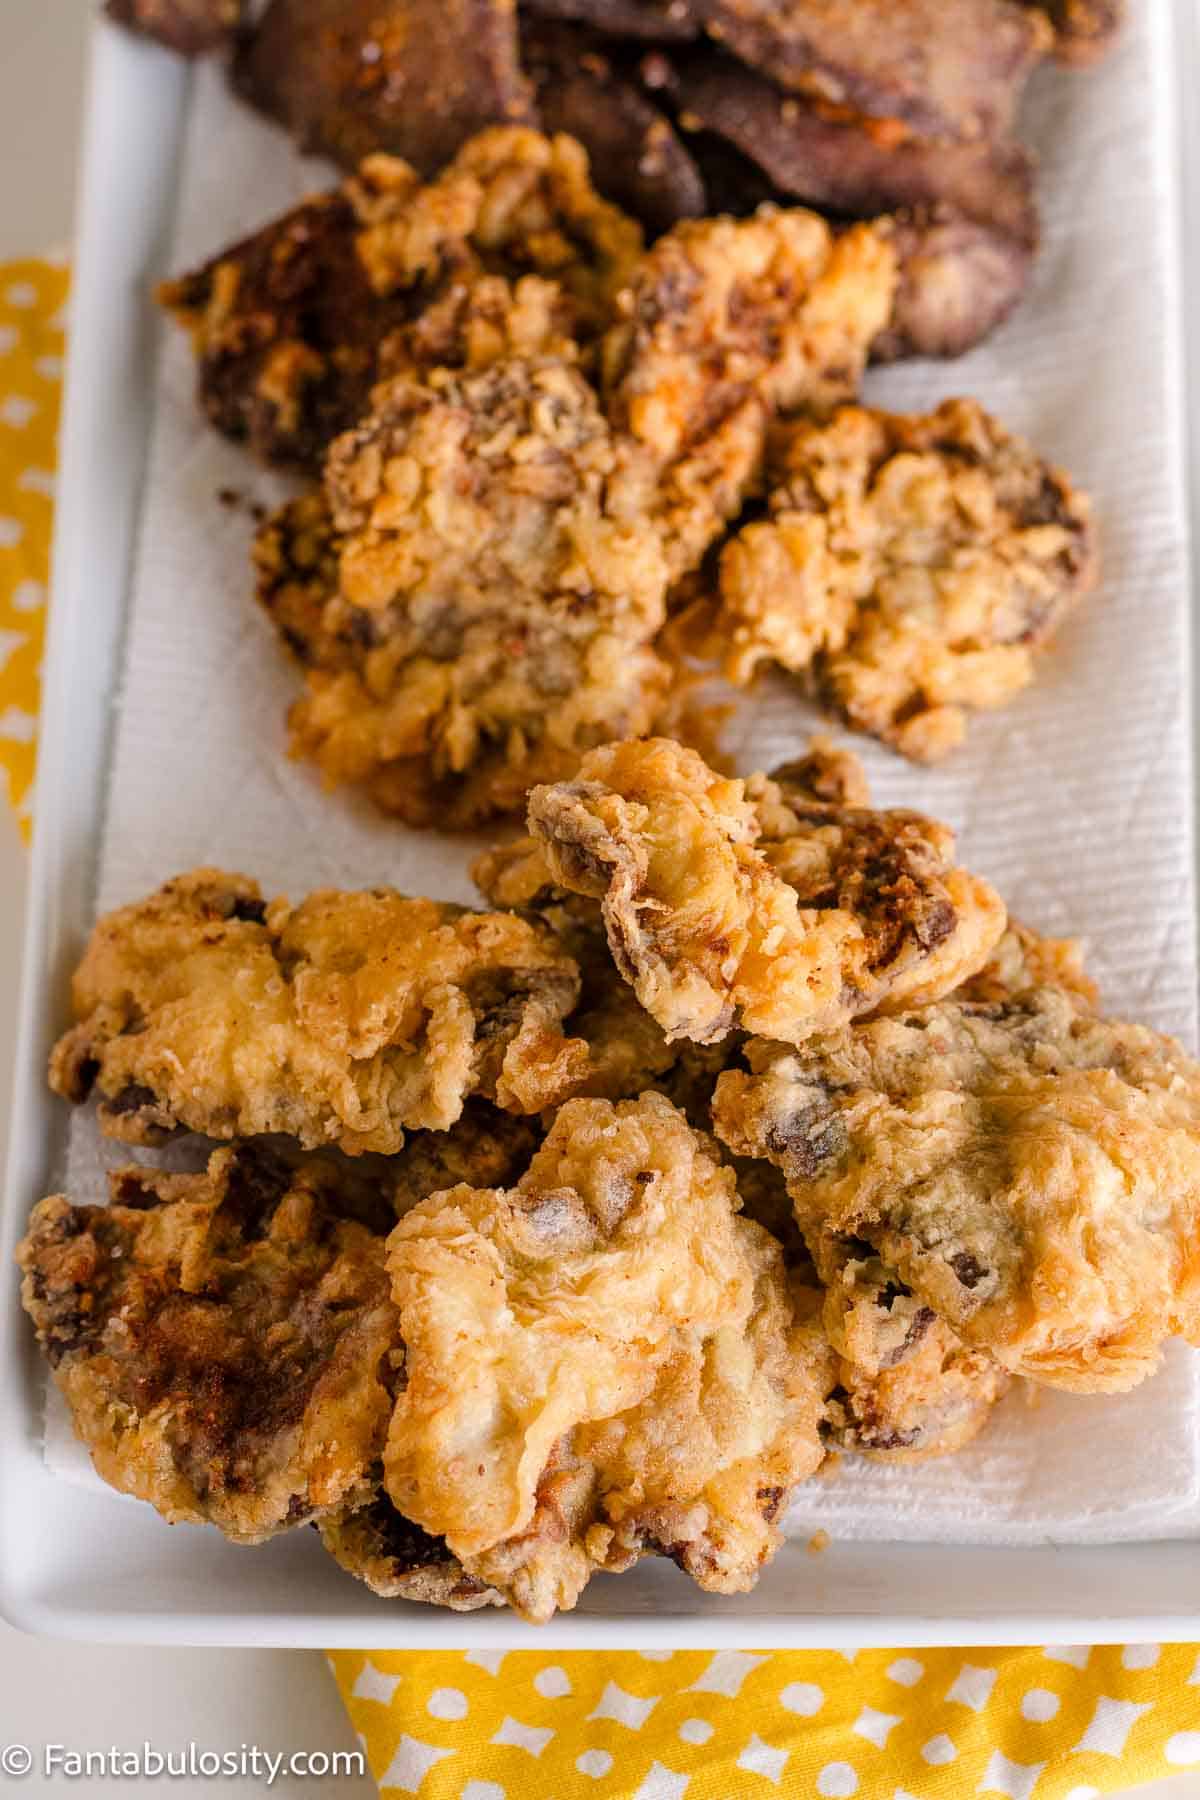
For Semi-Thick Breading: For deer meat with the type of breading in the middle of the photo below, whisk the 3-4 eggs in a small bowl. Dip each piece of deer meat in to the eggs and then in flour. (Result in image below.)
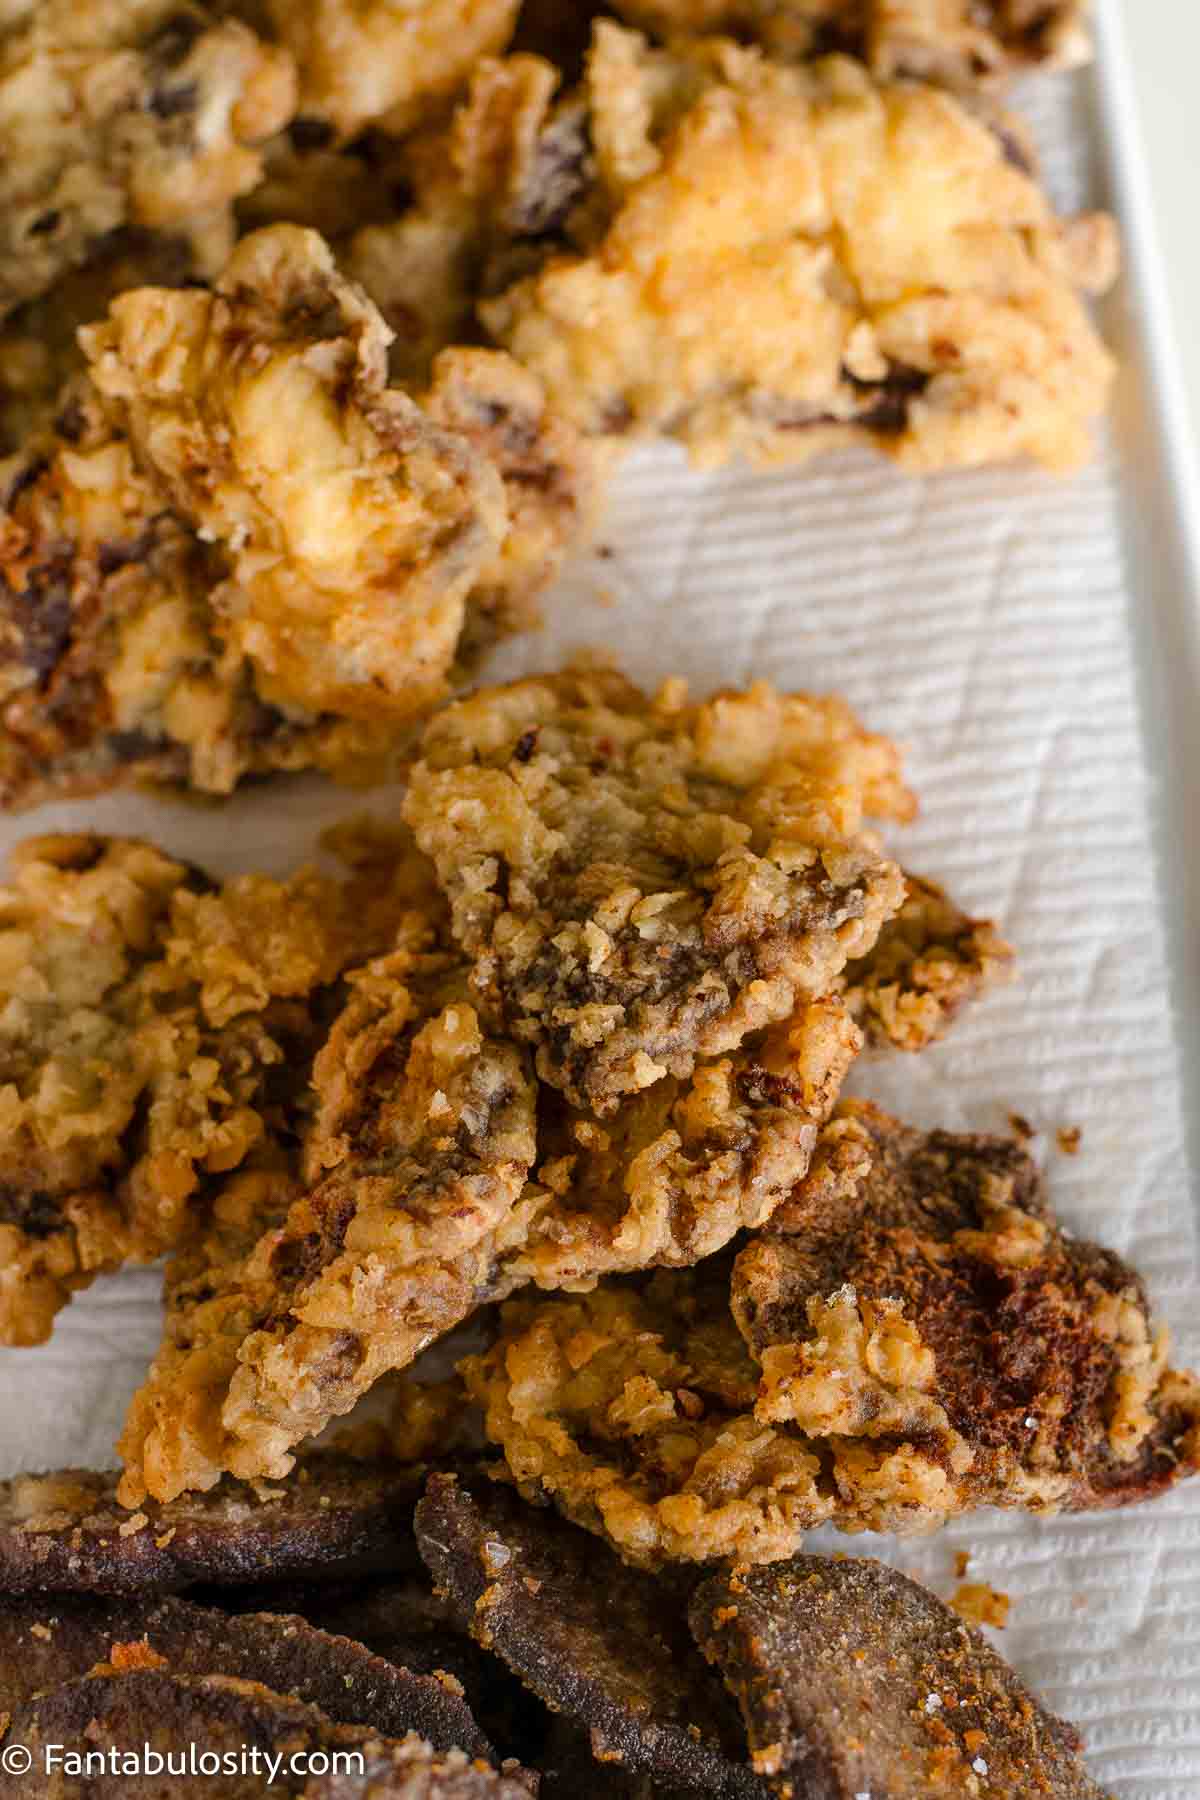
For Thicker breading: For deer meat with the thicker breading, whisk the 3-4 eggs in a bowl. Then, dip the deer meat in flour, then in the eggs, and then the flour again. (Result in image below.)
How to Fry the Deer Meat
(No matter how you choose to bread it.)
- Place the coated deer meat pieces into the heated vegetable oil. (To test the oil’s temperature, sprinkle a bit of flour in the oil to see if it bubbles. If it bubbles, it’s ready. However, be careful not to get the oil too hot, so it doesn’t splatter and burn you when adding the deer meat.)
- Flip deer meat after a few minutes when the underside is golden-brown. (Approx. 3 minutes)
- Cook on the alternate side until cooked through and there is no sign of undercooked meat. (We’ve been playing around with this recipe, and if you like a crunchy breading on your deer meat, cook it a bit longer until it reaches the desired “crunch,” you prefer.)
- Inside of fully cooked meat will be gray/brown, with no sign of red.
- Remove deer meat from pan, on to plate/dish covered with paper towels to drain oil.
- OPTIONAL: We LOVE sprinkling Greek Seasoning on the fried deer meat after it is fried for optimal flavor!
Expert Tips
- My husband and I also love to sprinkle Cavender’s Greek Seasoning, over the top after frying so it adds an extra kick of flavor. Then, if we are feeling frisky, we top it with a bit of Frank’s Hot Sauce.
- My sister prefers dipping the deer meat in to milk, then in to flour before frying, and she swears by it!

FAQs
Although I recommend soaking the deer meat in saltwater, it’s not something you have to do. It can help draw blood out and remove a gamey taste that it may have. Some also soak in milk instead of water and believe that it helps keep it tender and juicy.
We don’t recommend marinating venison in dressings, oils, or any flavorings when frying with this recipe. So besides soaking in salt water or milk, if desired to help remove a gamey taste, marinating ingredients are not necessary.
Absolutely. If freezing a deer tenderloin or backstrap, it’s recommended that you slice it in to small pieces (as shown in the video above), before freezing. So when you’re ready to cook it, you can thaw it out much faster and it will already be cut for frying. Freeze in food-saving bags or your favorite freezer packaging.
How to Store Leftover Venison
If you have leftover fried deer meat, store cooled deer in an airtight container in the refrigerator for 3-4 days.
Side Dishes for Venison
What goes good with venison backstrap? Some of our favorites to serve with is are white gravy, or for fun, chorizo gravy, mashed potatoes, and biscuits. However, this romaine side salad and this roasted broccoli are other favorite vegetables to serve with it!
Related Recipes
If you have more venison, you’ll also love this air fryer deer meat that only takes 5-7 minutes to make! If you have ground venison, you’ll want to also try this venison chili recipe!
Or, if fried steaks are your favorite, you’ll love this old-fashioned country fried steak recipe. Or, these country-fried pork chops are a family favorite in our house!
Make sure to see the 80+ easy dinner recipes to add to your dinner idea meal planner!
Recipe
Fried Deer Tenderloin Recipe
Video
Ingredients
- 1-2 pounds deer meat tenderloin and/or backstrap, sliced in to ¼ inch slices
- 2 Tablespoons salt for soaking
- 2 Tablespoons salt for flour breading + additional to taste after fried
- 2 cups water
- 3 cups flour
- 2 cups vegetable oil Or enough to create ½ inch to 1 inch of oil in the skillet.
- Greek seasoning optional
Optional for Thicker Breading
- 4 eggs
Instructions
- In a bowl, mix together water and 2 tablespoon salt. Soak sliced deer meat in salt water overnight if you’re able, or at least an hour.
- Heat vegetable oil in a skillet over medium heat to 325 degrees.
- Remove deer meat from refrigerator, and discard salt water
- Pat the deer meat dry, with paper towels (UPDATE: We left the deer meat wet the other night, and dipped it in flour, and woah… that wasn’t too shabby. So it’s up to you!)
- Mix flour and 2 tablespoon salt, in a ziptop bag or a separate bowl/plate for coating
For Thin Breading
- Coat deer meat in flour/salt mixture
For Medium Breading
- Whisk eggs in a small bowl. Dip the pieces of deer meat, one at a time, in to the egg mixture, then in to flour (coating all of the deer).
For Thickest Breading
- Whisk eggs in a small bowl. Dip the pieces of deer meat, one at a time, in to the salted flour, then in to the egg mixture, and then in to flour again (coating all of the deer).
Frying the Deer Meat
- Place the coated deer meat pieces into the heated vegetable oil. (To test oil’s temperature, sprinkle a bit of flour in the oil to see if it bubbles. If it bubbles, it’s ready. However, be careful not to get the oil too hot, so it doesn’t splatter and burn you when adding the deer meat.)
- Flip deer meat after a few minutes when the underside is golden-brown. (Approx. 3 minutes)
- Cook on the alternate side until cooked through and there is no sign of undercooked meat. (We’ve been playing around with this recipe, and if you like a crunchy breading on your deer meat, cook it a bit longer until it reaches the desired “crunch,” you prefer.)
- Inside of fully cooked meat will be gray/brown, with no sign of red.
- Remove deer meat from pan, on to plate/dish covered with paper towels to drain oil.
- We LOVE sprinkling Greek Seasoning on the fried deer meat after it is fried for optimal flavor!
Nutrition
Nutritional information is based on third-party calculations and should be considered estimates. Actual nutritional content will vary with brands used, measuring methods, portion sizes and more.


Jasmin says
Excellent! Thanks so much for sharing. I made it extra crispy by drenching the strips in milk for a few minutes, then in the flour, egg and seasoned bread crumbs. My husband said “Wow Make this again please!!”. We enjoy eating venison at our house. There are many ways I have cooked it, but this was new to us and a definite winner.
Jessica says
I am SO glad to hear this Jasmin! Thank you so much for sharing how you did it and that you liked it!
Debbie Martin says
Also great breaded with a thin layer of whipped egg
Loved your recipe
Jessica says
Yum!! Thank you so much. I’m so glad that you liked it!
Gigi says
This is the best way to make deer, tender and full of flavor. I added my Greek seasoning in with the flour and it is great as well. It is a little salty for my taste so I need to remember to cut back on it next time. Delicious!!!!
Jessica says
Hi Gigi! Thank you so much for taking the time to leave a comment and a review! I have to agree… it’s the best way to cook deer! Thank you for letting me know about the Greek seasoning too!
Billie says
I’m a huge deer fan. And love trying new recipes. This one’s definitely a keeper! Thanks Jessica for sharing. And your dad’s right, gotta cut it in the right direction or it will be tough 😉
Jessica says
YES!!! It’s super good and it does make a difference with the way you cut it!
Niki Rousell says
I love you and your dad! Very informative and quirky! Thank you!
Jessica says
Awww, haha, thank you!!
Bobbie Lewis says
This will be my first time frying deer meat. This recipe seems like it will be just right. I hope it works out for me.
Jessica says
Hi Bobbie! I hope it turned out great and you loved it!
Jan says
I soaked mine in buttermilk also. It was so tender and was not dry. first time I pan fried mine and it was a hit. Thank you for the recipe.
Jessica says
Yaaaay! I’m so glad, and thank you for sharing how you did it!!!
Tara says
This will be my first attempt ever with game meat so thank you for the recipe… hope my husband likes it
Jessica says
Yay!!! I’m so excited for you. I hope you all love it as much as we do!
Stephanie says
We have always soaked it in water with garlic salt. Then we breaded it with a egg and flour mixture that had seasoning salt and pepper. However in my house we cook a lot by experimenting and last year my cousin decided that we would try putting a ranch dressing pack in with the flour. It was pretty good, but not how my momma makes it. This year we will be going back to the family recipe.
Jessica says
That is so good to know! Thank you so much for sharing.:)
Marissa M says
I am trying out your recipe tonight! 😊 This will be my first time frying backstrap so wish me luck! 🤞
Jessica says
Yay!!! I hope it turned out great and you love it!
Patty says
Heat oven to 325* Then coat venison/flour and S & P, pan fry both sides til brown, pour cool black coffee (not decaff) in pan to 1/2 venison height. cover with a lid, bake 45 min. Meanwhile make B.Powder biscuits and have them ready to put in oven when venison comes out of oven, uncover, place on burner at med-lo heat, and add either Fat Free 1/2 and 1/2 or full fat 1/2 and 1/2 gently stir in. Serve venison on plate with biscuit halves, and cover with pan gravy!! AWESOME…Just wish I had some venison
Pioneer recipe!!
Jessica says
Oh my goodness!!! Thank you Patty! I must try this!
Colton Edwards says
I learned how to cook deer tenderloins from this recipe. Family loves it!
Jessica says
Oh good!!! I’m so glad that you like it, and the family loves it too! Thank you!
LaRae Lara says
Hi jessica. My name is LaRae and I am very new to cooking any type of deer meat. I was just wondering which spacific meat you use for this recipe or can you use any part….I have deer steaks, back strap, and a small tenderloin. And have you tried all of the them with this recipe?
Jessica says
Hi LaRae! You can use any of those with this recipe! If you use the back strap and tenderloin, make sure to trim off the silver. Then if you are ever using the hams, section off the hams in big pieces and cut across the grain. If you’ve had the meat processed, and cut in to steaks… it’s hard to fry those with this recipe. So grilling, or following my beef steak recipe may be a good option here: https://fantabulosity.com/easy-steak-recipe-pan-seared-in-the-oven/ I hope that helps!!
Gordon says
Hello, Jessica. Since your husband is a die-hard elk hunter (nice bull in the pic, by the way), you can also do the same with elk meat. I wouldn’t recommend using elk backstrap just because I prefer that on the grill with my favorite seasoning salt. 😊. If you use a lesser cut of meat and tenderize it with a mallet, it gives more surface area for the breading to stick to, as well. Would love to see your father’s instruction on cutting the meat for best results, too. Thanks for posting. I agree that this is the best way to prepare deer. Yum, yum!!!
Jessica says
Hi Gordon! Thank you so much for this! I’ll be sure to pass on the compliment too!
I’m going to try and get a video tutorial of him slicing the deer meat the next time an opportunity arises! I think it would be a great addition to this recipe!! Thank you again!
Becky Pierce says
Do you slice it before you soak it?
Jessica says
Hi Becky! Yep! Slice it before you soak it!
Donna O says
Our family has always used Dale Seasoning marinade. You can use it direct or add somemilk with the marinade. My sister -n-law soaks the meat in the marinade overnight. I usually only do it for one half to one hour. It all depends on how much salt you like. You can also add Worcestershire sauce to the marinade. Then when you’re ready to fry, you coat in flour that has been seasoned with salt and pepper – or you can do without the salt in the flour. Again, It all depends on how much salt you like. We like to serve fried potatoes, greens or wilted lettuce, & pretty much any other sides you like. It really goes with just about anything! Yum!
Jessica says
Mmmmmm!!!! This all sounds amazing! We like to use Dale Seasoning marinade in some of our dishes too! Thank you for sharing!
Cody says
Did y’all use the water as well with the sale sauce
Karen Lester says
I love deer meat as well (fried Back strap) but I do mine a little different. Instead of soaking my deer meat over night in salt water. I choose Buttermilk it tenderizes the meat nicely and does not dry it out or give it a odd taste. I have been cooking it this way for nearly 30 + years everyone loves it. never any leftovers.
Jessica says
Yum!! Thank you Karen! I’ve heard of others using buttermilk as well, and loving it!! You’re right… leftovers are far and few between when it comes to deer meat around our house too! Haha!! Thanks for coming by!
Roger Hardin says
This is the way i do mine it is so much better this way😀😀 ps is this the Karen i know?this is Roger in Tx Geralds Brother…
Charla Duvall says
Karen-
Do you rinse the buttermilk off before breading it or do you just drain it, then fry it?
Jessica says
Hi Charla! Do you mean the salt water by chance? We don’t use buttermilk for this deer meat recipe. If so, we used to drain the salt water and then pat dry the deer meat and then bread it. However, recently we drained the deer meat, and did not pat try before breading! (This allowed more breading to stick to the deer meat, and it was divine!) I hope that helps!
Sabrina Stegall says
Hi Jessica i cook deer steaks same way as you only different thing i do is to make it more crispy roll it in flour first then dip it in egg and milk batter then in flour again and fry it just like u do yummy
Jessica says
Oh good!!! Yes! I believe that’s how my sister cooks hers too! It’s so so good that way too!
Pam says
Yes! And add a little beer to your egg and milk batter and it is even crispier