

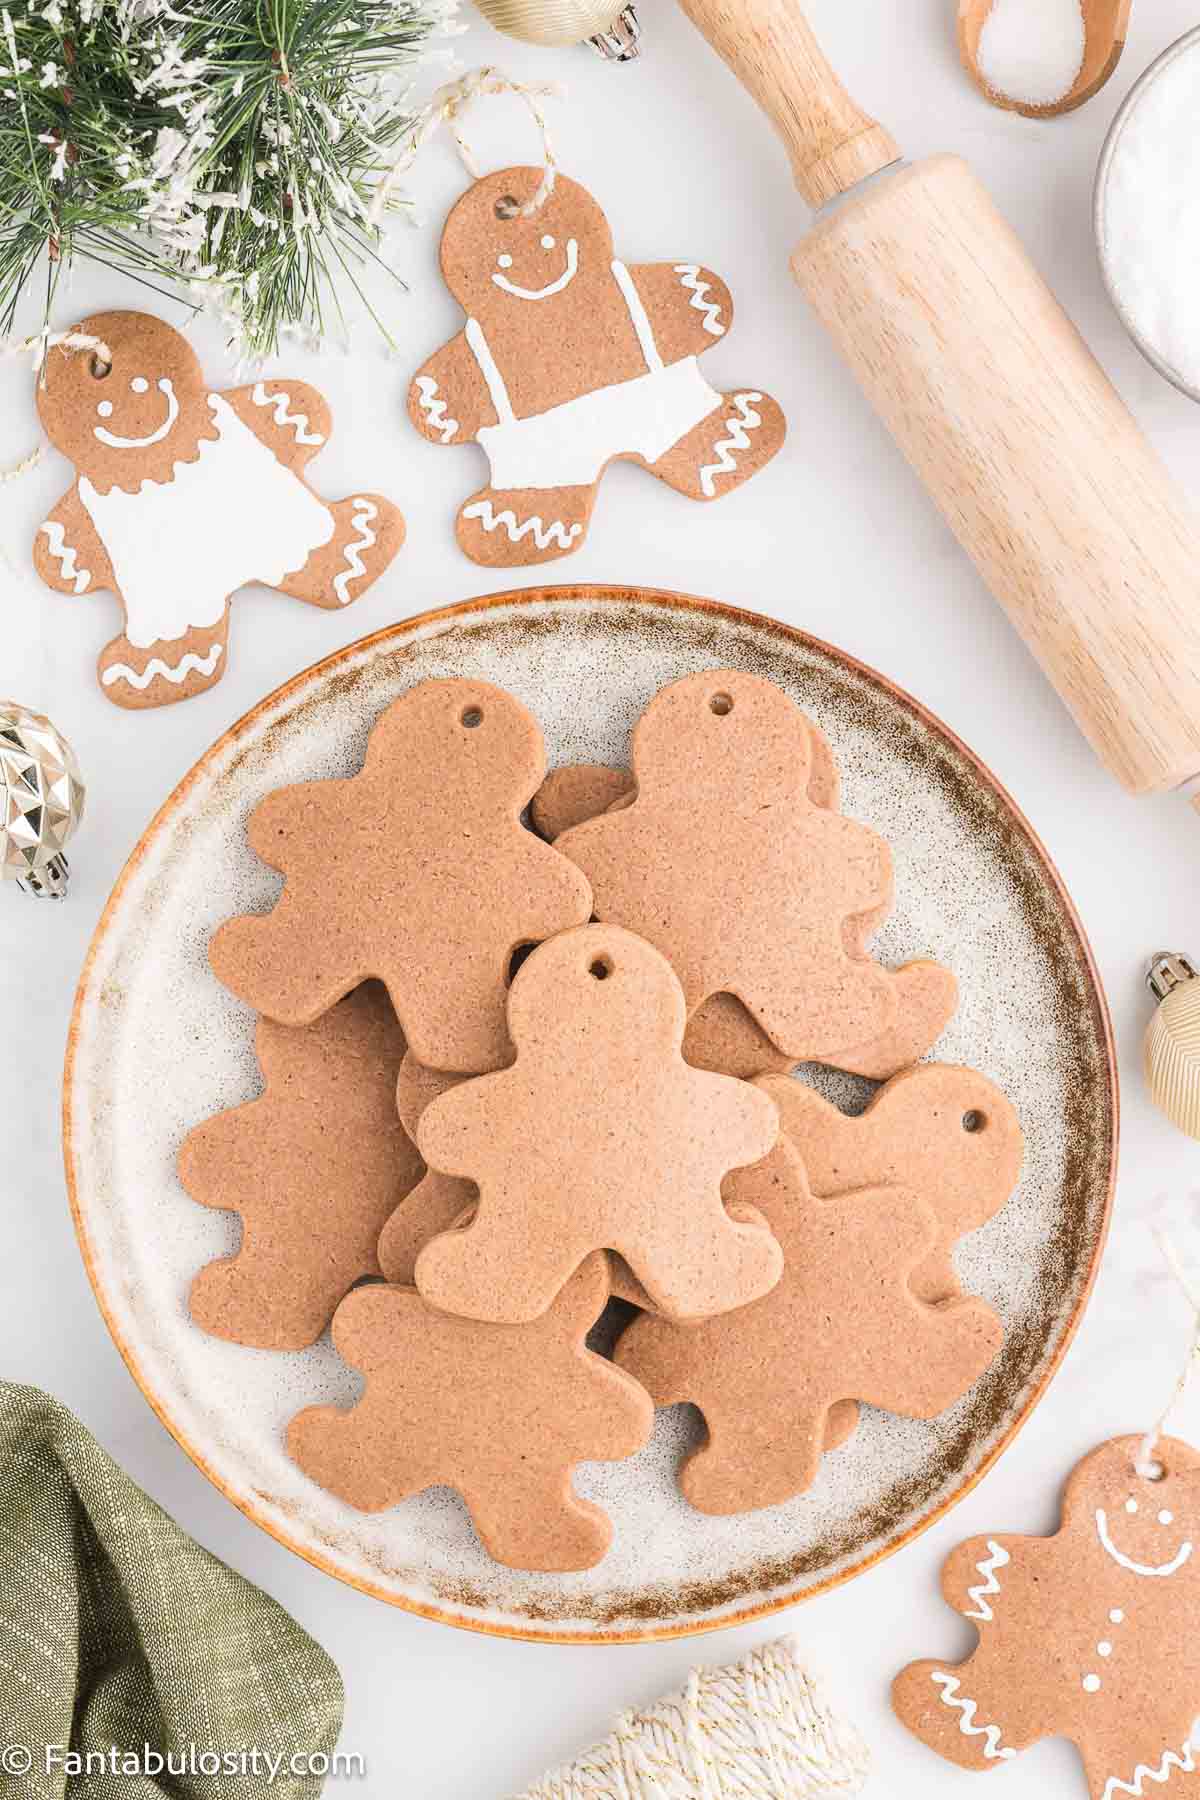
Gingerbread Ornaments: If you are looking for something adorable to decorate your tree with this year for Christmas, look no further than these easy-to-make gingerbread ornaments. These homemade Christmas ornaments are seriously cute and a craft idea that is so easy to make.
Coming together with just a few simple ingredients, these ornaments that look like gingerbread cookies are sure to impress.

While these adorable little Christmas tree decorations look edible, they are not. Do not eat a homemade ornament! If you are in the mood for some holiday desserts after making these, I suggest trying out these easy gingerbread men cookies, these yummy sugar cookies, or this Christmas cake dip.
Jump to:
❤️ Why You’ll Love This Recipe
- It uses easy ingredients: You likely already have the necessary ingredients for this adorable DIY in your pantry!
- Easy to make: These gingerbread cookie ornaments are just as easy to make as they are adorable.
- Great family activity: Did I mention these are easy to make? Grab the kids or grandkids and get to baking this holiday season.
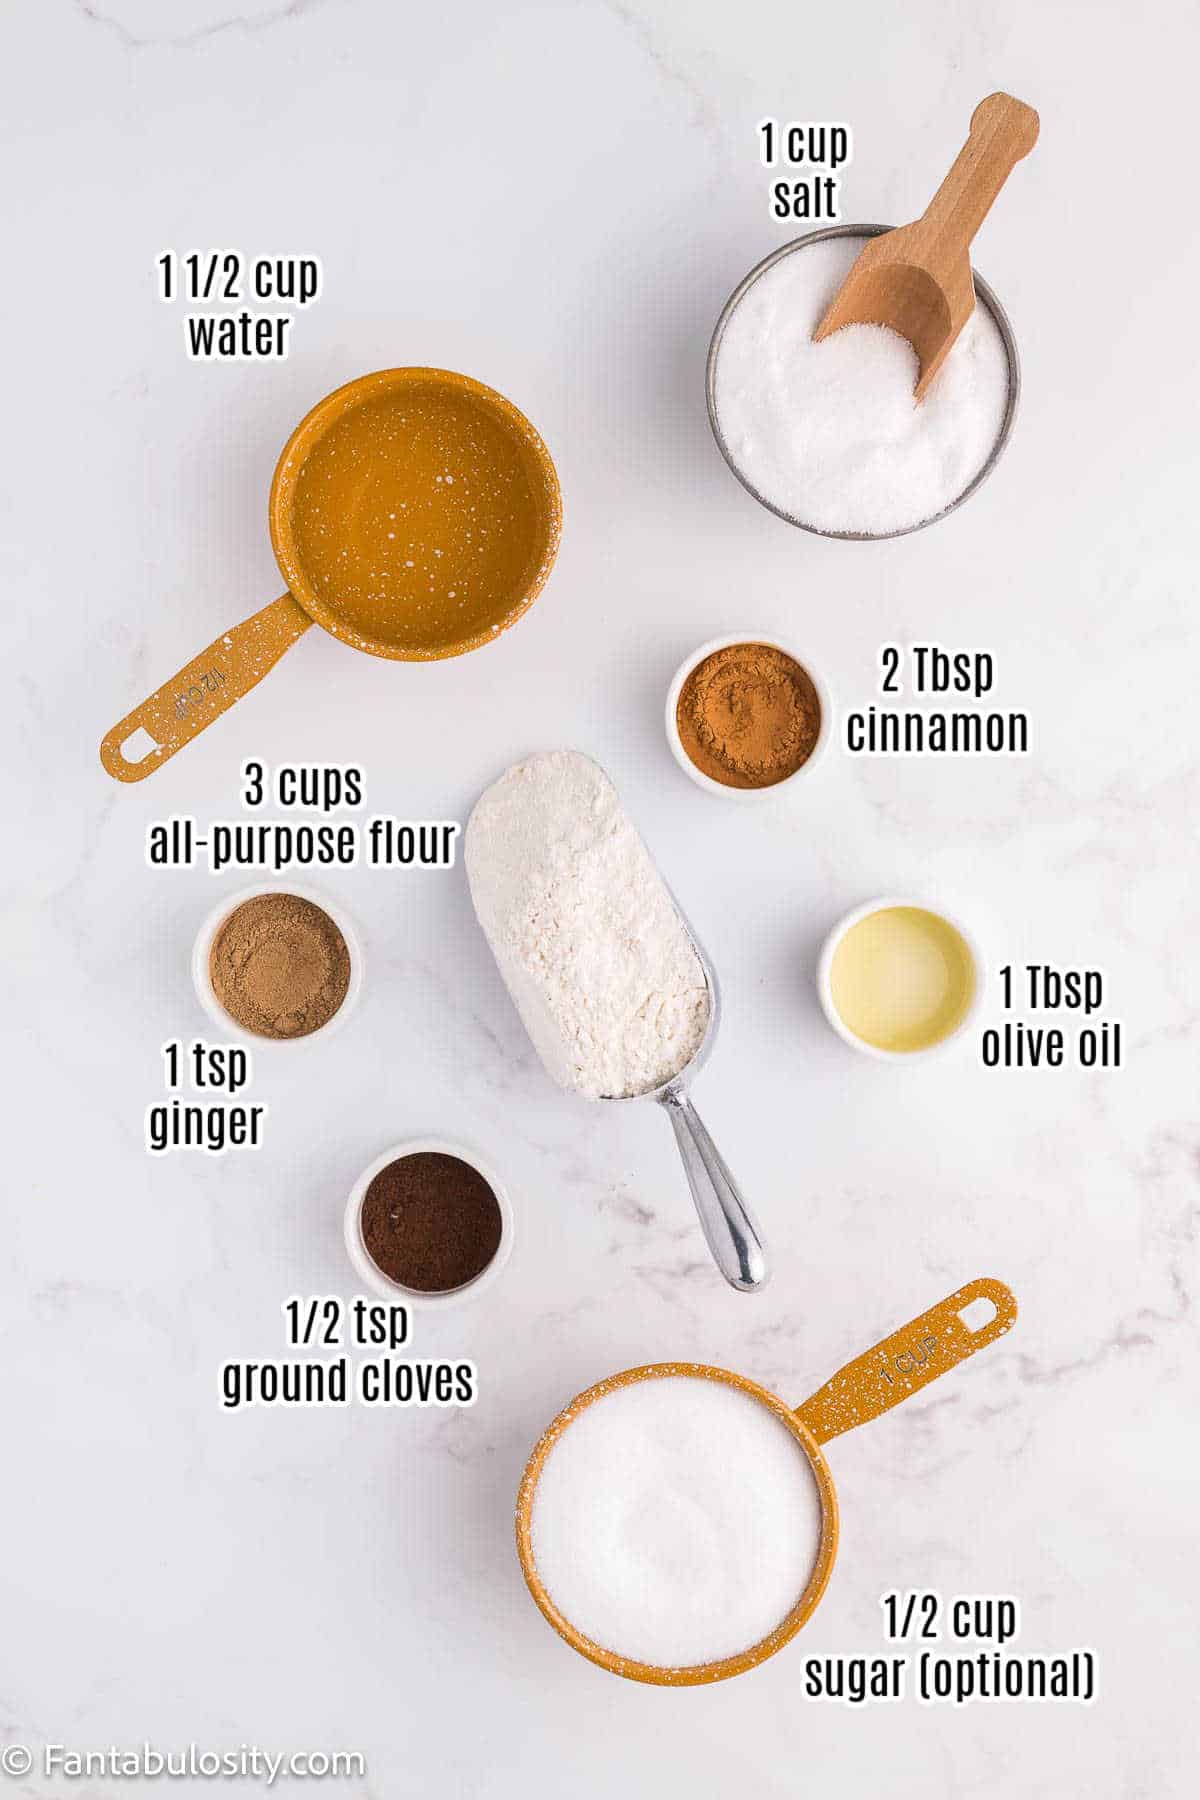
🧾 Ingredients Needed
I’ve highlighted a couple of ingredients below with some relevant notes. Aside from this, the ingredients needed are pretty basic.
- Spices – While these aren’t necessary for the look of the salt dough ornaments, they do make them smell delicious!
- Salt – Salt is the most important piece of this recipe.
- Flour – We used all-purpose flour for this recipe.
📖 Variations
If you want to take this up a notch, you could just as easily make a gingerbread house ornament out of this recipe. All you need are some different cookie cutters and some glue! Make the recipe as stated, but when it comes to cutting out the shapes, cut your shapes in preparation for building gingerbread houses. Once baked and dried, hot glue the pieces together and then decorate!
Christmas cookie cutters other than gingerbread men would also be a great choice.
Another step you could take is adding some festive essential oils to the dough prior to baking for a long-lasting holiday scent!
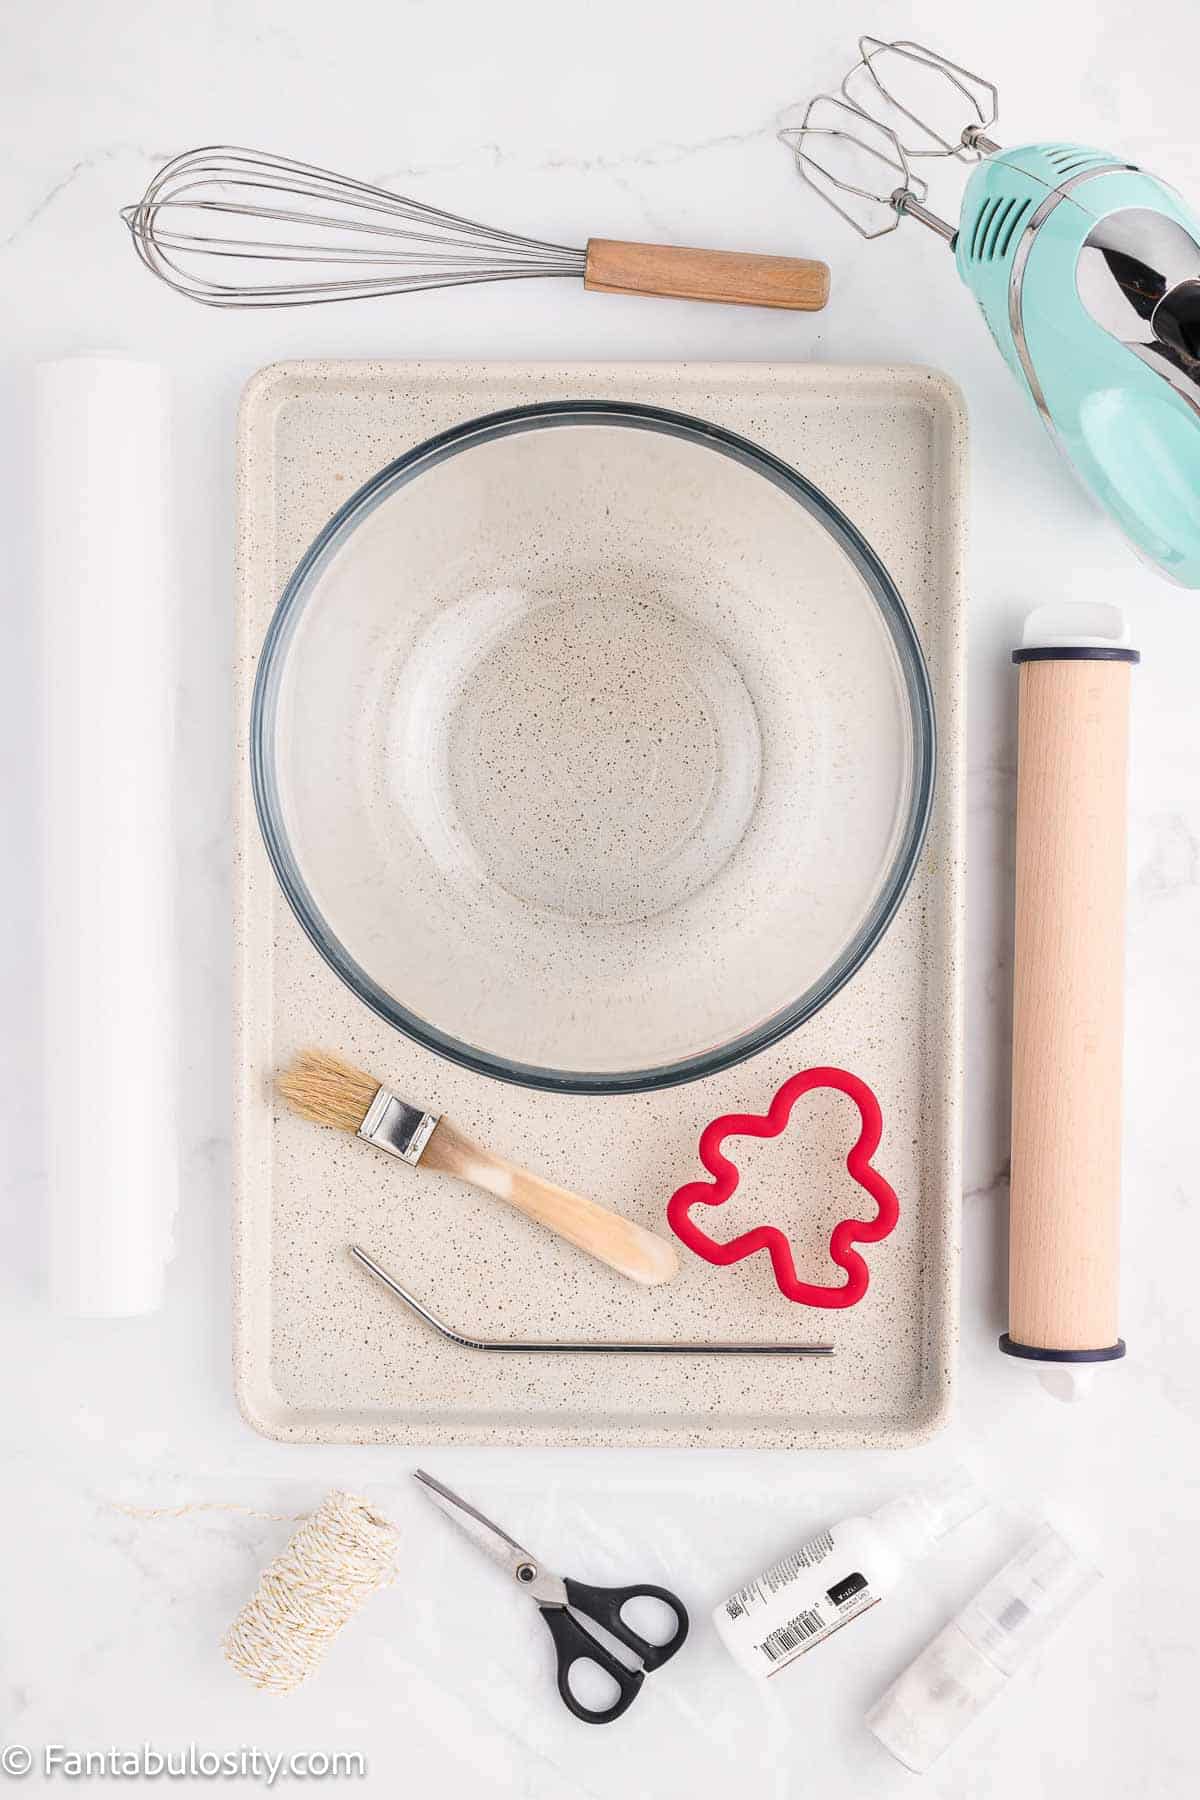
✄ Supplies
You will need quite a few things in order to bring these gingerbread salt dough ornaments to life including:
- Writing paint or White Glue
- Hand mixer
- Whisk
- Large bowl
- Rolling pin
- Parchment paper
- Baking sheet
- Scissors
- Ribbon or Twine
- Straw or Toothpick
- Gingerbread Man cookie cutter
- Basting brush
- Icing bag for glue or writing paint (optional)
- Edible spray glitter (optional)
👩🏻🍳 How to Make Gingerbread Men Ornaments
There are quite a few steps to this recipe in order for the gingerbread men to turn out correctly. The steps are simple but make sure to follow them closely!
I suggest making these salt dough ornaments a few days before you plan on stringing them together or decorating with them.
*Be sure to see the recipe card below for the full ingredients list & instructions!*
You are going to begin this recipe by preheating the oven to 200 degrees F.
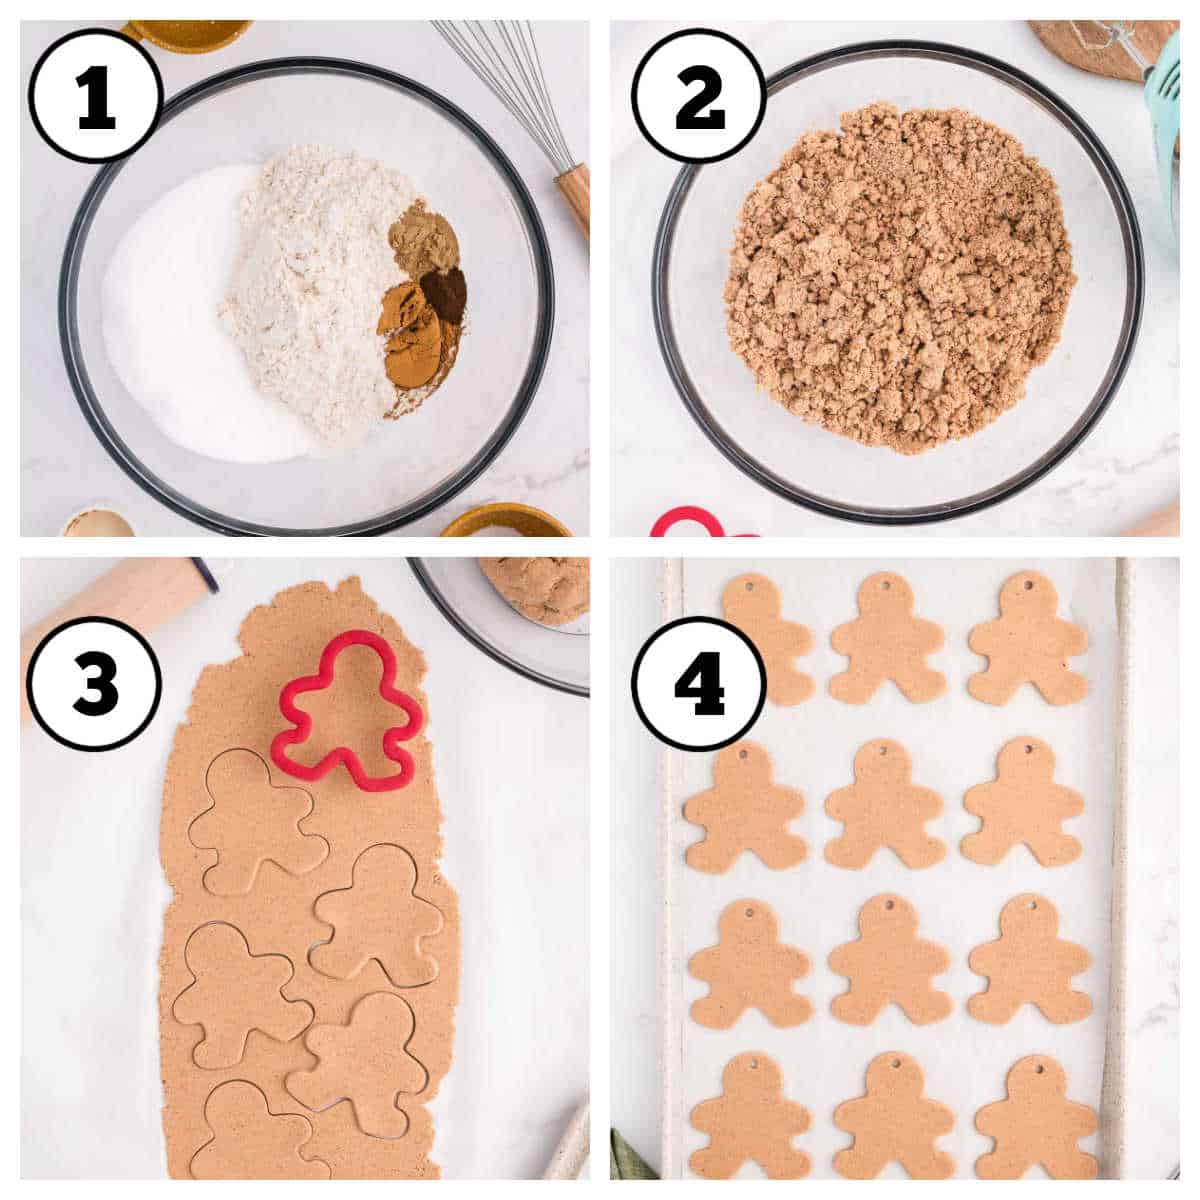
STEP 1. Combine the dry. Put all dry ingredients into a large bowl and mix with a whisk. (Image 1).
STEP 2. Add water. Next, use the hand mixer and slowly pour in the water until the dough is formed. (Image 2).
STEP 3. Lay down some parchment. Place the piece of parchment paper down on the countertop to roll out the dough. To avoid white spots on the dough, do not add flour to your surface.
STEP 4. Roll out the dough. Roll dough ⅛ inch thick. Using a rolling pin with thickness rings can help guide you with this. If you make the dough thicker, then the ornaments will puff up and not be flat. Use a gingerbread man cookie cutter to cut out the shapes. (Image 3).
STEP 5. Poke some holes. Then place the straw or toothpick at the top of the ornament in the middle of the head to make a hole for the ribbon or twine. (Image 4).
Tip: Make sure to poke the hole all the way through so that you can easily string the ornaments together after baking & cooling.
STEP 6. Place parchment on cookie sheet. Place parchment paper on the baking sheet and then place the ornaments on top spacing them evenly apart.
STEP 7. Bake. Next, put the cookie sheet in the oven for 2 ½ to 3 hours until the ornaments are hard and dry. If you turn the temperature up higher, they with puff up and not be flat and if you take them out sooner, they won't be as hard.
STEP 8. Cool. Let the ornaments cool completely before decorating.
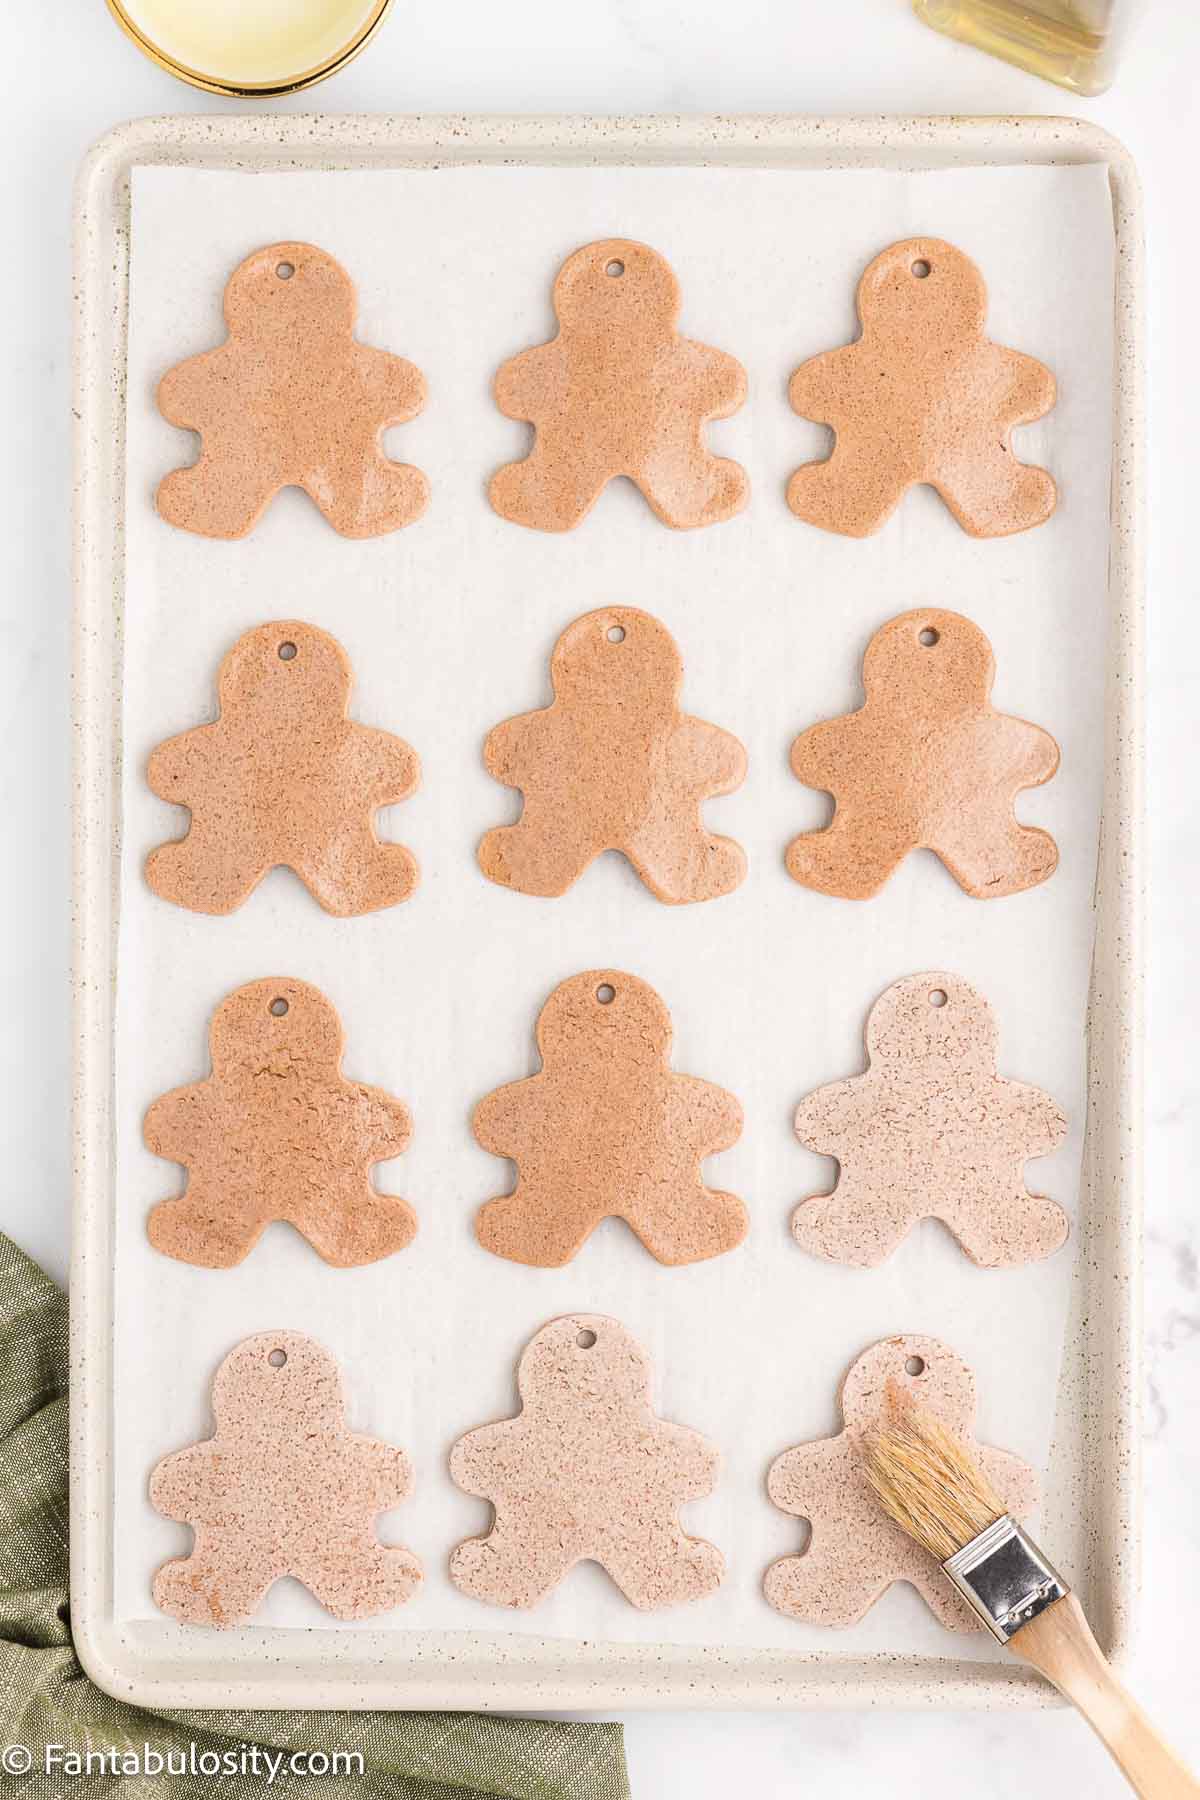
STEP 9. Make ’em shine. If you want the ornaments to have a shine, then coat each ornament with olive oil or any cooking oil you might have. Use a basting brush or a small paintbrush to apply the oil. Wipe off any extra oil as needed. If you want to keep the rustic look then leave the olive oil off.
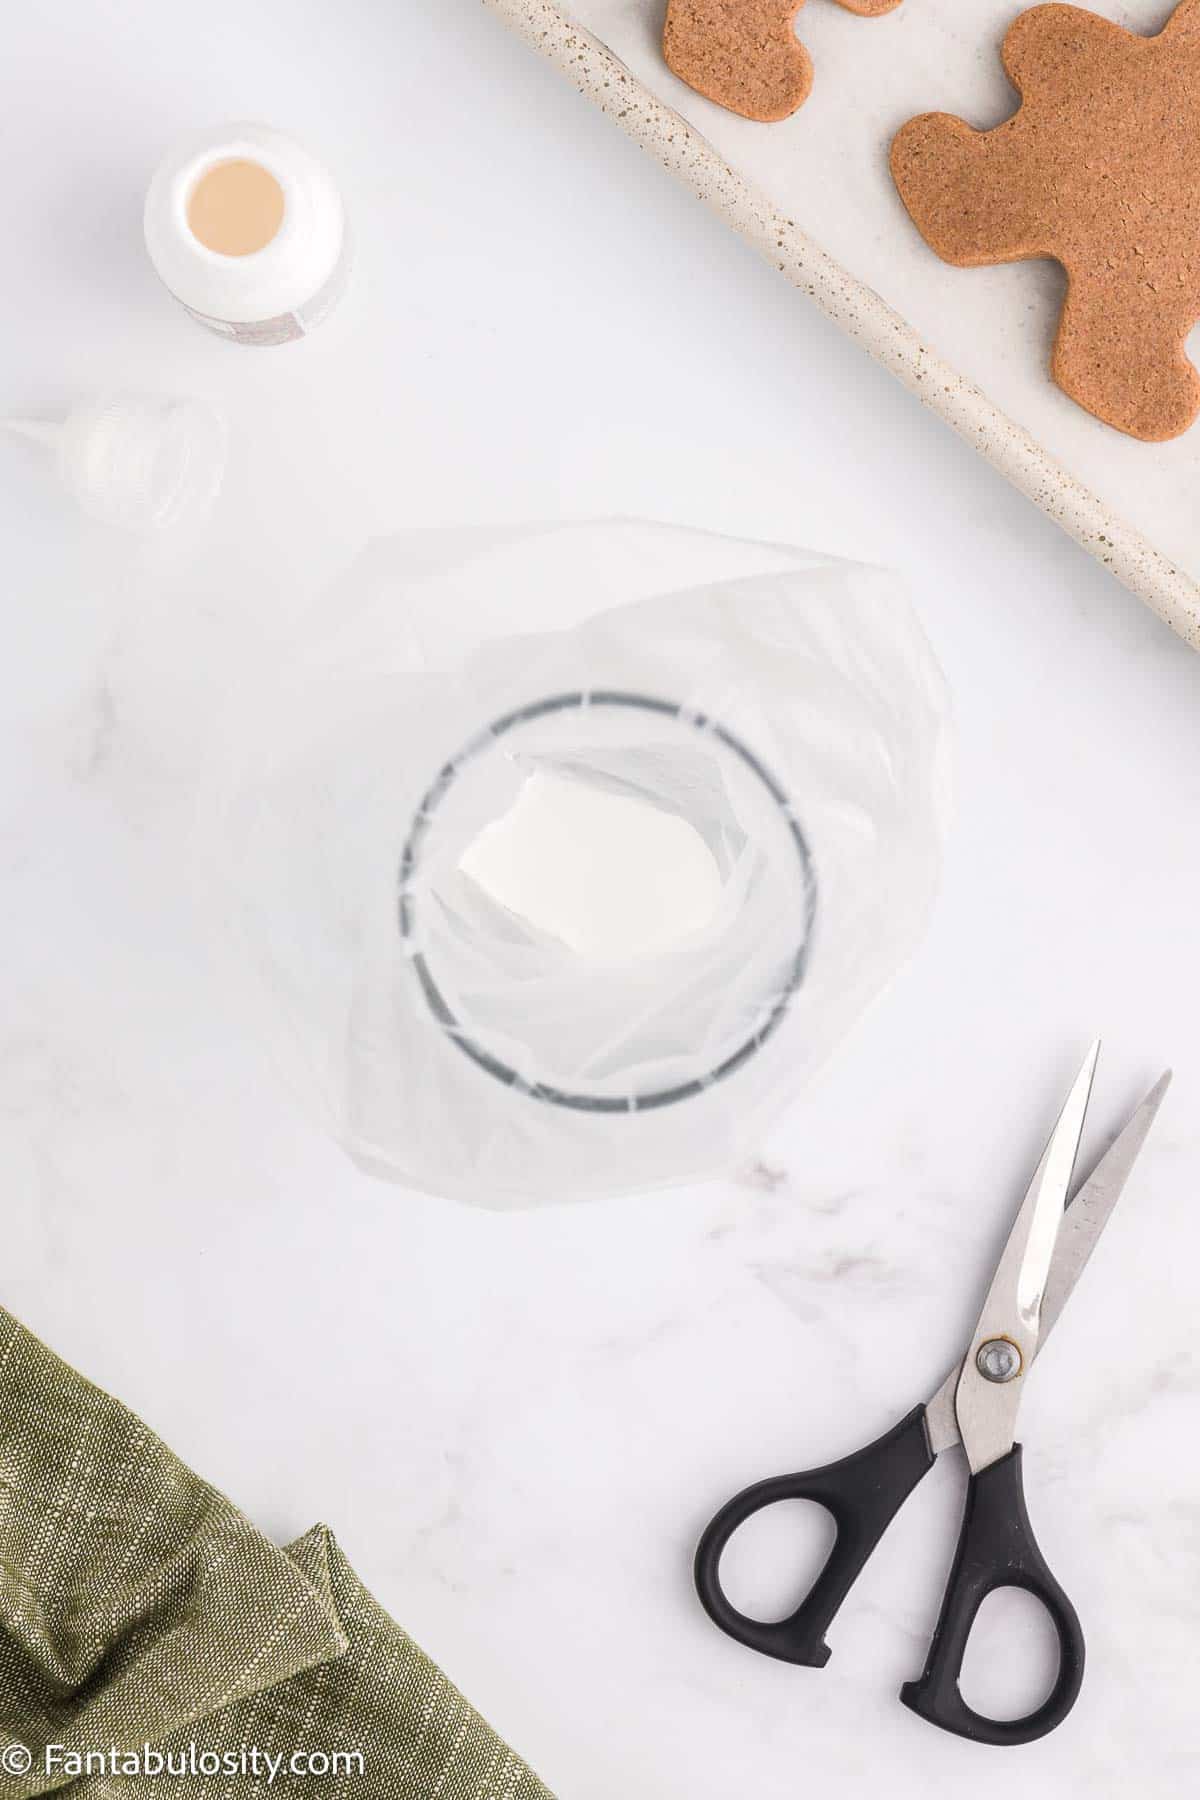
STEP 10. Prepare to decorate. Pour writing paint into an icing bag and cut off a very small tip at the tip of the bag. This will allow you to make thinner lines with the writing paint. This step is optional. Leave in the bottle if you do not want to do this step.
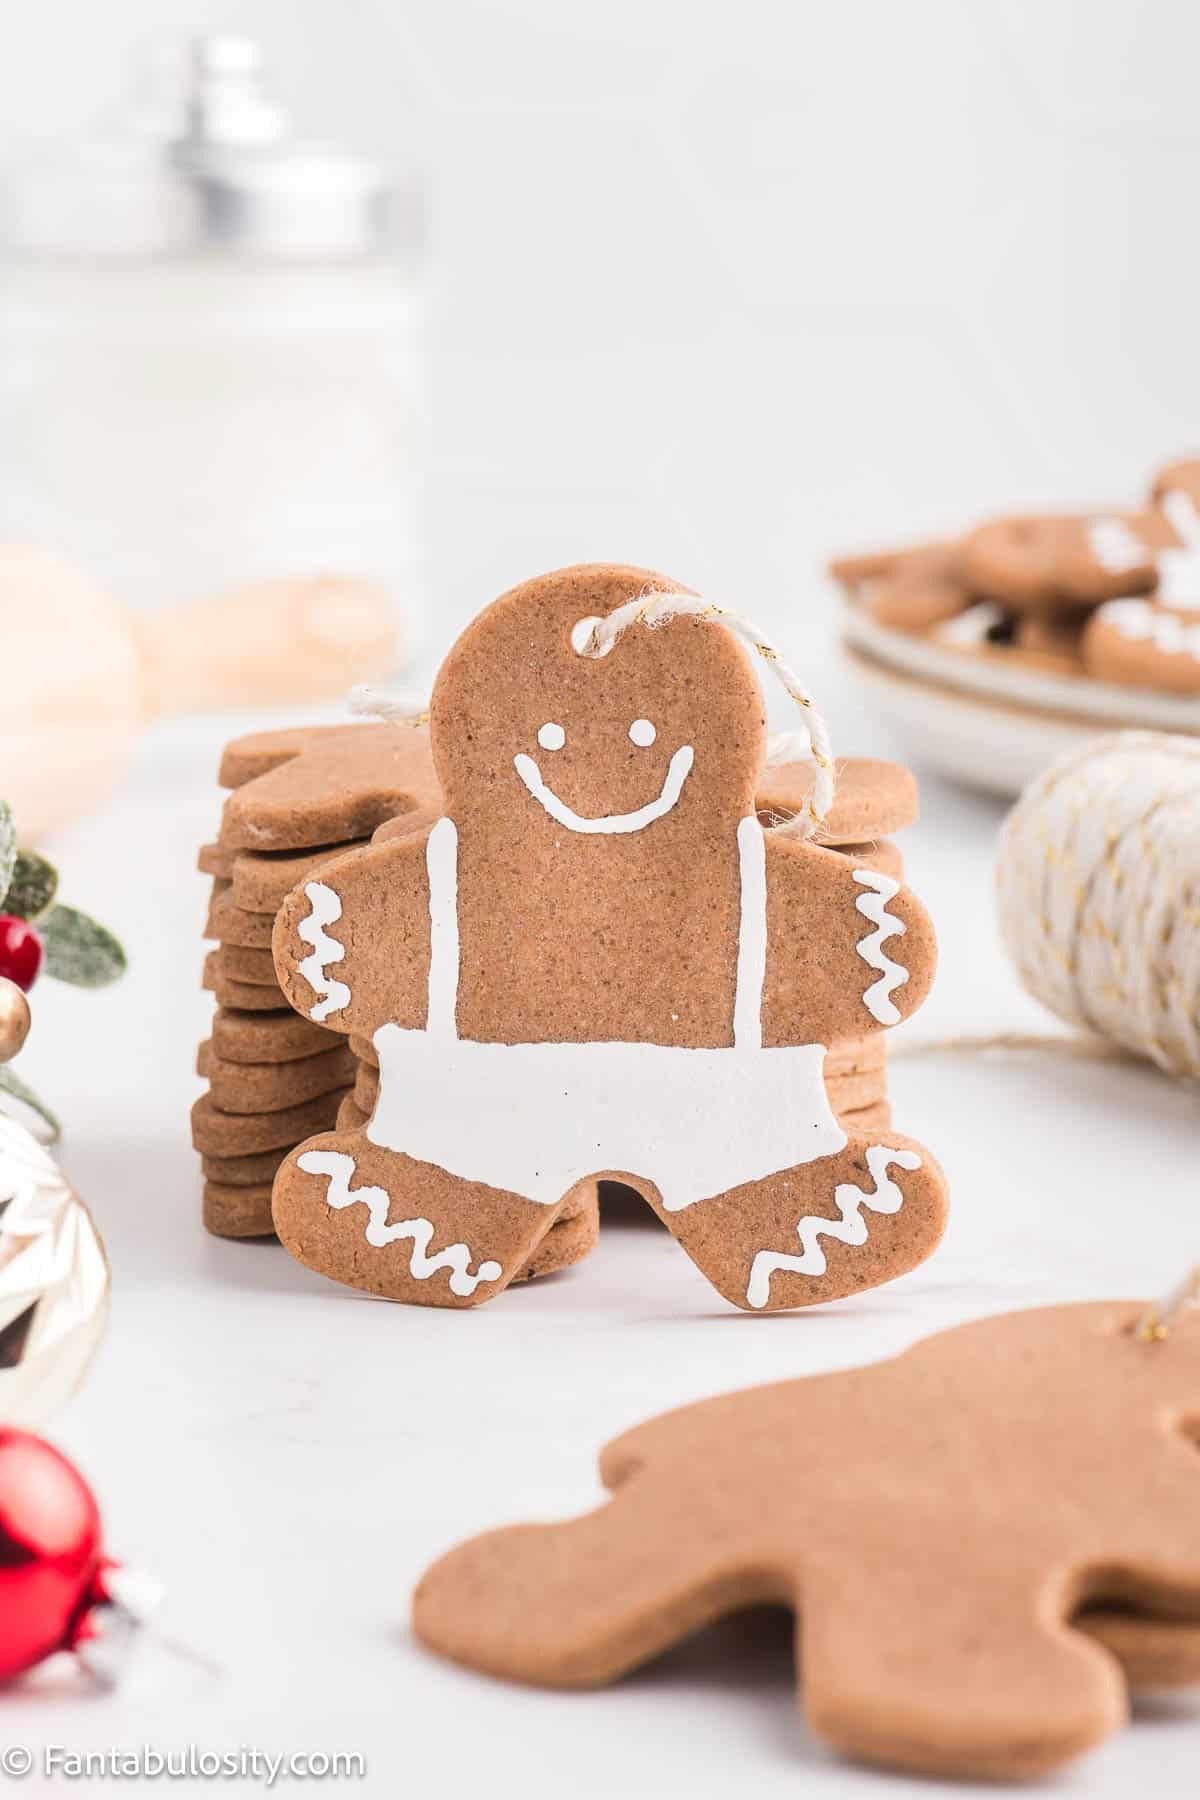
STEP 11. Decorate. Decorate each tree ornament as shown above using writing paint, sugar, and edible glitter spray or any way you would like. Enjoy and have fun.
STEP 12. Dry. Let dry completely before hanging ornaments.
💭 Recipe Pro Tips
- Allow to fully cool. Allow the salt dough ornaments to fully cool before any decorating.
- Allow to dry. Give them a few days to air dry before you decorate with them.
- Not edible ornaments. Remember, these beautiful gingerbread man ornaments are not edible!
- Make a night of it. Make these during a Christmas movie night for some added fun!

📋 Recipe FAQs
If using a gingerbread man cookie cutter that is 3 inches wide and 3 inches tall, the recipe should make 36 ornaments. I rolled my dough ⅛ inch thick using a rolling pin with thickness rings.
You can but it possibly will make your ornament have white spots on them. Roll with long rolls instead of a back-and-forth motion to avoid dough sticking to the rolling pin without having to add more flour.
Some ideas are Puff Paint, Acrylic Paint, Glue, Sprinkles, Watercolors, and Glitter.
Yes, they will look like this unless you put a light coat of olive oil on them. The oil will give them a nice shine and finished look.
If they puffed up, try baking them with a lower temperature and for a longer time.
Gingerbread is a Christmas star because it brings tradition and warmth to the festive table. With its cozy spices and the fun of decorating, it’s not just a treat but also a festive family activity that adds a dash of joy to the holiday season!
❄️ Storage
Store in an air-tight container in order to avoid them breaking and store in a dry place such as a closet.
🧵 More DIY Ideas That You’ll Love
If you’re in the mood for more DIY activities, we think you’ll really love these DIY ornaments and these ideas too:
Did you make this? I’d be so grateful if you left a “star” rating below to let me know what you thought! Then, the next time you need a quick and easy recipe, come back to Fantabulosity to browse all of my easy recipes!

Gingerbread Ornaments
Ingredients
- 3 cups all-purpose flour
- 1 cup salt
- 2 tablespoon cinnamon
- 1 teaspoon ginger
- ½ teaspoon ground cloves
- 1 ½ cup water
- ½ cup sugar for decorating optional
- 1 tablespoon olive oil for shine optional
Supplies
- Writing paint or White Glue
- Hand mixer
- Whisk
- Large bowl
- Rolling pin
- Parchment paper
- Baking sheet
- Scissors
- Ribbon or Twine
- Straw or Toothpick
- Gingerbread Man cookie cutter
- Basting brush
- Icing bag for glue or writing paint optional
- Edible spray glitter optional
Instructions
- Preheat oven to 200 degrees F.
- Put all dry ingredients into a large bowl and mix with a whisk.
- Next use the hand mixer and slowly pour in the water until the dough is formed.
- Place parchment paper down on countertop to roll out dough. To avoid white spots on dough, do not add flour to your surface.
- Roll dough ⅛ inch thick. Using a rolling pin with thickness rings can help guide you with this. If you make the dough thicker, then the ornaments will puff up and not be flat. Use a gingerbread man cookie cutter to cut out the shapes.
- Then place the straw or toothpick at the top of the ornament in the middle of the head to make a hole for the ribbon or twine.
- Place parchment paper on the baking sheet and then place the ornaments on top spacing them evenly apart.
- Next, put the baking sheet in the oven for 2 ½ to 3 hours until the ornaments are hard and dry. If you turn the temperature up higher, they with puff up and not be flat and if you take them out sooner, they won't be as hard.
- Let the ornaments cool completely before decorating.
- If you want the ornaments to have a shine, then coat each ornament with olive oil or any cooking oil you might have. Use a basting brush or a small paint brush to apply the oil. Wipe off any extra oil as needed. If you want to keep the rustic look then leave the olive oil off.
- Pour writing paint into an icing bag and cut off a very small tip at the tip of the bag. This will allow you to make thinner lines with the writing paint. This step is optional. Leave in bottle if you do not want to do this step.
- Decorate as shown above using writing paint, sugar, and edible glitter spray or any way you would like. Enjoy and have fun.
- Let dry completely before hanging ornaments.
Notes
- let cool completely before decorating
- let dry completely before stringing them or decorating with them
- store in a hard box in a dry place
Nutritional information is based on third-party calculations and should be considered estimates. Actual nutritional content will vary with brands used, measuring methods, portion sizes and more.


Comments
No Comments