• Skip to primary navigation
  • Skip to main content
  • Skip to primary sidebar

Fantabulosity logo

  • All Recipes
  • Vintage Recipes
  • Holiday
  • Dinner Theme System
  • About
  • Navigation Menu: Social Icons

    • Facebook
    • Instagram
    • Pinterest
    • TikTok
    • YouTube
menu icon
go to homepage
  • Recipes
  • Desserts
  • Dinners
  • Gatherings
  • Holidays
  • About Jessica
    • Facebook
    • Instagram
    • Pinterest
    • TikTok
    • YouTube
  • search icon
    Homepage link
    • Recipes
    • Desserts
    • Dinners
    • Gatherings
    • Holidays
    • About Jessica
    • Facebook
    • Instagram
    • Pinterest
    • TikTok
    • YouTube
  • ×
    Home » Recipes

    Apple Cider Punch

    Apple Cider Punch

    September 29, 2024

    Fall punch in a drink dispenser with orange slices and cinnamon sticks.

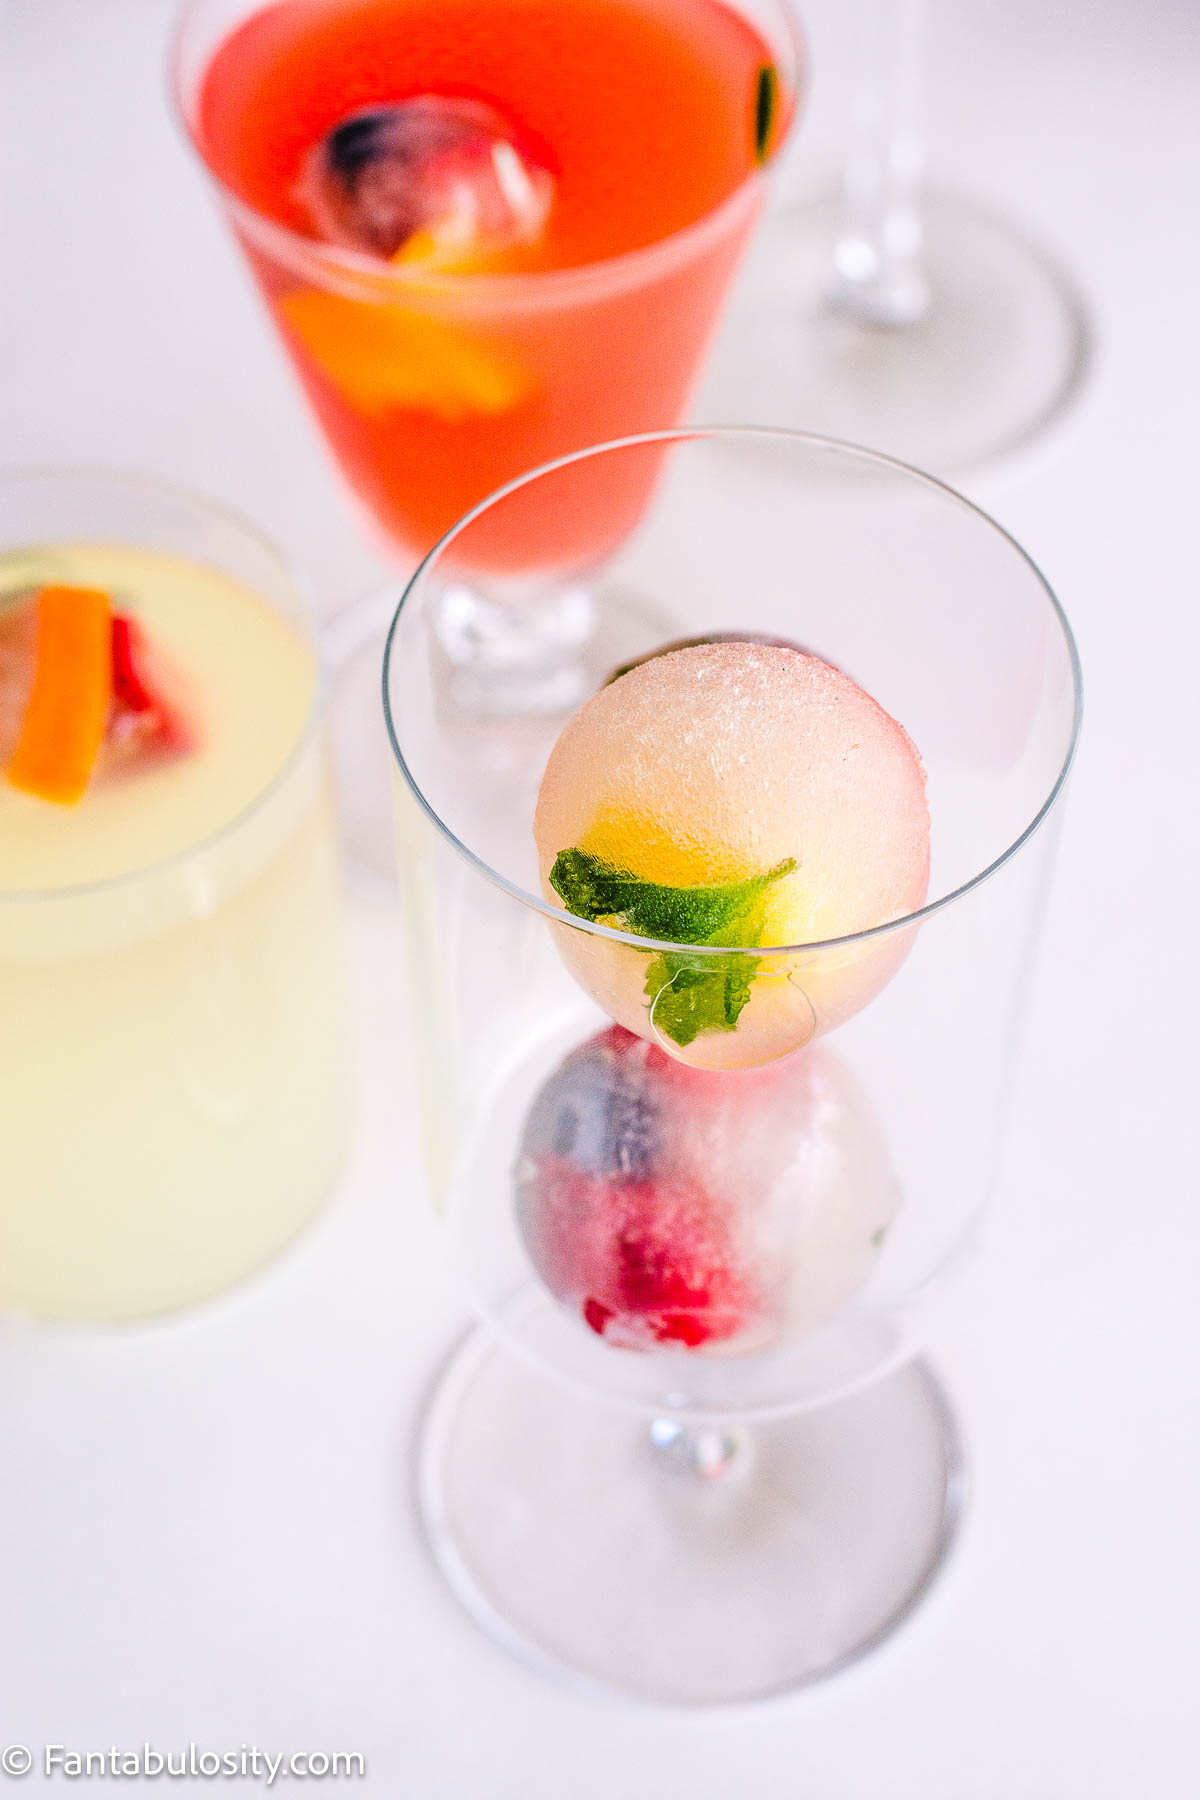
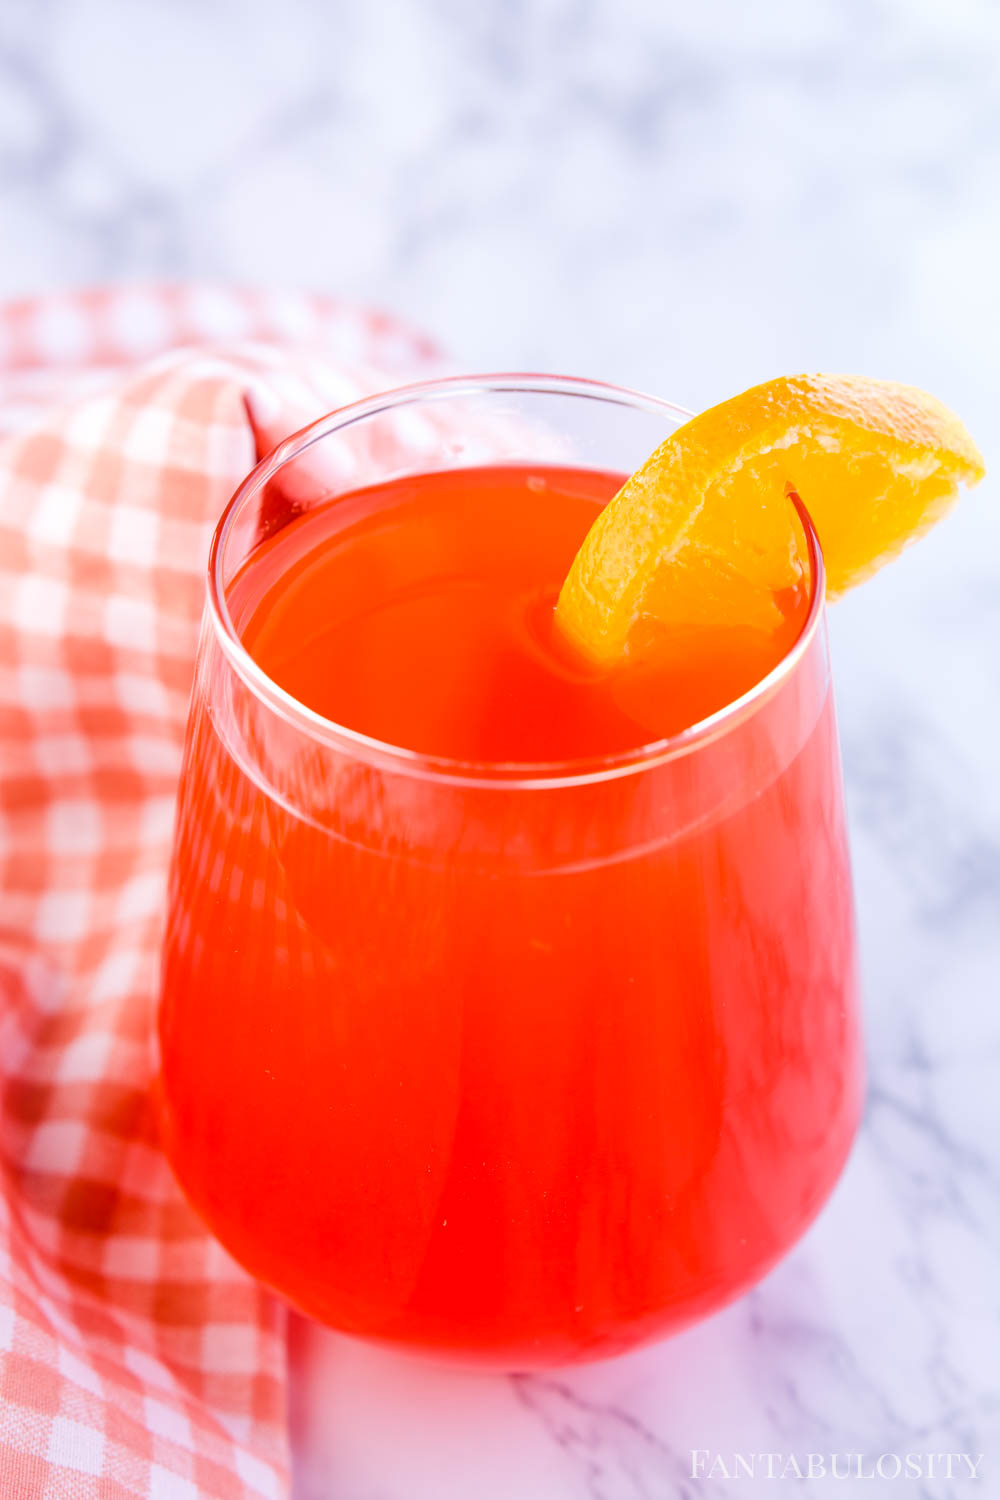
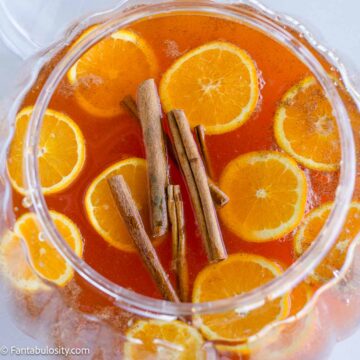
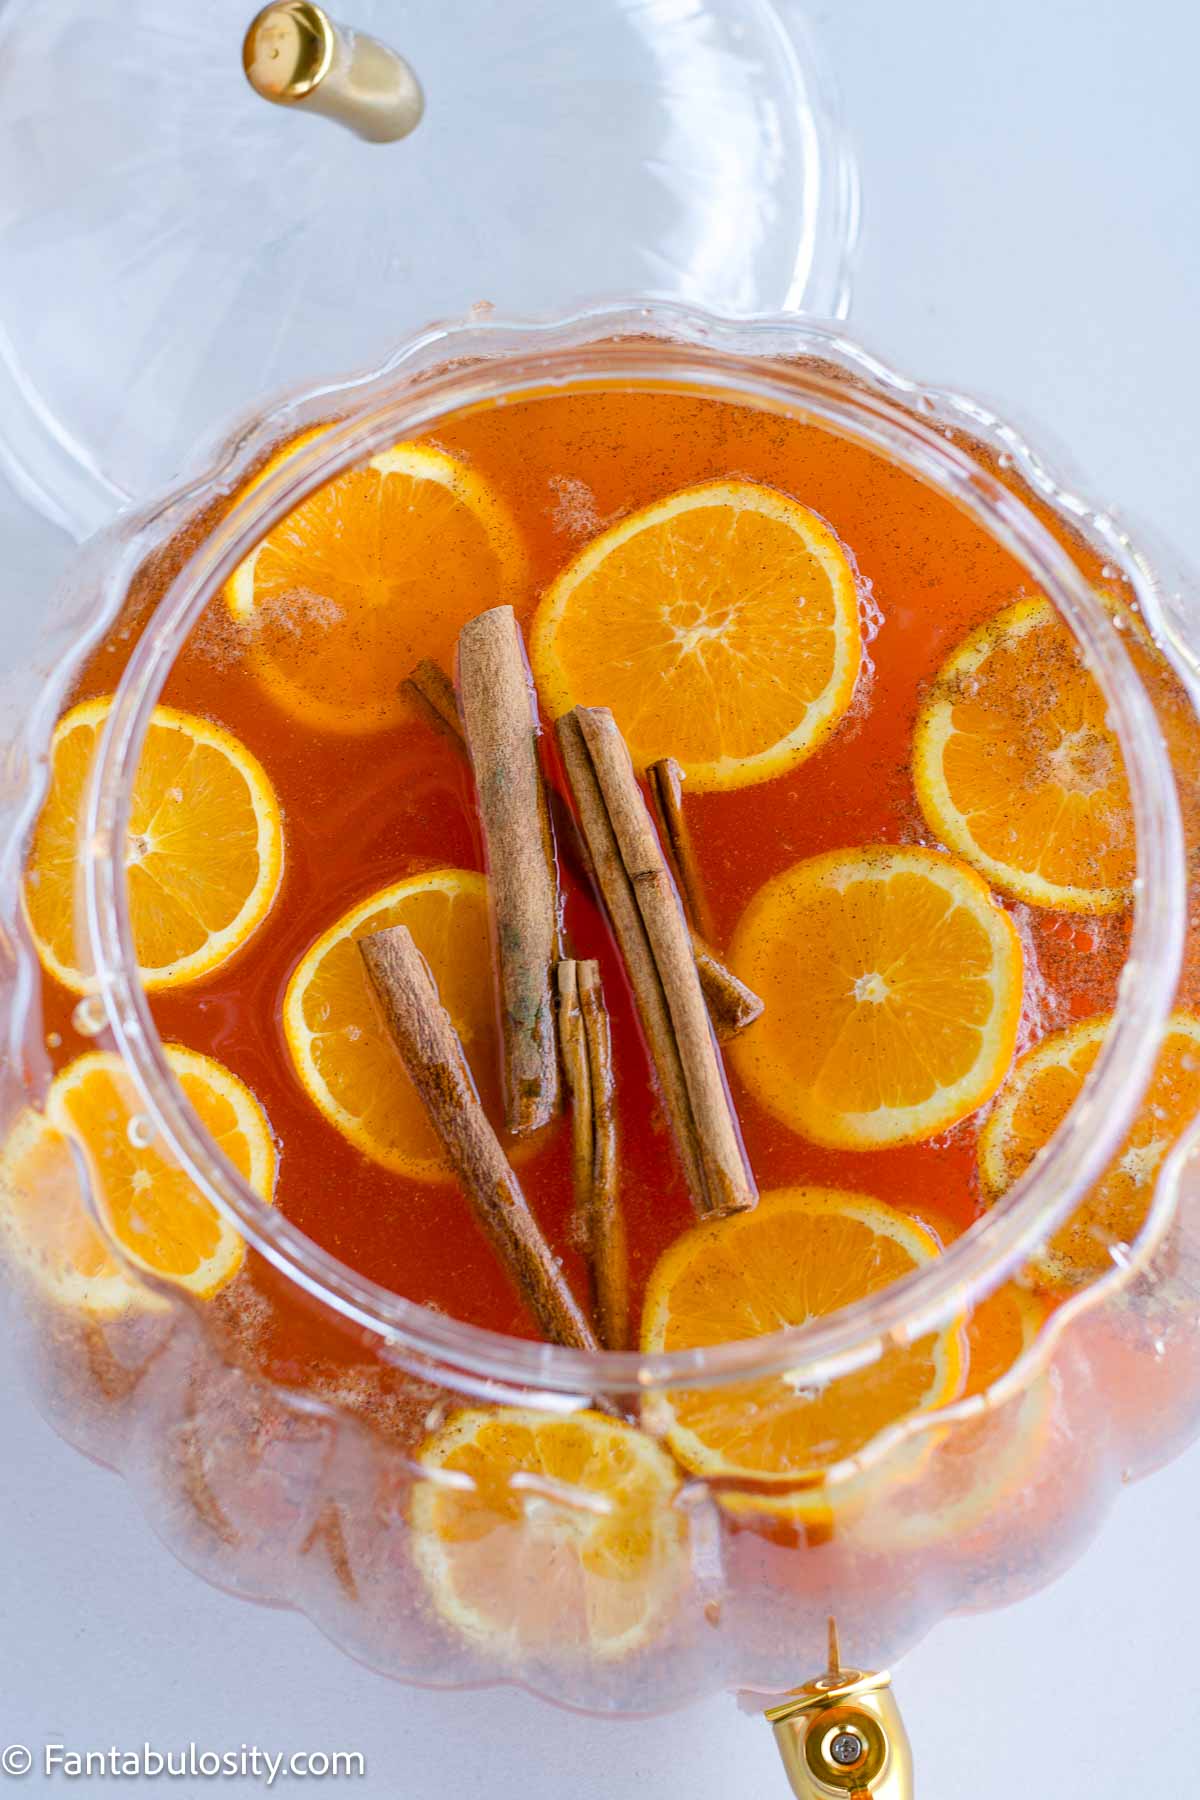
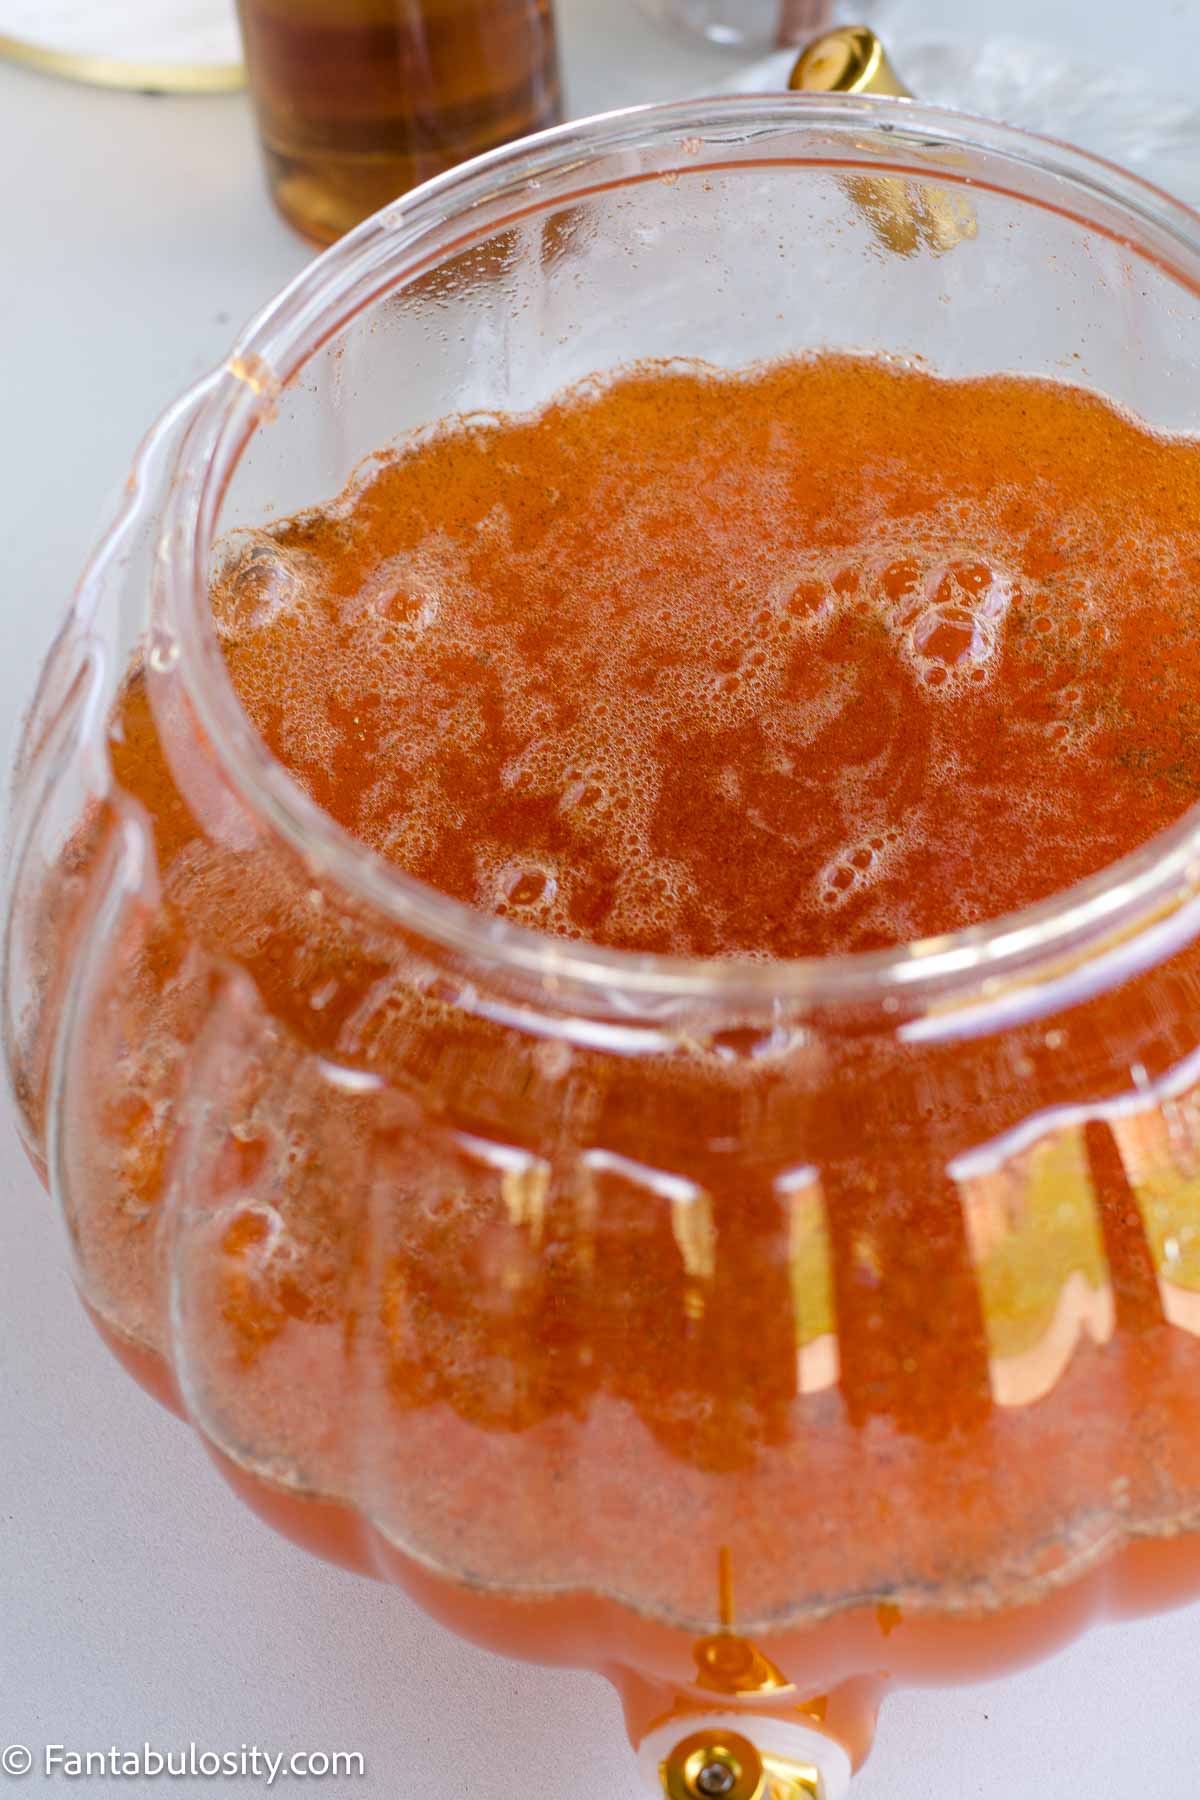
    Apple Cider Punch is made with apple cider, orange soda, caramel syrup, pumpkin pie spices, and the optional oranges and cinnamon sticks. It’s ready in minutes and great for fall parties!

    Apple cider punch in a pumpkin drink dispenser.

    Serve this easy recipe at Halloween parties or Thanksgiving dinners, and watch it disappear quickly when everyone has that first sip. It has the flavors of autumn and is such a refreshing blend of flavors for any occasion.

    This Fruit Punch Recipe is always a winner during the holidays, and this Orange Sherbet Punch is a great summer option, or another orange punch option if you don’t mind ice cream punch during the cooler months. If you love apples, but are looking for something alcoholic, this red apple martini is a great option.

    Autumn Punch Highlights

    • Flavors: This punch has warm flavors of smooth caramel, orange, and apple spice, that come together perfectly.
    • Ease: With just a few ingredients, and being able to pour everything right in together, makes this a great recipe for kids to help with, or even beginners in the kitchen.
    • Time: This punch is ready in just a few minutes, meaning you can whip this up right when the party starts (and is recommended).
    [feast_advanced_jump_to]

    Key Ingredients

    Have fun making this punch your way and with your favorite ingredients. However, the combination you see below is my favorite.

    Ingredients for apple cider punch.

    Complete list of ingredients and amounts can be found in the recipe card below.

    • Apple Cider: The apple cider I used was a Honeycrisp style so I feel it wasn’t as thick as some ciders but do believe other ciders will work lovely in this too. It just may make your punch darker if your cider is darker.
    • Pumpkin Pie Spice: If you have apple pie spice on hand instead, this is perfectly fine to use as well.
    • Caramel Syrup: You can use an ice cream caramel syrup instead although I’m not sure how it will mix with the cold beverages. I prefer using a flavored coffee-type syrup, like the Torani brand.
    • Orange Soda: You can use Fanta or Sunkist, whichever you prefer. Or, try ginger ale, or even another type of citrus soda.

    How to Make This Apple Cider Punch Recipe

    Apple cider, orange soda, caramel syrup, and pumpkin pie spice in drink dispenser.
    • In Advance (Optional): Chill apple cider and orange soda so it’s a cold punch when serving.
    • Slice oranges if using.
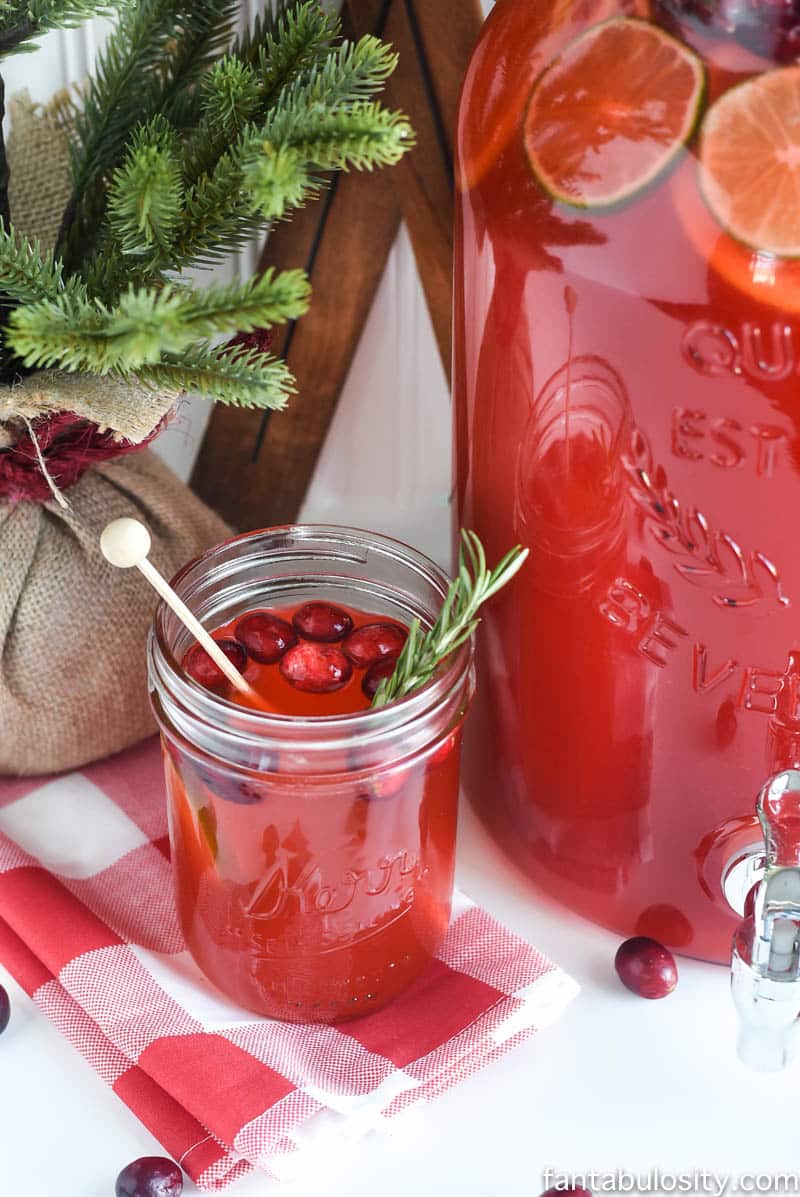
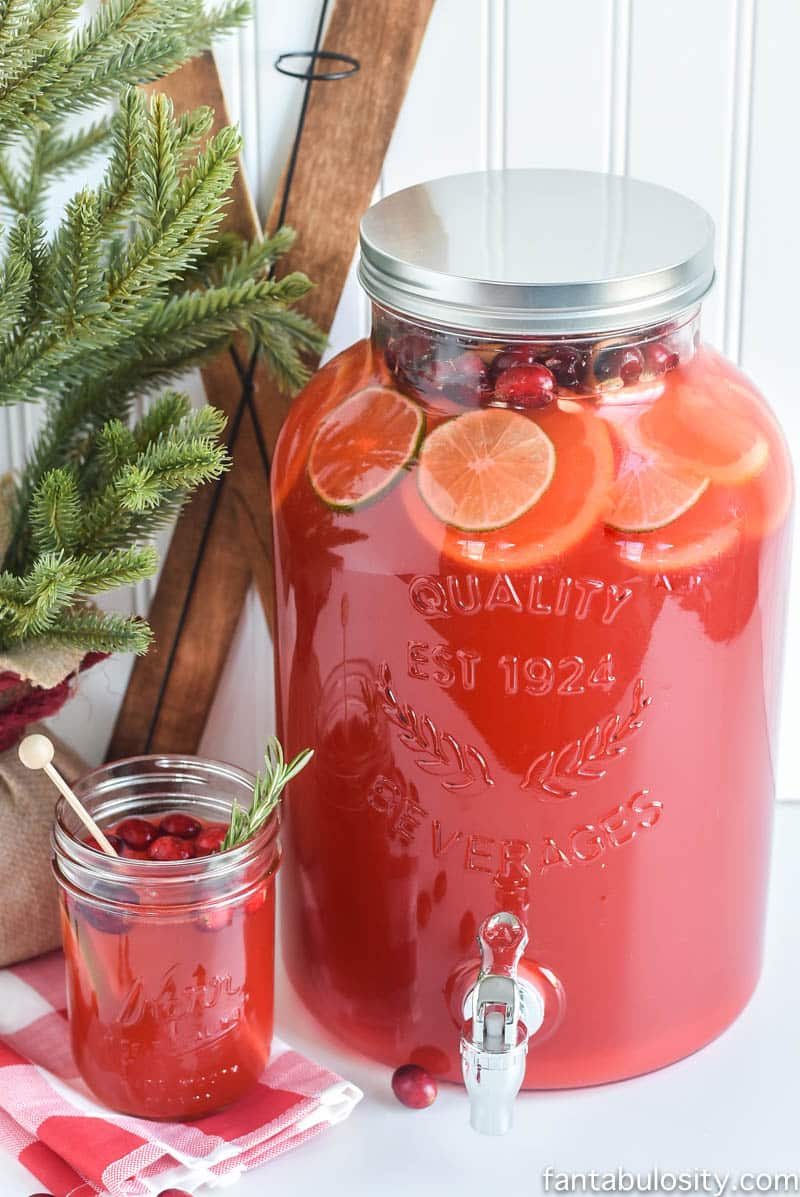
    • In drink dispenser or punch bowl, pour in the apple cider, caramel syrup, pumpkin pie spice, and orange soda and whisk for a couple of minutes, trying to dissolve the spices.
    • Lastly, place orange slices and cinnamon sticks in punch bowl and serve.
    Apple cider punch in pumpkin drink dispenser for the fall season.

    Fall Punch Tips

    • Garnish: Rim drinking glasses with a cinnamon and sugar mixture if desired. Or, place a cinnamon stick in each glass when serving.
    • Punch for a Crowd: This recipe makes about 1 gallon of punch, which makes about 16 glasses, so you can easily double or triple the recipe if needed.
    • Making in Advance: If you plan to make this punch ahead of time, it’s best to wait to pour/open the orange soda, to keep it fresh and bubbly when drinking.
    • Pumpkin Pie Spice: Using a whisk can help mix in the powdery spices but with it being a cool beverage, it’s harder for the spices to dissolve. Feel free to reduce the amount you use too.
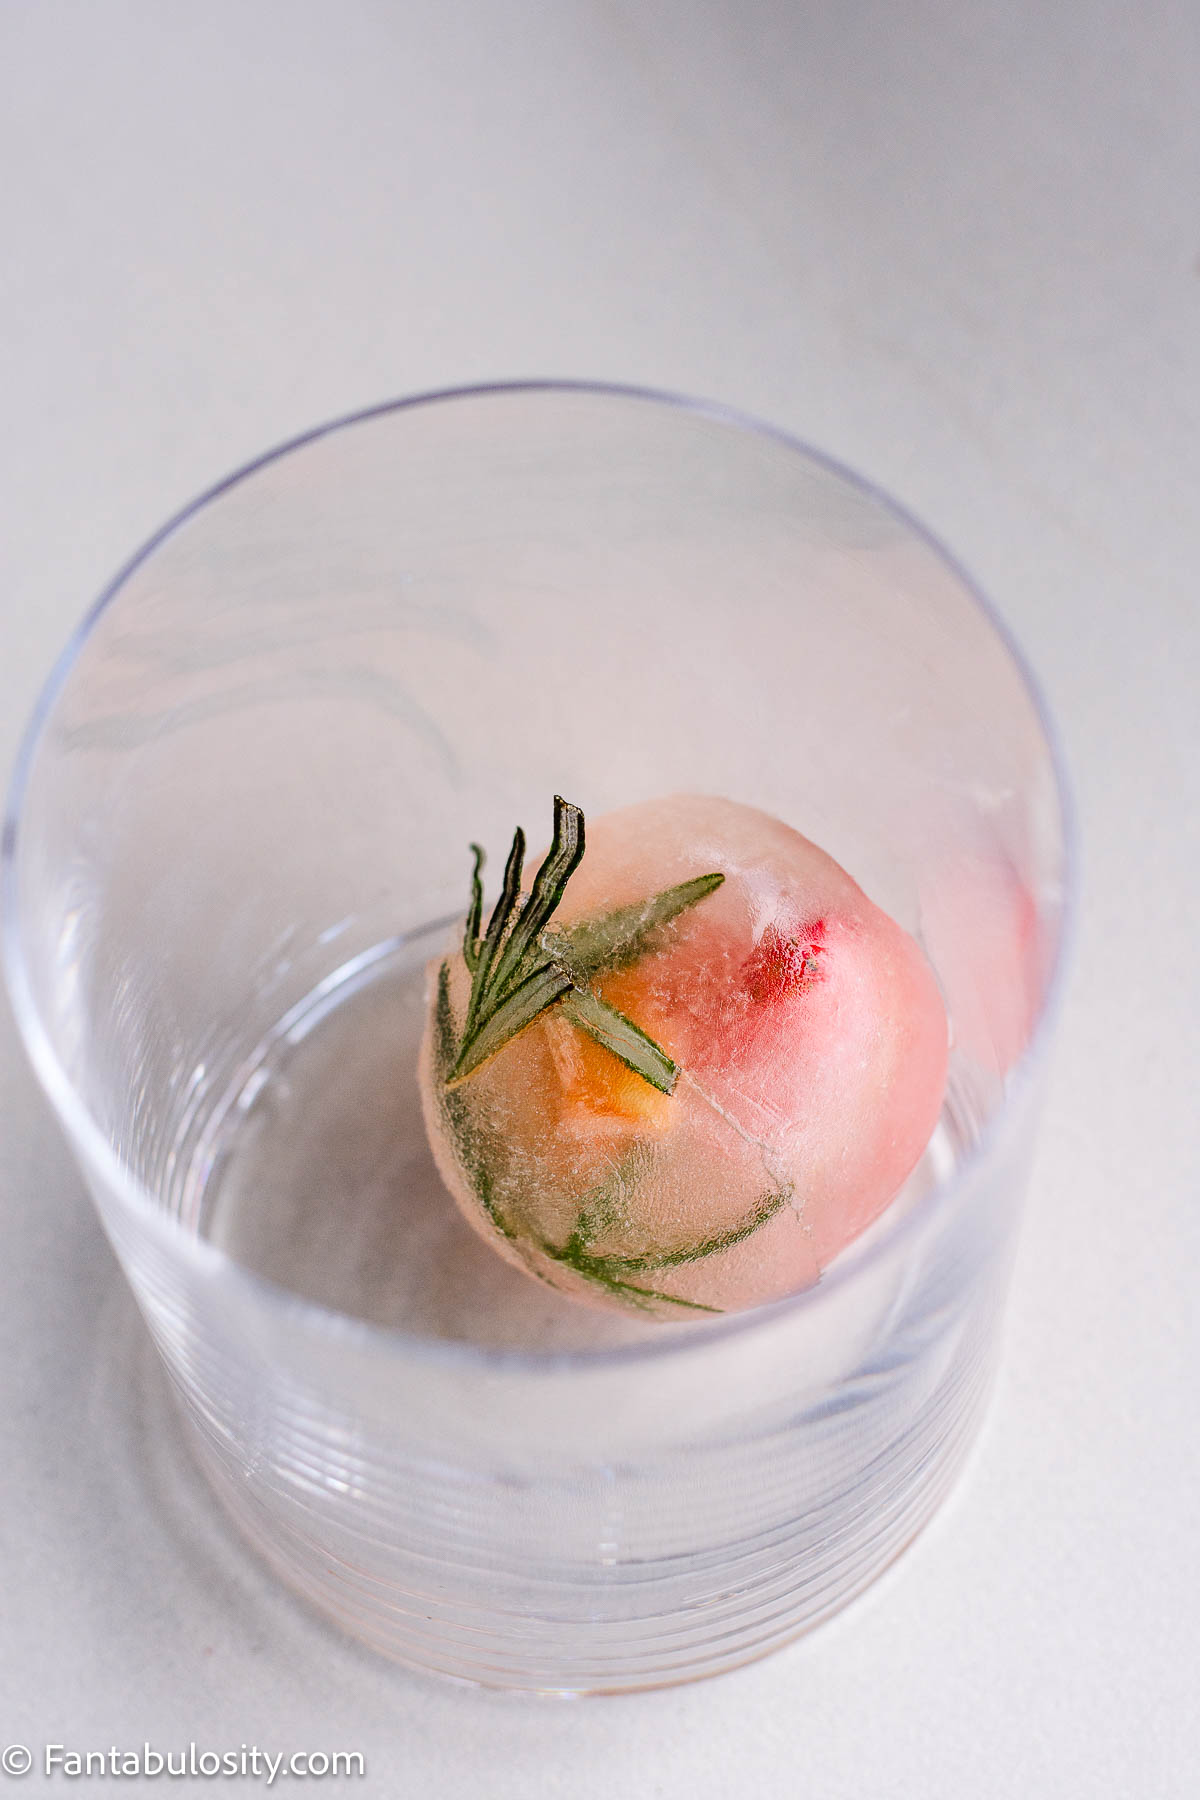
    • Keeping it Cold: You can always add about 6 cups of ice if you’d like but as the ice melts it will water down the punch. So if you buy extra apple cider, you can free the cider in ice cube trays and add those to the punch, so as they melt, it’s not as watered down.

    Additional Variations

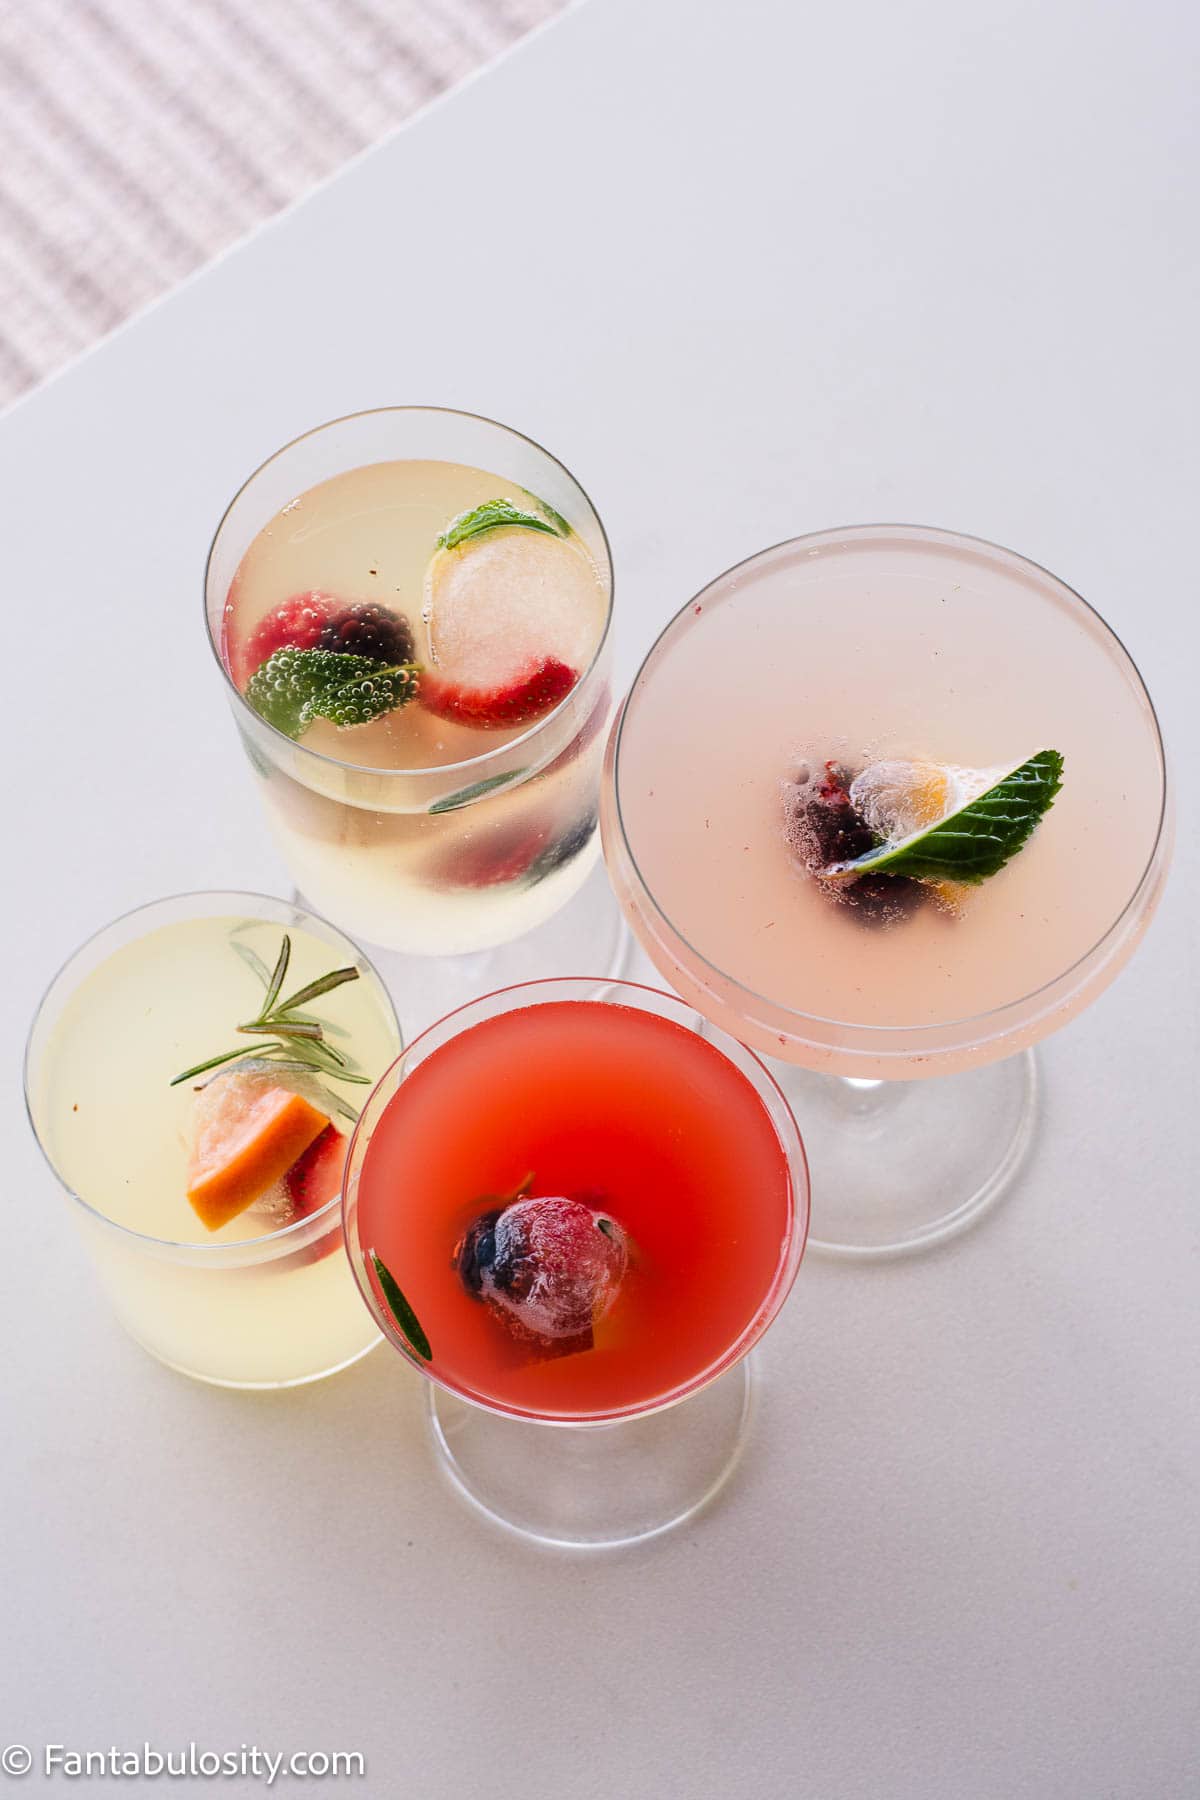
    • Fruits: Sliced apples (red or green), cranberries,and pears would look amazing in this punch too.
    • Herbs: Fresh rosemary and or thyme would look beautiful with the fall colors.

    Apple Cider Punch FAQs

    What is good to mix with apple cider?

    Citrus beverages mix wonderfully with warm-flavored beverages like apple cider.

    How to serve apple cider at a party?

    It’s a beautiful golden color for fall, so pouring it in to a drink dispenser looks great, especially when garnished with fruits in this punch recipe.

    Is apple cider just warmed up apple juice?

    It’s not. It has warm spices added to it like cloves, cinnamon and allspice, and has been heated.

    More Fall Recipes

    • Baked pumpkin bread on cutting board.
      Easy Pumpkin Bread Recipe
    • Pumpkin fluff in Pyrex serving bowl, with Reddi Wip and pumpkin pie spice on top.
      Pumpkin Fluff
    • Slice of sweet potato pie recipe on spatula.
      Sweet Potato Pie Recipe
    • A stack of desserts bars with a graham cracker crust and swirled pumpkin cheesecake filling are in the center of the photo
      Pumpkin Cheesecake Bars

    Recipe

    Fall punch in a drink dispenser with orange slices and cinnamon sticks.
    Print Pin
    Be the first to rate!

    Apple Cider Punch

    This apple cider punch recipe uses apple cider, orange soda, caramel syrup, pumpkin pie spice and a few other ingredients to create drink that's perfect for hosting!
    Course Drinks
    Cuisine American
    Prep Time 5 minutes minutes
    Total Time 5 minutes minutes
    Servings 16 glasses
    Calories 126kcal
    Author Jessica Burgess

    Ingredients

    • 64 ounces apple cider
    • 2 liters orange soda
    • ¼ cup caramel syrup
    • ⅛ teaspoon pumpkin pie spice
    • 3 oranges optional
    • 6 cinnamon sticks optional

    Instructions

    • Optional: Place apple cider and orange soda in the refrigerator, hours in advance so punch is cold when serving.
    • Slice oranges and set aside.
    • Pour 64 ounces apple cider, 2 liters orange soda, ¼ cup caramel syrup, ⅛ teaspoon pumpkin pie spice, in a drink dispenser or punch bowl. Stir or whisk to combine in the ingreidents, trying to make the spices dissolve more. (They may not dissolve easily since beverages are cold, and that's ok.)
    • Place the sliced, 3 oranges and 6 cinnamon sticksin punch and serve immediately!

    Video

    Notes

    Tips for the Perfect Punch
    • Wait to pour in the orange soda if not serving soon, to keep the soda from going flat too much in the punch. 
    • Freeze extra apple cider in advance, in ice cube trays, to add to punch to help keep it cool without watering the punch down.
    • Double or triple this recipe easily for a large batch when hosting a party.

    Nutrition

    Serving: 8ounces | Calories: 126kcal | Carbohydrates: 32g | Protein: 1g | Fat: 0.2g | Saturated Fat: 0.03g | Polyunsaturated Fat: 0.1g | Monounsaturated Fat: 0.02g | Sodium: 29mg | Potassium: 168mg | Fiber: 2g | Sugar: 28g | Vitamin A: 63IU | Vitamin C: 14mg | Calcium: 36mg | Iron: 0.3mg

    Easy Pumpkin Bread Recipe

    September 25, 2024

    Baked pumpkin bread on cutting board.

    This Easy Pumpkin Bread Recipe is the perfect way to welcome the fall season. This uses canned pumpkin puree, warm spices, and a few other simple ingredients, and this dessert bread is ready to enjoy in about an hour.

    Sliced pumpkin bread on wooden cutting board with a streusel on top.

    When the cooler weather hits, the pumpkin flavors start flowing. So it’s a toss-up between this bread, these pumpkin cream cheese bars, or this no-bake pumpkin pie.

    Gift Idea: This pumpkin bread recipe is one of my favorites to gift my neighbors when the season rolls around too. It’s a great way to bring the fall flavors in and spread the love. It’s hard to choose if this banana bread recipe, this chocolate bread loaf, or this pumpkin bread is their favorite.

    Pumpkin Bread Highlights

    • Texture: This bread is dense, soft, and sturdy enough to hold a piece in your hand while you take a bite.
    • Simple ingredients: No wild things to get for this dessert recipe. You may already have the items on hand to make this one, except the pumpkin puree. But you can grab a can of it to keep on hand for those last-minute fall dessert cravings.
    • Quick: A quick bread that’s ready in about an hour!
    [feast_advanced_jump_to]

    Key Ingredients

    Here’s what you’ll need to make this fall bread recipe:

    Complete list of ingredients and amounts can be found in the recipe card below.

    • Cream cheese: Since cream cheese usually comes in 8-ounce blocks, save the other 4 ounces to make this cream cheese frosting for brownies.
    • Oil: I like to use coconut oil for a lot of my baking and cooking. You can use vegetable oil if you prefer.
    • Brown Sugar: Light brown sugar is recommended for this recipe.
    • Streusel Topping Ingredients: Note that the streusel uses a lot of the same ingredients that are used in the bread. So when checking the ingredient measurements to see if you have all that you need, don’t forget the similar ingredients in the streusel.
    • Buttermilk: If you don’t have buttermilk, you can use regular milk (the same amount) and add a tablespoon of lemon juice to it, and allow it to sit and curdle a bit before adding to the pumpkin batter.
    • Eggs: I’ve made this recipe using 4 eggs in the past, and it causes the bread to be fluffier and lighter. I prefer using only 2 eggs, and it making a heavier, more dense bread. It’s up to you on how you prefer your bread.

    How to Make This Pumpkin Bread

    Canned pumpkin puree and spices in saucepan.
    1. Cook pumpkin puree, 1 teaspoon salt, ¼ teaspoon nutmeg & ⅛ cloves.
    Sugars, and cream cheese added to pumpkin mixture.
    2. Add sugars, oil, and cream cheese & cook until melted together.
    Eggs and buttermilk in small bowl.
    3. Mix eggs and buttermilk.
    Pouring eggs and buttermilk in to pumpkin mixture.
    4. Add buttermilk mixture to the pumpkin mixture.
    Flour, baking soda and baking powder mixed in small bowl.
    5. Mix flour, baking soda and baking powder together.
    Flour added in to pumpkin puree mixture for pumpkin bread.
    6. Add flour mixture to pumpkin mixture.
    Loaf pan lined with parchment paper.
    7. Grease or line loaf pans with parchment paper.
    Pumpkin bread batter poured in to loaf pan.
    8. Pour half of batter in each loaf pan.
    Pumpkin bread streusel ingredients in mixing bowl.
    9. Make streusel: Combine ingredients.
    Streusel ingredients poured on top of pumpkin bread batter.
    10. Sprinkle half of the streusel on top of each loaf pan.

    About the Streusel: The Streusel on top is kind of my favorite. There are times I’ll leave a streusel off of my recipes, just because I feel like it’s a whole other step that’s not really necessary. But with this one… I couldn’t believe how good it was. I start eating a piece, anticipating when I reach the top, to get to the streusel.

    Baked pumpkin bread in loaf pan.

    Bake the pumpkin bread at 350° degrees F for 45-50 minutes, or until a toothpick inserted in to the middle comes out clean.

    Baked loaf of pumpkin bread on parchment paper.

    Remove the bread from the oven. Carefully lift out parchment paper (if using) slice, and enjoy.

    For Mini Loaves:

    If making mini loaves of pumpkin bread, I found that it only took about 15 minutes for the mini loaves to be done, baking at 350 degrees. However, mini loaf pans can vary so it’s best to check with a toothpick after about 12 minutes to see if the bread is finished baking.

    Baked mini pumpkin bread loaves.
    Mini pumpkin cream cheese loaves.

    Pumpkin Bread FAQs

    What’s the difference between canned pumpkin and pumpkin puree?

    There is no difference. Canned pumpkin is the same as pumpkin puree. However, canned pumpkin pie mix is not the same as pumpkin puree. Pumpkin pie mix has spices mixed in with it already.

    How to store pumpkin bread?

    When the bread has cooled, it’s best to store it by wrapping in parchment paper or wax paper. You can also store it in an airtight container or in a zip-top storage bag but it could cause the bread to become gummy. No need to refrigerate. It’s best to enjoy within 2-3 days.

    How do you remove pumpkin bread from a loaf pan?

    For a no-fail way of removing pumpkin bread from a loaf pan, it starts before you even put the batter in the pan. Spray the loaf pan with nonstick cooking spray. Then place a piece of parchment paper inside of the loaf pan, with the corners cut with a slit, so it forms to the loaf pan easier. Then, once baked, simply lift out the bread loaf by pulling on the parchment paper corners.

    Related Recipes

    Love pumpkin flavors? Then you’ll also love these other pumpkin favorites:

    • Pumpkin Cheesecake Bites on wooden cutting board.
      Pumpkin Cheesecake Bites
    • Pumpkin fluff in Pyrex serving bowl, with Reddi Wip and pumpkin pie spice on top.
      Pumpkin Fluff
    • Slice of pumpkin poke cake on plate with fork
      Pumpkin Poke Cake
    • Close up of pumpkin streusel muffins stacked on top of one another
      Pumpkin Streusel Muffins

    Recipe

    Baked pumpkin bread on cutting board.
    Print Pin
    5 from 2 votes

    Easy Pumpkin Bread Recipe

    This moist pumpkin bread is the perfect fall recipe and is easy to make using canned pumpkin, and a few other simple ingredients.
    Course Dessert
    Cuisine American
    Prep Time 20 minutes minutes
    Cook Time 45 minutes minutes
    Total Time 1 hour hour 5 minutes minutes
    Servings 15 servings
    Calories 307kcal
    Author Jessica Burgess

    Equipment

    • 2 loaf pans or 2, 9-cavity mini loaf pans

    Ingredients

    • 15 ounce can pumpkin puree
    • 1½ teaspoon cinnamon
    • 1 teaspoon kosher salt
    • ¼ teaspoon ground nutmeg
    • ⅛ teaspoon ground cloves
    • 1 cup sugar
    • 1 cup light brown sugar
    • 4 ounce cream cheese
    • ½ cup oil I use coconut but you can use vegetable
    • ¼ cup buttermilk or milk with a few drops of lemon juice
    • 2 large eggs Use 3-4 eggs for a lighter, fluffier bread.
    • 2 cups all-purpose flour
    • ½ teaspoon baking powder
    • ½ teaspoon baking soda

    Streusel:

    • 5 Tablespoons light brown sugar
    • 1 Tablespoon all-purpose flour
    • 1 Tablespoon unsalted butter cold
    • 1 teaspoon cinnamon
    • ¼ teaspoon kosher salt

    Instructions

    • Preheat over to 350 degrees.
    • In a small saucepan, add the 15 ounce can pumpkin puree, 1½ teaspoon cinnamon, 1 teaspoon kosher salt, ¼ teaspoon ground nutmeg and ⅛ teaspoon ground cloves.
    • Cook over medium heat for 5-6 minutes, stirring occassionally.
    • Reduce heat to low-medium heat (to reduce bubbling & splashing).
    • Add in the 1 cup sugar, 1 cup light brown sugar, 4 ounce cream cheese, and ½ cup oil.
    • Cook until cream cheese is melted.
    • In a separate dish, combine the ¼ cup buttermilk and 2 large eggs.
    • Slowly add into the cream cheese mixture, and remove the saucepan from heat.
    • In a separate bowl, combine the 2 cups all-purpose flour, ½ teaspoon baking powder, ½ teaspoon baking soda, and fold into the wet mixture.
    • Line two 9×5 loaf pans with parchment paper or spray with nonstick spray (see notes below for tips) and pour half of the pumpkin batter, in to each pan.

    Streusel Topping

    • Combine the 5 Tablespoons light brown sugar, 1 Tablespoon all-purpose flour, 1 Tablespoon unsalted butter, 1 teaspoon cinnamon, and ¼ teaspoon kosher salt and mix until corporated. (I use a fork and my hands to mix togther the cold, hard butter with the spices the best that I can. Try to only have small pieces of butter left.)
    • Evenly distribute the streusel over the top of both loaf pans of batter.
    • Bake at 350 degrees F for 45-50 minutes or until a toothpick inserted in the middle, comes out clean.
      For mini loaf pans, bake at 350 degrees for 15-20 minutes or until a toothpick inserted in to the middle, comes out clean.

    Video

    Notes

    Tip for Prepping Loaf Pans: I like to spray my loaf pans with non-stick cooking spray and then line with parchment paper. The spray helps the paper stick to the sides. Also, cutting small slits in the corners of the parchment paper helps the paper fit better in to the pans.
    For mini loaf pans, only using non-stick cooking spray works just fine.

    Nutrition

    Serving: 11-inch slice | Calories: 307kcal | Carbohydrates: 48g | Protein: 4g | Fat: 12g | Saturated Fat: 3g | Polyunsaturated Fat: 2g | Monounsaturated Fat: 6g | Trans Fat: 0.1g | Cholesterol: 35mg | Sodium: 289mg | Potassium: 128mg | Fiber: 1g | Sugar: 33g | Vitamin A: 4581IU | Vitamin C: 1mg | Calcium: 53mg | Iron: 2mg

    Recipe originally shared in September 2016, updated in September 2024.

    Pulled Pork Sliders

    September 23, 2024

    Close up of a pulled pork slider on a Hawaiian bun.

    Pulled Pork Sliders on Hawaiian buns are the recipe that should be on every gameday table. Use my pulled pork recipe(s) or pre-made, store-bought pulled pork for this one.

    The yummy glaze and delicious sprinkled seasonings on top of the buttery buns, make this a recipe everyone will be begging for.

    Close-up of pulled pork sliders stacked on top of one another.

    Whether you’re hosting a party for the big game, or feeding a crowd, these will disappear once everyone finds out how delicious they are.

    These pork sliders also make a wonderful and easy dinner recipe that the whole family will love.

    Love slider recipes? Then you’ll also want to try these buffalo chicken sliders and these cheeseburger sliders that have become so popular.

    [feast_advanced_jump_to]

    Pulled Pork Slider Recipe Highlights

    • Comfort Food: The sweet, salty, hearty flavors in this soft, tender, and meaty recipe, give all the feels.
    • Quick Recipe: When using leftover or store-bought cooked pulled pork, this can speed up the recipe by a lot!

    Key Ingredients

    Here's what you need to make these pulled pork sliders:

    Labeled ingredients for pulled pork sliders.

    Complete list of ingredients and amounts can be found in the recipe card below.

    • Pulled Pork – If you’d like to make your own pulled pork recipe for this, I’d suggest this slow cooker pulled pork recipe or this Instant Pot pulled pork recipe.
    • Hawaiian Buns – You can use different sliders if you prefer. These sweet rolls offer such an amazing contrast with the saltiness of the glaze and pulled pork.
    • BBQ Sauce – Using original sauce is recommended, instead of spicy or some other type, however, feel free to mix things up!
    • Red Pepper Flakes – If you don’t like any heat, you can leave this out of the glaze but it adds a great little kick to mix with the sweet and salty flavors.
    • Cheese – I love the flavor of provolone cheese on these sliders but you can use pepper jack, American, Colby jack, swiss, or your favorite.

    How to Make BBQ Pulled Pork Sliders

    Full instructions can be found in the recipe card below.

    Steps 1-4 of how to make pulled pork sliders.

    Preheat your oven to 350 degrees F.

    Next, mix together your pulled pork and barbecue sauce (unless your pulled pork already has bbq sauce on it).

    TIP: Warmed pulled pork is ideal, so it won’t take as long for the meat to heat through when baking. You can pop it in to the microwave to warm it before assembling the sliders.

    Slice Hawaiian buns in half, creating a top bun layer and a bottom bun layer.

    Place the bottom layer of buns on a baking sheet that’s lined with parchment paper. Spoon out all 4 cups of cooked pulled pork on to the bottom bun layer and then cover pork with the 9 slices of cheese.

    Steps 4-7 of how to make pulled pork sliders.

    Next, place top layer of buns on top of the cheese.

    In a small bowl, mix together ¼ cup melted butter, 1 teaspoon garlic powder, 1 teaspoon Dijon mustard and 1 teaspoon Worcestershire sauce to make glaze.

    Brush the glaze on top of the buns, saving half of it for after you’ve baked the sliders.

    Sprinkle 1 teaspoon of sesame seeds, 1 teaspoon grated parmesan cheese and ½ teaspoon crushed red pepper flakes across the top of the glazed buns.

    Place sliders in the preheated over and bake, covered with foil, for 20 minutes. (TIP: Remove the foil when there’s a minute left, and let it cook to toast the buns a bit.)

    Recipe Pro Tip

    • If your cheese hasn’t melted after the 20 minutes, it could be because the cheese is thick. Simply cover with foil again and bake an additional 3-4 minutes or until it has melted. Or, slice the sliders, and place back in to the oven, covered, so it melts the cheese more evenly. (If your pulled pork was cold, when assembling the sliders, this could also delay the warming process.)
    Baked pulled pork sliders on baking sheet and parchment paper.

    Brush the remaining glaze on top of the buns, then slice in to individual sliders and serve!

    Pulled pork sliders stacked on top of one another.

    📋 Recipe FAQs

    What kind of cheese goes with pulled pork?

    Provolone, cheddar, pepper jack, Monterey Jack, Colby Jack, Swiss, and American, are all great options for these sliders.

    What goes with a pulled pork slider?

    Creamy coleslaw, french fries, baked beans with ground beef, chips and dip, and red potato salad are amazing side dishes that go with pulled pork sliders.

    What is the best liquid to moisten pulled pork?

    If your pulled pork is dry, this could make for a dry slider. Try mixing a little bit of apple juice, beer or broth in to your pulled pork (about a teaspoon at at time) until it shows moisture. Just be cautious of adding too much, as it will make your slider soggy.

    Stacked bbq pulled pork sliders, sitting in front of a bowl of cole slaw.

    Storage

    For leftover sliders: allow them to cool and then cover with plastic wrap or aluminum foil, and refrigerate for up to 3-5 days.

    To reheat: you can place individual sliders in the microwave for about 30 seconds, or until heated through. Or, place multiple sliders in the oven and bake, covered (so the bread doesn’t get hard) at 350 degrees until heated through.

    Bite taken out of bbq pulled pork sliders on Hawaiian buns.

    More Slider Recipes You’ll Love

    If you love sliders as much as I do, you’ll also love these popular slider recipes:

    • Close up of pizza sliders on white plate.
      Pizza Sliders
    • Sloppy joe sliders with melted cheese on white marble cutting board
      Sloppy Joe Sliders
    • Italian sliders on Hawaiian buns
      Italian Sliders (Easy Party Sandwiches)
    • Turkey slider sitting on top of other turkey sliders with cheese.
      Turkey Sliders

    Did you make this? I’d be so grateful if you left a “star” rating below to let me know what you thought! Then, the next time you need a quick and easy recipe, come back to Fantabulosity to browse all of my easy recipes!

    Recipe

    Close up of a pulled pork slider on a Hawaiian bun.
    Print Pin
    5 from 2 votes

    Pulled Pork Sliders

    This easy pulled pork sliders recipe uses simple ingredients, a homemade pulled pork recipe or store-bought pulled pork, and is perfect for game day or an easy dinner.
    Course Appetizer, Dinner, Main Course, Side Dish
    Cuisine American
    Prep Time 5 minutes minutes
    Cook Time 20 minutes minutes
    Total Time 25 minutes minutes
    Servings 12 sliders
    Calories 364kcal
    Author Jessica Burgess

    Ingredients

    • 12 slider Hawaiian buns (don't cut them individually yet)
    • 4 cups cooked pulled pork Either store bought or use this pulled pork recipe.
    • 9 slices provolone cheese
    • 1 cup bbq sauce

    Glaze and Topping Ingredients

    • ¼ cup butter
    • 1 teaspoon garlic powder
    • 1 teaspoon Dijon mustard
    • 1 teaspoon Worcestershire sauce
    • 1 teaspoon sesame seeds
    • 1 teaspoon grated parmesan cheese
    • ½ teaspoon crushed red pepper flakes optional for a little heat

    Instructions

    • Preheat oven to 350 degrees F.
    • Slice Hawaiian buns in half, creating top and a bottom layers. (You will not cut the buns individually yet. It's much easier to assemble sliders and then cut in to sliders.) Place bottom layer of buns in a 9×13 baking dish.
    • In a mixing bowl, mix together 4 cups cooked pulled pork and 1 cup bbq sauce until combined. (Tip: microwave or warm the pulled pork so it warms faster in the oven.)
    • Spread pulled pork on top of bottom layer of Hawaiian buns, evenly.
    • Top pulled pork with slices of 9 slices provolone cheese and then place tops of Hawaiian buns on.
    • In a small mixing bowl, melt the ¼ cup butter, and add 1 teaspoon garlic powder, 1 teaspoon Dijon mustard, and 1 teaspoon Worcestershire sauce, and mix together until combined. Brush at least half of the glaze on top of Hawaiian buns.
    • Sprinkle 1 teaspoon sesame seeds, 1 teaspoon grated parmesan cheese, and ½ teaspoon crushed red pepper flakes on top of buttered buns.
    • Cover baking dish with aluminum foil and bake at 350 degrees for 20 minutes, uncovering with only 1 minute left to give the tops of the buns a golden finish.

    Notes

    If your cheese is not melted in the middle of your sliders after the 20 minutes, this could be due to the pulled pork being colder when baking, or that the cheese is thicker. Simply cover with aluminum foil and continue baking until heated through.

    Nutrition

    Serving: 3sliders | Calories: 364kcal | Carbohydrates: 39g | Protein: 17g | Fat: 16g | Saturated Fat: 8g | Polyunsaturated Fat: 0.3g | Monounsaturated Fat: 2g | Trans Fat: 0.2g | Cholesterol: 64mg | Sodium: 953mg | Potassium: 87mg | Fiber: 0.3g | Sugar: 24g | Vitamin A: 444IU | Vitamin C: 2mg | Calcium: 163mg | Iron: 1mg

    Blackberry Banana Bread

    September 23, 2024

    Blackberry banana bread on cooling rack.

    Blackberry Banana Bread – the perfect way to use up those blackberries and older bananas, or even to buy just for this recipe!

    OMG. Now THIS is the banana bread I'll be making. Blackberry Flax Banana Bread

    Remember my banana bread recipe that went viral on Pinterest? On average, we probably make this about once a month in our home. My kiddos eat about a banana-a-day, but somehow we always end up with bananas that are a little too brown to eat by themselves. (It may have something to do with buying too many, so I then have an excuse to make this banana bread.)

    If you have green bananas, here’s how to ripen bananas for recipes like this one!

    OMG. Now THIS is the banana bread I'll be making. Blackberry Flax Banana Bread

    Why You’ll Love This Blackberry Banana Bread

    There’s a secret ingredient (buttermilk) that makes this banana blackberry bread so moist and so different than other recipes out there.

    OMG. Now THIS is the banana bread I'll be making. Blackberry-Flax Banana Bread

    TIP: I did choose to put flax seed in this recipe but you don’t have to! It’s just an added ingredient that I like to sneak in for the kids.

    OMG. Now THIS is the banana bread I'll be making. Blackberry-Flax Banana Bread

    I so hope you love this recipe. I kid you not, when I tell you that it never lasts a day in our house So that whole thing I said about how it’s good for breakfast? Yeah, that’s a theory. We’ve never even made it to breakfast with this banana bread in the house.

    More Bread Recipes

    If you love fruit breads, then you’ll also love this pineapple bread recipe too!!

    • Cherry bread with cherry icing on wooden cutting board.
      Cherry Bread with Cherry Glaze
    • Strawberry Bread loaf with Strawberry Icing, dripping down the side.
      Strawberry Bread with Strawberry Icing
    • Sliced lemon blueberry bread with lemon glaze.
      Lemon Blueberry Bread
    • Stack of homemade hush puppies on white plate, with one split open to show the inside.
      Hush Puppies

    Recipe

    Blackberry banana bread on cooling rack.
    Print Pin
    4 from 2 votes

    Blackberry Banana Bread

    This blackberry banana bread is SO easy to make and is perfect for breakfast. Try this easy recipe for a yummy breakfast on the go!
    Course Breakfast
    Cuisine American
    Prep Time 20 minutes minutes
    Cook Time 45 minutes minutes
    Total Time 1 hour hour 5 minutes minutes
    Servings 12 servings (2 loaves)
    Calories 334kcal
    Author Jessica Burgess

    Ingredients

    • ½ cup buttermilk or you can combine ½ c. milk with 2 tsp. lemon juice & set aside to curdle
    • ¾ cup butter softened (1 ½ sticks)
    • 1½ cup granulated sugar
    • 1½ cup very ripe bananas mashed, which is about 3 large bananas (Here's how to ripen bananas.)
    • ½ cup mashed blackberries
    • 2 eggs
    • 2 cup all-purpose flour
    • 1 teaspoon baking soda
    • 1 teaspoon salt
    • ¼ cup flaxseed Optional but not required.

    Instructions

    • Preheat your oven to 325 degrees F.
    • Cream the butter and the sugar.
    • Add in the mashed bananas & blackberries (I combine the two in a Ziploc bag and squeeze until mixed.)
    • Add in the eggs.
    • Mix all together until combined.
    • In a separate bowl. mix together the flour, baking soda, salt and flaxseed if using.
    • Add the flour mixture and the buttermilk alternately to the creamed mixture, and mix on low or by hand until combined.
    • If you're adding chocolate chips/pecans, add to mixture and hand stir to combine
    • Pour into two greased pans, or mini loaf pans.
    • If baking in two regular loaf pans, bake at 325 for 40-45 minutes. If baking in mini loaf pans, bake at 325, and begin checking after 20 minutes with a toothpick to see if it comes out clean. (Because each mini loaf size is different, like mentioned above.)

    Nutrition

    Serving: 1slice (⅙ regular loaf) | Calories: 334kcal | Carbohydrates: 48g | Protein: 4g | Fat: 14g | Saturated Fat: 7g | Cholesterol: 58mg | Sodium: 409mg | Potassium: 178mg | Fiber: 2g | Sugar: 29g | Vitamin A: 430IU | Vitamin C: 2.5mg | Calcium: 32mg | Iron: 1.4mg

    Chicken Chipotle Melts

    September 10, 2024

    Hand holding a chipotle chicken melt over a pan of others.

    These copycat Taco Bell Chipotle Chicken Melts, are cheesy, filled with shredded rotisserie chicken and a storebought Chipotle sauce, that’s all wrapped in a tortilla, making these a 4-ingredient recipe.

    These cheesy melts are baked and ready in only 15 minutes!

    Chicken chipotle melts in baking dish and hand holding one to see the inside.

    This chipotle chicken melt recipe is great for a school lunch recipe, an easy dinner or even a snack to take to the beach or for a picnic.

    Keep the ingredients on hand (you can even boil chicken breasts instead of using a rotisserie chicken) for last minute meals.

    Love last-minute easy meal ideas? Make sure to try these Salt & Pepper Chicken Bites and these Texas Toast Pizzas for those nights where you need something quick and can keep the ingredients on hand for.

    Chicken Chipotle Melts Highlights

    • Quick and Easy: Assembly takes just a few minutes and these copycat melts from the cravings value menu are baked in about 12 minutes for a cheesy treat.
    • Control the Spice: The more chipotle sauce that you add, the spicier these melts will get. So if you love a little spice, just a dab will do. If you prefer a lot of spice, add more. You can also sprinkle on a little taco seasoning to give it a little more flavor.
    • Family Friendly: These chicken melts are great for the kids and family members of all ages. (Some may prefer these without the chipotle sauce and that’s ok too! They become more like a rolled up chicken and cheese quesadilla by leaving the sauce off and that’s absolutely ok.)

    Key Ingredients

    Here's what you need to make these copycat Taco Bell Chicken Chipotle Melts.

    Ingredients for Chicken Chipotle Melts.

    A complete list of ingredients and amounts can be found in the recipe card below.

    • Tortillas: You’ll want to use medium flour tortillas to make them as pictured. You can use different sizes and even different types of tortillas (such as corn) if you prefer but they will have a different taste and the portions may very if smaller or larger. You’ll just want to use soft tortillas for these, and if you only have hard shells, you can make these crispy chicken tacos instead.
    • Chicken: Don’t have a rotisserie chicken? No problem. Feel free to boil chicken thighs, boil chicken legs, or other types of cooked chicken that you may already have, or make crockpot shredded chicken. Taco Bell’s chicken has a smokey flavor so you can even smoke chicken tenders and chop those up for this recipe to get it even closer.
    • Cheese: You can use shredded colby jack or cheddar but I usually just use the feista blend that the store has.
    • Chipotle: If you can find the Taco Bell brand of Chipotle sauce, even better! If not, no worries. You can find a chipotle sauce at the store and it should still be delicious. Or, try making this chipotle sauce.

    How to Make Chicken Chipotle Melts

    Shredded chicken on flour tortilla for Chipotle melt.
    1. Lay a tortilla flat and place shredded chicken on bottom ⅓ of tortilla.
    Taco Bell Chipotle being added to chicken melt.
    2. Drizzle on about 1 tsp. of Chipotle sauce.
    Shredded cheese added to Chicken Chipotle Melt.
    3. Sprinkle about 2 Tbsp. of shredded cheese on top of chicken and sauce.

    TIP: You can adjust how much chicken, creamy sauce and cheese that you put in your melts. The measurements do not have to be exact, and you can do more than suggested. Just be cautious not to add too much sauce for spice and not too much filling, so the tortilla doesn’t roll up properly.

    Hand rolling tortilla for Chicken Chipotle Melt.
    4. Roll the bottom of the tortilla up just enough to cover chicken filling.
    Rolling up the tortilla in to a tube, to make a chipotle chicken melt.
    5. Tuck the tortilla under the filling (to try and secure it) and continue rolling all of the way.
    Chicken chipotle melts in baking dish.
    6. Place rolled tortillas in a greased baking dish, pressing up against one another to secure them from unrolling.

    How Long to Bake Chicken Melts: Place baking dish in an oven that’s preheated to 375 degrees, and bake for 12-15 minutes or until it looks like the cheese is melted.

    Recipe Tips

    • Additional Flavors: Love more flavor? No problem. Mix chicken taco seasoning in with your chicken or sprinkle it on the chicken when making each melt.
    • Assembly: When placing your chicken melts in the baking dish, place the tortillas with the flap side, down, so they stay rolled during the baking process.
    • Make them Extra: If you’re looking to add more to this recipe, feel free sprinkle more shredded cheese on top of the melts before baking. Or, pour cheese sauce on top and then bake, to make more of a cheesy enchilada type dish.

    Storing Tips

    • Leftovers: If you have leftover chicken chipotle melts, allow them to fully cool and then store them in an airtight container or plastic bag in the refrigerator.
    • Freezing: These make the perfect, make-ahead, freezer-meal. Assemble as instructed, and place in a freezer-safe dish or bag and freeze. Simply place in a baking dish and bake until heated through, or microwave. Freezing Tip: Wrap each chicken melt in Glad Press ‘n Seal (or similar), so they can easily be pulled out of the freezer without sticking to one another.

    What to Serve with Chicken Chipotle Melts

    This Rotel salsa recipe is not only another great recipe that you can keep ingredients on hand for but serving it with chips is a great side dish to serve with these chicken melts.

    These stuffed celery sticks are an easy vegetable to serve alongside these melts to get veggies in, or for a warmer side dish, this Elote dip recipe is easy to whip up and pairs with these wonderfully.

    Recipe FAQs

    Can I make chicken chipotle melts in the microwave?

    Yes. Since the ingredients are fully cooked and really only need warming up, these melts can be warmed up in the oven. They’ll have more of a “steamed” tortilla, rather than a toasted texture but that works too.

    What all comes in a Chicken Chipotle Melt?

    Chicken, cheese, and Chipotle sauce are wrapped up in a tortilla and warmed so the cheese melts together.

    Are copycat Taco Bell Chicken Chipotle Melts the same?

    They do taste a little differently than the chicken chipotle melts you get at the fast food change, only because the chicken can be difficult to get the exact same. So the idea of these is to get the same type of outcome, and they’re still a delicious recipe idea.

    More Recipes You’ll Love

    Love quick and easy chicken recipes like this one? You’ll also love this chicken grilled cheese sandwich recipe, and these crockpot chicken drumsticks.

    Recipe

    Hand holding a chipotle chicken melt over a pan of others.
    Print Pin
    Be the first to rate!

    Chicken Chipotle Melts

    Chicken Chipotle Melts are a Taco Bell copycat recipe that only uses 4 ingredients and they are ready in about 20 minutes.
    Course Dinner, Lunch, Main Course, Snack
    Cuisine Mexican
    Prep Time 5 minutes minutes
    Cook Time 15 minutes minutes
    Total Time 20 minutes minutes
    Servings 6 melts
    Calories 294kcal
    Author Jessica Burgess

    Ingredients

    • 6 medium flour tortillas
    • 3 cups shredded rotisserie chicken The breasts from a rotisserie chicken
    • 6 tablespoons creamy Chipotle sauce I use the Taco Bell brand
    • 1 cup shredded fiesta cheese Or shredded Colby or shredded cheddar

    Instructions

    • Grease an 8×8 baking dish with cooking spray or line with parchment paper, and preheat the oven to 375 degrees.
    • Take one of the 6 medium flour tortillas, and lay it flat. Divide the 3 cups shredded rotisserie chicken evenly between the 6 tortillas, and place it on the bottom third of each tortilla. (This is about ¼ cup of shredded chicken, or so. Feel free to add more/less.)
    • Next, drizzle about 1 Tablespoon of the 6 tablespoons creamy Chipotle sauce on top of the chicken on each tortilla.
    • Divide the 1 cup shredded fiesta cheese between each tortilla, sprinkling it on the chicken and sauce.
    • Fold the tortilla, about a third of the way up, just enough to cover the filling and tuck the tortilla under the chicken, and continue rolling the tortilla all of the way up.
    • Place the rolled tortillas in the prepared baking dish, with the flap side down so it stays secure in the baking dish. Place the melts, side-by-side, in the baking dish to also help secure them to help stay in place.

    Notes

    You may also want to sprinkle a little taco seasoning on to the chicken if you want a little more spice or flavor added to these. 

    Nutrition

    Serving: 3melts | Calories: 294kcal | Carbohydrates: 18g | Protein: 18g | Fat: 16g | Saturated Fat: 6g | Polyunsaturated Fat: 3g | Monounsaturated Fat: 6g | Trans Fat: 0.1g | Cholesterol: 60mg | Sodium: 575mg | Potassium: 216mg | Fiber: 1g | Sugar: 3g | Vitamin A: 304IU | Vitamin C: 3mg | Calcium: 176mg | Iron: 2mg

    Sausage Tortellini Soup

    September 9, 2024

    Soup ladle with a creamy sausage and tortellini soup inside of it.

    This Sausage Tortellini Soup is creamy and full of flavor and so cozy during the fall months.

    The crumbled Italian sausage and cheese tortellini pasta gives this soup a hearty texture.

    Soup ladle holding creamy sausage and tortellini soup.

    This soup recipe can be enjoyed any time of year but it’s especially delicious to have this warm soup in the fall and winter months. Pair it with a sandwich for “Soup and Sandwich Saturday” in your Dinner Theme System too!

    The heavy cream helps give this a creamy soup base, while the fresh spinach gives this soup a beautiful color and another type of texture in a bite. The everyday spices are simple yet add a seasoned touch to this soup.

    Want more soup recipes? If you like the idea of a hearty soup but want it a little bit differently, try my lasagna soup or cowboy stew recipes.

    Bowl of tortellini and sausage soup.

    Sausage and Tortellini Soup Highlights

    • Quick and Easy Homemade Soup – In under an hour, this creamy soup is ready for serving!
    • Chunky and Hearty – The texture in this soup is meaty, soft, and creamy, giving each bite something hearty, and making this soup so filling.
    • Flexible Ingredients – Love spicy? How about a thicker soup? You can add optional or more ingredients to increase the spice level or add more flour to make the soup thicker.

    Key Ingredients

    Here’s what you need to make this sausage and tortellini soup:

    Ingredients for sausage tortellini soup.

    Complete list of ingredients and amounts can be found in the recipe card below.

    • Cheese Tortellini: (Frozen or refrigerated) Adds heartiness and texture, making the soup more filling and providing bursts of cheesy flavor.
    • Italian Sausage: Provides a rich, savory flavor and meaty texture. The spices in the sausage enhance the overall taste of the soup. If you prefer spicier soups, you can opt for hot and spicy Italian sausage.
    • Spices: These are spices that you may already have on hand since they’re common pantry staples. You’ll need minced garlic, crushed red pepper flakes, salt, pepper, and Italian seasoning.
    • Chicken Broth: I love using my own rotisserie chicken broth or homemade chicken broth, however storebought is absolutely fine to use too.

    How to Make Sausage Tortellini Soup

    Raw Italian sausage in skillet.
    1. Cook sausage and set aside.
    Vegetables, flour, and spices in soup pot for tortellini soup.
    2. Cook vegetables and make a roux.
    Chicken broth added to soup pot for tortellini soup.
    3. Add chicken broth.
    Cooked Italian sausage added to soup pot.
    4. Add cooked sausage and simmer for 15-20 minutes.
    Heavy cream added to sausage and tortellini soup pot.
    5. Add heavy cream and tortellini.
    Fresh spinach added to sausage and tortellini soup.
    6. Add spinach and red pepper flakes.

    Recipe Tips:

    • Spicy Sausage: Use a high-quality Italian sausage for the best flavor. If you like a bit of heat, choose spicy Italian sausage. For a milder taste, opt for sweet or mild Italian sausage.
    • Thicker Soup: If you prefer a thicker soup, increase the amount of flour to 4 tablespoons or reduce the amount of chicken broth slightly.
    • Optional Tomato Paste: Tomato paste adds a rich, concentrated tomato flavor that can deepen the overall taste of the soup. It also adds a subtle sweetness and a hint of acidity, which can balance the richness of the cream and sausage. Add 2 tablespoons tomato paste to the soup and stir until fully incorporated in step 3.
    Creamy Sausage and Tortellini Soup with carrots and spinach.

    Storing Tips

    • Refrigerate: Allow the soup to cool to room temperature before storing. Use an airtight container(s) or heavy-duty freezer bags. You may want to divide the soup into smaller portions, making reheating only the amount you need easier.
      Be sure to label the containers with the storage date and contents. Store in the refrigerator if you plan to consume it within 3 – 4 days.
    • Freeze: Once you have transferred the soup to an airtight container, you can store the soup in the freezer for 2 – 3 months. 
    • Reheating: If refrigerated, reheat the soup on the stove over medium heat, stirring occasionally, until thoroughly heated.
      If your soup is frozen, move the container to the refrigerator and let it thaw overnight. On the stovetop, heat over low to medium heat, stirring occasionally.
      As the soup begins to thaw and loosen, you can increase the heat to medium and continue stirring until thoroughly heated. If the soup has thickened too much during storage, add a bit of Chicken broth or purified water to reach the desired consistency.

    What to Serve with Sausage Tortellini Soup

    This soup is full of so many hearty ingredients so it’s great alone but there are also some great side dishes that pair wonderfully with this soup.

    Cheesy pull-apart bread is fun to serve with this soup as you can pinch off small pieces and even dip it in to the soup.

    Add even more heartiness by adding these ham and cheese sliders with this soup for a fall meal that will leave everyone feeling full and happy!

    For dessert, these turtle cookies will conquer that sweet tooth from the salty and savory soup contrast that you’re looking for.

    Tortellini and sausage soup with spoon.

    Recipe FAQs

    What is sausage tortellini soup made of?

    Cheese tortellini, Italian sausage, carrots, fresh spinach, heavy cream, chicken broth, flour and a few spices.

    How to keep tortellini from getting mushy in soup?

    It’s best to add the soup last or towards the end of the cooking process. It will only need long enough to soften, and not overcook, as overcooking is what causes it to become mushy.

    Should pasta be cooked before adding to soup?

    Pasta can cook right in the soup, in the liquid. Just be cautious of the type of pasta and how long it needs to cook. Dried pasta, will take longer to cook, unlike a refrigerated tortellini pasta.

    Similar Hearty Recipes

    • Sausage pasta bake in white baking dish.
      Easy Sausage Pasta Bake
    • Baked ravioli being lifted out of baking dish.
      Baked Ravioli
    • Close up of pasta recipe with kielbasa on white plate.
      Kielbasa Pasta
    • Creamy taco soup serving in white bowl.
      Creamy Taco Soup

    Recipe

    Soup ladle with a creamy sausage and tortellini soup inside of it.
    Print Pin
    5 from 1 vote

    Sausage and Tortellini Soup

    This creamy Sausage Tortellini Soup is ready in under an hour, so flavorful using everyday spices and is hearty enough to feed the family a comforting dinner.
    Course Dinner, Lunch, Main Course, Soup
    Cuisine American, Italian
    Prep Time 15 minutes minutes
    Cook Time 40 minutes minutes
    Total Time 55 minutes minutes
    Servings 8 servings
    Calories 586kcal
    Author Jessica Burgess

    Ingredients

    • 1 Tablespoon olive oil
    • 16 ounces mild Italian sausage (or spicy, if you prefer)
    • 2 carrots peeled and diced
    • 1 large sweet onion finely chopped
    • 4 cloves garlic minced
    • 2 teaspoons Italian seasoning
    • 3 Tablespoons all-purpose flour
    • 6 cups chicken broth
    • 1½ cups heavy cream
    • 16 ounces cheese tortellini (frozen or refrigerated)
    • 2 cups fresh spinach roughly chopped
    • salt and pepper to taste
    • ½ teaspoon red pepper flakes optional for added spice

    Instructions

    • Heat 1 Tablespoon olive oil over medium heat in a large pot or Dutch oven. Add 16 ounces mild Italian sausage , breaking it up into small pieces with a spoon. Cook until browned and cooked through, about 5 – 7 minutes. Remove the sausage from the pot with a slotted spoon and set aside, leaving the rendered fat in the pot.
    • Add 2 carrots (diced) and 1 large sweet onion finely chopped, to the pot. Cook, stirring occasionally, until the vegetables are softened, about 5 minutes. Add 4 cloves garlic, minced and cook for another 1 – 2 minutes until fragrant. Stir in 2 teaspoons Italian seasoning and 3 Tablespoons all-purpose flour. Cook for 1 – 2 minutes to create a roux.
    • Slowly stir or whisk in 6 cups chicken broth, making sure to scrape up any browned bits from the bottom of the pot.
    • Return the cooked sausage to the pot. Bring the mixture to a boil, then reduce the heat and let it simmer for 15 – 20 minutes, allowing the flavors to meld together.
    • Stir in 1½ cups heavy cream and add 16 ounces cheese tortellini. Simmer until the tortellini float to the surface and are tender, about 3 – 6 minutes.
    • Add 2 cups fresh spinach and salt and pepper to taste. Cook for an additional 2 – 3 minutes until the spinach wilts. If using, add ½ teaspoon red pepper flakesfor a spicy kick.

    Video

    Notes

    • Type of sausage: Use a high-quality Italian sausage for the best flavor.
    • If you prefer a thicker soup: increase the amount of flour to 4 tablespoons or reduce the amount of chicken broth slightly.
    • Optional tomato paste: Tomato paste adds a rich, concentrated tomato flavor that can deepen the overall taste of the soup. Add 2 tablespoons tomato paste to the soup and stir until fully incorporated in step 3 if desired.

    Nutrition

    Serving: 1serving | Calories: 586kcal | Carbohydrates: 35g | Protein: 20g | Fat: 41g | Saturated Fat: 19g | Polyunsaturated Fat: 3g | Monounsaturated Fat: 14g | Cholesterol: 119mg | Sodium: 1349mg | Potassium: 375mg | Fiber: 3g | Sugar: 7g | Vitamin A: 3957IU | Vitamin C: 7mg | Calcium: 159mg | Iron: 3mg

    Butterscotch Cinnamon Pie

    September 6, 2024

    Slice of butterscotch cinnamon pie on white plate, next to gold fork.

    Butterscotch Cinnamon Pie is a rich, creamy, no-bake pie recipe that is great any time of year! It uses a refrigerated pie crust (or make this homemade pie crust) and cook the ingredients like milk, eggs, and brown sugar on the stove, and then chill the pie in the refrigerator! It’s easy as…well… pie!

    Butterscotch Cinnamon Pie slice on a plate next to a gold fork.

    A creamy pie, or custard-like pie, is always a holiday dessert favorite. However, with certain pies being chilled, they’re also a great dessert idea for the summertime. This egg custard, lemon meringue pie, and no-bake chocolate pie are other old-fashioned pies you should try too!

    What is a butterscotch pie made of? This vintage butterscotch pie recipe uses butterscotch chips, cinnamon, brown sugar, and thickening ingredients to give off flavors of caramel, and a smooth texture.

    [feast_advanced_jump_to]

    Ingredients

    Labeled ingredients for butterscotch cinnamon pie on kitchen counter.

    Here are some notes about some of the key ingredients:

    • Prepared raw pie crust - You could also make a homemade pie crust, or use a graham cracker crust would be divine as well. If you have the box of 2 refrigerated pie crusts, consider making these easy pie crust cookies with this other.
    • Dark brown sugar - Light brown sugar will also work. You will end up with a slightly more mild, less molasses-y flavor. 
    • Vanilla extract – You can use almond extract instead of (or in addition to) vanilla. Just note that almond extract is stronger than vanilla. So, you won't need as much.  
    • Cool Whip – Homemade whipped cream would totally work here as well. 

    *Be sure to see the recipe card below for the full ingredients list & instructions!*

    Equipment Needed:

    Do a quick inventory of your kitchen and make sure you have the following ingredients. 

    • Pie pan (I like using glass or ceramic) 
    • Fork 
    • Parchment paper
    • Pie weights (sugar or uncooked rice will also work)
    • Heavy-bottomed saucepan 
    • Mixing bowl 
    • Whisk 
    • Measuring cups and spoons 

    For another vintage dessert recipe, you should also try this buttermilk pie.

    How to Make Butterscotch Cinnamon Pie

    Steps for how to make butterscotch cinnamon pie.

    Pre-bake the pie crust. Lay the pie crust in a pie pan, crimp the edges, and use a fork to poke holes in the bottom. Set a sheet of parchment paper on top of the crust and weigh it down with pie weights or sugar. Pre-bake (here’s how to blind bake a pie crust) the crust according to package instructions. Allow the pie crust to cool while you make the filling.  

    Pie Dish Size: I used a 10-inch, 40-ounce deep pie dish. You could also make this recipe in a standard depth pie dish, it will make 2 pies this way! Just grab 2 pie crusts.

    Make the filling base. In a medium non-stick saucepan, combine the brown sugar, cornstarch, salt, cinnamon, and milk. Bring the mixture to a light simmer over medium heat and then reduce the heat to low. Cook until thickened, about 7 minutes, stirring occasionally. 

    Temper in the egg yolks. In a small mixing bowl, very slowly whisk together the egg yolks and ¼ cup of the milk mixture. Slowly whisk the egg mixture into the bulk of the milk mixture. Cook, stirring consistently, for 3 minutes or until quite thick. The texture should be like thick pudding when ready.

    Final steps for making butterscotch cinnamon pie.

    Add some flavor. Remove the filling from the heat and stir in ¾ cup butterscotch chips along with the vanilla and butter. 

    Assemble and chill. Smooth the filling into the cooled pie crust and pop the pie in the fridge for at least 6 hours or until set. 

    Serve. Remove the pie from the fridge, top with the remaining butterscotch chips, and serve with the Cool Whip.

    Recipe FAQs

    Why is my butterscotch pie soft?

    Make sure when cooking the filling you keep stirring and simmering until it is a nice thick pudding texture to avoid a soft pie.

    Do you eat butterscotch pie warm or cold?

    Creamy butterscotch pie is best enjoyed chilled. So, keep it in the fridge until you are ready to serve.

    Can you freeze butterscotch pie?

    Absolutely. Prepare and bake as directed, allow it to cool, and then freeze for up to 3 months.

    Slice of butterscotch cinnamon pie on small plate with fork.

    Storage

    Once the filling has fully set and you've topped the pie with extra butterscotch chips, go ahead and wrap the whole thing (or what's left of it) in a double layer of plastic wrap. You can also store individual slices in a single layer in an airtight container. Butterscotch cinnamon pie will stay good in the fridge for up to 4 days.

    To freeze: Follow the recipe from start to finish. Once it’s set, wrap the whole pie in a double layer of plastic wrap and store it in the freezer for up to 3 months. Allow the pie to thaw in the fridge before slicing and serving.  

    Thaw: If you choose to freeze this sweet masterpiece, allow it to thaw in the fridge before serving. 

    Related Recipes

    If you love this kind of dessert recipe with flavors of butterscotch, caramel, and cinnamon, then you’ll also love these desserts:

    • A stack of easy butterscotch brownies.
      Easy Butterscotch Brownies
    • hello dollies bars stacked on white plate
      Hello Dolly Bars
    • A cornflake brownie propped up around other brownies.
      Cornflake Brownies
    • Stack of cinnamon biscuits on white plate.
      Cinnamon Biscuits

    Did you make this? I’d be so grateful if you left a “star” rating below to let me know what you thought! Then, the next time you need a quick and easy recipe, come back to Fantabulosity to browse all of my easy recipes!

    Recipe

    Slice of butterscotch cinnamon pie on white plate, next to gold fork.
    Print Pin
    Be the first to rate!

    Butterscotch Cinnamon Pie

    Butterscotch Cinnamon Pie has flavors of caramel and cinnamon in this smooth pie that's perfect for Fall or any time of year, especially the holidays.
    Course Dessert
    Cuisine American
    Prep Time 10 minutes minutes
    Cook Time 30 minutes minutes
    Chill Time 6 hours hours
    Total Time 6 hours hours 40 minutes minutes
    Servings 10 servings
    Calories 332kcal
    Author Jessica Burgess

    Equipment

    • pie pan 10 inch, 40 ounce deep dish is what I used – (I like using glass or ceramic)
    • parchment paper
    • pie weights (sugar or uncooked rice will also work)
    • Heavy-bottomed saucepan
    • Mixing bowl
    • Whisk
    •  Measuring cups and spoons

    Ingredients

    • 1 prepared raw pie crust or make this buttery pie crust recipe
    • ¾ cup dark brown sugar
    • 2½ Tablespoons cornstarch
    • ½ teaspoon salt
    • 1½ Tablespoons cinnamon
    • 2½ cups whole milk
    • 6 egg yolks room temperature
    • 1 cup butterscotch chips divided
    • 2 teaspoons vanilla extract
    • ¼ cup unsalted butter
    • Cool Whip for topping

    Instructions

    • Pre-bake the pie crust. Lay the 1 prepared raw pie crust in a pie pan, crimp the edges, and use a fork to poke holes in the bottom. Set a sheet of parchment paper on top of the crust and weigh it down with pie weights or sugar.
      Pre-bake the crust according to package instructions. Allow the pie crust to cool while you make the filling.  
    • Make the filling base. In a medium non-stick saucepan, combine the ¾ cup dark brown sugar, 2½ Tablespoons cornstarch, ½ teaspoon salt 1½ Tablespoons cinnamon and 2½ cups whole milk. Bring the mixture to a light simmer over medium heat and then reduce the heat to low. Cook until thickened, about 7 minutes, stirring occasionally. 
    • Temper in the egg yolks. In a small mixing bowl, very slowly whisk together the 6 egg yolks, and ¼ cup of the milk mixture. Slowly whisk the egg mixture into the bulk of the milk mixture.
      Cook, stirring consistently, for 3 minutes or until quite thick. The texture should be like thick pudding when ready.
    • Add some flavor. Remove the filling from the heat and stir in ¾ cup of the butterscotch chips along with the 2 teaspoons vanilla extract and ¼ cup unsalted butter. 
    • Assemble and chill. Smooth the filling into the cooled pie crust and pop the pie in the fridge for at least 6 hours or until set.
    • Serve. Remove the pie from the fridge, top with the remaining butterscotch chips, and serve with Cool Whip.

    Notes

    • Pie too soft? Make sure when cooking the filling you keep stirring and simmering until it is a nice thick pudding texture to avoid a soft pie.
    • Can I make this ahead of time and freeze it? You can. Follow the recipe from start to finish. Once it's set, wrap the whole pie in a double layer of plastic wrap and store it in the freezer for up to 3 months. Allow the pie to thaw in the fridge before slicing and serving.  
    • How to Store Butterscotch Pie? Store leftovers in the refrigerator for up to 4 days.

    Nutrition

    Serving: 1slice | Calories: 332kcal | Carbohydrates: 46g | Protein: 5g | Fat: 14g | Saturated Fat: 7g | Polyunsaturated Fat: 1g | Monounsaturated Fat: 5g | Trans Fat: 0.2g | Cholesterol: 138mg | Sodium: 322mg | Potassium: 150mg | Fiber: 1g | Sugar: 33g | Vitamin A: 417IU | Vitamin C: 0.05mg | Calcium: 120mg | Iron: 1mg

    Garlic Roasted Broccoli

    September 4, 2024

    Garlic roasted broccoli in square bowl, sitting on linen napkin.

    Garlic Roasted Broccoli is such a delicious way to enjoy the popular green vegetable. The garlic powder, olive oil, and kosher salt are all it takes to make this broccoli side dish in the oven, something the family will love.

    Garlic Roasted Broccoli

    Within 25 minutes, (including prep and cook time) this recipe is ready to serve alongside your favorite main dish like this cheesy chicken bake or this Ribeye steak in the oven.

    [feast_advanced_jump_to]

    How to Make Garlic Roasted Broccoli

    To start, just a small little bowl will do, and mix the oil and the seasonings together in it.

    Olive oil with spices

    For the broccoli, you can buy the already-cut, broccoli florets, or you can buy the stalks and cut it yourself.

    Just cut the broccoli stems off the big stalk, to create smaller broccoli pieces, easy for picking up with a fork and taking a bite. Place them in a plastic bag. (You can also put them in a bowl, and mix this way if you prefer.)

    Pour the seasoned oil over the broccoli, seal the bag, and shake to try and coat all of the broccoli.

    Broccoli in plastic bag to season

    To avoid dirty dishes, cover cookie sheet (or baking pan) with aluminum foil and spray it with a non-stick spray.

    Lay all of the broccoli out on to the foil, trying to make sure pieces don’t overlap. (This is so it will cook evenly.)

    Uncooked Broccoli

    How Long to Bake Broccoli

    Bake it at 425 degrees F, for 20 minutes (or longer if you like an even crispier broccoli — I sure do).

    Roasted broccoli in oven

    Enjoy this broccoli hot, right out of the oven. If you prefer, you can also sprinkle parmesan cheese over the broccoli or even a little black pepper, or include it in the seasoned oil before coating the broccoli.

    This was so easy, and GOOD! I don't even like broccoli that much! Healthy Side Dish Recipe

    Storage

    If you have leftovers, allow the baked broccoli to fully cool and then store in a container, in the refrigerator and enjoy within 4-5 days.

    Reheat: When reheating, you can warm the broccoli in the microwave or if you have an air fryer or even a toaster oven, this can help the broccoli remain a bit crispy, instead of soggy. You could also put it back in the oven but reheating at a lower temperature would be best so it doesn’t cook more and burn.

    Related Recipes

    If you love easy vegetables or are looking for more side dishes to serve with dinner, I think you’ll also love this asparagus wrapped in bacon!

    • Easy Broccoli Raisin Salad with Bacon
    • Roasted Brussel Sprouts with Bacon, Cranberries + Sweet Glaze
    • Air Fryer Butternut Squash

    Recipe

    Garlic roasted broccoli in square bowl, sitting on linen napkin.
    Print Pin
    4.57 from 32 votes

    Garlic Roasted Broccoli

    This garlic roasted broccoli side dish is the BEST way to eat broccoli. Pair this with chicken or steak, and a starch for a rounded out meal.
    Course Side Dish
    Cuisine American
    Prep Time 5 minutes minutes
    Cook Time 20 minutes minutes
    Total Time 25 minutes minutes
    Servings 3 servings
    Calories 131kcal
    Author Jessica Burgess

    Ingredients

    • 12 ounces broccoli florets About 1.5-2 cups
    • 2 Tablespoons olive oil
    • 3 teaspoons garlic powder
    • salt to taste; I used 2 teaspoons kosher salt
    • black pepper optional
    • parmesan cheese optional

    Instructions

    • Preheat oven to 425 degrees F
    • Place your broccoli in a gallon size ziptop bag
    • In a small bowl, combine oil, powder, and salt (pepper if using)
    • Pour liquid mixture over the top of the broccoli
    • Shake until broccoli is fully covered
    • Pour broccoli out on to a greased cookie sheet, covered in aluminum foil
    • Bake for 20 minutes
    • Remove from oven. Sprinkle with additional salt, parmesan cheese if desired.
    • Serve immediately.

    Notes

    It’s best to use fresh broccoli, and not frozen for this recipe. Frozen broccoli has a lot of moisture and can alter the bake time for this roasted broccoli.
    It’s best to enjoy this right after cooked, however leftovers can also be enjoyed at a later date.

    Nutrition

    Serving: 1serving (⅓ recipe without cheese) | Calories: 131kcal | Carbohydrates: 10g | Protein: 4g | Fat: 10g | Saturated Fat: 1g | Sodium: 39mg | Potassium: 394mg | Fiber: 3g | Sugar: 2g | Vitamin A: 705IU | Vitamin C: 101.1mg | Calcium: 53mg | Iron: 1mg

    Fruity Ice Cubes (Balls)

    September 1, 2024

    Fruity Ice Cubes in glass, showing fresh herbs and fruit inside of round ice cubes.

    Fruity ice cubes (or round ice balls) are so easy to make and are beautiful for any type of drink. This tutorial uses coconut water to make the pretty ice cubes, which can add a touch of flavor to your favorite drink. (You can use regular water, and I’ll give tips below on how to choose the type of water to freeze for clear ice.)

    Fruity Ice Cubes in different shapes of glasses.

    Jessica’s “How-To” Highlights

    • Appearance: Options are endless for how beautiful these ice cubes can look. If hosting a party, or serving one specific drink, it can be fun to customize the ice cubes to match and coordinate with specific colors.
    • Flavor: Using coconut water adds a touch more flavor to already fruity fun flavors the ice provides as it melts.
    • Ease: It’s as simple as adding fruit, water, and fresh herbs to your ice molds. Freeze, and they’re ready for your drink!

    Why Use Fruity Ice Cubes?

    • The bright colors of the fruits add such an amazing look to clear drinks or even colorful drinks, like this fruit punch recipe or this apple cider punch recipe.
    • Great way to save fruits and fresh herbs that may go bad before enjoying them.

    What You’ll Need

    • Ice mold of your choice. I used a round ice mold but you can use a cube, or different shapes.
    • Coconut water or distilled water
    • Fresh fruit (See fruit ideas below.)
    • Fresh herbs, if desired (See fresh herb ideas below.)

    How to Make Fruity Ice

    First, wash and slice your fruit in to small pieces so they will fit in the ice molds.

    Using your ice mold, fill each hole with fruit and fresh herbs. How much, will depend on the size of your molds.

    ** TIP: I like mixing up different fruits for each ice cube but you can use all of the same fruits in each cube if you like.

    Fruit and herb ice balls, in black round ice mold.

    Fill your ice molds with coconut water, water, or juice, and then freeze until ice has become solid. (Ice usually takes about 2 hours but can depend on the size of your ice, and type of mold. I usually make them the night before I want to use them, just in case.)

    Beautiful round ice cube with fresh rosemary, and fruit inside.

    Fruit Ideas for Ice Cubes:

    • strawberry
    • oranges
    • nectarines
    • blueberries
    • blackberries
    • raspberries
    • kiwi
    • watermelon
    • canteloupe
    • honeydew
    • lemon
    • lime
    Mint leaves, nectaries, inside of round ice cube.

    Fresh Herb Ideas for Ice Cubes:

    • mint
    • thyme
    • rosemary
    Drinks in different shaped glasses with different drinks, and fruit flavored ice.

    Drinks to Make with Ice Cubes Filled with Fruit

    • lemonade
    • ginger ale
    • soda
    • tea
    • juices (ruby red grapefruit, orange juice, etc.)

    Tips for the Best Flavored Ice Cubes

    • How to Make Clear Ice: If using coconut water, it will depend on which brand you use to get clear ice. Some coconut water is white, milk’ish looking. If using regular water, try to use distilled or very filtered water. I also have this ice cube tray that’s specifically to make very clear, cubed ice.
    • Use fresh fruit and herbs: Remove browned leaves, or and rotten spots on the fruit, as this will make for poor flavored ice.
    • Added flavors: Take things up a notch and add flavorings to your ice, such as flavored syrups or extracts.

    Recipe

    Fruity Ice Cubes in glass, showing fresh herbs and fruit inside of round ice cubes.
    Print Pin
    Be the first to rate!

    Fruity Ice Cubes

    Making these fruity ice cubes (ice balls) is easy, and they use coconut water which adds a fun flavor twist to any drink! Use fresh fruit and fresh herbs for any drink!
    Course Drinks
    Cuisine American
    Prep Time 5 minutes minutes
    Freeze Time 2 hours hours
    Total Time 2 hours hours 5 minutes minutes
    Servings 6 cubes
    Author Jessica Burgess

    Equipment

    • Ice Mold Shape and size can vary

    Ingredients

    • coconut water or distilled/filtered water
    • fresh fruit see post for fruit ideas
    • fresh herbs see post for fresh herb ideas

    Instructions

    • Wash, and dice fruit.
    • Place fruit pieces and pieces of herbs in ice mold and then fill with coconut water or water of choice.

    Notes

    • How to Make Clear Ice: If using coconut water, it will depend on which brand you use to get clear ice. Some coconut water is white, milk’ish looking. If using regular water, try to use distilled or very filtered water. I also have this ice cube tray that’s specifically to make very clear, cubed ice.
    • Use fresh fruit and herbs: Try not to use browned leaves, or rotten fruit, as this will make for poor ice.
    • Added flavors: Take things up a notch and add flavorings to your ice, such as flavored syrups or extracts.

    Nutrition

    Serving: 1cube

    Pumpkin Pancakes with Pancake Mix

    August 29, 2024

    Pumpkin White Chocolate Pancakes with a White Chocolate Maple Syrup: A breakfast recipe that’s perfect for cool fall days.

    Pancake recipes are my JAM, and if you’re looking for a basic, homemade pancake recipe, then you’ll also love these fluffy pancakes!

    Pumpkin White Chocolate Pancakes with a White Chocolate Maple Syrup Recipe fantabulosity.com

    There is something about the idea of the smell of pancakes that helps me roll out of bed in the morning.

    They’re easy to whip up, always requested by my little guys, and perfect to make in bulk to store for leftovers for a few days. Pancakes for the win!

    Pumpkin White Chocolate Pancake Recipe

    If you’ve made my 5-minute Butternut Squash pancakes, then you know that I LOVE experimenting by adding “not so normal” ingredients to the dessert-like breakfast dish. If I can sneak in a little healthy, you better count on it.

    But with the Fall season here, the taste and scent of “pumpkin,” is EVERYWHERE. This last weekend was no exception. Unlike with the butternut squash pancakes, I didn’t add in a can of pumpkin to these. I absolutely could have, but decided to splurge and get a little unhealthy with these beauties.

    Pumpkin spice, white chocolate chips, and maple syrup created a combo of something pretty amazing.

    If you love pumpkin flavors, you’ll also love this pumpkin pie with a graham cracker crust.

    Pumpkin White Chocolate Pancakes with a White Chocolate Maple Syrup Recipe fantabulosity.com

    Could you also add in some canned pureed pumpkin? You bet. It would probably actually make it a little more “pumpkin,” flavored. (I didn’t have any on hand, so I skipped it this round.)

    So pumpkin pie spice and white chocolate chips were the heroes of this pancake recipe. But I didn’t stop there.

    White Chocolate Maple Syrup

    We all know maple syrup is delicious as it stands. (At least I think so. Especially when my hand reaches for the “extra butter,” flavored syrup. Sinful, and unhealthy I know. But only on a whim. Promise.)

    To “wow” the kiddos at the breakfast table, I mixed in a bit of maple syrup and milk (to thin it out) to some melted white chocolate… creating a white chocolate maple syrup to drizzle over their Pumpkin White Chocolate Pancakes.

    Pumpkin White Chocolate Pancakes with a White Chocolate Maple Syrup Recipe fantabulosity.com

    Their eyes became wide open like silver dollars when I told them what the “new syrup,” was made of.

    Pumpkin White Chocolate Pancakes with a White Chocolate Maple Syrup Recipe fantabulosity.com

    For my pancakes, I use Krusteaz pancake mix, only because it’s the best one I’ve used. You only have to add water (for regular ole pancakes), and they make the biggest fluffiest pancakes around! I buy a HUGE bag at Costco to stock up for our ever-so-loving pancake hearts.

    For the white chocolate in this recipe, I used Ghirardelli white chocolate chips. You can use any brand that you wish.

    You could also add Oreo cookies like we did in our cookies and cream pancakes, and that would be delicious!

    Related Recipes

    Love pancakes too? Try these oven pancakes that are swirled with cinnamon! Or, if you love using almond milk at home, you will love trying these almond milk pancakes.

    If you love pancakes as much as I do, then you’ll want to get a hold of this list of over 95 pancake toppings to add to all sorts of pancakes!

    pumpkin-white-chocolate-pancakes-with-a-white-chocolate-maple-syrup-11

    Needless to say, the kids begged for these the next morning, but I had to be the bearer of bad news, and tell them that we only get to have this on special occasions. Chocolate syrup for breakfast every morning? Yeah I don’t think so. I’m the only one that gets to pour a ton of sugar in my “dish” of the day around here.

    I so hope you love these ANY time of the year. Not feeling the “pumpkin,” flavor right now? No problem. Replace it with cinnamon, apple pie spice, or anything else that your little heart desires.

    Recipe

    Print Pin
    5 from 1 vote

    Pumpkin Pancakes with White Chocolate Maple Syrup

    This pumpkin pancake recipe is the perfect fall breakfast treat! Drizzled in a white chocolate syrup, the whole family will love this!
    Course Breakfast
    Cuisine American
    Prep Time 10 minutes minutes
    Cook Time 15 minutes minutes
    Total Time 25 minutes minutes
    Servings 10 servings
    Calories 221kcal
    Author Jessica Burgess

    Ingredients

    Pancakes:

    • 2 cups pancake mix Or a homemade pancakes recipe works too!
    • 1-⅓ cup water
    • 1 Tablespoon pumpkin pie spice
    • ½ cup white chocolate chocolate chips
    • butter for greasing

    Syrup:

    • 1 cup white chocolate chocolate chips
    • 1 Tablespoon milk
    • 3 Tablespoons maple syrup

    Instructions

    Pancakes:

    • Preheat griddle to 350.
    • Gently mix pancake mix, water, and pumpkin pie spice together in mixing bowl, until evenly distributed. The batter will be lumpy.
    • Add in chocolate chips, and gently stir in.
    • Grease griddle with butter.
    • Begin pouring batter on to griddle into approx. 5 in circles (I use a measuring cup or ice cream scoop.)
    • When tops of pancakes begin to bubble, flip.
    • When pancakes are cooked through, remove from griddle. (Stacking the pancakes will help retain heat until time to eat.)

    Syrup:

    • Melt chips in microwave safe container at medium power for 1 to 1 ½ minutes, stir. If chips have not melted, continue heating in 15-second intervals until smooth.
    • Stir in milk and maple syrup.
    • Drizzle over pancakes and serve!

    Nutrition

    Serving: 1serving | Calories: 221kcal | Carbohydrates: 28g | Protein: 3g | Fat: 10g | Saturated Fat: 5g | Cholesterol: 24mg | Sodium: 157mg | Potassium: 146mg | Sugar: 19g | Vitamin A: 70IU | Vitamin C: 0.4mg | Calcium: 122mg | Iron: 0.5mg

    Italian Cucumber Salad

    August 28, 2024

    Italian cucumber salad with onions, tomatoes, Italian dressing and seasonings.

    This Italian cucumber salad recipe has only 7 ingredients and only a few minutes of prep time, then stored in the refrigerator for serving later! The best thing about this recipe? It uses store-bought Italian dressing to keep things fast and simple. Looking for a creamy version? This creamy cucumber salad is one to try too!

    Italian cucumber salad with onions, tomatoes, and Italian dressing, and seasoning.

    The most difficult thing about this recipe? Slicing the tomatoes, onion, and cucumbers, and that’s not difficult at all! It’s a great dish to make as a side dish for a quick summer dinner or even to take along to a BBQ on a hot summer day, alongside this carrot salad recipe too.

    Looking for more great recipes for a summer BBQ? Try this easy broccoli salad recipe, and this baked beans and hamburger recipe.

    Why You’ll Love This Recipe

    • Easy to make
    • Simple ingredients
    • Make ahead of time
    • Tons of flavor

    Ingredients for Italian Cucumber Salad

    Ingredients for Italian cucumber salad recipe.

    Here are key ingredients that make the best cucumber salad:

    • Cucumbers – find firm cucumbers with little “give” so you have that crunch. I used regular cucumbers for this recipe when making it for you but I also love using English cucumbers in this recipe.
    • Cherry tomatoes – you can use slicing tomatoes instead but I find that cherry tomatoes, sliced in half, add a less mushy texture, and are more firm and pair with the cucumbers nicely.
    • Onions – white or yellow, or red onions will work for this recipe.
    • Italian dressing – using your favorite brand will work just fine, and you can even use a zesty Italian to make a zesty cucumber salad if you prefer.

    How to Make Italian Cucumber Salad

    Steps to show how to make Italian cucumber salad recipe.
    • Slice all of your veggies and place them in a large mixing bowl.
    • Next, pour on the salad dressing, and then sprinkle on the seasonings.
    • Stir to combine and mix in well.
    Italian cucumber salad with dressing, mixed together.
    • Cover the bowl with plastic wrap, or a lid, and refrigerate for 2 hours (or longer if making ahead of time).

    TIP: Chilling the salad for a couple of hours allows the vegetables to absorb flavor and the dressing to give them more flavor.

    Italian cucumber salad in glass bowl, covered to be refrigerated.
    • Once the cucumber salad has chilled for a couple of hours, it’s ready to serve.
    Italian Cucumber Salad in bowl with spoon.

    Cucumber Salad Storage Instructions

    Keep this cucumber salad in the refrigerator when not actively serving. Enjoy within a couple of days to enjoy the freshness of the cucumbers and other vegetables if possible. Discard after 4-5 days if needed.

    More Summer Salad Recipes

    • Red Potato Salad
    • Avocado Tomato Mozzarella Salad
    • Macaroni Chicken Salad
    • Cornbread Salad
    • Carrot Salad
    • Pea Salad Recipe
    • KFC Coleslaw

    Recipe

    Italian cucumber salad with onions, tomatoes, Italian dressing and seasonings.
    Print Pin
    Be the first to rate!

    Italian Cucumber Salad

    Italian cucumber salad uses simple ingredients, such as Italian dressing, onions, cherry tomatoes and a few seasonings to make this a summer side dish to keep on hand!
    Course Salad
    Cuisine American, Italian
    Diet Vegetarian
    Prep Time 10 minutes minutes
    Chill Time 2 hours hours
    Total Time 2 hours hours 10 minutes minutes
    Servings 6 servings
    Calories 128kcal
    Author Jessica Burgess

    Ingredients

    • 2 large cucumbers
    • 1 medium onion sweet, red, white or yellow
    • 1 pint cherry tomatoes
    • 8 ounces Italian dressing half of a 16 ounce bottle
    • ½ teaspoon black pepper Or more if you prefer a stronger pepper flavor
    • 1 teaspoon garlic powder
    • 1 Tablespoon Italian seasoning

    Instructions

    • Wash and slice 2 large cucumbers (with peel) in to about ¼ inch thick slices.
    • Wash and slice 1 pint cherry tomatoes, in half. Slice 1 medium onion in to long, thin, slices/strips.
    • Place all sliced vegetables in large mixing bowl.
    • Pour 8 ounces Italian dressing on to the vegetables and then add ½ teaspoon black pepper, 1 teaspoon garlic powder, and 1 Tablespoon Italian seasoning. Stir to combine and evenly coat vegetables in dressing and seasonings.
    • Cover bowl with plastic wrap or lid and store in the refrigerator for at least 2 hours to allow the flavors to absorb in to the vegetables. Serve!

    Video

    Notes

    You can stir the cucumber salad once or twice during the two hours of chill time if you prefer but not required.
    Store in the refrigerator when not serving, and it’s best to enjoy it within the first couple of days.

    Nutrition

    Serving: 1serving | Calories: 128kcal | Carbohydrates: 13g | Protein: 2g | Fat: 8g | Saturated Fat: 1g | Polyunsaturated Fat: 4g | Monounsaturated Fat: 2g | Trans Fat: 0.02g | Sodium: 387mg | Potassium: 376mg | Fiber: 2g | Sugar: 8g | Vitamin A: 482IU | Vitamin C: 23mg | Calcium: 45mg | Iron: 1mg

    Crack Green Beans

    August 24, 2024

    Crack green beans on wooden spoon.

    These crack green beans are a vintage recipe that takes canned green beans to a whole new level. Flavors of bacon, brown sugar, onion, soy sauce, and a few other simple ingredients give this green bean recipe a taste that even non-green bean lovers will love. This is a recipe that makes canned green beans taste so much better!

    Cooked green beans with bacon, in skillet.

    Why are they called crack green beans?

    Well, if you’ve seen certain recipes called “crack” it’s typically because the recipes are so good, that they’re addicting. I’ll be the first to say, that these green beans are addicting for sure. I ate them right out of the pan and they didn’t even make it dinnertime. Even my non-green bean-loving kiddo was eating right out of the skillet too.

    Need some other vintage side dish recipes? You’ll also love this green bean casserole, or this macaroni and tomatoes recipe, this broccoli salad recipe, or this baked beans with ground beef recipe.

    Ingredients

    The ingredients for this recipe are simple, and I wanted to use ingredients that you could keep on hand for those last-minute side dish needs or even a dish to take to a family gathering, holiday dinner, or potluck.

    Ingredients sitting out, for crack green beans recipe.

    Here are some helpful notes about some of the ingredients you’ll need for this recipe:

    • Green Beans – I prefer to use cut green beans instead of french-style green beans but you can use those if you prefer. With fresh green beans, more cook time may be required so they’ll soften more.
    • Bacon – Using thick-cut bacon is my favorite for texture reasons but you can use any thickness that you prefer. You may also want to keep in mind the flavor of the bacon that you use. Lower sodium, or sweeter bacon like “maple” bacon, could alter the flavor some as well.
    • Soy Sauce – I used less-sodium soy sauce (as you can see in the photo above) and you don’t have to use this but it’s the only type I had on hand when making this recipe for you.
    • Worcestershire Sauce – As with any recipe that uses Worcestershire sauce, I always recommend Lea and Perrines as it just has a much better flavor than the generic brands tend to have.

    How to Make Crack Green Beans

    Begin by cooking the diced bacon and diced onion in a skillet over medium heat until the bacon is crispy.

    Bacon and onions sautéing in enameled cast iron pan.

    Next, add the two cans of drained green beans, and the remaining ingredients.

    Turn the burner to medium to low heat, and cook covered, for 20 minutes, stirring carefully, and once, halfway through. (At the 10 minute mark.)

    Green beans and brown sugar in enameled cast iron pan.

    Tip: You can cut back on the sugar, making it ¼ cup (instead of ½ cup) of brown sugar if you don't want the green beans that sweet.

    Cooked crack green beans with bacon in enameled cast iron pan.

    How to Serve this Green Beans Recipe

    Serve this warm side dish alongside your favorite dinners like this country fried steak, these homemade chicken and dumplings, or these fried pork chops.

    If taking to a gathering or potluck, keep these beans warm in a slow cooker (on “warm” or “low”) or in a dish inside of a warmer if possible.

    More Bean Recipes: You’ll also love these bean recipes that are easy and they go great with so many dishes:

    • Instant Pot Green Beans and Potatoes in a white serving dish
      Instant Pot Green Beans and Potatoes
    • Close up of apple pie baked beans in skillet, with wooden spoon.
      Apple Pie Baked Beans
    • 3 bean salad recipe - cilantro lime, black beans, dark red kidney beans, pinto
      3 Bean Salad Recipe – Mexican Side Dish
    • A close up photo of a bowl of 15 bean soup.
      15 Bean Soup

    Recipe

    Crack green beans on wooden spoon.
    Print Pin
    5 from 4 votes

    Crack Green Beans Recipe

    Crack green beans are made on the stovetop, using brown sugar, soy sauce, bacon, onion and a few other ingredients and they're delicious.
    Course Side Dish
    Cuisine American
    Cook Time 30 minutes minutes
    Total Time 30 minutes minutes
    Servings 4 servings
    Calories 215kcal
    Author Jessica Burgess

    Ingredients

    • 2 cans green beans 14.5 each, drained
    • 4 pieces bacon diced in to small pieces
    • ⅓ cup light brown sugar
    • ½ teaspoon garlic powder
    • 1 teaspoon Worcestershire sauce
    • 2 teaspoons soy sauce
    • ½ cup yellow onion diced in to small pieces
    • ¼ teaspoon black pepper

    Instructions

    • Cook 4 pieces bacon and ½ cup yellow onion over medium heat, until bacon is crispy.
    • Add 2 cans green beans (drained) and ⅓ cup light brown sugar, ½ teaspoon garlic powder, 1 teaspoon Worcestershire sauce, 2 teaspoons soy sauce, and ¼ teaspoon black pepper.
    • Cook between med low heat, covered, for 20 minutes, stirring carefully and once, halfway through. (At 10 min.)

    Video

    Notes

    If you don’t prefer a sweeter taste, you can cut back on the sugar to ¼ cup brown sugar.

    Nutrition

    Serving: 1serving | Calories: 215kcal | Carbohydrates: 30g | Protein: 6g | Fat: 9g | Saturated Fat: 3g | Polyunsaturated Fat: 2g | Monounsaturated Fat: 4g | Trans Fat: 0.03g | Cholesterol: 15mg | Sodium: 347mg | Potassium: 398mg | Fiber: 4g | Sugar: 23g | Vitamin A: 914IU | Vitamin C: 18mg | Calcium: 72mg | Iron: 2mg

    Baked Ravioli

    August 15, 2024

    Baked ravioli being lifted out of baking dish.

    This Baked Ravioli recipe uses storebought fresh or frozen ravioli (pick your favorite flavor) and your favorite store-bought marinara sauce, along with a few other ingredients to create an easy, short-cut dinner in under an hour, making it one of the easiest pasta recipes for dinner!

    Baked Ravioli being lifted out of baking dish with a stainless serving spoon.

    Do you love casserole recipes as much as I do? It’s basically a one pot meal but baked in the oven! It’s perfect for busy nights because you are simply layering ingredients and popping them in a hot oven to do their thing. This recipe is like a combination of a delicious pasta dish and a casserole.

    This sausage pasta bake is similar in how it’s made but uses different flavors and types of pasta if you’d love to mix things up but still keep things simple at dinnertime.

    [feast_advanced_jump_to]

    Ingredients Needed

    I’ve highlighted a couple of ingredients below with some relevant notes. Aside from this, the ingredients needed are pretty basic.

    Labeled ingredients for baked cheese ravioli.
    • Ravioli – Use any brand of fresh (refrigerated) or frozen. But do not use any dried options on the regular pasta shelf, as these won’t cook through.
    • Marinara – Again, any brand or flavor will do!
    • Cheese – I highly recommend shredding your own Parmesan or finding the little cup in the deli section. Shredding mozzarella is a bit tricky, but it will melt SO much better! But pre-shredded is fine here; just don’t use the green can of Parmesan!
    • Herbs – A bit of chopped fresh parsley on top is a great finish touch.

    Substitutions

    • Ravioli – use any variety you’d like. Maybe you prefer sausage or spinach ravioli. You can even go gourmet with lobster ravioli!
    • Sauce – use your favorite pasta sauce, whether it’s a nice basic red sauce or one that has lots of fresh seasonings added!

    Variations

    Some like to add cooked ground beef or Italian sausage to the sauce layers. This is an easy way to increase the bulk of the meal! You would only need a half pound to give flavor. Just make sure to cook the meat before adding it to the ravioli before baking.

    Feel free to add some fresh spinach leaves in the layers as well!

    How to Make Easy Baked Ravioli

    *Be sure to see the recipe card below for the full ingredients list & instructions!*

    STEP 1. Preheat the oven to 375 degrees, F.

    STEP 2. Start layers. Add a thin layer of sauce to a greased baking dish.

    Tip: You don’t need a ton of sauce in each layer, it’s more important to ensure there is sauce on both top and bottom of all ravioli!

    STEP 3. Pasta and cheese. Add an even layer of ravioli over the sauce. Next up, add more sauce and then a third of the mozzarella cheese.

    STEP 4. Repeat. Repeat with sauce, ravioli, sauce, cheese – until you’ve used everything up and end with mozzarella.

    Steps 2-5 of how to make baked ravioli.

    STEP 5. Bake. Add a sprinkle of Parmesan over top, then cover the dish with aluminum foil and bake. Uncover for the final 5 minutes to brown the cheese.

    Recipe Pro Tips

    • Allow to fully cool. When saving leftovers, it’s always best to cool to room temperature before placing in the fridge. This will allow it to chill quickly and also not get a lot of condensation.
    • Fresh or frozen. All ravioli works here, whether it is in the refrigerated case or the freezer section of your store. Just check the package weights as they may differ between brands.
    A serving of baked ravioli on a white plate, with a fork.

    Recipe FAQs

    How do I store leftovers?

    Once cooled, store leftovers in an airtight container in the fridge for up to 3 days. Reheat in the microwave for a quick lunch. You can also freeze leftovers for up to 3 months.

    Do I have to boil ravioli?

    Great question! The ravioli should be already par-cooked, which is why it only takes a few quick minutes in boiling water. This means it is already soft enough to cook in the pasta sauce without any extra water so there’s no boiling involved! Simply assemble and bake.

    Bite of baked cheese ravioli on a fork.

    🍽 What to Serve with Baked Ravioli

    A house salad is the perfect veggie here as it’s nice and light compared to a heavy baked pasta dish. You can also drop some Texas toast in the air fryer.

    More Pasta Recipes You’ll Love

    • Baked Feta Pasta Recipe
      Baked Feta Pasta Recipe
    • Sausage pasta bake in white baking dish.
      Easy Sausage Pasta Bake
    • Easy instant pot pasta recipe
      Instant Pot Cajun Pasta
    • scoop of chicken bacon ranch pasta
      Chicken Bacon Ranch Pasta

    Did you make this? I’d be so grateful if you left a “star” rating below to let me know what you thought! Then, the next time you need a quick and easy recipe, come back to Fantabulosity to browse all of my easy recipes!

    Recipe

    Baked ravioli being lifted out of baking dish.
    Print Pin
    Be the first to rate!

    Baked Ravioli (Fresh or Frozen!)

    This baked ravioli recipe is like a hearty casserole, that's perfect for an easy dinner, potluck or to make for someone needing a meal. Storebought ravioli, jarred marinara sauce, and a few ingredients make a complete dish.
    Course Main Course
    Cuisine Italian
    Prep Time 10 minutes minutes
    Cook Time 40 minutes minutes
    Total Time 50 minutes minutes
    Servings 6 servings
    Calories 600kcal
    Author Jessica Burgess

    Ingredients

    • 25 ounces marinara sauce
    • 25 ounces frozen or fresh cheese ravioli
    • 3 cups shredded mozzarella cheese about 12 ounces
    • 3 Tablespoons shredded Parmesan cheese
    • Fresh chopped parsley for topping optional

    Instructions

    • Preheat the oven to 375°F and grab a 9×13-inch baking dish. Lightly spray the dish with cooking spray.
    • Cover the bottom of the dish with a thin layer of marinara sauce. Line up ravioli in a single layer on the sauce.
    • Next, layer 1 cup of sauce and 1 cup of shredded mozzarella over the ravioli. Repeat the layers twice more until you've used up the ravioli.
    • Add remaining marinara and mozzarella cheese as a final layer.
    • Evenly sprinkle the Parmesan cheese over the top of the casserole.
    • Using a sheet of foil, cover the dish tightly. Bake in the preheated oven for 25-30 minutes. 25 for fresh ravioli, and 30 if they are frozen.
    • Carefully remove the foil from the dish. Bake uncovered for 5-7 minutes longer, or until the cheese is bubbly and browning.
    • Remove from the oven and let rest for about 5 minutes. Add fresh parsley on top and serve.

    Notes

    • Try fresh basil on top in place of the parsley!
    • Use whatever flavor of ravioli you like here. Spinach or sausage filled would add lots of flavor.

    Nutrition

    Serving: 1serving | Calories: 600kcal | Carbohydrates: 56g | Protein: 32g | Fat: 27g | Saturated Fat: 12g | Polyunsaturated Fat: 1g | Monounsaturated Fat: 4g | Cholesterol: 110mg | Sodium: 1680mg | Potassium: 396mg | Fiber: 5g | Sugar: 7g | Vitamin A: 910IU | Vitamin C: 8mg | Calcium: 353mg | Iron: 14mg

    Broccoli Crunch Salad

    August 14, 2024

    Broccoli crunch salad in big serving bowl, with bacon, cranberries and almonds.

    Broccoli Crunch Salad is a combination of a creamy dressing made of mayonnaise and Greek yogurt with a touch of sugar for sweetness, all mixed with crunchy broccoli, red onions, bacon, sliced almonds, and a few other ingredients. It’s a side dish recipe that’s easy enough to serve with dinner or to take to a potluck meal.

    Broccoli crunch salad in bowl, sitting on fabric napkin on table.

    The crunch of the broccoli and bacon, combined with the chewiness of the cranberries and creaminess of the dressing will ignite your tastebuds and leave your friends and family begging you to bring this to the next gathering!

    If you’re new around here, then you may not know that I’m a big fan of salad recipes and especially love that this particular savory salad recipe helps switch things up from a typical lettuce salad. Looking for other non-lettuce salads? This cucumber salad with Italian dressing and this carrot salad is great too!

    Ingredients

    Ingredients on cutting board to make broccoli salad.
    • Broccoli: I’m all about time-savers in the kitchen and believe that shortcuts can be sanity savers too! So feel free to grab a bag of the pre-cut broccoli in the produce section at your local grocery store. Or, if using a stalk of broccoli, cut off the florets and use as directed in the recipe card below.
    • Red Onion: I don’t know if I’m alone here, but red onion is one of my absolute favorite veggies out there. Whether it’s on a simple cheeseburger recipe or chopped up in the world’s best guacamole… you can almost bet you’ll see me adding it into just about anything that will work. Well this salad is no exception and it’s the perfect flavor addition. Slice up one red onion, really thin and add it to the bowl of broccoli!
    • Bacon: Crispy bacon is key here! For more crunch, crispy bacon is so delicious in this salad.
    • Cranberries: Dried cranberries add a touch of sweetness and softness to this otherwise crunchy recipe.
    • Mayonnaise: I prefer to use Hellmans or Best Foods brands but any will do.
    • Almonds: For even more crunch, using almonds or your favorite type of nut is a great idea. You may also prefer to use sunflower seed kernels.

    How to Make Broccoli Crunch Salad

    How to make broccoli crunch salad.

    Tip: Feel free to make this broccoli salad ahead of time to save time in the kitchen later.

    Broccoli salad in small bowl, sitting next to large serving bowl of broccoli salad.

    Check out my other favorite make-ahead salads for a crowd!

    More Salads and Recipes You’ll Love:

    • 3 Bean Salad
    • Creamy Crunchy Cucumber Salad
    • Garlic Roasted Broccoli

    Recipe

    Broccoli crunch salad in big serving bowl, with bacon, cranberries and almonds.
    Print Pin
    5 from 2 votes

    Broccoli Crunch Salad

    Broccoli crunch salad uses bacon, goat cheese, cranberries, Greek yogurt, mayonnaise and a few other ingredients and it's a great make-ahead salad recipe!
    Course Side Dish
    Cuisine American
    Prep Time 15 minutes minutes
    Cook Time 10 minutes minutes
    Total Time 25 minutes minutes
    Servings 8 servings
    Calories 351kcal
    Author Jessica Burgess

    Ingredients

    Broccoli Salad

    • 5 cups broccoli florets pre-cut or cut from stems
    • 8 slices thick-sliced bacon cooked, chopped
    • ½ cup dried cranberries
    • ½ cup sliced almonds
    • ⅓ cup diced red onion sliced thin
    • ¼ cup crumbled goat cheese

    Broccoli Salad Dressing

    • ½ cup mayonnaise Hellmans or Best Foods is recommended
    • ½ cup plain Greek yogurt
    • ½ teaspoon granulated sugar

    Instructions

    Broccoli Salad Instructions

    • In a large mixing bowl, add 5 cups broccoli florets, 8 slices thick-sliced bacon, ½ cup dried cranberries, ½ cup sliced almonds, ⅓ cup diced red onion, and ¼ cup crumbled goat cheese.
    • In a small mixing bowl, combine the ½ cup mayonnaise, ½ cup plain Greek yogurt and the ½ teaspoon granulated sugar. Mix with a whisk to combine.

    Broccoli Salad Dressing Instructions

    • Pour dressing over broccoli mixture and stir to combine. It's ready to serve or you can place in the refrigerator until ready to serve.

    Notes

    You can leave the sugar out if you prefer.
    Store any leftovers in the refrigerator and enjoy within 4-5 days.

    Nutrition

    Serving: 1g | Calories: 351kcal | Carbohydrates: 13g | Protein: 10g | Fat: 29g | Saturated Fat: 8g | Polyunsaturated Fat: 9g | Monounsaturated Fat: 11g | Trans Fat: 0.1g | Cholesterol: 34mg | Sodium: 377mg | Potassium: 329mg | Fiber: 3g | Sugar: 8g | Vitamin A: 451IU | Vitamin C: 51mg | Calcium: 71mg | Iron: 1mg

    Avocado BLT

    August 11, 2024

    Avocado BLT sliced in half, stacked and sitting on cutting board.

    An avocado BLT takes the classic sandwich recipe to the next level. Plus, the simple seasonings I use and how I apply them, make every bite full of so much extra goodness and flavor. Bake bacon in the oven ahead of time, pop it in the microwave, or make air fryer bacon, and you can easily assemble this sandwich in minutes.

    Sliced avocado BLT sandwich on wooden cutting board, sitting next to lettuce and mayo.

    BLTs (bacon, lettuce, and tomato sandwiches) have been around for years. It wasn’t until recently that I decided to start adding avocados on BLTs and I’m so glad that I did because they had a creamy layer, and good fats.

    Have extra avocados? You’ll love this guacamole recipe, this chopped Caprese salad, or this summer side salad to serve alongside this sandwich, too.

    Ingredients

    Make sure to see the recipe card below as well, to get all of the specifics of the ingredients and instructions!

    Ingredients for avocado BLT on wooden cutting board.

    Ingredient Tips:

    • Mayo: Using a great quality of mayonnaise is key for this. I suggest Hellman’s, or Best Foods brands.
    • Bread: I love using wheat (honey and nut bread) but you can use white bread or your favorite type of bread.
    • Bacon: This recipe calls for cooked bacon, so making it ahead of time, however you prefer can help save time when it comes time to eat. Thick bacon works best, and crispy bacon makes the sandwich easier to eat so you’re not pulling on the bacon when taking a bite.
    • Tomatoes: Do not refrigerate tomatoes. This causes them to lose flavor.
    • Seasonings: Sprinkling salt on ingredients such as tomatoes and avocados, can help even out the flavors. The garlic pepper adds a hint of spice and garlic to the already delicious mayo but it is optional.

    How to Make an Avocado BLT

    It’s really easy to make this version of the BLT and feel free to change up the layers and the ingredients but I’m showing how I make this sandwich, to get optimal flavor!

    Steps on how to make an avocado blt sandwich.
    • To toast or not to toast: Either toasted or not toasted will work, however, my favorite is not toasted, to appreciate the texture of the crispy bacon, soft tomato, crunchy lettuce and creamy mayo. Sometimes toasted bread can overpower the textures of the ingredients.
    • Start by spreading on mayo on bread and seasoning the mayo. The amount can depend on how much mayo you actually love on a sandwich but I do put mayo on both slices of bread, and this is usually about 2 Tablespoons total for the sandwich.
    • Next, slice half of an avocado thin. You can also choose to mash your avocado and spread this on your sandwich as well. Add the avocado on top of one slice of mayonnaise-topped bread. Sprinkle sliced avocados with salt.
    • Cut 6 pieces of thick bacon in half, and place all of them on top of the avocado.
    • Slice tomato in to 2 thin slices, and place on top of bacon. Sprinkle tomatoes with salt.
    Lettuce and mayo on bread with garlic pepper.
    • Next, place two pieces of leaf lettuce on top of bacon slices.
    • Place the other slice of garlic pepper and mayo-topped bread, on top of the lettuce.
    • Serve, or slice in half and serve.
    Avocado BLT on wooden cutting board.

    Recipe Tips:

    • Sandwich assembly: If your bacon cooks flat, your tomatoes and avocado and tomato slices are sliced thin, your sandwich should stay assembled well while eating, without falling apart. However, feel free to place toothpicks in to sandwich to help secure ingredients, if needed.
    • Too salty: Keep in mind that some garlic pepper contains salt and some bacon is saltier than others. So be cautious of adding too much salt.
    • Tomatoes: Pat dry the tomatoes after slicing to prevent juices from making the bread mushy.
    Half BLT stacked on top of one another.

    Additional Topping Options for a BLT

    • Cheese: American, pepper jack, swiss or provolone are delicious cheeses for this sandwich.
    • Onion: Sliced white or yellow onion would also be delicious on this sandwich.
    • Chips: Yes! Regular, original potato chips add a fun crunch to this sandwich.
    • Sauce: Not a fan of mayo? No problem. Using mustard, or an aioli could be a great alternative.

    Related Recipes

    If you’re a fan of BLTs, you’ll also love these similar recipes:

    • Salmond slider with garlic aioli, tomato and lettuce.
      Salmon Sliders
    • Chicken club sandwich in platter next to french fries.
      Chicken Club Sandwich
    • Chicken Caprese Sandwich on white plate.
      Chicken Caprese Sandwich

    Recipe

    Avocado BLT sliced in half, stacked and sitting on cutting board.
    Print Pin
    5 from 1 vote

    Avocado BLT

    The best avocado blt sandwich with mayonnaise, garlic pepper, avocado slices, lettuce and tomato on sliced bread. The salt and garlic pepper add so much flavor too!
    Course Dinner, Lunch, Side Dish
    Cuisine American
    Prep Time 5 minutes minutes
    Total Time 5 minutes minutes
    Servings 1 sandwich
    Calories 721kcal
    Author Jessica Burgess

    Ingredients

    • 6 slices cooked bacon oven method bacon is best
    • 2 slices sandwich bread
    • 2 Tablespoons mayonnaise
    • 2 pieces leaf lettuce
    • 2 slices tomato
    • ½ avocado sliced
    • ¼ teaspoon garlic pepper
    • ¼ teaspoon salt

    Instructions

    • Begin by spreading about 2 Tablespoons mayonnaise on 2 slices sandwich bread (About 1 Tablespoon on each.) Sprinkle ¼ teaspoon garlic pepper between both pieces of mayo topped bread.
    • Slice ½ avocado in to thin slices, and place on top of one piece of bread. Sprinkle with ½ of the ¼ teaspoon salt.
    • Next, slice 6 slices cooked bacon in half and place all pieces on top of avocado slices.
    • Thinly slice 2 slices tomato, and place them on top of bacon pieces, and sprinkle with the remaining ¼ teaspoon salt.
    • Place the 2 pieces leaf lettuce on top of the tomato, and top with other mayo and garlic pepper seasoned bread.
    • Slice and serve.

    Video

    Nutrition

    Serving: 1sandwich | Calories: 721kcal | Carbohydrates: 36g | Protein: 24g | Fat: 54g | Saturated Fat: 12g | Polyunsaturated Fat: 18g | Monounsaturated Fat: 22g | Trans Fat: 0.1g | Cholesterol: 59mg | Sodium: 2396mg | Potassium: 923mg | Fiber: 9g | Sugar: 5g | Vitamin A: 781IU | Vitamin C: 18mg | Calcium: 132mg | Iron: 3mg

    Smoked Cheeseburger Sliders

    August 8, 2024

    Smoked cheeseburger sliders stacked on top of others, made with Hawaiian buns.

    Smoked Cheeseburger Sliders take our sheet pan cheeseburger sliders to a different level by adding smoke flavor, with the smoker. All you’ll need is Hawaiian buns (and yes, we steam these like we do in our burgers in the oven recipe), ground beef, cheese, butter, and a few spices, and about an hour, then you’re ready to enjoy these as a party appetizer or easy dinner!

    Smoked cheeseburger sliders stacked on top of one another.

    Slider recipes have become a hit lately, so experimenting with different types of sliders is always fun because you never know which one will be your favorite.

    These roast beef sliders, pizza sliders, and fried chicken sliders are just a few of the sliders that have been drool-worthy in kitchens all over! Now, with the idea of smoking sliders, it’s so fun to take the slider ideas and add “smoke” flavor to them. I also made these Smoked Italian Sliders and they were gone within minutes. There’s something about that smoke flavor that changes the whole experience.

    Ingredients:

    It doesn’t take a lot to make these sliders but I recommend not skipping an ingredient for optimal flavor. I’ll give some notes below that you may find helpful about the ingredients needed!

    Ingredients for cheeseburger sliders sitting on table.
    • Ground beef: I use a lean beef for these, only because we get our beef from a local farm. You can use a fattier beef so just make sure that you “stretch” the beef accordingly when you patty it out in to the rectangle because as the fat cooks, it will shrink. Mine didn’t shrink as much, so it hung over the buns, and that was ok with us!
    • American cheese slices: Any cheese should work but I recommend getting cheese sliced in the deli – so good! Or, get thicker cheese for that extra gooey bite.
    • Butter: I just use salted or unsalted, whatever I have on hand. However garlic salt is mixed with the butter so if you’re not a fan of too salty, this will be something to keep in mind.
    • Hawaiian buns: Make sure you get the 12-pack, sweet buns. You can use the dinner rolls version if you don’t like sweet though.

    How to Make Smoked Cheeseburger Sliders:

    You can also scroll down to the recipe card for the ingredients and instructions as well. However, I’d love to walk you through the process so you can see a visual of how I make these.

    Raw ground beef on parchment paper.
    1. Preheat your smoker to 250 degrees.
    2. Next, in a large mixing bowl, use your hands to mix together the 2 pounds of ground beef with the seasoning salt and pepper, until it’s evenly combined.
    3. Then, on a piece of parchment paper, flatten out the 2 pounds of ground beef in to a rectangle shape that’s slightly larger than the rectangle of Hawaiian buns. (Keep in mind the shrinking that I mentioned above in the ingredient notes.) To be safe, making the rectangle about an inch wider than your Hawaiian buns will be a good size.

    TIP: You can also place the parchment paper on a baking sheet if desired, to make the transition of the ground beef to the smoker, easier.

    Raw ground beef rectangular shaped patty on the smoker.
    1. When the smoker is preheated, flip the ground beef patty, directly on to the smoker, and close the lid, and set the timer for one hour.
    2. When the hour is almost up, melt the butter and garlic salt in a small bowl and set aside. If you do it too early, the butter will harden again.
    3. This is also a great time to slice the Hawaiian buns in half (making a top layer and a bottom layer – do not slice each individual bun just yet). Once sliced, place the bottom bun later in the bottom of a 11×9 aluminum pan.
    Smoked ground beef for cheeseburger sliders.

    Note: The ground beef will have a pink “tent” to it because it’s smoked. If you want to check the temperature of your beef, insert a meat thermometer in to the center and remove when it has reached 160 degrees.

    1. Using a 2 large spatulas, carefully lift the ground beef patty and place it on to the bottom buns that are in the aluminum pan.
    American cheese on cheeseburger sliders in aluminum pan.
    1. Next, layer on your slices of American cheese, making sure to cover all of the ground beef. If your cheese slices aren’t very thick, you can do two layers of cheese if you prefer for extra gooeyness.
    2. Add top layer of buns on top of the cheese.
    3. Then, brush about half of the melted garlic butter on top of the buns. (Saving the remaining butter for later.)
    4. Cover the aluminum pan with aluminum foil and place the pan on the smoker for about 10 minutes to allow the cheese to melt and the buns to steam/toast.
    Smoked cheeseburger sliders in aluminum pan.
    1. Using your spatulas, you can remove the cheeseburger sliders from the aluminum pan and place the batch on a cutting board.
    2. Using a bread knife, slice the sliders, in to individual pieces, and serve!
    Smoked cheeseburger sliders sliced in to small pieces.

    What to Serve with Smoked Sliders

    When smoking food, it’s always fun to have foods like this easy potato salad recipe, or even more smoked recipes like these smoked mushrooms, as a side dish.

    Storing Leftovers

    Have leftovers? No problem. You can either reheat them in the oven (cover with aluminum foil) at 350 degrees until the burgers are heated through. (How long will depend on how many you have, if they’re spaced out, etc.)

    More Burger Recipes You’ll Love

    If you’re a fan of burgers, you’ll also love these favorites:

    • cowboy burger on bun
      The Greatest Cowboy Burgers
    • A juicy Lucy burger cut in half so we can see the cheese inside and stacked one half on top of the other.
      Juicy Lucy Burgers
    • Aloha burger on white plate.
      Aloha Burgers
    • Blue cheese burger on pretzel bun, with lettuce leaf, sitting next to french fries on plate.
      Blue Cheese Burgers

    Recipe

    Smoked cheeseburger sliders stacked on top of others, made with Hawaiian buns.
    Print Pin
    5 from 1 vote

    Smoked Cheeseburger Sliders

    These smoked cheeseburger sliders are made with simple ingredients but are filled with flavor. The garlic butter topping helps add even more flavor.
    Course Appetizer, Dinner, Main Course
    Cuisine American
    Prep Time 5 minutes minutes
    Cook Time 1 hour hour
    Total Time 1 hour hour 5 minutes minutes
    Servings 12 sliders
    Calories 327kcal
    Author Jessica Burgess

    Equipment

    • smoker
    • 11×9 Aluminum foil pan

    Ingredients

    • 12 Hawaiian buns
    • 2 pounds ground beef
    • 9 slices American cheese or more for thicker cheese layer
    • 1 teaspoon seasoned salt
    • ½ teaspoon black pepper
    • ½ teaspoon garlic salt
    • 2 Tablespoons butter

    Instructions

    • Preheat smoker to 250 degrees.
    • In a medium-sized bowl, mix together 2 pounds ground beef, ½ teaspoon black pepper, and 1 teaspoon seasoned salt, until evenly combined.
    • On a piece of parchment paper, flatten out the ground beef in to a rectangle shape, makign it slightly larger than the size of the size of the Hawaiian buns rectangle. (About an inch larger should be good.)
    • Transfer ground beef rectangle on to smoker grill. (Using your hand, or a spatula, you should be able to flip the patty on to the smoker and pull the parchment paper off.)
    • Smoke for one hour, or until the internal temperature of the ground beef reaches 160 degrees. (Meat will look pink due to the smoke.)
    • While meat is smoking, and toward the end of the hour, this is a good time to melt the 2 Tablespoons butter, and combine it with the ½ teaspoon garlic salt. It's also a good time to slice the Hawaiian buns in half, creating a bottom layer and a top layer of buns. (Do not cut individual buns right now.)
    • When the meat has finished smoking, place the bottom layer of 12 Hawaiian buns in an aluminum foil pan and place the smoked ground beef patty on top of the buns.
    • Top ground beef with 9 slices American cheese (or more) and top with top bun layer. Brush on half of the melted seasoned butter and cover the pan with aluminum foil.
    • Place the pan on the smoker and smoke for an additional 10 minutes or until the cheese has melted and the buns are nice and steamed/toasted.

    Video

    Nutrition

    Serving: 3sliders | Calories: 327kcal | Carbohydrates: 15g | Protein: 20g | Fat: 20g | Saturated Fat: 9g | Polyunsaturated Fat: 1g | Monounsaturated Fat: 7g | Trans Fat: 1g | Cholesterol: 82mg | Sodium: 703mg | Potassium: 246mg | Fiber: 0.02g | Sugar: 4g | Vitamin A: 208IU | Calcium: 177mg | Iron: 2mg

    Smoked Italian Sliders

    July 31, 2024

    Smoked Italian Sliders stacked on top of one another.

    These smoked Italian sliders take my baked Italian sliders recipe to a whole new level by cooking them in the smoker for a couple of hours! The smoked flavor, delicious seasoned butter on top of the Hawaiian buns, melty cheese, and different meats make these a great appetizer for parties or even an easy dinner.

    Smoked Italian sliders stacked on top of one another.

    Slider recipes are incredibly easy to make, and when using Hawaiian buns, they add a sweet flavor as a contrast to savory flavors of some of my favorite sliders. These cheeseburger sliders are the most popular slider recipe, these fish sliders are the most unique and these ham sliders are the most common, and they all use Hawaiian buns too.

    Most sliders are made in the oven but when I thought I’d try making sliders in the smoker, I was hoping they’d come out with a delicious smokey flavor, and they did! Plus, cooking the sliders this way, was a great way to cook dinner without having to babysit a dish. I also smoked cheeseburgers on Hawaiian buns!

    Ingredients for Smoked Italian Sliders

    I’ve given notes on a few of the key ingredients below, but you can see the recipe card below that lists all of the ingredients and instructions too!

    Ingredients for Italian sliders on table.
    • Hawaiian buns: If you do not like sweeter buns, you can use regular slider buns for this recipe.
    • Italian dressing seasoning: This is different than Italian seasoning that you find in the spice aisle. This is the seasoning packet that you’ll find in the dressing aisle at the grocery store. I’ve used Zesty Italian and have also used regular Italian dressing seasoning, so either will work.
    • Cheese: I prefer to use provolone for this recipe but mozzarella or white American cheese would also be delicious.
    • Banana peppers: Totally optional. Sometimes I will include these on Italian sliders but have found that I prefer them without. If using, simply top the meat with your desired amount of peppers, trying to make sure they don’t carry over a lot of liquid that could make the bread soggy.

    How to Make Smoked Italian Sliders

    1. First, preheat your smoker to 250 degrees F.
    2. Next, slice the Hawaiian rolls in half, creating a top bun and a bottom bun, making two separate pieces. (Do NOT cut each roll or bun in to individual buns. It will be much easier to keep the rolls intact, so you can easily create a bottom bun and a top bun.
    3. Place the bottom buns in an aluminum foil pan. Next, layer on the sliced provolone cheese, covering the bottom layer of buns. I did 12 slices of cheese, using 9 to cover the buns and 3 more pieces running diagonal through the middle, just to use the package of cheese and get more cheese in more bites. You can do more or less depending on your preference.
    4. After the cheese, add a layer of salami, then a layer of pepperoni and a layer of smoked ham. (It doesn’t have to be in this order.) If you prefer banana peppers on your sliders, this is where you’ll layer those on as well.
    5. Place the top buns on top of the meat. Mix together the melted butter and the Italian dressing seasoning and stir to combine. Brush the tops of the buns with half of the seasoned butter. (If desired, you can mix in crushed red pepper and grated parmesan in to the butter as well.)
    6. Cover the aluminum foil pan with aluminum foil, and place the pan in the preheated smoker, and smoke at 250 for 2 hours.
    Smoked Italian sliders in aluminum baking pan.
    1. After the two hours are up, remove pan from smoker and remove the aluminum foil. The cheese should all be melted, the meat heated through and the buns a beautiful seasoned brown. (The aluminum foil will protect the buns from toasting and drying out.) You can now top the buns with the remaining melted butter if desired.
    Smoked Italian slider on cutting board, sitting around others.

    Using a spatula (preferably two) slide the Italian sliders on to a cutting board so you can cut the sliders in to individual pieces.

    Serve while warm, or leave covered with foil to keep them warm longer before serving.

    Pro Tips

    • Careful Removing: The cheese could stick to the sides of the aluminum pan, or if the cheese melts and sticks to the bottom of the pan. So before removing the sliders to the cutting board to cut in to pieces, make sure to detach anything sticking to the pan, to help make sure that your bread does not break or pull apart.
    • More Flavor: Love a little kick to your sandwiches? Feel free to add some crushed red pepper. You can also add grated parmesan cheese to the butter mixture if you prefer.

    Related Recipes

    If you love slider recipes, you’ll also love these other fun flavors that readers love:

    • Stack of roast beef sliders.
      Roast Beef Sliders
    • Sloppy joe sliders with melted cheese on white marble cutting board
      Sloppy Joe Sliders
    • Corned beef sliders stacked on top of one another, sitting on a white plate.
      Corned Beef Sliders
    • Close up of pizza sliders on white plate.
      Pizza Sliders

    Recipe

    Smoked Italian Sliders stacked on top of one another.
    Print Pin
    Be the first to rate!

    Smoked Italian Sliders

    This smoked Italian sliders recipe is ready in 2 hours, made with ham, salami, pepperoni, provolone, and topped with an Italian seasoned butter glaze.
    Course Appetizer, Dinner, Lunch, Main Course, Side Dish
    Cuisine Italian
    Prep Time 5 minutes minutes
    Cook Time 2 hours hours
    Total Time 2 hours hours 5 minutes minutes
    Servings 12 sliders
    Calories 252kcal
    Author Jessica Burgess

    Equipment

    • 1 aluminum foil pan Disposable
    • smoker We have a Treager but any brand will work

    Ingredients

    • 12 count package of Hawaiian buns
    • 12 slices provolone cheese slices
    • 9 ounces smoked ham
    • 7 ounces salami slices
    • 5 ounces large pepperoni slices or small (Can also use more/less pepperoni if desired.)
    • 4 Tablespoons butter melted
    • 1 Tablespoon Italian dressing seasoning
    • sliced banana peppers optional
    • crushed red pepper optional
    • grated parmesan cheese optional

    Instructions

    • Preheat smoker to 250° F.
    • Using a sererated bread knife, slice the 12 count package of Hawaiian buns in half, creating a top bun later and a bottom bun later.
    • Place the bottom buns in a 11×9 aluminum pan.
    • Add layer of 12 slices provolone cheese slices on top of the bottom buns, making sure to cover the bread completely.
    • Next layer on the meats, (9 ounces smoked ham, 7 ounces salami slices, 5 ounces large pepperoni slices) one at a time, and the order doesn't matter, just try to make sure the meats are evenly layered if possible, so the top buns rest evenly on top. If desired, layer on sliced banana peppers.)
    • Add top layer of buns on to the top of meats.
    • Mix 4 Tablespoons butterwith 1 Tablespoon Italian dressing seasoning and brush half or ¾ of the mixture on top of the buns. (If desired, mix in crushed red pepper and grated parmesan cheese as well.)
    • Cover the pan with aluminum foil and place on smoker and cook for 2 hours.
    • Remove the pan from the smoker, remove the aluminum foil, and if desired, brush on remaining melted seasoned butter. (You may have to re-melt the butter.)
    • Remove sliders from the pan and place on to a cutting board or platter. Using a big spatula to remove the large rectangle is easiest. Using the serrated bread knife, slice the sliders in to individual pieces, where the lines are aleady formed. Serve!

    Notes

    Careful Removing: The cheese could stick to the pan in the smoking process. Before removing the sliders to the cutting board, make sure to detach anything sticking to the pan, to help make sure that your bread does not break or pull apart.

    Nutrition

    Serving: 3sliders | Calories: 252kcal | Carbohydrates: 2g | Protein: 15g | Fat: 21g | Saturated Fat: 10g | Polyunsaturated Fat: 2g | Monounsaturated Fat: 8g | Trans Fat: 0.3g | Cholesterol: 58mg | Sodium: 1025mg | Potassium: 179mg | Sugar: 0.3g | Vitamin A: 284IU | Calcium: 151mg | Iron: 1mg

    Instant Pot Brownies

    July 29, 2024

    Instant Pot brownie on white plate.

    These easy Instant Pot brownies are so gooey, have a great balance of rich cocoa flavor and vanilla, and make things easy without heating up the oven. In about an hour, these thick, delicious brownies are ready to enjoy, making it one of my favorite Instant Pot recipes to date.

    Instant Pot brownie on white plate.

    Whether for a late-night dessert or you’re looking to impress at a potluck, these brownies will be a hit!

    Want to try more variations of the classic chocolate brownies? You could start with these dessert recipes: Condensed Milk Brownies for a rich chocolatey flavor, Cornflake Brownies for a tasty and crunchy option, or for something different, try these Lemon Cake Mix Brownies.

    [feast_advanced_jump_to]

    Why You’ll Love This Recipe

    • Versatile dessert: This Instant Pot Brownies recipe is perfect for any occasion. From casual family dinners to elegant gatherings, these brownies can serve as a mouthwatering treat everyone can relish.
    • Steps are simple to follow: You don’t have to be a culinary expert to whip up this dessert. This fudgy brownie recipe is straightforward, making it suitable for novice cooks and baking enthusiasts alike.
    • Regulates sweetness: The beauty of homemade desserts is in the control you have over the ingredients. With this recipe, you can adjust the level of sweetness to your preferences and dietary needs.

    Are Instant Pot Brownies Different?

    Instant Pot Brownies take the classic oven-baked treat to a whole new level. They’ve got this irresistible texture and richness that’s hard to resist. 

    Thanks to the Instant Pot’s unique cooking environment, every inch of these rich fudgy brownies is perfectly sticky. And guess what? They’re even made in a deep-dish style, so you’re in for a thick, decadent dessert packed with chocolatey goodness. Just a small piece is enough to satisfy your sweet tooth, making them perfect for those who like to keep an eye on portion sizes. 

    Ingredients Needed

    I’ve highlighted a couple of ingredients with some relevant notes. Aside from this, the ingredients needed are pretty basic.

    Labeled ingredients for Instant Pot brownies.
    • Granulated Sugar – When measuring granulated sugar, ensure to level it off using the back of a knife for accurate measurements. Also, store it in an airtight container to prevent it from clumping due to moisture.
    • Cocoa Powder – For a deeper, richer flavor, opt for unsweetened cocoa powder. Also, sift it before use to get rid of any lumps, ensuring a smoother mix into your batter.
    • Chocolate Chips – Consider using a mix of milk and dark chocolate chips for a more complex chocolate flavor.

    Substitutions

    • Cocoa Powder – If you run out of cocoa powder, you can use the same amount of unsweetened baking chocolate by reducing the butter in the recipe accordingly. If the recipe calls for 3 tablespoons of cocoa powder, use one ounce of unsweetened chocolate and reduce the butter in the recipe by 1 tablespoon.
    • Vanilla Extract – In case you’re out of vanilla extract, you can use an equal amount of maple syrup or honey. Alternatively, almond extract can also be used, but only half as much as it has a stronger flavor.
    • Chocolate Chips – If you don’t have chocolate chips, you can chop up any bar of chocolate that you have on hand. If you’re looking to avoid chocolate, try using dried fruit, nuts, or seeds for a healthful twist. For a dairy-free or vegan option, opt for dairy-free chocolate chips.

    Variations

    • Nutty Brownies: Enhance the texture and flavor of the brownies by folding a handful of your favorite nuts into the batter. You can use chopped almonds, walnuts, or pecans for a delightful crunch.
    • Salted Caramel Brownies: Drizzle some salted caramel over the brownies just before they’re done. The sweet and salty combination will take your brownies to a whole new level.
    • Mocha Brownies: For a coffee-infused twist to your brownies, add two tablespoons of instant coffee or espresso powder to the batter.
    • Fruity Brownies: Consider adding some dried cherries, cranberries, or orange zest to the batter for a fruity twist.
    • Peppermint Brownies: Add a drop or two of peppermint extract to the brownie batter for a refreshing, minty flavor. This variation is particularly popular during the holiday season.
    • Vegan Brownies: Substitute the eggs in this recipe with a flax egg (1 tablespoon ground flaxseed + 3 tablespoons water per egg) and use dairy-free chocolate chips for a vegan-friendly version.

    Equipment

    I have read that using a 3-inch high trivet keeps the brownies a bit less sticky and dense; however, I used the one that came with the Instant Pot and enjoyed them!

    How to Make Instant Pot Brownies

    *Be sure to see the recipe card below for the full ingredients list & instructions!*

    STEP 1: Cream the butter and sugar. Melt butter and blend with sugar in a medium bowl until a smooth consistency is achieved. Add cocoa powder and stir. (Image 1).

    STEP 2: Add eggs. Add the eggs and vanilla extract into the mix. Ensure thorough mixing. (Image 2).

    Steps 1-4 of how to make Instant Pot brownies.

    STEP 3: Mix in flour and chocolate chips. Add flour and salt to the mixture. Stir until a blend is achieved. Fold chocolate chips in gently with a wooden spoon. (Image 3-4).

    STEP 4: Add mix to the pan. Pour batter into a 7" greased springform pan. Optionally, add more chocolate chips on top. Cover the pan tightly with tin foil. (Image 5).

    STEP 5: Prepare the Instant Pot. Pour a cup of water into the bottom of your Instant Pot, situate the pan on top of the trivet, and lower it into the Pot. (Image 6).

    STEP 6: Cook the brownies. Secure the lid of the Instant Pot, ensure the valve is set to sealing, and set the Pot to high-pressure cooking for 55 minutes of cook time. Permit for a 10-minute natural release for the remaining pressure. (Image 7).

    Steps 5-8 for making Instant Pot brownies.

    STEP 7: Check the brownies. Open the lid, and inspect the brownies. Ensure no jiggling is present, and check for a firm center. If not firm, re-cook for an extra 5 minutes on high pressure and allow for a natural release. (Image 8).

    STEP 8: Cool and serve. Allow the pan of brownies to cool completely before detaching the sides and cutting into square or wedge slices.

    Instant Pot brownies on white plates, sitting next to Instant Pot.

    Recipe Pro Tips

    • Check for doneness: For best results, use a toothpick to check if the brownies are fully cooked. Insert the toothpick into the center of the brownie. If it comes out clean or with a few crumbs clinging, the brownies are done.
    • Let the brownies cool: Be patient and allow the brownies to cool completely before cutting. This will make them easier to cut, and they’ll hold their shape better.
    • Grease the Pan Well: Make sure to thoroughly grease your prepared pan to prevent the brownies from sticking.
    • Use Quality Ingredients: For the best flavor, use high-quality chocolate and cocoa powder. The quality of your ingredients can make a big difference in the final product.
    • Perfect The Texture: For a fudgier texture, slightly undercook the brownies. If you prefer cake-like brownies, add an extra egg to the recipe.
    • Mixing Matters: Don’t overmix the batter once the flour is added. Overmixing can lead to tougher brownies. Mix just until you don’t see any flour.
    • Keep an Eye on the Instant Pot: Make sure the Instant Pot is sealed correctly before starting and check that the release valve is in the right position. This will ensure that steam doesn’t escape, which can affect the cooking time and texture of the brownies.
    Close up of Instant Pot brownies on white plate.

    Recipe FAQs

    Can I double this recipe?

    Yes, you can double this great recipe. Just be sure that you have a pan large enough to accommodate the increased quantity.

    I don't have an Instant Pot. Can I make this recipe in the oven?

    Yes, you can make this recipe in the oven. The cooking time and temperature might need to be adjusted, though. You’ll likely need to bake the brownies at 350°F (180°C) for about 20-25 minutes but check them often to avoid overcooking.

    Can I substitute the sugar with a sugar substitute?

    Yes, you can substitute the sugar with a sugar substitute. However, the texture and taste might vary. It’s best to use a sugar substitute specifically designed for baking and follow the conversion instructions on the package.

    Is it necessary to use a springform pan?

    A spring form pan makes it easier to remove the brownies once they’re cooked, but it’s not strictly necessary. You can use any pan that fits in your Instant Pot, just make sure to line it with parchment paper for easier removal.

    What can I substitute for eggs in this recipe?

    If you’re looking for an egg substitute, you can use applesauce, mashed bananas, or flax eggs. However, the texture of the brownies might differ slightly.

    What to Serve with Instant Pot Brownies

    These delectable Instant Pot Brownies pair earnestly with a variety of accompaniments, offering a sweet finish to any meal.

    A warm brownie with a scoop of creamy vanilla ice cream or a dollop of whipped cream can create an irresistible combination, while fresh berries or a dusting of powdered sugar provide simpler, yet equally satisfying options. Or make it extra chocolatey by adding some chocolate sauce on top of the brownie.

    Storage

    These brownies can be stored at room temperature in an airtight container for up to 3 days. If you want to keep them longer, you can refrigerate them, where they’ll last for about a week. Before storing, ensure that the brownies have cooled completely to prevent condensation, which can make them soggy. 

    As for freezing, yes, you can freeze these brownies. After they’ve cooled, cut them into individual squares and wrap them tightly in plastic wrap. Then, put the wrapped brownies in a zip-top bag or an airtight container and freeze for up to 3 months. The next time you want a delicious brownie, thaw at room temperature or warm up in the oven or microwave.

    More Chocolate Recipes You’ll Love

    If you have some chocolate chips left, there are plenty of delicious recipes you can make with them! If you don’t want to turn on the oven, then this No Bake Chocolate Pie is perfect. Or you could go for a great combination of chocolate and banana in these Banana Chocolate Chip Cookies,

    • Hot fudge cake sitting on white plate, with a scoop of vanilla ice cream on top.
      Hot Fudge Cake
    • chocolate bread pudding in a baking dish
      Chocolate Bread Pudding
    • No bake cookies on aluminum foil.
      The BEST No Bake Cookies Recipe
    • Mini chocolate cake on small cake stand.
      Mini Chocolate Cake

    Did you make this? I’d be so grateful if you left a “star” rating below to let me know what you thought! Then, the next time you need a quick and easy recipe, come back to Fantabulosity to browse all of my easy recipes!

    Recipe

    Instant Pot brownie on white plate.
    Print Pin
    Be the first to rate!

    Instant Pot Brownies

    Instant Pot Brownies made from scratch are cooked in the Instant Pot, giving them a fudgy, gooey texture, and they're ready in about an hour!
    Course Dessert
    Cuisine American
    Prep Time 10 minutes minutes
    Cook Time 1 hour hour
    Total Time 1 hour hour 10 minutes minutes
    Servings 12 large pieces
    Calories 323kcal
    Author Jessica Burgess

    Equipment

    • 1  3-inch high trivet 

    Ingredients

    • ¾ cup butter melted
    • 1 ½ cups granulated sugar
    • ½ cup cocoa powder
    • 2 eggs
    • 1 Tablespoon vanilla extract
    • ¾ cup flour
    • ¼ teaspoon salt
    • 1 cup chocolate chips plus more for top if desired

    Instructions

    • Whisk together melted butter and sugar until smooth, then stir in the cocoa powder.
    • Add the eggs and vanilla extract and stir well
    • Stir in the flour and salt until just combined,
    • then gently fold in the chocolate chips
    • Transfer the batter to a greased 7" springform pan, add additional chocolate chips to top if desired, and cover tightly with tin foil
    • Place 1 cup of water in the bottom of instant pot, the place the brownies on a trivet and lower into the pot
    • Put on the lid, make sure valve is set to sealing and cook on high pressure for 55 minutes, and allow for a 10 minute natural release
    • Open lid and check brownies, there should be no jiggling and the center should be firm to the touch. If not cook for an additional 5 minutes on high pressure and allow for a natural release
    • Allow brownies to cool completely before removing the sides and slicing into squares or wedges

    Notes

    Brownies in the Instant Pot are different than typical oven-baked brownies. The entire pan is sticky and gooey like the very middle piece of traditional brownies!
    These brownies are deep dish, and super chocolatey you only need a very small piece to feel satisfied
    I have read that using a 3-inch high trivet keeps the brownies a bit less sticky and dense, however, I used the one that came with the pot and enjoyed them!

    Nutrition

    Serving: 1brownie | Calories: 323kcal | Carbohydrates: 43g | Protein: 3g | Fat: 16g | Saturated Fat: 10g | Polyunsaturated Fat: 1g | Monounsaturated Fat: 3g | Trans Fat: 0.5g | Cholesterol: 60mg | Sodium: 162mg | Potassium: 78mg | Fiber: 2g | Sugar: 35g | Vitamin A: 428IU | Vitamin C: 0.1mg | Calcium: 31mg | Iron: 1mg

    Fried Dill Pickle Chips

    July 28, 2024

    Fried pickles in basket, with a cup of ranch dressing.

    Fried Dill Pickle Chips: With simple ingredients and just a few minutes, you’ll have a delicious, tangy, and crunchy appetizer recipe that’s perfect dipped in this jalapeno ranch dip or chipotle aioli.

    Fried pickles in black basket with small bowl of ranch.

    Love deep-fried recipes? Then you’ll also want to try The BEST Fried Shrimp Recipe! Or these fried mushrooms.

    [feast_advanced_jump_to]

    Why You’ll Love This Recipe

    • It’s versatile: These zesty fried pickles can be enjoyed as a snack, a delicious appetizer, or unique side dish to your main course. They are sure to add a fun twist to your usual menu.
    • They’re a crowd pleaser: Great for gatherings! The unexpected, tangy flavor of the pickles combined with the satisfying crunch often leaves people reaching for more. Who knew pickles could be such a hit?
    • Fun to make: This is an enjoyable recipe to prepare. From the battering process to the sizzle of the fryer, cooking up these pickles feels almost as good as eating them.

    Ingredients Needed

    I’ve highlighted a couple of simple ingredients with some relevant notes. Aside from this, the ingredients needed are pretty basic.

    Labeled ingredients for fried pickles.
    • Dill pickle chips or dill pickle slices – For the best flavor, opt for pickles labeled as ‘Kosher.’ These pack a more potent dill flavor, which results in a tastier fried pickle. Also, drain them well before using them to prevent your batter from getting soggy.
    • All-Purpose Flour – When measuring flour, don't scoop it out directly from the container. Use a spoon to fluff up the flour within the container. Then, spoon the flour into the measuring cup. Sweep off the excess flour with the back of a knife. This prevents the flour from compacting and giving you more than you need for the recipe.
    • Smoked Paprika – This spice brings a sweet, smoky flavor to the recipe, enhancing the overall taste. However, it’s pretty potent, so use it sparingly. You can use half the amount stated in the full recipe if you prefer a milder flavor.

    Substitutions

    • Whole Milk – If you’re out of whole milk, you can use almond or soy milk as a substitute. For every cup of whole milk, you can use a cup of either almond or soy milk.
    • All-Purpose Flour – For those who are gluten-free, you can use almond flour or coconut flour instead of all-purpose flour. It’s a one-to-one substitution. But remember that these options can slightly change the texture of your dish.
    • Garlic Powder – Fresh garlic is an excellent substitute for garlic powder. Approximately half a teaspoon of minced fresh garlic equals an eighth of a teaspoon of garlic powder.
    • Smoked Paprika – You can use regular paprika or chili powder if you don’t have smoked paprika. The flavor will slightly differ, but it’ll still add a nice kick to your dish.
    • Corn Starch – Need an alternative for corn starch? You can use arrowroot powder or potato starch. Use two tablespoons of either arrowroot or potato starch for every tablespoon of cornstarch.

    Variations

    This recipe is quite versatile and can be tweaked to suit your personal preferences. Here are some fun variations you can try:

    • Spicy Deep Fried Pickles: For a spicy kick, add a dash of cayenne pepper, cajun seasoning, or some hot sauce to the batter before frying. This will give your pickle recipe a fiery twist that spice lovers will adore.
    • Cheesy Deep-Fried Pickles: Enhance the richness of your deep-fried pickles by adding some grated parmesan or sharp cheddar to the batter. The cheese will melt during frying, producing a gooey, savory delight.
    • Herb-Infused Deep Fried Pickles: Add some finely chopped herbs such as rosemary or thyme into the batter for an aromatic variation. This will impart a subtle, earthy flavor to your deep-fried pickles.
    • Sweet and Tangy Deep Fried Pickles: Do you prefer a dance of sweet and tangy on your taste buds? Dip the fried pickles in a sauce made of honey and mustard. The sweet honey balances the tangy pickles for an irresistible combo!

    How to Make Deep Fried Pickles

    *Be sure to see the recipe card below for the full ingredients list & instructions!*

    STEP 1: Mix the eggs and milk. Beat milk and eggs together in a medium-sized bowl until well mixed. Soak the pickles in this mixture for five minutes. (Photo 1-2)

    STEP 2: Add the seasoning. Combine dry ingredients: flour, garlic powder, paprika, and cornstarch in a second bowl. (Photo 3)

    Steps 1-4 of how to make fried pickles.

    STEP 3: Prepare the pickles. Drain the pickle-milk mixture, then toss the pickles into the flour mixture until fully covered. (Photo 4)

    STEP 4: Heat the oil in a frying pan. Pour oil into a pan or pot until it’s about 2 inches deep, and heat it up.

    Fried pickle chips in skillet with oil.

    STEP 5: Fry the pickles in the hot oil. Carefully place your pickles into the heated oil, cooking each side for 2-3 minutes or until brown. Remove pickles with a slotted spoon and put them on top of paper towels on a baking sheet to absorb excess oil.

    Fried pickles in black basket.

    Recipe Pro Tips

    • For the best results, I like to use canola oil for frying, but you can also use vegetable oil or any other high-temperature frying oil.
    • For the crispiest fried pickle, it is important to ensure the pickles are entirely coated in the flour mixture before you fry them; otherwise, the coating may separate from the pickles.
    • You can store these pickles in an airtight container in the fridge for 2 days.
    • These pickles are good served with ranch, a garlic aioli sauce, or by themselves.
    • You can substitute the pickles for bread and butter pickles if you would like, but they will have a bit of a sweeter flavor.
    Fried pickle dipped in ranch dressing, with hand holding it.

    Recipe FAQs

    Can I air-fry the pickles instead of deep-frying?

    Yes, you can air-fry these pickles. Preheat your air fryer to 400°F. Arrange the battered pickles in a single layer in the basket, ensuring they don’t overlap. Cook for about 10 minutes until golden brown, flipping halfway. This method will give you a lighter, less oily version of the recipe. You can also try using a deep fryer.

    Can I use Panko bread crumbs instead of flour for the coating?

    Certainly! Panko bread crumbs will give the fried pickles a different texture. If you’re using breadcrumbs, add the seasonings directly to the egg-milk mixture so the flavor sticks to the pickles.

    What if I don’t have cornstarch?

    If you don’t have cornstarch, you can use more flour in its place. While cornstarch helps make the coating extra crispy, using only flour will yield delicious results.

    Can I use any type of pickle in this recipe?

    This recipe works best with kosher dill pickles due to their strong flavor and crunchy texture. However, you can experiment with different types of pickles based on your preference. Just remember that the flavor and texture of the fried pickles will vary depending on the kind of pickles used.

    How do I make sure my batter sticks to the pickles? 

    To ensure the batter sticks to the pickles, pat them dry after draining them. Excess liquid can prevent the batter from adhering properly. Also, pressing the flour mixture onto the pickles can help the batter stick better.

    What to Serve with Deep Fried Pickles

    Deep-fried pickles are excellent as a standalone snack, but they’re also super versatile when it comes to pairing with other dishes. Here are a few suggestions:

    • Burgers: The crispy, tangy flavor of the pickles can perfectly balance the rich, savory taste of a burger recipe.
    • BBQ Ribs: Deep-fried pickles pair wonderfully with this classic barbecue dish – a match made in heaven!
    • Grilled Cheese Sandwich: Add some crunch and excitement to a classic grilled cheese sandwich with a side of fried pickles. Or, this chicken grilled cheese sandwich.
    • Chicken Wings: Spice up a plate of chicken wings with the tangy contrast of these pickles.
    • Salads: Chop some fried pickles and sprinkle them on a salad recipe for a unique and tasty twist.
    • Sauces: Dip pickles in your favorite dipping sauce, from ranch dressing to chipotle mayo, or even a specialty sauce of your choice.

    Storage

    The best way to store leftover deep-fried pickles is to refrigerate them. Place them in an airtight container and refrigerate for up to 2 days. It’s important to note that the pickles may lose some of their crispiness when stored. 

    To reheat, warm them in the oven at 350°F for about 10 minutes or until heated through. 

    As for freezing, you can freeze the fried pickles for up to a month. Before transferring them to a freezer-safe bag or container, make sure they are cooled and dry. 

    When ready to eat, reheat the frozen pickles in the oven

    More Recipes You’ll Love

    If you are looking for more side dishes to pair up with meals alongside these dried pickles, why not try making some Easy Red Skin Potato Salad? Or, if you want to get your crock pot into action while you make these pickles, try making some Crock Pot Cheesy Hashbrowns.

    • Cowboy Pasta Salad in bowl with wooden spoon.
      Cowboy Pasta Salad
    • Dr. Pepper baked beans in a cast iron and wooden spoon spooning out a serving.
      Dr. Pepper Baked Beans
    • A collage of side dishes for sliders.
      Best Sides for Sliders (Easy Recipes Your Family Will Love)
    • Crockpot baked beans cooked with a wooden spoon resting inside.
      Crockpot Baked Beans

    Did you make this? I’d be so grateful if you left a “star” rating below to let me know what you thought! Then, the next time you need a quick and easy recipe, come back to Fantabulosity to browse all of my easy recipes!

    Recipe

    Fried pickles in basket, with a cup of ranch dressing.
    Print Pin
    Be the first to rate!

    Fried Dill Pickle Chips

    Frying pickle chips is easy, and they're the perfect appetizer recipe that's a restaurant favorite. Serve them with ranch or a chipotle aioli!
    Course Side Dish
    Cuisine American
    Prep Time 10 minutes minutes
    Cook Time 5 minutes minutes
    Total Time 15 minutes minutes
    Servings 24 servings
    Calories 56kcal
    Author Jessica Burgess

    Ingredients

    • 32 ounces can kosher dill chip pickles drained
    • 1 cup whole milk
    • 2 large eggs
    • 2 cups all-purpose flour
    • 2 teaspoon garlic powder
    • 1 teaspoon smoked paprika
    • 1 Tablespoon corn starch
    • Oil for frying

    Instructions

    • In a medium sized mixing bowl, whisk together the milk and eggs until homogenous. Dump the pickles into the milk mixture and allow them to sit for five minutes.
    • In a separate bowl, whisk together the flour, garlic powder, paprika, and corn starch.
    • Drain the milk mixture from the bowl with the pickles and add the flour mixture. Use your hands or a spoon to fold the pickles in the flour mixture until they are evenly coated.
    • Heat 2 inches of oil in a pan or pot.
    • Gently place the pickles in the oil and cook for 2-3 minutes per side, or until they begin to brown. Place the pickles on a plate lined with paper towels to soak up the excess oil.
    • Serve and enjoy!

    Notes

    • For the best results, I like to use canola oil for frying, but you can also use vegetable oil or any other high-temperature frying oil.
    • For the crispiest fried pickle, it is important to ensure the pickles are entirely coated in the flour mixture before you fry them; otherwise, the coating may separate from the pickles.
    • You can store these pickles in an airtight container in the fridge for 2 days.
    • These pickles are good served with ranch, a garlic aioli sauce, or by themselves.
    • You can substitute the pickles for bread and butter pickles if you would like, but they will have a bit of a sweeter flavor.
    • The paprika adds just a hint of spice to the pickles. You can omit this ingredient if you do not want any spice.

    Nutrition

    Serving: 1serving | Calories: 56kcal | Carbohydrates: 10g | Protein: 2g | Fat: 1g | Saturated Fat: 0.4g | Polyunsaturated Fat: 0.2g | Monounsaturated Fat: 0.2g | Trans Fat: 0.001g | Cholesterol: 15mg | Sodium: 315mg | Potassium: 79mg | Fiber: 1g | Sugar: 1g | Vitamin A: 147IU | Vitamin C: 1mg | Calcium: 37mg | Iron: 1mg

    Easy Bagel Recipe

    July 26, 2024

    Baked homemade bagels on wire cooling rack.

    Easy Bagel Recipe: Baking bread doesn’t have to be intimidating! Save the time and money of running to bagel shops on the weekend and make your own Easy Bagels at home!

    Homemade bagels on wire rack, cooling.

    When you’re looking for delicious recipes for breakfast, these fluffy pancakes and this brioche French toast are always a hit but now I’m excited to add these homemade bagels to the mix.

    Bread does take time to proof, but bagels only need one rise rather than two, making them the perfect brunch meal, especially on a bagel cart. You can easily add toppings to these, or serve them alongside baked bacon and eggs, or even make these bagel sandwiches, for the most amazing homemade meal.

    [feast_advanced_jump_to]

    Why You’ll Love This Recipe

    • It uses a few ingredients: With only 5 ingredients, this recipe uses items that you may even have on hand.
    • Make-ahead recipe: Bread freezes SO well! You’ll want to keep these on hand at all times.
    • Affordable: Running out for bagels can be expensive! Make your own at home to save some dough.

    Ingredients Needed

    I’ve highlighted a couple of ingredients below with some relevant notes. Aside from this, the ingredients needed are pretty basic.

    Labeled ingredients for homemade bagels, sitting on counter.
    • Flour – Regular all-purpose flour has the right protein levels for bagels.
    • Yeast – Instant and active dry act the same here. This recipe isn’t formulated for fresh or cake yeast.
    • Sugar – White granulated is used to feed the yeast as well as to achieve a crisp crust.

    Variations

    It’s so easy to add toppings so your bagels aren’t just plain!

    • After boiling, let excess water drip back into the pot. Then, place the top of your bagel onto a plate of seasoning (sesame seeds, poppy seeds, everything bagel seasoning…) and press gently. Then rest on the cooling rack to dry.

    How to Make Easy Homemade Bagels

    Bread can seem finicky, but it’s really just a few simple steps. We are going to mix, proof, shape, boil, and bake. When you think of each step individually, it’s not overwhelming!

    *Be sure to see the recipe card below for the full ingredients list & instructions!*

    Steps 1-4 of how to make homemade bagels.

    STEP 1. Proof the yeast. Add yeast to warm (not hot!) water and let it bloom or proof (soften) (Image 1).

    Tip: If you bake a lot of bread, you’ll know if your water temperature is right just by feel. But if you aren’t sure, pull out that instant-read thermometer and give it a check. Water should be about 100-110°F and no higher. Higher than that and you will kill your yeast and the bagels will be flat and impossible to enjoy.

    STEP 2. Make dough. Add salt and 1 cup of flour to the yeast (Image 2). Stir to incorporate and add more flour until a soft dough forms (Image 3).

    STEP 3. Knead. Once you can no longer use a spoon, place the dough on a lightly floured surface and continue to knead in more flour (Image 4).

    Steps 5-8 of how to make bagels at home.

    STEP 4. Proof. Add dough back to a clean, greased bowl and cover. Let rise until doubled in size (Images 5 & 6).

    Tip: Bread dough needs warmth, but not too much, in order for the yeast to multiply. Place the bowl on the counter over your dishwasher if it is running. Another option is to place it in the cold oven and turn on the inside light. Just make sure to remove it before turning on the oven!

    STEP 5. Shape. Punch down and divide the dough into 8 equal pieces (Image 7). Form into smooth balls and use your thumb to make a center hole (Image 8).

    Raw bagel on silver spoon, being dipped in to water.

    STEP 6. Boil. Add the bagels gently to a pot of boiling sugar water for 1 minute on each side. Remove to a rack for water to evaporate.

    STEP 7. Bake. Bake on a parchment lined sheet until golden.

    Boiled bagels on baking sheet.

    Recipe Pro Tips

    • Boil, then bake. This extra step is essential if you want your bagels to have the correct texture.
    • Check your yeast. You can use instant or active dry yeast here. This is a perfect recipe for testing if your yeast is still good because we proof it before adding to any other ingredients. No waste if your yeast isn’t good!
    Baked bagels on baking sheet.

    Recipe FAQs

    What does boiling bagels before baking do?

    Boiling create a “crust” on the bread before it even hits the oven. This actually hinders raising in the oven – which is good for bagels. Unlike a soft and fluffy white bread loaf, we want a dense, chewy interior. The crust prevents the bagels from rising, which aids in their signature chew.

    Is it better to boil or not boil bagels?

    If you want the classic bagel texture, both inside and out, then boiling is a must. This one-two punch of boiling before baking will give you a crust to truly bite into before getting to that dense, chewy interior that will hold up to any spread you like.

    What makes for a good bagel?

    The crispy outside and chewy inside! Making any type of bread from scratch allows you to enjoy it fresh from the oven. This is the best way to experience the perfect texture of each type of bread. Boiling then baking will make really good bagels!

    Can I boil bagels without honey?

    Yes! I used granulated sugar here, which takes the place of honey. This allows your bagels to be vegan to fit a majority of diets. Using sugar in your boiling water glazes the dough and gives bagels their classic outer texture.

    Baked bagel recipe on wire cooling rack.

    What to Serve with Homemade Bagels

    Bagels are great on their own, when topped with jam, peanut butter, cream cheese, anything you like! You can also use them as the base for an egg sandwich, hot ham and cheese, or a fantastic chicken caprese.

    Baked, stacked bagels on kitchen counter.

    Storage

    Store bagels in a plastic bag, either with a tie or a zip. Make sure they are cooled completely, all the way through, before placing in the bag. If they are warm at all they will create condensation and the bagels will turn soggy!

    For long term storage, place in a plastic bag with all air removed and freeze for up to 3 months. Thaw overnight before slicing and toasting.

    Baked bagel with cream cheese and jam spread on top, sitting on white plate.

    More Bread Recipes You’ll Love

    • Focaccia bread in a bowl.
      Focaccia Bread
    • how to make Traditional Italian White Bread
      Easy Italian White Bread
    • Sliced banana bread on white platter
      Best Banana Bread
    • Hand pulling a piece of cheesy pull apart bread off of loaf.
      Cheesy Pull Apart Bread

    Did you make this? I’d be so grateful if you left a “star” rating below to let me know what you thought! Then, the next time you need a quick and easy recipe, come back to Fantabulosity to browse all of my easy recipes!

    Recipe

    Baked homemade bagels on wire cooling rack.
    Print Pin
    5 from 1 vote

    Easy Bagel Recipe

    This easy bagel recipe will have you wanting homemade bagels all of the time, with the soft, fresh, flavor of the bakery at home.
    Course Breakfast
    Cuisine American
    Prep Time 2 hours hours 25 minutes minutes
    Cook Time 30 minutes minutes
    Total Time 2 hours hours 55 minutes minutes
    Servings 8 bagels
    Calories 226kcal
    Author Jessica Burgess

    Ingredients

    • 1 ¼ cup warm water 296 ml
    • 1 packet active dry yeast 2 ¼ teaspoons or 7 g
    • ¼ cup sugar divided, 50 g
    • 3 ½ cups flour 420 g
    • 2 teaspoons salt 4 g

    Instructions

    • In a large mixing bowl or the bowl of your stand mixer, add the warm water, yeast, and 2 tablespoon of sugar. Stir to combine and allow to sit for 5 minutes.
    • Once the yeast has softened, add 1 cup of flour and the salt. Using a whisk, spatula, wooden spoon, or the dough hook of your stand mixer, stir to combine.
    • Slowly incorporate the rest of the flour ½ cup at a time. In the beginning, you can add an additional cup of flour. Once you get to the point (if making by hand) of not being able to add more flour with a spatula or wooden spoon, transfer the dough to a lightly floured surface.
    • Begin kneading in more of the flour. You will want to knead the dough for about 8-10 minutes or until the dough is soft and pliable.
    • If you are using a stand mixer, knead the dough for 8-10 minutes using the dough hook the dough will easily release from the sides of the bowl.
    • Place the dough in a lightly greased bowl and cover it. Allow the dough to rise until it has doubled in size. This should take between 1 ½ to 2 hours. This will depend on the temperature of your kitchen.
    • Line a baking sheet with a piece of parchment paper and set aside.
    • Once the dough has doubled in size, turn the dough over onto a lightly floured surface.
    • Divide the dough into 8 even pieces.
    • Form the pieces of dough into balls and then, using your finger, puncture a hole in the middle creating a donut shape then place it on the prepared baking sheet. Repeat this process for all 8 pieces.
    • Cover and allow to rest for 10 minutes.
    • Bring a large pot of water with the remaining 2 tablespoon of sugar to a boil.
    • Line a cooling rack with a paper towel or kitchen towel and set aside.
    • Preheat the oven to 375°F.
    • Gently place 2-4 bagels (one at a time) into the pot of boiling water. Allow them to boil for 1 minute on each side.
    • Remove them from the water and place them on the prepared cooling rack. Once the excess water has dried or evaporated, return the bagel to the prepared baking sheet.
    • Repeat this process for all 8 bagels.
    • Place the bagels in the oven at 375°F and bake for 25 minutes or until golden brown.

    Notes

    • Using a large slotted spoon works really well when placing the bagel into the boiling water.

    Nutrition

    Serving: 1bagel | Calories: 226kcal | Carbohydrates: 48g | Protein: 6g | Fat: 1g | Saturated Fat: 0.1g | Polyunsaturated Fat: 0.2g | Monounsaturated Fat: 0.1g | Sodium: 585mg | Potassium: 67mg | Fiber: 2g | Sugar: 6g | Vitamin C: 0.003mg | Calcium: 10mg | Iron: 3mg

    Blueberry Skillet Cobbler

    July 25, 2024

    Serving of skillet blueberry cobbler on white plate, next to cast iron.

    Blueberry Skillet Cobbler: Best served warm, this easy blueberry cobbler recipe comes together in under one hour which means you are only one hour away from warm, crumbly blueberry goodness!

    Serving of blueberry cobbler on white plate, that was made in a skillet.

    Obsessed with cobbler recipes? Try this Classic Peach Cobbler, this cobbler made with a cake mix, and this Bisquick peach cobbler too! All of which are delicious, served with a big scoop of vanilla ice cream.

    [feast_advanced_jump_to]

    Why You’ll Love This Recipe

    • It uses a few ingredients: With only 7 ingredients, this recipe uses items you may have on hand.
    • Super simple: You can basically just throw this easy dessert recipe together! Any skill level can make it.
    • Easily customizable: This cast iron skillet blueberry cobbler recipe can easily be added to it for even more deliciousness!

    Ingredients Needed

    I’ve highlighted a couple of ingredients below with some relevant notes. Aside from this, the ingredients needed are pretty basic.

    Labeled ingredients for skillet blueberry cobbler.
    • Butter – I used unsalted for this recipe but you can use salted if you prefer. Just remember that you may want to reduce the amount of salt the recipe calls for if using salted butter.
    • Milk – Any regular cow’s milk will do for this recipe.
    • Blueberries – I used fresh berries for this recipe.

    Substitutions

    Sometimes substitutions are necessary because of ingredients that are unavailable or needed for dietary restrictions. Here are some suggestions that can help:

    • Flour – If you are not a fan of all-purpose flour, feel free to sub in your preferred kind, like gluten-free flour, instead.
    • Milk – Easily swap in your favorite dairy-free milk variety to match your dietary needs.
    • Blueberries – Frozen berries work just as well for this recipe! Keep in mind that they might be a bit squishier, though. You could also use a blueberry filling for this recipe instead of fresh or frozen blueberries.

    Variations

    While this recipe is perfectly good as is, there are a few variations you can put into the mix to make it your own.

    • Cook Method – This recipe can be made in a baking dish if you’d prefer. Follow the same instructions!
    • Fruits – Feel free to add your favorite fresh fruits to this recipe to change up the fruit filling flavor.
    • Nuts – Some chopped nuts would really uplevel this classic skillet blueberry cobbler.
    • Lemon Juice – You can add some lemon juice to the blueberries to give them a hint of citrus flavor.
    • Lemon Zest Topping – Go the extra mile and finish this dish off with a dusting of lemon zest on top.

    How to Make Old Fashioned Blueberry Cobbler in a Skillet

    This recipe is super simple; just how grandma liked it to be!

    This Skillet Blueberry Cobbler is broken into 3 components:

    • Making the batter + pouring it into the dish
    • Tossing on the blueberries
    • Baking to perfection

    I suggest making this easy recipe right before you intend to serve it for the best flavor profile.

    *Be sure to see the recipe card below for the full ingredients list & instructions!*

    Begin by preheating your oven to 350 degrees.

    Steps 1-4 of how to make blueberry skillet cobbler.

    STEP 1. Melt butter. Place the stick of butter in an oven-safe cast-iron skillet (we use a cast iron pan), and melt over low heat on the stovetop. Remove from the burner when melted. (Image 1).

    STEP 2. Mix batter. While butter is melting, mix together flour, sugar, milk, baking powder & salt in a separate medium bowl. It should end up being a roughly mixed cake-like batter. (Image 2).

    Tip: You do not have to make sure the “clumps” are gone. Mix just enough that the wet ingredients are incorporated with the dry.

    STEP 3. Pour into dish. Pour batter on top of the melted butter in the hot skillet. (Do not mix.) (Image 3).

    STEP 4. Add blueberries. Pour blueberries on top of the batter mixture. (Do not mix.) (Image 4).

    Skillet blueberry cobbler baked, sitting in cast iron.

    STEP 5. Bake cobbler. Bake for 35-40 minutes, until the top is almost golden brown.

    Close-up image of skillet blueberry cobbler.

    Recipe Pro Tips

    • Serve warm. This cobbler recipe is best served with some vanilla ice cream after baking.
    • Don’t overcook. Be careful of the time. Overcooking cobbler can lead to a really mushy fruit filling.
    A bite of skillet blueberry cobbler on spoon.

    Recipe FAQs

    Why is my cobbler mushy?

    A mushy cobbler can come from excess fruit juices or not allowing it to bake long enough. To fix it, try reducing the fruit juices or bake it a bit longer until the topping is crisp.

    Why is my cobbler spongey?

    A spongey cobbler can happen when the batter is too wet or overmixed. To avoid this, ensure the batter is just mixed until combined and not too runny before pouring it over your fruit filling.

    Does blueberry cobbler need to be refrigerated after baking?

    Yes, after baking, it’s a good idea to refrigerate your blueberry cobbler if you have leftovers (which will be a surprise). Refrigeration helps to keep it fresh and safe to eat for a longer period. Just cover it or transfer it to an airtight container before putting it in the fridge. Enjoy your delicious cobbler tomorrow if you must!

    Is cobbler supposed to be eaten hot or cold?

    Cobbler is typically enjoyed warm, as the heat brings out the flavors and makes the topping crisp. However, you can also enjoy it at room temperature or even chilled if you prefer a different texture.

    Can you overcook cobbler?

    Yes, you can overcook cobbler, which may result in a dry or overly browned topping. To avoid this, follow the recommended baking time in your recipe, and keep an eye on it to ensure it’s just right - golden and bubbling.

    What to Serve with Cast-Iron Blueberry Cobbler

    Cobbler is best served with a scoop of ice cream or homemade whipped cream.

    Storage

    If, and only IF you have any leftover blueberry cobbler, store it in an airtight container once it has cooled down, and enjoy within 4-5 days.

    More Blueberry Recipes You’ll Love

    Love the simplicity of a cobbler? I think you will adore these other easy recipes too!

    • A buttermilk blueberry muffin cut in half with butter on one half.
      Buttermilk Blueberry Muffins
    • Blueberry turnovers with a powdered sugar and milk glaze.
      Blueberry Turnovers Recipe
    • Blueberry waffles on a plate, drenched in syrup.
      Blueberry Waffles Recipe
    • Blueberry Pancakes
      Easy Blueberry Pancakes

    Did you make this? I’d be so grateful if you left a “star” rating below to let me know what you thought! Then, the next time you need a quick and easy recipe, come back to Fantabulosity to browse all of my easy recipes!

    Recipe

    Serving of skillet blueberry cobbler on white plate, next to cast iron.
    Print Pin
    5 from 1 vote

    Skillet Blueberry Cobbler

    This old fashioned blueberry cobbler comes together fast and easy thanks to it's few, simple ingredients. Become the star of the show at your next dinner party if you break out this recipe!
    Course Dessert
    Cuisine American
    Prep Time 10 minutes minutes
    Cook Time 35 minutes minutes
    Total Time 45 minutes minutes
    Servings 8 servings
    Calories 294kcal
    Author Jessica Burgess

    Ingredients

    • 8 Tablespoons unsalted butter stick of butter
    • 1 cup all-purpose flour
    • 1 cup sugar
    • 1 cup milk
    • 2 teaspoons baking powder
    • ½ teaspoon salt
    • 2 cups blueberries

    Instructions

    • Prep: Preheat oven to 350 degrees.
    • Melt butter: Place stick of butter in oven-safe skillet (we use a cast iron pan), and melt over low heat on the stove top. Remove from burner when melted.
    • Mix batter: While butter is melting, mix together flour, sugar, milk, baking powder & salt in a separate bowl. (You do not have to make sure the "clumps" are gone. Mix just enough that the wet ingredients are incorporated with the dry.)
    • Pour in to dish: Pour batter on top of the melted butter in the baking pan. (Do not mix.)
    • Add blueberries: Pour blueberries on top of batter mixture. (Do not mix.)
    • Bake cobbler: Bake for 35-40 minutes, until top is almost a golden brown.

    Nutrition

    Serving: 1serving | Calories: 294kcal | Carbohydrates: 44g | Protein: 3g | Fat: 13g | Saturated Fat: 8g | Polyunsaturated Fat: 1g | Monounsaturated Fat: 3g | Trans Fat: 0.5g | Cholesterol: 34mg | Sodium: 160mg | Potassium: 196mg | Fiber: 1g | Sugar: 30g | Vitamin A: 420IU | Vitamin C: 4mg | Calcium: 89mg | Iron: 1mg

    Slow Cooker Pulled Beef

    July 24, 2024

    Slow Cooker Pulled Beef sitting on square plate.

    This Slow Cooker Pulled Beef recipe uses simple ingredients to give this tender chuck roast amazing flavor, all while cooking in the Crock Pot. Serve on bread as a sandwich, on top of mashed potatoes, rice, or even as a stand-alone.

    Slow cooker pulled beef wit onions, sitting on serving platter.

    This tender pulled beef is slow cooked to perfection, on low for 8 hours, and acts as an amazing base for so many dishes like pasta, or to serve on sliders. Or, this pulled chuck roast is even delicious next to some of your favorite side dishes.

    I also love using chuck roast for these pulled beef tacos, in this Instant Pot Roast recipe, and this Dutch oven roast recipe.

    Ingredients for Crock Pot Pulled Beef

    The ingredients used in this recipe are simple, and they give the pulled beef a flavor that pairs perfectly with so many things!

    I’ve provided a few key notes on some of the ingredients below, but you can skip right to the recipe card below with all the ingredients and instructions listed in one place.

    Ingredients for slow cooker pulled beef on kitchen table.
    • Chuck Roast – I used a 5-pound roast for this recipe, so if your roast is smaller/larger, please note that the cook times and ingredient amounts can be adjusted if preferred. However, this recipe is very forgiving so feel free to keep things the same and watch as it cooks.
    • Garlic – I have also used garlic powder instead of minced garlic and either will work great but I prefer minced garlic for more garlic flavor. Also, 2 Tablespoons of garlic gives this recipe quite a bit of garlic flavor so feel free to cut back on that if you don’t like it to overpower.
    • Smoked Paprika – You can use regular paprika instead of smoked paprika if desired. The flavor won’t vary too much at all.

    How to Make Slow Cooker Pulled Beef

    It’s really easy to make pulled beef in the slow cooker! It consists of seasoning the meat, placing it in the Crock Pot, and allowing it to cook!

    Steps on how to make slow cooker pulled beef.
    1. Mix spices together (except garlic if using minced garlic, although garlic powder can be mixed in with the other spices if using that instead).
    2. Slice onions and place in the bottom of the slow cooker.
    3. Coat roast with spice mixture and place in slow cooker, and top with minced garlic (unless garlic powder was used instead).
    4. Pour broth over roast and onions, and place the lid of the slow cooker on top. Cook on low for 8 hours.
    Cooked slow cooker beef roast on square plate.
    1. Remove roast from the slow cooker, and place on a platter that’s large enough for the chuck roast to be shredded.
    Shredded slow cooked beef, with forks poked in.

    The roast is now ready to be enjoyed how you wish! If serving alone, pouring some of the juices on top of the shredded beef, as well as the onions, is my favorite way to keep the meat from drying out and adding more flavor.

    Pro Tips:

    • Tough Roast: If you find that your roast is tough when shredding, it may need to cook longer. It could just be a tough cut of meat that needs a little more time.
    • Gravy: In my Instant Pot tri-tip recipe, I made a gravy out of the drippings and this can be done with the drippings of this chuck roast too.
    • Garnish: If entertaining, sprinkling fresh parsley on top adds some great color to this dish!
    Cooked pulled beef with cooked onions and juices on platter.

    Storage

    To store leftover cooked pulled beef, allow it to cool and store it, preferably with some of the juice and onions to keep it from drying out, in an airtight container and enjoy within 4-5 days.

    Related Recipe

    Love easy recipes like this one? Here are some of my other favorites for easy dinners:

    • Dutch oven beef stew in white pot.
      Dutch Oven Beef Stew
    • Crock Pot cube steak on top of mashed potatoes, sitting on white plate.
      Crock Pot Cube Steak
    • Close up of slow cooker steak on a pile of mashed potatoes.
      Slow Cooker London Broil and Gravy
    • Slow Cooker Pulled Pork shredded with bbq sauce
      Cherry Coca-Cola Slow Cooker Pulled Pork

    Recipe

    Slow Cooker Pulled Beef sitting on square plate.
    Print Pin
    Be the first to rate!

    Slow Cooker Pulled Beef

    This slow cooker pulled beef recipe uses simple ingredients that create delicious flavor, while slow cooking for 8 hours! Serve alone or on bread as a sandwich, or on top of mashed potatoes.
    Course Dinner, Main Course
    Cuisine American
    Prep Time 5 minutes minutes
    Cook Time 8 hours hours
    Total Time 8 hours hours 5 minutes minutes
    Servings 5 servings
    Calories 842kcal
    Author Jessica Burgess

    Equipment

    • slow cooker

    Ingredients

    • 5 pound chuck roast
    • 1 ½ Tablespoons salt
    • 1 Tablespoon pepper
    • 2 Tablespoons minced garlic or garlic powder
    • 1 Tablespoon smoked paprika
    • 2 teaspoons dried rosemary
    • 2 teaspoons dried thyme
    • 1 cup beef broth
    • 1 white onion

    Instructions

    • In a small bowl, mix together the 1 ½ Tablespoons salt, 1 Tablespoon pepper, 1 Tablespoon smoked paprika, 2 teaspoons dried rosemary, 2 teaspoons dried thyme, and garlic powder if using that instead of minced garlic.
    • Cut 1 white onion in to small slices and place them in the bottom of the slow cooker. Rub seasoning mixture all over roast.
    • Place 5 pound chuck roast on top of sliced onions and top, spread 2 Tablespoons minced garlic on top of roast.
    • Pour 1 cup beef broth on top of roast and onions, place lid on slow cooker and cook on low for 8 hours.
    • Remove roast from slow cooker and shred beef with two forks while still warm.
      If desired, pour some of the juices and cooked onions on top of the shredded beef and then serve on bread as a sandwich, or on top of mashed potatoes if desired.

    Nutrition

    Serving: 1serving | Calories: 842kcal | Carbohydrates: 5g | Protein: 88g | Fat: 52g | Saturated Fat: 23g | Polyunsaturated Fat: 4g | Monounsaturated Fat: 27g | Trans Fat: 3g | Cholesterol: 313mg | Sodium: 2642mg | Potassium: 1629mg | Fiber: 1g | Sugar: 1g | Vitamin A: 772IU | Vitamin C: 3mg | Calcium: 109mg | Iron: 11mg

    How to Make Salami Roses

    July 23, 2024

    Salami rose on charcuterie board, sitting next to nuts, cheese and crackers.

    How to Make Salami Roses – this tutorial will show you the easiest way to make a salami rose with a shot glass or wine glass, perfect for a charcuterie board, or when entertaining with a meat and cheese tray.

    Salami Rose on a charcuterie board.

    Charcuterie boards are beautiful additions to any buffet or holiday table, and adding items such as salami roses to them send them over the top! I love making charcuterie boards as an appetizer idea for parties, holidays (like this Christmas charcuterie board) and just as a casual dinner with friends.

    Did you know it’s easy to make salami roses? It’s true! I’m going to show you below just how easy it is, and tips on how to make them “stick”, different types of meats to use besides salami, and how to make different sizes of them.

    What You’ll Need:

    Salami in packaging, next to a shot glass.

    All you’ll need to make these meat roses are:

    • slices of salami
    • shot glass (or wine glass)

    (It will depend on the size of the salami rose that you’re looking for. See more tips below.)

    How to Make a Salami Rose:

    With only a few steps, you’ll have salami roses in minutes. I’ll walk you through with photos but you can also see the recipe card below for the tutorial in clear, concise, steps.

    Step by step of how to make a salami rose.
    1. Take one slice of salami, and bend the middle of it, over the edge of the shot glass, pressing hard, trying to get it to stick in a downward form.
    2. Next, take a second slice of salami, and cover half of the first piece of salami, pressing down on both, trying to get them to stick in place.
    3. Repeat with more slices of salami, working your way around the edge of the shot glass.
    4. When you’ve worked all the way around, keep repeating the process of overlapping the previous piece, placing the slices on top of one other, making layers and layers of salami. (How many slices will depend on the width of your shot glass or wine glass, and how “thick” you want your rose.)
    Three salami roses on square plate.
    1. When you have as many layers of salami as desired (I usually do 3 layers or so) take the palm of your clean hand (or glove covered hand) and press down very hard. This is securing the salami pieces the best that you can, so they’ll “stick” together in the rose shape.)
    2. Turn the shot glass over on to where you want to place your salami rose, and slowly lift up on the shot glass. (TIP: You can press down on the shot glass after flipping to give the rose an extra “stick” to stay in place.)
    Salami rose on mini charcuterie board.

    Tips for Perfect Salami Roses

    • Temperature of Salami: You don’t want the salami to sit out too long of course but if you allow it to sit out for about 10 minutes before working with it, it won’t be as “stiff” when trying to mold.
    • Placement on Board: If placing your salami rose on a charcuterie board, plan ahead and think of what types of food you can “butt up” against the rose to help hold it in place.
    • Make Roses Ahead of Time: These can be made ahead of time, and stored in an airtight container in the refrigerator. Either store in containers where the sides of the container can help hold the salami rose in shape, or place something in the container that presses up against to the rose to help secure it. (i.e. paper towels, cheese, etc.)
    • Different Types of Meats: Salami slices are great to work with to make roses but I’ve also made pepperoni roses for charcuterie boards.
    • Wine Glasses, and Different Types of Glasses: Wine glasses can be used to make large salami roses, as well as champagne glasses, or any other, thin, round, edge that’s food save. Do note that the bigger the rim, the bigger your salami roses will be.

    Recipe

    Salami rose on charcuterie board, sitting next to nuts, cheese and crackers.
    Print Pin
    Be the first to rate!

    How to Make Salami Roses

    Making salami roses are easy using a shot glass, champagne glass or wine glass. In minutes you'll have a beautiful rose for a charcuterie board or meat and cheese tray.
    Course Appetizer
    Cuisine American
    Prep Time 5 minutes minutes
    Total Time 5 minutes minutes
    Servings 1 rose
    Calories 440kcal
    Author Jessica Burgess

    Ingredients

    • 12 slices salami

    Instructions

    • Begin by taking one slice of salami, and bending the middle of the salami over the edge of the shot glass.
    • Next, take a second piece of salami and place it on the middle of the first piece, overlapping half of the first peice of salami.
    • Repeat this process, going around the entire rim of the shot glass. When you've reached the first piece, continue on, place the salami on top of one another, making layers. For a shot glass, about 12 pieces, and/or three layers of salami usually gives a "full" rose look. Size of shot glass, wine glass or champagne glass can vary on amounts of salami needed.
    • When desired amount of salami slices are added, take your clean palm and press down on the rim, and the sides of the salami, trying to secure the peices to stick to one another.
    • Decide where to place your salami rose on your charcuterie board, and turn the shot glass over, pressing down again, and slowly pulling off the shot glass.
      See tips in blog post for ways to help make the rose even more secure for the best appearance.

    Video

    https://youtube
    .com/shorts/tNMTQYfNAOE

    Nutrition

    Serving: 1rose | Calories: 440kcal | Carbohydrates: 2g | Protein: 24g | Fat: 36g | Saturated Fat: 13g | Polyunsaturated Fat: 4g | Monounsaturated Fat: 17g | Cholesterol: 85mg | Sodium: 2441mg | Potassium: 408mg | Calcium: 14mg | Iron: 1mg

    Marry Me Chicken Pasta

    July 21, 2024

    Marry me chicken pasta in white bowl.

    Marry Me Chicken Pasta is a delicious blend of chicken, pasta, heavy cream, garlic, parmesan, sundried tomatoes, Italian seasoning, and a few other spices to create the creamiest comfort food in under an hour.

    Marry Me Chicken Pasta in white bowl.

    Pasta recipes are the ultimate comfort food; and when they’re easy recipes, it’s a win-win. This blackened chicken alfredo and this bacon ranch chicken pasta recipe are similar pastas, that you’ll want to add to your dinner rotation too.

    Looking for another pasta recipe that will impress? This easy chicken lasagna looks fancy but is easier than you may think!

    Ingredients for Marry Me Pasta

    Ingredients for Marry Me Chicken Pasta recipe.

    The ingredients for this recipe are simple and should be easy to find at your local grocery store. I’ve provided notes on a few key ingredients below but make sure to see the recipe card at the bottom of this post for the full list of ingredients and instructions.

    • Chicken – you can use chicken breasts or chicken thighs for this recipe. Chicken thighs are my favorite to use, since they’re so tender, and flavorful. If you have another package of chicken to use this week, definitely consider this chicken spaghetti with Rotel too!
    • Penne pasta – using a different type of pasta will work but I prefer using penne because it’s tube shape and ridges hold the creamy sauce well, ensuring each bite is flavorful.
    • Grated parmesan cheese – if you have the time, freshly grating your parmesan cheese is so great. It makes this dish so creamy, instead of using a storebought version that tends to have an anti-caking agent to prevent sticking, that doesn’t allow it to be as creamy in the dish. I recommend the same expert tip in my easy homemade Alfredo sauce recipe.
    • Basil – Fresh basil is very recommended. Fresh basil provides so much flavor compared to dried.
    • Chicken broth – Try my easy homemade chicken broth recipe.

    How to Make Marry Me Chicken Pasta

    Ready for this delicious pasta in under an hour? I’ll walk you through how to make this with photos and key notes but make sure to also check out the recipe card below that lists the ingredients and full instructions.

    How to make marry me chicken pasta.
    1. Cook your pasta, drain and set aside.
    2. Next, cook chicken pieces until done.
    3. Remove the chicken and in the same skillet, make the creamy sauce recipe.
    4. When finished with the sauce, add your chicken back in, and stir.
    1. Add the sundried tomatoes.
    2. Toss in your cooked pasta, and stir to combine.
    3. Next, add in spinach.
    4. Stir to combine all of the ingredients.
    Marry Me Chicken Pasta in white bowl, with fork stuck in to middle.

    Your Marry Me Chicken Pasta is ready to be enjoyed! If desired, top with fresh basil.

    Serve this alongside some garlic cheese pull-apart bread, this hearty Alfredo chicken garlic bread, or even the best side salad recipe!

    Related Recipes

    Love pasta recipes? Try this baked ravioli recipe next time, and I know you’ll also love these easy pastas too!

    • Mac and Cheese with Ham in bowl.
      Mac and Cheese with Ham
    • Chicken macaroni salad in a bowl.
      The BEST Chicken Macaroni Salad
    • Chicken Caesar Pasta Salad in big bowl, sitting on napkin.
      Chicken Caesar Pasta Salad Recipe
    • Shrimp Pasta Salad With Mayo
      Shrimp Macaroni Salad

    Recipe

    Marry me chicken pasta in white bowl.
    Print Pin
    Be the first to rate!

    Marry Me Chicken Pasta

    Marry Me Chicken Pasta is a creamy, comforting dish made of ingredients such as sundried tomatoes, heavy cream, Italian seasoning, parmesan cheese, a few other simple ingredients and is ready under an hour!
    Course Dinner, Main Course
    Cuisine Italian
    Prep Time 20 minutes minutes
    Cook Time 30 minutes minutes
    Total Time 50 minutes minutes
    Servings 4 servings
    Calories 973kcal
    Author Jessica Burgess

    Ingredients

    Chicken and Pasta

    • 16 ounces bonesless, skinless chicken more/less is fine too! Cut in to 1-inch pieces.
    • 12 ounces penne pasta uncooked
    • 1 teaspoon kosher salt
    • ½ teaspoon ground black pepper
    • 2 Tablespoons olive oil

    Marry Me Pasta Sauce

    • 2 Tablespoons unsalted butter
    • 4 cloves minced garlic
    • 3 Tablespoons all-purpose flour
    • 2 cups chicken broth
    • 1 cup heavy cream
    • 1 cup grated parmesan cheese
    • ½ teaspoon paprika
    • 1 teaspoon dried Italian seasoning
    • ½ cup sun-dried tomatoes drained and chopped
    • 1 cup baby spinach optional
    • Fresh basil for garnish if desired

    Instructions

    Prep Chicken and Pasta

    • Bring a large pot of salted water to a boil. Add 12 ounces penne pasta and cook according to the package instructions until al dente. Drain and set aside.
    • Season the 16 ounces bonesless, skinless chicken pieces with 1 teaspoon kosher salt and ½ teaspoon ground black pepper.
    • Heat 2 Tablespoons olive oil in a large skillet over medium-high heat. Add the chicken pieces and cook until golden brown and cooked through (about 7 – 9 minutes). Remove the chicken from the skillet and set aside.

    How to Make Marry Me Pasta Sauce

    • To make the sauce, add 2 Tablespoons unsalted butter to the same skillet and melt over medium heat. Add 4 cloves minced garlic and sauté until fragrant, for about 1 minute. Stir in 3 Tablespoons all-purpose flour and cook for another minute to form a roux. Gradually whisk in 2 cups chicken broth, ensuring no lumps remain. Add 1 cup heavy cream and bring to a gentle simmer. Stir in½ teaspoon paprika, 1 teaspoon dried Italian seasoning, and 1 cup grated parmesan cheesee until melted and the sauce is smooth.

    Combine Chicken, Pasta and Sauce

    • Add the cooked chicken back to the skillet.
    • Stir in ½ cup sun-dried tomatoes. Simmer for 5 minutes until the sauce thickens and coats the chicken.
    • Add the cooked penne pasta to the skillet and toss to coat with the sauce. Simmer for an additional 2 – 3 minutes to allow the flavors to meld together.
    • Finally, add 1 cup baby spinach (optional) and stir until slightly wilted.
    • Garnish with Fresh basil for garnish if desired, and serve.

    Nutrition

    Serving: 1serving | Calories: 973kcal | Carbohydrates: 83g | Protein: 38g | Fat: 55g | Saturated Fat: 26g | Polyunsaturated Fat: 5g | Monounsaturated Fat: 19g | Trans Fat: 0.3g | Cholesterol: 164mg | Sodium: 1552mg | Potassium: 1008mg | Fiber: 5g | Sugar: 10g | Vitamin A: 2333IU | Vitamin C: 10mg | Calcium: 332mg | Iron: 4mg

    Broiled Pork Chops

    July 19, 2024

    Broiled pork chop on roasting rack.

    Broiled Pork Chops in less than 30 minutes! Simple ingredients such as lemon pepper, garlic, and rosemary add flavor to these bone-in pork chops baked in the oven.

    Other similar recipes like these bbq pork chops in the oven and this sheet pan pork chop and vegetables recipe, are also great ways to cook this cut of pork in your dinner rotation.

    Broiled pork chops on broiling rack, surrounded by fresh herbs.

    Recipe Overview:

    • Prep: Coat with oil and seasonings for an easy prep before broiling.
    • Flavor: Everyday spices give this pork chop recipe the most delicious flavor by keeping things simple.
    • Cooking Level: So easy! Not only an easy prep process but baking these in the oven and only flipping once, means you can let the oven do most of the work. It’s almost as easy as dumping pork chops in the crockpot!

    Ingredients You’ll Need

    Ingredients for broiled pork chops.
    • Pork chops: When shopping for pork chops, look for 1.5-2 pounds of thick-cut bone-in pork chops that are 1-1.5 inches thick. Other sizes will work, however keep in mind that the cooking time can vary based on if the pork chops are thinner or thicker.
    • Water: This is key to prevent smoking and the juices from the pork from burning.
    • Herbs: If you prefer to use fresh herbs you can substitute dried rosemary with 1 ½ teaspoons of fresh rosemary. You can also substitute granulated garlic with 1 clove of fresh minced garlic.
    • Lemon juice: The lemon juice is optional but it can add even more great flavor, after broiling.

    How to Make Broiled Pork Chops

    Make sure to check the recipe card below for the ingredients and instructions all in one place.

    Hand using a paper towel to pat the pork chops dry.

    First, you’ll wash and pat dry the pork chops, with a paper towel. You want to make sure the pork chops are dry so the oil and spices stick to the pork well.

    Hand seasoning pork chops on paper towels.

    Next, it’s time to brush the olive oil onto each side of the chops and sprinkle the seasonings over the pork chops.

    Pouring water in to roasting pan.

    Pour water into the bottom of the roasting pan to prevent smoking and juices from burning. Then place the pork chops onto the pan. 

    Raw pork chops on roasting pan rack.

    Once the broiler is pre-heated, and the oven rack is placed 5 inches from the broiler, place the pan into the oven and broil for 10-16 (depending on thickness), flipping once halfway through cooking.

    Broiled pork chop on around plate sitting next to mashed potatoes and broccoli.

    The pork chops are done when a meat thermometer reads 145 degrees after being inserted in to the middle of the thickest part of one of the pork chops. Let the pork chops rest 3-5 min before serving.

    If desired, squeeze a lemon wedge and juice the tops of hte pork chops to add extra flavor.

    Pro Tips for This Recipe

    • Type of Pan: If you do not have a short-sided roasting pan you can use a sheet pan with an oven-safe cooling rack placed inside of it.
    • Clean-Up: For easy clean-up, line the pan with aluminum foil.
    • Internal Temperature of Pork: The FDA states that pork is done at 145 degrees. To prevent overcooking you can remove the chops at 140 degrees and they will continue to cook while resting to reach 145 degrees.
    • For complete temperature and timing guidance, see our full guide on how to cook pork chops in the oven.
    Fork holding a piece of a broiled pork chop.

    Storage Instructions

    These are best when eaten immediately after cooking but also make great leftovers. Store leftovers in an airtight container for up to 5 days in the refrigerator.

    More Pork Recipes

    If you love cooking with pork, these are popular pork recipes you can also find here:

    • Close up of southern fried pork chops on white plate, with a pork gravy poured on top.
      Southern Fried Pork Chops
    • Grilled pork chop on plate next to asparagus.
      Grilled Pork Chops Recipe
    • Baked BBQ Pork Steaks on white plate
      Pork Steaks in the Oven
    • BBQ Pork Steaks
      BBQ Pork Steaks in the Slow Cooker

    Recipe

    Broiled pork chop on roasting rack.
    Print Pin
    Be the first to rate!

    Broiled Pork Chops

    These broiled pork chops are brushed with oil, herbs ans spices with optional lemon juice for extra flavor, making these juicy and so delicious!
    Course Dinner, Main Course
    Cuisine American
    Prep Time 8 minutes minutes
    Cook Time 16 minutes minutes
    Total Time 24 minutes minutes
    Servings 2 servings
    Calories 498kcal
    Author Jessica Burgess

    Ingredients

    • 1.5-2 pounds thick-cut bone-in pork chops about 1-1.5 inches thick
    • 1 Tablespoon olive oil
    • ¼ teaspoon garlic powder
    • ½ teaspoon lemon pepper
    • ½ teaspoon dried rosemary
    • ½ teaspoon salt
    • ½ cup water
    • lemon juice from fresh lemons if possible

    Instructions

    • Wash and pat dry the 1.5-2 pounds thick-cut bone-in pork chops.
    • Brush 1 Tablespoon olive oil onto each side of the chops.
    • Mix the seasonings (¼ teaspoon garlic powder, ½ teaspoon lemon pepper, ½ teaspoon dried rosemary, ½ teaspoon salt) together in a small bowl and then sprinkle the mixture over the chops, evenly. You may need to use the brush to spread the seasoning out evenly. 
    • Pour the ½ cup waterinto the bottom of the roasting pan to prevent smoking and juices from burning. Then place the pork chops onto the pan.
    • Move the oven shelf to approximately 5 inches from the broiler element. Then preheat the broiler on HI for 2-3 minutes.
    • Once heated, place the pan into the oven and broil for 10-16 (depending on thickness), flipping once halfway through cooking.
    • Pork chops are done when a meat thermometer reads 145 degrees. Let the pork chops rest 3-5 min before serving.
    • Garnish with lemon juice to add extra flavor if desired. 

    Nutrition

    Serving: 1serving | Calories: 498kcal | Carbohydrates: 1g | Protein: 53g | Fat: 30g | Saturated Fat: 9g | Polyunsaturated Fat: 4g | Monounsaturated Fat: 14g | Trans Fat: 0.2g | Cholesterol: 176mg | Sodium: 725mg | Potassium: 887mg | Fiber: 0.2g | Sugar: 0.01g | Vitamin A: 19IU | Vitamin C: 0.02mg | Calcium: 54mg | Iron: 2mg

    Fruit Punch Recipe

    July 7, 2024

    fruit punch in glass with orange slice

    Fruit Punch Recipe: Made with Sprite (or lemon-lime soda), pineapple juice, kool-aid, sugar, and water! So simple and easy and one of the best punch recipes there is!

    Quick Overview: Makes 2 gallons; Excellent for a party, kids or to make, and ready in only 5 minutes! The perfect Christmas punch or all-year-around punch!

    Red Fruit punch in glass with orange slice

    Why You’ll Love This Recipe

    It’s quite fun to be sharing one of the BEST punch recipes with you all today.

    Perhaps it’s because:

    • this recipe has gone VIRAL on Pinterest and Google for being one of the favorites.
    • it’s one of the most delicious childhood memories that I had as a little girl.
    • because it’s literally is the best punch I’ve ever had.
    • or because it’s SO SIMPLE!

    We’ll go with all four and roll with it!

    Also, if you loved Hawaiian fruit punch as a kid, I think you’re really going to love this one too! Not only does it have a similar flavor but it conquers that sweet-tooth craving if you’re wanting something for the kids at snack time or to serve at a birthday party! Looking for punch recipe for Thanksgiving? This apple cider punch is very popular too!

    How to Make this Fruit Punch Recipe

    As always, there’s a full, printable, recipe card at the bottom of this post, but I’d love to walk you through the recipe with photos and extra tips to help you make the punch recipe that so many have made and given 5 stars to!

    Non-Alcoholic Punch Recipe

    This recipe is for a non-alcoholic version but if you’re looking to make it alcoholic, it can be done easily!

    Here are some suggestions to make it a cocktail:

    • add vodka (coconut, coconut rum for rum punch, etc.)
    • combine wine/fruit for a sangria
    • mix with sparkling champagne
    Fruit punch in a mason jar with cranberries and rosemary sprig

    Fruit Punch Ingredients:

    Using a handful of ingredients, and AFFORDABLE ingredients at that… it’s easy to whip up this punch recipe for a crowd and double, triple, or quadruple it. (Think family gatherings, holiday parties, play dates, summertime picnics, potlucks and so much more!)

    See the full recipe card below for ingredient amounts and instructions!

    • Sprite (or lemon-lime soda)
    • Pineapple Juice
    • Packets of Kool-aid (Orange, lemon, strawberry, and cherry)
    • Sugar
    • Water

    Tips for How to Serve Punch:

    If you’re serving this for a large crowd, making it ahead of time is ideal! However, here are some tips to make it the BEST…

    Add Sprite Just Before Serving:

    Don’t add the lemon-lime soda, or Sprite until right before serving. This is to retain the carbonation of the soda, to give the punch a little “fizz.”

    Serve in a Pretty Drink Dispenser

    Fruit punch in drink dispenser and mason jar

    If you’re like me, then you may love to serve this fruit punch recipe in a drink dispenser; for a party or just to have at home!

    Garnish Your Punch

    For each serving, it’s fun to garnish with a cute drink stirrer or actually, a sprig of rosemary looks FABULOUS for the holidays. OR rim the glass like I did for the Red Apple Martini’s here.

    Expert Tip

    • Freeze punch ice cubes: If you plan to make your punch ahead of time, freeze some of it into ice cube trays (I’d say 1-2 trays), and before the party starts, empty the punch cubes into the punch so when they melt… it won’t water down your punch!

      However, it can be served over regular or fruity ice cubes, so if placing in a punch bowl before the party is more your style, that’s absolutely ok!

    This way it will keep it cold, and still flavorful!

    Fruit Punch in glass with rosemary sprig and large batch in a drink dispenser.

    Substitutions

    YES! This fruit punch recipe is incredibly easy, and “forgiving,” in case you’re short an ingredient, or want to change things up a bit. Feel free to experiment a little and add or take away anything you like! Now THAT’S simple.

    More Punch and Drink Recipes You’ll Love:

    • Orange Sherbet Punch
    • Cran-Apple Martini
    • Iced Coffee Recipe
    • Blue Lagoon Mocktail

    Did You Make This?
    Snap a pic and hashtag it #Fantabulosity - I love to see your creations on Instagram and Facebook.

    Recipe

    fruit punch in glass with orange slice
    Print Pin
    4.27 from 381 votes

    The BEST Fruit Punch Recipe

    Fruit Punch Recipe: Made with Sprite (or lemon-lime soda), pineapple juice, kool-aid, sugar, and water! So simple and easy and one of the best punch recipes there is!
    Course Drinks
    Cuisine American
    Prep Time 5 minutes minutes
    Total Time 5 minutes minutes
    Servings 32 servings (2 gallons)
    Calories 84kcal
    Author Jessica Burgess

    Ingredients

    • 1 package each Kool-Aid mix: Orange, Lemon, Cherry and Strawberry (small packets of each flavor – and the pkgs. that say it will make 2 quarts)
    • 1 gallon water
    • 3.5 cups sugar super fine if possible, but not necessary
    • 46 ounce can of pineapple juice
    • 2 liter bottle of lemon-lime soda

    Instructions

    • Mix together all ingredients EXCEPT lemon-lime soda.
    • Right before serving, add in the lemon-lime soda and stir.
    • Serve chilled or over ice.

    Video

    Notes

    Optional: I love serving mine in an adorable drink dispenser that I can stick right in the fridge if we’re left with any leftovers! 
    MAKE AHEAD TIP: If you plan to make your punch ahead of time, freeze some of it into ice cube trays (I’d say 1-2 trays) and before the party starts, empty the punch cubes into the punch so when they melt… it won’t water down your punch!
     

    Nutrition

    Serving: 1serving (8 ounces) | Calories: 84kcal | Carbohydrates: 21g | Sodium: 6mg | Sugar: 21g | Calcium: 4mg

    Crispy Chicken Burger (KFC Zinger Burger)

    July 7, 2024

    Crispy Chicken Burger

    Crispy Chicken Burger Recipe (or Zinger Burger): Chicken breasts soaked in a buttermilk marinade, spices, and hot sauce then breaded and fried before being sandwiched between two hamburger buns.

    Crispy Chicken Burger

    With our now, WORLD FAMOUS burger recipe, I knew we had to create more burger recipes for you, even if that meant, chicken burgers! So today, get ready because this may be your new favorite chicken sandwich, especially if you’re a fan of the Zinger burger from KFC!

    Why You’ll Love This Fried Chicken Burger Recipe

    If you love a good chicken sandwich but you don’t own a deep fryer (and you don’t feel like ordering takeout tonight), this fried chicken burger made in a skillet is going to blow your mind. (Or if a fried chicken sandwich isn’t your thing, this chicken club sandwich will win over your heart!) This homemade version will give you all the crunch and all the flavor you’ve been craving!

    I know the idea of frying chicken pieces might seem intimidating, but I promise it’s not as scary as all that. Follow along below and I’ll show you how easy it can be!

    Zinger Burger Copycat

    Did you ever have the Zinger burger from KFC? Oh my goodness. That crispy chicken patty, with a little heat… was BEYOND delicious. It has since been discontinued but with this crispy chicken sandwich, topped with the optional sauce recipe below, your zinger burger lovin-heart will once again be fulfilled. This reminds me SO much of it and I can’t wait to share it with you!

    Pair this crispy chicken sandwich with our Baked Fiesta Ranch Potato Wedges and The BEST Side Salad Recipe for a dinner time your family won’t soon forget!

    [feast_advanced_jump_to]

    Ingredients for Crispy Chicken Burgers

    Ingredients for crispy chicken burgers.
    • 4 small chicken breasts, thawed & raw (or 2 large breasts, cut in half)
    • 32 ounces vegetable oil

    Chicken Marinade Ingredients

    • 2 cups buttermilk
    • 2 tablespoons hot sauce of your choice (our favorite is Frank’s Red Hot)
    • 1 tablespoon garlic powder
    • 1 teaspoon ground paprika
    • 1 teaspoon salt
    • ½ teaspoon ground black pepper
    • 1 cup all-purpose flour

    Ingredients for Seasoned Flour Mixture to Bread Chicken

    • 2 cups all-purpose flour
    • 2 tablespoons garlic powder
    • 2 tablespoons ground paprika
    • 1 teaspoon salt
    • ½ teaspoon ground black pepper
    • ½ teaspoon ground cayenne pepper

    Toppings

    If desired of course. (Make sure to see the sauce recipe below too if that’s something you’d love to top this with!)

    • 4 large hamburger buns (brioche buns are our FAVE!)
    • 4 slices cheddar cheese
    • 2 large ripe tomatoes, sliced
    • ½ head iceberg lettuce, washed
    • 8 pickle slices

    Substitutions

    If you are looking for a healthier version of a crispy chicken sandwich, try swapping out the hamburger bun for romaine lettuce! Lay 4-5 romaine lettuce leaves out, overlapping the edges slightly. Place your burger and toppings in the center of the lettuce and then fold the edges up around it.

    It’s messy, but it’s delicious and it cuts down the calories and carbs in this recipe.

    Variations

    If this isn’t your first chicken breast burger recipe and you’re looking for ways to change things up, try these variations…

    • Instead of cheddar cheese, try a jalapeño Havarti cheese for an extra kick.
    • Instead of hamburger buns, try using toasted brioche buns for a more decadent experience!
    • Bacon doesn’t come on these but wouldn’t it be delicious? Use a thick-sliced bacon like I use on this BLT recipe, and that’s going to add even more flavor this already tasty sandwich.

    How to Make This Crispy Chicken Sandwich

    Chicken breasts with spices in small bowls surrounding them.
    1. Wrap chicken breasts in plastic wrap/cling film and place them on a cutting board. Using a mallet or other kitchen tool (like a rolling pin), pound the chicken pieces until evenly thick (about ¾ inch).
    Marinade mixture ready to be used.
    Mix together- this will be your marinade.
    1. Combine your marinade ingredients (buttermilk, hot sauce, garlic powder, paprika, salt, and pepper) into a large bowl and whisk together. 

    Optional – You can add the chicken breasts to the marinade and refrigerate for 2-4 hours or overnight, like we do with these mini chicken sandwiches! Then remove the chicken from the marinade (reserving marinade to use when coating chicken breasts) and allow chicken to rest for 15 minutes at room temperature before moving on with the recipe.

    1. Add remaining cup of flour to the marinade and mix. Set aside. 
    Add flour to your buttermilk to create a batter.
    1. Add the ingredients for the seasoned flour mixture used to bread the chicken into a small bowl and whisk together. Pour this onto a large plate or into a shallow bowl.
    Mix together flour and spices to create the coating for your chicken.
    1. Add oil to a large skillet on medium heat and let it heat up. Grab one piece of chicken at a time and dip it into the marinade/flour mixture until it’s completely coated, then dredge chicken in the seasoned flour batter mixture (coat it, making sure all sides are covered). Use your hands to press firmly to ensure the batter mixture sticks.
    Use your hands to make sure the flour mixture sticks to the chicken.
    Coat the dipped chicken piece in the seasoned flour mixture for a second, final time.

    Repeat this process (dip in marinade, coat in batter mixture) twice for each chicken breast, gently shaking off any excess flour mixture when you are done. 

    1. Once all breasts are thoroughly coated, place them into hot oil making sure they are not touching each other (you may need to do this in batches depending on the size of your chicken and the size of your pan). Fry for 8 minutes, then flip and fry for an additional 7 minutes. The chicken patties should be golden brown when finished. 
    2. Remove the chicken from the oil and place on a wire rack that’s sitting over a baking tray or pan (you could also place some paper towel on the baking tray/pan to catch the excess oil that drips off). 

    Next, make the burger sauce…

    Let your chicken pieces sit on a wire rack to cool a bit and let the excess oil drip off.

    Crispy Chicken Burger Sauce

    This creamy mayonnaise-based sauce is delicious on chicken burgers (and with fries, and for dipping chicken fingers in…) and it’s SO easy to make!

    Here’s what you’ll need:

    • 1 tablespoon ketchup
    • 3 tablespoons mayonnaise
    • 1 teaspoon hot sauce of your choice
    • 1 teaspoon ground paprika
    • ⅛ teaspoon ground black pepper
    Mix together your sauce ingredients.
    1. In a small bowl, add sauce ingredients – mayo, ketchup, hot sauce, paprika, and ground pepper, then whisk until combined. And voila, your crispy chicken burger sauce is ready to go!
    Your creamy mayonnaise mixture will go on the top bun of your burger.
    1. Open the hamburger buns and spread the creamy mayonnaise mixture onto the top bun. Place pickle slices, fried chicken breast, and a slice of cheese onto the bottom bun, then top with tomato slices and fresh lettuce. 
    Place a cheese slice on top of each chicken patty.

    Top with the bun and enjoy!

    Your chicken sandwiches are ready to eat!

    Storage

    Store the crispy chicken burger patties, sauce, and toppings separately in airtight, sealed containers. When you are ready to eat, warm the patties up and then assemble your chicken sandwiches as specified in the recipe.

    stacked zinger burgers with white background

    Expert Tips and FAQs

    What is the best type of bun to use for a crunchy chicken burger?

    Switching up the style of bun you use can add a bit of variety to your chicken burger.

    Do you like a really soft, sweet bun? Try a Hawaiian roll.

    Looking for something super soft and decadent? Brioche rolls are for you!

    If you’re interested in something more classic, try using a classic hamburger bun but instead of leaving them as is try toasted buns.

    Can I use chicken tenders instead of chicken breasts for this recipe?

    You sure can, but chicken tenders are smaller than a breast so your resulting chicken patty will be a bit smaller as well.

    Zinger burger on brioche bun with lettuce tomato cheese

    Related Recipes

    If you loved this crispy chicken burger recipe, you’ll also love these Air Fryer Buffalo Chicken Tenders and these Air Fryer Chicken Legs!

    More Burger Recipes

    But if you’re a burger lover, you definitely don’t want to miss my stove-top burgers, donut burgers, waffle burgers, and cheeseburger sliders. (Yeah, we’re kind of addicted to burgers around here!)

    Did you make this? I’d be so grateful if you left a “star” rating below to let me know what you thought! Then, the next time you need a quick and easy recipe, come back to Fantabulosity to browse all of my easy recipes!

    Recipe

    Crispy Chicken Burger
    Print Pin
    5 from 8 votes

    Crispy Chicken Burger Recipe

    This crispy chicken burger is made of chicken breasts soaked in buttermilk, spices, and hot sauce then breaded and fried and sandwiched between two hamburger buns with a delicious sauce.
    Course Main Course
    Cuisine American
    Prep Time 10 minutes minutes
    Cook Time 15 minutes minutes
    Total Time 25 minutes minutes
    Servings 4 burgers
    Calories 802kcal
    Author Jessica Burgess

    Ingredients

    • 4 small chicken breasts thawed and raw (or 2 large breasts, cut in half)
    • 32 ounces vegetable oil

    Chicken Marinade

    • 2 cups buttermilk
    • 2 tablespoons hot sauce brand of your choice (our favorite is Frank's Red Hot)
    • 1 tablespoon garlic powder
    • 1 teaspoon ground paprika
    • 1 teaspoon salt
    • ½ teaspoon ground black pepper
    • 1 cup all-purpose flour

    Flour Mixture for Breading Chicken

    • 2 cups all-purpose flour
    • 2 tablespoons garlic powder
    • 2 tablespoons ground paprika
    • 1 teaspoon salt
    • ½ teaspoon ground black pepper
    • ½ teaspoon ground cayenne pepper

    Toppings

    • 4 large hamburger buns
    • 4 slices cheddar cheese
    • 2 large tomatoes sliced
    • ½ head iceberg lettuce washed
    • 8 pickle slices

    Crispy Chicken Burger Sauce

    • 3 tablespoons mayonnaise
    • 1 tablespoon ketchup
    • 1 teaspoon hot sauce brand of your choice
    • 1 teaspoon ground paprika
    • ⅛ teaspoon ground black pepper

    Instructions

    • Wrap chicken breasts in plastic wrap/cling film and place them on a cutting board. Using a mallet or other kitchen tool (like a rolling pin), pound the chicken pieces until evenly thick (about ¾ inch).
    • Combine your marinade ingredients (buttermilk, hot sauce, garlic powder, paprika, salt, and pepper) into a large bowl and whisk together.
      Optional – You can add the chicken breasts to the marinade and refrigerate for 2-4 hours. Then remove the chicken from the marinade (reserving marinade to use when coating chicken breasts) and allow chicken to rest for 15 minutes at room temperature before moving on with the recipe.
    • Add remaining cup of flour to the marinade and mix. Set aside.
    • Add the ingredients for the batter to bread the chicken into a small bowl and whisk together. Pour this onto a large plate or into a shallow bowl.
    • Add oil to a large skillet on medium heat and let it heat up. Grab one piece of chicken at a time and dip it into the marinade/flour mixture until it's completely coated, then dredge chicken in the seasoned flour batter mixture (coat it, making sure all sides are covered). Use your hands to press firmly to ensure the batter mixture sticks.
      Repeat this process (dip in marinade, coat in batter mixture) twice for each chicken breast, gently shaking off any excess flour mixture when you are done.
    • Once all breasts are thoroughly coated, place them into hot oil making sure they are not touching each other (you may need to do this in batches depending on the size of your chicken and the size of your pan). Fry for 8 minutes, then flip and fry for an additional 7 minutes. The chicken patties should be golden brown when finished.
    • Remove the chicken from the oil and place on a wire rack that's sitting over a baking tray or pan (you could also place some paper towel on the baking tray/pan to catch the excess oil that drips off).
    • In a small bowl, add your sauce ingredients – mayo, ketchup, hot sauce, paprika, and ground pepper, then whisk until combined.
    • Open the hamburger buns and spread the creamy mayonnaise mixture onto the top bun. Place pickle slices, fried chicken breast, and a slice of cheese onto the bottom bun, then top with tomato slices and fresh lettuce.

    Nutrition

    Serving: 1burger | Calories: 802kcal | Carbohydrates: 82g | Protein: 66g | Fat: 22g | Saturated Fat: 7g | Polyunsaturated Fat: 7g | Monounsaturated Fat: 6g | Trans Fat: 1g | Cholesterol: 167mg | Sodium: 1432mg | Potassium: 1461mg | Fiber: 7g | Sugar: 8g | Vitamin A: 3464IU | Vitamin C: 19mg | Calcium: 261mg | Iron: 7mg

    Crockpot Chicken Pasta

    July 6, 2024

    Crockpot Chicken Pasta on wooden spoon.

    This Crockpot Chicken Pasta is creamy, cheesy, and full of garlic parmesan flavor! Just a few simple ingredients, including a storebought sauce (how easy is that?), is all it takes for this dinner idea, that will become a new favorite.

    Crockpot Chicken Pasta scooped up on wooden spoon.

    Crockpot recipes are such a great way to make dinnertime easy. Some of my favorite crockpot recipes for my family are these slow cooker pork steaks, crockpot enchiladas, and this crockpot chicken and stuffing.

    If you’re looking for another crockpot recipe to make an easy, delicious dinner, this is the one you’ll want to make next. Pour ingredients like the raw chicken breasts, garlic parmesan sauce, cream cheese, cheeses, and a few spices; allow it to cook, shred the chicken right in the slow cooker, and then toss in the cooked pasta, stir, and enjoy. It doesn’t get much easier than that!

    Ingredients Needed

    Ingredients for crockpot chicken pasta.

    So much creaminess in just a few ingredients! Here are a few notes on some of the key ingredients to make this crockpot chicken pasta. See the recipe card below for the measurements.

    • Buffalo Wild Wings Parmesan Sauce - Any brand of garlic parmesan sauce will do but this is my favorite.
    • Shredded parmesan cheese - You can use grated parmesan instead.  
    • Red pepper flakes - If you're not a spice person, leave out the red pepper flakes. 
    • Heavy cream– Whole milk will also work.
    • Boneless skinless chicken breasts - Chicken breast tenderloins would also be great, or boneless skinless chicken thighs would be good too.
    • Rotini pasta - Feel free to use a different pasta shape. Any short pasta will do. I also like macaroni, bowtie, and penne. I love using penne too, as it locks in the sauce on to the noodle, like in this recipe for Marry Me Chicken Pasta.
    • Fresh parsley - The parsley is optional, but I love the vibrant color it brings to the finished dish. 

    How to Make Crockpot Garlic Parmesan Chicken Pasta

    Here’s an overview of how to make this crockpot chicken pasta but you can skip to the recipe card for the instructions too.

    1. Make the sauce. With a spoon or spatula, mix the parmesan sauce, cream cheese, parmesan, cheddar, red pepper flakes, garlic, onion powder, and heavy cream in the bottom of your crockpot basin.
    Ingredients in crockpot to make garlic parmesan chicken pasta.
    1. Add chicken. Nestle the chicken breasts into the cheesy garlic parmesan mixture and spoon some of it over the chicken to cover it. 
    Raw chicken breasts added to crockpot.
    1. Cook. Seal the crockpot and cook on low for 4 hours or on high for 2 hours. At the end of the cooking time, check the chicken with a meat thermometer before removing it from the crockpot. You'll know it's done when the thermometer reads that the chicken is 165°F.
    2. Cook the pasta. 20 minutes before the cooking time for the chicken is up, cook the pasta per the package's instructions. Drain the pasta and set aside. 
    3. Shred. When the chicken is cooked, use two forks to shred it while still in the crock pot. Give everything a good stir to coat the chicken in sauce.
    Cooked chicken breasts in crockpot with sauce.
    1. Put it all together. Add the cooked pasta to the crockpot and stir once more to coat the pasta. 
    Cooked pasta added to crockpot chicken.

    Add the fresh parsley if desired, and enjoy!

    Crockpot chicken pasta with garlic parmesan sauce.

    Recipe Pro Tips:

    • No crockpot? No problem. You can make this creamy chicken pasta in the oven. Mix up the sauce and load a baking dish up just as you would the crockpot. Bake, uncovered, for 30 minutes or until a meat thermometer inserted into the largest chicken breast reads 165°F. 
    • What size crockpot is best? A 6 quart crockpot was used here. If your crockpot is larger, you can scale the recipe up for proper cooking. If it is smaller than 6 quarts, scale the recipe down. 
    • Can I add the pasta to the crockpot raw? Do not try to add the pasta to the crockpot raw. While it might be tempting, there is not enough liquid in this dish to hydrate the pasta without drying the chicken out. Plus, the pasta will get mushy if you add the liquid with it. 
    • Pasta turn out too thick? If you like a thinner pasta sauce you can add ¼ cup more of heavy cream and mix it well. This will thin it a bit without losing flavor. Add it after the chicken is cooked. The chicken will release juices when cooked so the thickness of the sauce will change by the time it’s ready to serve. 
    • Add vegetables? You can definitely add vegetables to this dish! I love adding broccoli florets, sliced carrots, cubed potatoes, peas, or some combination. Just mix the veggies in with the sauce before adding the chicken to the crockpot. 
    Garlic parmesan chicken pasta serving on a round plate, sitting next to a fork.

    How to Store Crockpot Chicken Pasta

    • To store: Once the chicken pasta has cooled completely, seal it in an airtight container. You can store it in the fridge for up to 4 days or in the freezer for up to 3 months. 
    • To reheat: Allow the leftovers to thaw in the fridge (if applicable) before transferring them to a baking dish. Cove the baking dish with aluminum foil and bake at 350°F for 20 minutes or until heated through. 
    • How to Freeze in advance: Mix up the sauce, place the chicken in a large freezer bag, pour the sauce over the chicken, and mix it around a bit to coat the chicken. Seal the bag and freeze for up to 3 months. When you are ready to enjoy, allow the chicken and sauce to thaw in the fridge before loading everything into the crockpot and cooking as you normally would and then place in the crockpot to cook.

    What to Serve with this Crockpot Chicken Pasta:

    Some of my favorite side dishes to go with this crockpot recipe are this creamy cucumber salad (to keep the cooking to a minimum), these cheddar biscuits, and this garlic roasted broccoli. Or check out these side dish recipes that are newer here:

    • 9x13 baking dish with party potatoes inside, and a wooden serving spoon, spooning it out.
      Party Potatoes
    • Sweet cornbread muffins stacked on a plate.
      Sweet Cornbread Recipe
    • Wooden spoon holding a serving of old-fashioned cornbread dressing.
      Old-Fashioned Cornbread Dressing
    • Yeast rolls in baking pan.
      Yeast Rolls Recipe

    Recipe

    Crockpot Chicken Pasta on wooden spoon.
    Print Pin
    5 from 2 votes

    Crockpot Chicken Pasta

    This crockpot chicken pasta uses simple ingredients, a garlic parmesan sauce, and is one of the most delicous, creamy, cheesy, dinners that everyone will love!
    Course Dinner, Main Course
    Cuisine American
    Prep Time 10 minutes minutes
    Cook Time 4 hours hours
    Total Time 4 hours hours 10 minutes minutes
    Servings 6 1 cup servings
    Calories 650kcal
    Author Jessica Burgess

    Equipment

    • slow cooker

    Ingredients

    • 12 ounce Buffalo Wild Wings Parmesan Sauce or similar
    • 8 ounces cream cheese cubed and softened
    • ¾ cup shredded parmesan cheese
    • ½ cup shredded cheddar cheese
    • ¼ teaspoon red pepper flakes
    • ½ tablespoon minced garlic
    • 1 teaspoon onion powder
    • ¼ cup heavy cream
    • 2 pounds boneless skinless chicken breasts
    • 2 cups rotini pasta
    • Fresh chopped parsley to garnish optional

    Instructions

    • Make the sauce. With a spoon or spatula, mix the parmesan sauce, cream cheese, parmesan, cheddar, red pepper flakes, garlic, onion powder, and heavy cream in the basin of your crockpot.
    • Load the crock pot. Nestle the chicken breasts into the cheesy garlic parmesan mixture and spoon some of it over the chicken to cover it. 
    • Cook. Seal the crockpot and cook on low for 4 hours or on high for 2 hours. At the end of the cooking time, check the chicken with a meat thermometer before removing it from the crockpot. You'll know it's done when the thermometer reads 165°F.
    • Cook the pasta. 20 minutes before the cooking time for the chicken is up, cook the pasta per the package's instructions. Drain the pasta and set aside. 
    • Shred. When the chicken is cooked, use two forks to shred it while still in the crock pot. Give everything a good stir to coat the chicken in sauce.
    • Put it all together. Add the cooked pasta to the crockpot and stir once more to coat the pasta.
    • Serve. Serve warm garnished with fresh parsley. 

    Nutrition

    Serving: 1cup | Calories: 650kcal | Carbohydrates: 22g | Protein: 45g | Fat: 42g | Saturated Fat: 18g | Polyunsaturated Fat: 2g | Monounsaturated Fat: 7g | Trans Fat: 0.02g | Cholesterol: 170mg | Sodium: 856mg | Potassium: 690mg | Fiber: 1g | Sugar: 2g | Vitamin A: 916IU | Vitamin C: 2mg | Calcium: 272mg | Iron: 1mg

    Mini Corn Dogs

    July 5, 2024

    Mini corn dogs in food basket with red and white paper, with a cup of mustard.

    Mini Corn Dogs are made using only a few simple ingredients, and they’re ready in under 10 minutes. Sure, you can buy pre-made mini corn dogs in the frozen section of the store but making a homemade version will leave you wondering why you didn’t make them sooner!

    Mini corn dogs in red and white basket.

    Hot dogs are a great party food, or a quick lunch or dinner. There are so many options from cooking regular hot dogs to making pigs in a blanket. You can even top them a hot dog chili sauce, or serve hot dogs on a hot dog bar when hosting a party.

    Whatever your love for hot dogs include, these mini corn dogs will be a hit with the kiddos, for a party or to make for a fun meal at home and are fun to rotate with this Wiener Winks recipe.

    [feast_advanced_jump_to]

    Ingredients Needed

    I’ve highlighted a couple of batter ingredients with some relevant notes. Aside from this, the ingredients needed are basic.

    Labeled ingredients for mini corn dogs recipe.
    • All-Purpose Flour – Be sure to avoid compacting the flour when measuring. Instead, spoon it into your measuring cup and level it off with a knife. This ensures the right amount for the recipe, as compacted flour can lead to dense, heavy corn dogs.
    • Cornstarch – Always mix cornstarch with a cold liquid before adding it to your recipe to avoid clumping. This creates a slurry that can smoothly incorporate into your mix, ensuring a well-textured final product.
    • Whole Milk – Always use whole milk, if possible, for recipes like this. It provides a creamy richness that lower-fat alternatives can’t match. Ensure your milk is fresh and at room temperature when you add it to avoid curdling.

    How to Make Mini Corn Dogs

    *Be sure to see the recipe card below for the full ingredients list & instructions!*

    STEP 1: Heat vegetable oil. Pour enough oil into a large pan to cover approximately 4 inches of the base. Set your stove to medium-high heat until the oil reaches 350 degrees Fahrenheit. 

    STEP 2: Mix the dry ingredients. In a medium-sized bowl, combine the following ingredients: cornmeal, all-purpose flour, cornstarch, sugar, baking powder, salt, and pepper. Stir these together until they’re evenly mixed. (Photo 2)

    STEP 3: Mix the wet ingredients. Whisk together one large egg and 1-½ cups of whole milk in a different bowl until well-blended. (Photo 3)

    Steps 2-5 of how to make mini corn dogs.

    STEP 4: Make the corn dog batter. Pour the egg and milk mixture into the bowl with the dry ingredients. Stir the mixture until it’s thoroughly combined. (Photo 4)

    STEP 5: Coat the hot dogs. Use a pair of tongs to dip each hot dog half into the batter, ensuring they are fully coated. (Photo 5)

    Mini corn dog being deep fried in oil, in skillet.

    STEP 6: Fry the hot dogs in the hot oil. Once the oil is sufficiently heated, use the tongs to gently place the batter-coated hot dogs into the pan. Fry them for about 2-3 minutes or until they turn to golden brown perfection. Remove with a slotted spoon.  It’s best to fry in small batches to prevent overcrowding.

    STEP 7: Cool and serve. Allow the mini corn dogs to cool before serving. Pair them with sides like onion rings, french fries, or favorite condiments such as mustard or ketchup to enhance the taste. Enjoy your homemade mini corn dogs!

    Cooked mini corn dogs on paper towel lined plate.

    Recipe Pro Tips

    • Avoid Overmixing: For the best results when combining the wet and dry ingredients, stir until they’re mixed. Overmixing can lead to a dense and chewy corn dog. 
    • Oil Temperature: Maintaining a steady oil temperature is crucial for golden, crispy mini corn dogs. If the oil isn’t hot enough, the corn dogs will be soggy and absorb too much oil. 
    • Batter Consistency: If the batter is too thick, it won’t adhere well to the hot dogs and will drop off during frying. On the other hand, if it’s too thin, it won’t provide a sufficient coating. Aim for a batter thick enough to coat the back of a spoon. 
    • Even Coating: Make sure the hot dogs are dry before you dip them in the batter. This helps the batter stick to the hot dogs and ensures an even coating. 
    • Cool Down: Let your mini corn dogs cool on a wire rack after frying. This prevents them from becoming
    Cooked mini corn dogs in red and white basket with cup of mustard.

    Recipe FAQs

    Can I use other types of sausages instead of hot dogs?

    Yes, you can. Feel free to experiment with different types of sausages, such as bratwursts, Italian sausages, or even breakfast sausages. Just keep note that this might alter the flavor of your mini corn dogs.

    Is the cornstarch necessary in this recipe?

    While it’s not absolutely necessary, the cornstarch helps to give the batter a light and crispy texture. If you omit it, your mini corn dogs may have a soggier batter.

    Can I make these mini corn dogs in the oven instead of deep frying?

    Yes, you can bake the mini corn dogs in the oven. After coating the sausages in batter, arrange them on a baking sheet lined with parchment paper. Bake at 375°F (190°C) for 20-25 minutes or until golden brown. However, remember that baking will not give you the same crispy texture as deep frying.

    Can I make the batter ahead of time?

    Yes, you can make the batter ahead of time. Simply prepare the batter, cover it, and store it in the refrigerator. When ready to cook, let the batter come to room temperature before dipping the hot dogs.

    What can I do if my batter is too thick or too thin?

    If your batter is too thick, you can thin it by adding a little more milk. If it’s too thin, add more cornmeal and flour until it reaches the right consistency. Remember, you’re aiming for a batter that can stick to the back of a spoon.

    Can I use this easy recipe to make regular-sized corn dogs?

    Of course! Instead of using halved hot dogs, leave them whole. You may need to adjust your cooking time to ensure the corn dog is cooked through. As a larger corn dog will require longer frying time, be sure to keep the heat at a medium level to prevent the outside from burning before the inside is done.

    What to Serve with Mini Corn Dogs

    Mini corn dogs are a versatile crowd-pleaser that pairs well with various dishes. For a classic combination, serve them with French fries or sweet potato fries. A side of coleslaw or a fresh garden salad provides a refreshing contrast to the rich, perfect corn dog. 

    If you want to try something different, why not pair them with my chili recipe or these meaty baked beans? Consider traditional ketchup and mustard for dipping, or venture out with a spicy sriracha mayo or a sweet honey mustard.

    Mini corn dogs in basket with french fries.

    Storage

    Leftover Mini Corn Dogs: To store your homemade mini corn dogs, allow them to cool completely before arranging them in a single layer in an airtight container. They can be kept in the refrigerator for up to 3 days.

    To reheat: simply place them on a baking tray and warm them in the oven at 375°F (190°C) for 10-15 minutes or until heated through.

    To freeze: If you’d like to freeze them for later use, place the cooled mini corn dogs in a single layer on a baking sheet and freeze until solid. Once frozen, transfer them to a freezer-safe bag or container. They can be frozen for up to 2 months. 

    To reheat frozen corn dogs: bake in the oven at 375°F (190°C) for 20-25 minutes or until hot and crispy. There’s no need to defrost them beforehand. However, freezing might alter the texture slightly, but the taste should remain delicious.

    More Recipes You’ll Love

    Are you feeling inspired to try more hot dog recipes? You could start with a BLT Hot Dog for something a little different. Or you could try Buffalo Chicken Dog if you are tired of your usual hot dog sausages.

    • Blueberry dump cake, with serving spoon resting in pan.
      Blueberry Dump Cake (Easy, Buttery Dessert with Fresh Berries)
    • Cherry dump cake topped with homemade whipped cream, served in a dessert bowl.
      Cherry Dump Cake (Easy 3-Ingredient Dessert)
    • A serving of 3-ingredient dump cake in a bowl with a dollop of homemade whipped cream.
      Dump Cake Recipe (Easy 3-Ingredient Dessert That Always Works)
    • Orange upside down cake sliced on spatula.
      Orange Upside Down Cake

    Did you make this? I’d be so grateful if you left a “star” rating below to let me know what you thought! Then, the next time you need a quick and easy recipe, come back to Fantabulosity to browse all of my easy recipes!

    Recipe

    Mini corn dogs in food basket with red and white paper, with a cup of mustard.
    Print Pin
    5 from 3 votes

    Mini Corn Dogs

    Mini corn dogs are easy to make at home with just a few simple ingredients! You'll have homemade mini corn dogs ready to eat in under 10 minutes!
    Course Appetizer
    Cuisine American
    Prep Time 5 minutes minutes
    Cook Time 2 minutes minutes
    Total Time 7 minutes minutes
    Servings 10 mini corn dogs
    Calories 214kcal
    Author Jessica Burgess

    Ingredients

    • 1 cup cornmeal
    • 1 cup all purpose flour
    • 1 tablespoon cornstarch
    • ¼ cup sugar
    • 4 teaspoons baking powder
    • ¼ teaspoon salt
    • ¼ teaspoon pepper
    • 1 large egg
    • 1-½ cups whole milk
    • 5 hot dogs halved
    • 1 quarter vegetable oil for fryer

    Instructions

    • Add oil to a large pan, covering about 4 inches of the bottom and heat to 350 degrees.
    • In a medium mixing bowl, combine cornmeal, flour, cornstarch, sugar, baking powder, salt, and pepper together using a fork. Mix well.
    • In a separate mix bowl, beat together the milk and egg well.
    • Add egg mixture to dry ingredients and mix until well combined.
    • Dip each hot dog in the batter using a pair of tongs.
    • When the oil is ready, carefully lower the covered hot dogs into the oil for 2-3 minutes or until golden brown. Work just a handful of hot dogs at a time.
    • Allow mini hot dogs to cool before serving. Serve with french fries, mustard, and ketchup.

    Notes

    • Avoid Overmixing: For the best results when combining the wet and dry ingredients, stir until they’re mixed. Overmixing can lead to a dense and chewy corn dog. 
    • Oil Temperature: Maintaining a steady oil temperature is crucial for golden, crispy mini corn dogs. If the oil isn’t hot enough, the corn dogs will be soggy and absorb too much oil. 
    • Batter Consistency: If the batter is too thick, it won’t adhere well to the hot dogs and will drop off during frying. On the other hand, if it’s too thin, it won’t provide a sufficient coating. Aim for a batter thick enough to coat the back of a spoon. 
    • Even Coating: Make sure the hot dogs are dry before you dip them in the batter. This helps the batter stick to the hot dogs and ensures an even coating. 
    • Cool Down: Let your mini corn dogs cool on a wire rack after frying. This prevents them from becoming soggy from steam heat if you place them directly on a plate.

    Nutrition

    Serving: 1mini corn dog | Calories: 214kcal | Carbohydrates: 33g | Protein: 7g | Fat: 6g | Saturated Fat: 2g | Polyunsaturated Fat: 1g | Monounsaturated Fat: 2g | Trans Fat: 0.002g | Cholesterol: 31mg | Sodium: 403mg | Potassium: 160mg | Fiber: 2g | Sugar: 7g | Vitamin A: 84IU | Vitamin C: 0.02mg | Calcium: 150mg | Iron: 2mg

    Lemon Pepper Salmon Recipe

    June 28, 2024

    Lemon Pepper Salmon sitting on rice, next to broccoli, on round plate.

    This Lemon Pepper Salmon is a great, easy, dinner idea. It comes together very quickly and requires minimal ingredients but does not skimp on flavor.

    Lemon Pepper Salmon filets on baking sheet lined with aluminum foil.

    The lemon pepper crust makes each bite of salmon burst with lemony flavor and the sharpness of pepper to balance. Serve with rice and your favorite greens, like roasted broccoli or green beans.

    I absolutely love cooking this salmon and enjoying it as is for dinner or even slicing it in to small pieces and serving on top of this salad recipe or on top of this cream cheese pasta.

    Salmon is so versatile. I’ve used it in many ways, and some of my favorite ways are in a salmon slider recipe and even chopping up salmon and making a fried salmon patty. Or, if I’m feeling a bit nostalgic, these old fashioned salmon patties are my go-to option. But this lemon pepper salmon is definitely a go-to, easy dinner the whole family loves.

    Ingredients Needed

    Here’s what you’ll need to make lemon pepper salmon. I’ve provided key notes about some of the ingredients below but make sure to also see the full recipe card with ingredient amounts and instructions.

    Ingredients for lemon pepper salmon recipe, sitting on counter.

    Ingredient Notes:

    • Pepper: If you want to use the lemon pepper premade seasoning, to save time, I suppose it would work too. But do not skimp on the lemon juice or lemon zest. It makes a big difference.
    • Parsley: Fresh is recommended but if dried is all you have, that works in a pinch!

    How to Make Lemon Pepper Salmon

    Trust me when I say this is one of the easiest dinner recipes you can make! Simply place the salmon filets in a baking dish, mix up a lemon seasoning mixture, brush on the fish, and bake!

    Lemon juice, zest, pepper, salt, garlic powder, and oil in small clear bowl.
    1. Preheat your oven to 400°F (200°C).
    2. In a bowl, whisk together olive oil, lemon zest, lemon juice, black pepper, garlic powder, and a pinch of salt to create the lemon pepper crust.
    Uncooked salmon filets on baking sheet that's lined with aluminum foil.
    1. Place the salmon filets on a foiled-lined baking sheet. Pat them dry with paper towels. Create a foil ridge around the salmon with the foil, like a pizza crust.
    Lemon peppers salmon filets on baking sheet that's lined with foil.
    1. Brush the Lemon Pepper mixture over the top of each salmon filet, ensuring an even coating.
    2. Bake the salmon in the preheated oven for 12-15 minutes or until the salmon is cooked through and easily flakes with a fork.
    Baked lemon pepper salmon on baking sheet lined with foil.
    1. Take the salmon out of the oven and let it rest for a couple of minutes.
    2. Garnish with lemon slices and fresh parsley. Serve and enjoy.

    Top Tips to Make This Recipe a Success

    • Aluminum Foil: Cook the salmon in aluminum foil allows the salmon to retain the juices but also makes the skin crispy.
    • How to Know if Salmon is Done: A great way to test the doneness of the salmon is to take it out of the oven, using a fork, and peel away at the sides of the salmon. If it is flaky and comes apart easily, then it is done cooking. If it is a little bit firm and does not flake, then it needs a couple more minutes. 
    • Extra Flavor: Sprinkle it with fresh lemon juice, just before serving and eating. It adds a little bit more freshness to the dish. 

    Love lemon recipes? Try serving this lemon blondies recipe after this salmon to really tie in the lemon flavor.

    Similar Recipes You’ll Love

    To keep the seafood theme going this mussels recipe is easy to make and better than the restaurant!

    If you love easy recipes like this one, I think you’ll also love these similar recipes for dinner:

    • Baked chicken and vegetables on a sheet pan.
      Sheet Pan Chicken and Vegetables
    • Sliced baked chicken cutlets on white plate, next to green beans.
      Baked Chicken Cutlets
    • Slices of chicken meatloaf on a white plate.
      Chicken Meatloaf
    • Oven Baked Bacon Wrapped Chicken Thighs

    Recipe

    Lemon Pepper Salmon sitting on rice, next to broccoli, on round plate.
    Print Pin
    Be the first to rate!

    Lemon Pepper Salmon Recipe

    This lemon pepper salmon recipe uses simple ingredients, is easy to make in the oven, and ready in only 20 minutes!
    Course Dinner, Main Course
    Cuisine American
    Diet Low Calorie
    Prep Time 5 minutes minutes
    Cook Time 15 minutes minutes
    Total Time 20 minutes minutes
    Servings 4 filets
    Calories 312kcal
    Author Jessica Burgess

    Ingredients

    • 4 salmon filets about 4-5 ounces each, skin-on
    • 2 Tablespoons olive oil
    • 1 zest of lemon
    • 2 Tablespoons lemon juice
    • 1 Tablespoon freshly ground black pepper
    • 1 teaspoon garlic powder
    • salt to taste
    • lemon slices if desired as a garnish
    • fresh parsley if desired as a garnish

    Instructions

    • Preheat your oven to 400°F (200°C).
    • In a bowl, whisk together olive oil, lemon zest, lemon juice, black pepper, garlic powder, and a pinch of salt to create the lemon pepper crust.
    • Place the salmon filets on a foiled-lined baking sheet. Pat them dry with paper towels. Create a foil ridge around the salmon with the foil, like a pizza crust.
    • Brush the lemon pepper mixture over the top of each salmon filet, ensuring an even coating.
    • Bake the salmon in the preheated oven for 12-15 minutes or until the salmon is cooked through and easily flakes with a fork.
    • Take the salmon out of the oven and let it rest for a couple of minutes.
    • Garnish with lemon slices and fresh parsley if desired. Serve and enjoy.

    Notes

    How to Know if Salmon is Done: A great way to test the doneness of the salmon is to take it out of the oven, using a fork, and peel away at the sides of the salmon. If it is flaky and comes apart easily, then it is done cooking. If it is a little bit firm and does not flake, then it needs a couple more minutes. 
    Extra Flavor: Sprinkle it with fresh lemon juice, just before serving and eating. It adds a little bit more freshness to the dish. 

    Nutrition

    Serving: 1filet | Calories: 312kcal | Carbohydrates: 2g | Protein: 34g | Fat: 18g | Saturated Fat: 3g | Polyunsaturated Fat: 5g | Monounsaturated Fat: 9g | Cholesterol: 94mg | Sodium: 76mg | Potassium: 872mg | Fiber: 1g | Sugar: 0.3g | Vitamin A: 77IU | Vitamin C: 5mg | Calcium: 30mg | Iron: 2mg

    Flavored Butter Recipes (Compound Butter)

    June 26, 2024

    Close up of slices of flavored butter on a cutting board.

    Flavored butter recipes are so easy to make, rich and delicious, and are compound butters that are perfect to top your favorite bread, or steak recipe with! Go the extra step and make your flavored butter recipe using this homemade butter recipe, that’s easy to make!

    Learn below, how to make garlic & herb butter, lemon & dill butter, cinnamon & honey, honey and orange, and sun-dried tomato butter!

    Different flavored butters lined up on parchment paper, sliced and ready for serving.

    How to Use Flavored Butter

    There are so many different ways you can use flavored butter, whether its as a topping for your favorite protein, on a baked potato, a homemade bagel (even add it to a bagel bar for breakfast), homemade biscuits, or even to add to a vegetable like can of green beans! Whip up your favorite flavor of butter below, and store it to use over and over again!

    Ingredients Needed

    I’ve broken up the ingredients for each type of butter below, notes about a few of the ingredients. The recipe card below will also list out the ingredient amounts for each flavor. Note: You do not have to make every kind of butter in this recipe. Simply pick the the flavor you’d like, and the ingredients are broken out below.

    Labeled ingredients showing how to make 5 different kinds of flavored butter.

    Homemade Butter Recipe

    You can use storebought butter to make compound butter but if you have time, it would be wonderful to make this homemade butter recipe that makes about 1 pound of butter that you can work with to make different flavors. Or, you can use some of it to make flavored butters or leave it plain to enjoy as well.

    Garlic and Herb Butter

    Small clear bowl with butter and garlic and fresh herbs add to the butter.
    • ½ cup butter (1 stick)
    • ½ tablespoon minced garlic 
    • ¼ teaspoon rosemary, minced
    • ¼ teaspoon thyme, minced
    • ¼ teaspoon oregano, minced 

    Cinnamon and Honey Butter

    Cinnamon honey butter in clear glass bowl.
    • ½ cup butter (1 stick)
    • ¼ teaspoon vanilla extract
    • ½ teaspoon ground cinnamon
    • 1 tablespoon honey

    Lemon Dill Butter

    Lemon Dill Butter in clear glass bowl.
    • ½ cup butter (1 stick)
    • ½ tablespoon lemon zest
    • 1 teaspoon lemon juice
    • ½ tablespoon finely chopped dill

    Sundried Tomato Basil Butter

    Sundried tomato basil butter in clear glass bowl.
    • ½ cup butter (1 stick)
    • 1 tablespoon minced sundried tomato
    • ⅛ teaspoon ground black pepper
    • ½ tablespoon finely chopped basil

    Orange Honey Butter

    Orange honey butter in clear glass bowl.
    • ½ cup butter (1 stick)
    • ½ tablesppon orange zest
    • ½ teaspoon orange juice
    • ½ tablespoon honey

    *Be sure to see the recipe card below for the full ingredients list & instructions!*

    How to Make Compound Butter

    All of the butter varieties are made the same way! See below the steps on how to make each butter, and even store them for later if desired.

    Flavored butters in small glass bowls.

    STEP 1. Mix. In a small bowl, mix all ingredients until smooth and creamy. I used a small spoon to quickly incorporate the ingredients into the butter but a hand or stand mixer is a great choice as well, especially if you are doubling or tripling the recipes.  

    STEP 2. Let the butter rest. Once your butter flavors are mixed and smooth, you’ll want to let them sit at room temperature for about 15 minutes to allow the flavors to combine and saturate the butter. 

    STEP 3. Chill. You can enjoy your flavored butter right away, served fresh and soft, or you can chill them in your refrigerator to enjoy a firmer butter at a later time. See how to below:

    How to roll homemade butter.

    How to Store Flavored Butter:

    To save the butter for later: Press the individual butters into an airtight container or roll them in plastic wrap or parchment paper. Just spoon the butter onto the wrap and roll it up with twisted ends for freshness. Place them in your refrigerator for at least 15 minutes for firm texture.

    Can I use dried herbs instead of fresh? Fresh is best, but you can absolutely use dried and jarred ingredients. I will say though, that the dried herbs do not have the smooth-flowing texture that fresh ingredients give you. They cause a bit of a grainy texture. 

    Flavored butter sliced on a cutting board.

    More Condiment Recipes You’ll Love

    It’s so fun to keep homemade condiments on hand to top those favorite recipes with! Here are similar recipes that I think you’ll also love:

    • A mason jar of Instant Pot raspberry jam sits in front on of Instant Pot pressure cooker that is surrounded by lemons and berries
      Instant Pot Raspberry Jam
    • Chipotle Aioli in small bowl, with a polenta fry dipping in to it.
      Chipotle Aioli Recipe
    • Strawberry Buttercream frosting recipe
      Strawberry Buttercream with Jam
    • Jalapeno Ranch Dip in small crock.
      Jalapeno Ranch Dip (Or Dressing!) Recipe

    Did you make this? I’d be so grateful if you left a “star” rating below to let me know what you thought! Then, the next time you need a quick and easy recipe, come back to Fantabulosity to browse all of my easy recipes!

    Recipe

    Close up of slices of flavored butter on a cutting board.
    Print Pin
    5 from 1 vote

    Flavored Butter Recipes

    These 5 different flavored butter recipes are so easy to make and so delicious! Garlic and herb, lemon and dill, cinnamon and honey, orange and honey and sundried tomato butter!
    Course Side Dish
    Cuisine American
    Prep Time 5 minutes minutes
    Cool Time 30 minutes minutes
    Total Time 35 minutes minutes
    Servings 5 ½ cup servings
    Calories 840kcal
    Author Jessica Burgess

    Ingredients

    Garlic & Herb Butter

    • ½ cup butter Get my homemade butter recipe if desired
    • ½ Tablespoon minced garlic
    • ¼ teaspoon fresh rosemary minced
    • ¼ teaspoon fresh thyme minced
    • ¼ teaspoon fresh oregano minced

    Cinnamon Honey Butter

    • ½ cup butter Get my homemade butter recipe if desired
    • ¼ teaspoon vanilla extract
    • ½ teaspoon ground cinnamon
    • 1 Tablespoon honey

    Lemon Dill Butter

    • ½ cup butter Get my homemade butter recipe if desired
    • ½ Tablespoon lemon zest
    • 1 teaspoon lemon juice
    • ½ Tablespoon fresh dill finely chopped

    Sundried Tomato Basil Butter

    • ½ cup butter Get my homemade butter recipe if desired
    • 1 Tablespoon sundried tomatoes minced
    • ⅛ teaspoon ground black pepper
    • ½ Tablespoon fresh basil finely chopped

    Orange and Honey Butter

    • ½ cup butter Get my homemade butter recipe if desired
    • ½ Tablespoon orange zest
    • ½ teaspoon orange juice
    • ½ Tablespoon honey

    Instructions

    For All Flavored Butters

    • Mix. In a small bowl, mix all ingredients until smooth and creamy. Use a small spoon to quickly incorporate the ingredients into the butter. However, a hand or stand mixer is a great choice as well, especially if you are doubling or tripling the recipes.
    • Let the butter sit. Once your butter flavors are mixed and smooth, you'll want to let them sit at room temperature for about 15 minutes to allow the flavors to combine and saturate the butter. 
    • Chill. You can enjoy your flavored butter right away served fresh and soft or you can chill them in your refrigerator to enjoy a firmer butter at a later time.
      To store for later: you can press them into an airtight container or roll them in plastic wrap or parchment paper. Just spoon the butter onto the wrap and roll it up with twisted ends for freshness. Place them in your refrigerator for at least 15 minutes for firm texture.

    Nutrition

    Serving: 1tablespoon | Calories: 840kcal | Carbohydrates: 7g | Protein: 1g | Fat: 92g | Saturated Fat: 58g | Polyunsaturated Fat: 3g | Monounsaturated Fat: 24g | Trans Fat: 4g | Cholesterol: 244mg | Sodium: 731mg | Potassium: 77mg | Fiber: 0.5g | Sugar: 6g | Vitamin A: 2871IU | Vitamin C: 3mg | Calcium: 37mg | Iron: 0.2mg

    Sheet Pan Chicken and Vegetables

    June 25, 2024

    Baked chicken and vegetables on a sheet pan.

    You’re going to love this Sheet Pan Chicken and Vegetables recipe. It’s the perfect blend of simplicity and flavor, ideal to add your favorite seasonings and sauces if desired. It’s great for picky palates as is but adding spices, teriyaki sauce or garlic butter can ramp up the flavor a lot.

    Sheet pan chicken and vegetables baked and on the counter.

    Just toss the chicken and a medley of veggies onto a sheet pan, drizzle with olive oil, season, and you’re good to go! Believe me, this is the kind of easy, tasty dinner your whole family has been looking for!

    This sheetpan dinner is perfect for “Tray Bake Thursday” in your Dinner Theme System too!

    The great thing about sheet pan dinners is that you can make loads of different types of sheet pan recipes. Fancy something sweet? Try making these Sheet Pan Pancakes - Cinnamon Swirl. Or, for another savory option, make these Baked Pork Chops with Veggies.

    [feast_advanced_jump_to]

    Why You’ll Love This Recipe

    • Versatile and customizable: One of the things that makes this Sheet Pan Chicken and Veggies so great is its versatility. Don’t have a zucchini on hand? No problem, swap it out for another veggie you have in your fridge. You can mix and match the vegetables to suit your tastes and dietary needs. You can also add more seasonings if you have favorites. See below for more ideas!
    • Minimal clean-up: This meal is a dream come true for the dish-averse. All you need is a single sheet pan, meaning less cleaning up after a delicious dinner. You can spend that saved time relaxing or maybe even try one of our other fantastic recipes!

    Ingredients Needed

    I’ve highlighted a couple of ingredients below with some relevant notes. Aside from this, the ingredients needed are pretty basic.

    Marinade Ingredients

    Labeled ingredients for marinade for baked chicken and vegetables.

    Sheetpan Ingredients

    Labeled ingredients for baked chicken and vegetables.
    • Yukon Gold Potatoes – These potatoes are a great choice due to their buttery flavor and firm texture. They hold up well during baking and don’t get mushy. Plus, you don’t need to peel them, just a good scrub is enough. 
    • Carrots – Look for firm, bright orange carrots with no cracks. Carrots add a sweet and earthy flavor to the dish. You can peel them if you’d like, but it’s not necessary, especially if they’re organic. Have extra carrots? Try these air fryer carrots too.
    • Red Onion – These onions add a milder and slightly sweet flavor. Remember to cut them into thin wedges so they’ll cook at the same rate as the other veggies on the sheet pan.
    • Yellow Squash – Adding a great pop of color, yellow squash is tender and has a fairly neutral flavor that works well in this dish. Always look for squash that feels heavy for its size and has a vibrant color with no blemishes or soft spots.
    • Chicken Breasts – Boneless chicken breasts work perfectly for this easy dinner.

    Substitutions

    Sometimes substitutions are necessary because of ingredients that are unavailable or needed for dietary restrictions. Here are some suggestions that can help:

    • Yukon Gold Potatoes – If you can’t get hold of these, just use any other type of potato. Red potatoes are a good option; they’ll stay firm and won’t become mushy when baked. Sweet potatoes can also be used as a nutritious and slightly sweeter alternative.
    • Carrots – If you need a substitute for carrots, parsnips are an excellent choice. They have a similar texture and are sweet, just like carrots. You could also use bell peppers, which will add a different flavor but are delicious when roasted.
    • Red Onion – Shallots or white onions can be used in place of red onions. They have a slightly stronger flavor, but when cooked, they’ll mellow out and add a great taste to your dish.
    • Zucchini – Green beans can replace zucchini. They will add a nice crunch to your sheet pan meal. For a softer texture, eggplant and brussels sprouts are also a good alternative.
    • Yellow Squash – If you don’t have yellow squash, you could use zucchini. They have a similar texture and flavor. Another option is bell peppers, which would add a little sweetness to the dish.
    • Olive Oil – If you’re out of olive oil, avocado oil is a great substitute. It has a high smoke point, making it ideal for roasting. If you don’t have that, melted butter also works well and adds a lovely richness to the vegetables.

    Add More Flavor + Ingredients

    This recipe is lightly seasoned to allow for your favorite seasonings and to be picky-palate friendly. Here are some suggestions to ramp up the flavor…

    • Add more protein: If you’re looking to amp up the protein content, feel free to toss in some cubed tofu or chickpeas along with the chicken. They’ll soak up the flavors beautifully, adding an extra layer of complexity to your meal.
    • Go spicy: For those who like their meals with a bit of a kick, sprinkle some red chili flakes or garlic pepper before baking, or drizzle your finished sheet pan with some hot sauce. This will certainly add some heat to your Sheet Pan Chicken and Veggies!
    • Cheese lovers: Sprinkle your favorite grated cheese over the chicken and veggies about 5 minutes before they’re done baking. The cheese will melt and add a delicious creamy texture. Parmesan, cheddar, or mozzarella would work great.
    • Extra crunch: For an added crunch, sprinkle some slivered almonds or sunflower seeds over the top before serving. The nuts and seeds not only give a pleasant crunch but also add a bit of healthy fat.
    • Go Mediterranean: Swap out the oregano for some rosemary and thyme, add some sliced olives and feta cheese, and you’ve got yourself a Mediterranean twist to this sheet pan chicken recipe.

    How to Make Sheet Pan Chicken and Vegetables

    *Be sure to see the recipe card below for the full ingredients list & instructions!*

    STEP 1: Make the marinade. Make the marinade by mixing its ingredients in a small bowl. Add the chicken pieces to a large bowl or plastic bag, pour the marinade over them, and ensure they’re fully coated. Chill the marinated chicken in the fridge for at least 30 minutes.

    STEP 2: Add the vegetables. Scatter the potatoes, carrots, red onion, zucchini, and squash in an even layer on a large sheet pan. Drizzle them with olive oil, season with salt and pepper as you like, and give everything a good mix.

    Collage showing steps 1-4 to make baked chicken and vegetables.

    STEP 3: Roast in the oven. Stick the baking sheet in the oven (preheated to 400°F) and let everything roast for about 15-20 minutes.

    STEP 4: Stir the ingredients. Pull the sheet out of the oven, give the veggies a stir, then nestle the chicken pieces among them. Pour any leftover marinade over the chicken.

    Baked chicken and vegetables on baking sheet.

    STEP 5: Cook until the chicken is hot. Pop the sheet back into the oven for another 15-20 minutes, or until the chicken is cooked through (it should hit an internal temperature of 165°F) and the veggies are tender.

    STEP 6: Garnish and serve. If you’re feeling fancy, sprinkle some freshly chopped parsley over everything and serve with lemon wedges on the side. Make sure to eat it while it’s still hot.

    Sheet pan vegetables and chicken on baking sheet, with wooden spatula scooping a serving.

    Recipe Pro Tips

    • Don’t overcrowd the pan: Ensure the ingredients are spread out in a single layer on the pan. Overcrowding can result in steamed veggies instead of the desired crispy, roasted effect.
    • Cut veggies uniformly: Make sure your veggies are cut into similar-sized pieces so that they cook evenly.
    • Marinate the chicken: Marinating the chicken enhances its flavor. If you have the time, marinate it overnight for maximum taste.
    • Don’t skip the preheat: Preheating your oven is crucial as it ensures your chicken and veggies start to cook as soon as they hit the heat.
    • Rotate pan for even cooking: Halfway through cooking, rotate your pan to ensure even roasting.
    • Check the chicken’s temperature: Use a meat thermometer to verify the chicken is cooked to a safe internal temperature of 165°F. 
    • Customize to your liking: Feel free to swap out any of the veggies for what you have on hand or what’s in season, and even add on other seasonings to give this even more flavor.
    Sheet pan chicken and vegetables serving on white plate.

    Recipe FAQs

    Can I use chicken thighs instead of breasts?

    Absolutely! Both juicy chicken thighs and breasts work well for this easy recipe. Just remember that thighs might take a little longer to cook.

    Can I add other types of veggies?

    Yes! This great recipe is super versatile. You can add different veggies like bell peppers, broccoli, tomatoes, or mushrooms. Just keep in mind the cooking times may vary.

    Is marinating the chicken necessary?

    While marinating the chicken isn’t absolutely necessary, it does help to infuse the meat with more flavor. If you’re short on time, even a quick 30-minute marinade can make a difference!

    Can I use dried herbs instead of fresh herbs?

    Yes, dried herbs can be used in place of fresh. Generally, you’ll want to use ⅓ of the amount of dried herbs as you would fresh since dried herbs are more potent.

    Can I prepare this dish ahead of time?

    Yes, you can chop all the veggies and make the marinade ahead of time. You can even marinate the chicken overnight. Just remember to take it out of the fridge about 30 minutes before cooking to let it come up to room temperature.

    What to Serve with Sheet Pan Chicken and Vegetables

    The beauty of this Sheet Pan Chicken and Veggies recipe is that it’s a complete meal on its own! However, if you’re looking to add a little something extra to the dinner table, here are a few ideas:

    • Quinoa or Rice: A side of fluffy quinoa or rice would complement the chicken and veggies quite well, soaking up any delicious juices left on the plate.
    • Green Salad: A fresh green salad with a tangy vinaigrette can provide a crisp, refreshing contrast to the roasted flavors in the dish.
    • Bread: Try serving it with some warm homemade Italian bread, cheesy pull-apart bread, or frozen garlic bread. It’s perfect for mopping up any flavorful bits left behind.
    Fork scooping a bite of baked chicken and vegetables off of a white plate.

    Storage

    Storing and freezing this Sheet Pan Chicken and Veggies is quite straightforward. Let the leftovers cool down to room temperature. Once cooled, transfer them into airtight container and place them in the refrigerator. They will stay good for up to 4 days. 

    As for freezing, you can indeed! Place the cooled leftovers in freezer-safe containers or heavy-duty freezer bags and freeze for up to 3 months. 

    The next time you’re ready to eat, let them thaw overnight in the fridge and then reheat in the microwave or oven until hot. Remember, the veggies might not be as crisp when reheated, but they will still be delicious!

    More Chicken Recipes You’ll Love

    Chicken works for almost any meal, and there’s always something new to try. Want a simple lunchtime option? Then try these Fried Chicken Sliders. Or, for a slow cooker option, you could make Easy Slow Cooker Shredded Chicken.

    • Eight cooked chicken drum sticks are swimming in a sauce in a black crock pot
      Slow Cooker Chicken Drumsticks
    • Cooked chicken bites with salt, pepper and browned butter.
      Chicken Bites
    • Creamy Caesar Chicken in a skillet.
      Creamy Caesar Chicken
    • Spatula holding up a piece of cheesy chicken.
      Cheesy Chicken

    Did you make this? I’d be so grateful if you left a “star” rating below to let me know what you thought! Then, the next time you need a quick and easy recipe, come back to Fantabulosity to browse all of my easy recipes!

    Recipe

    Baked chicken and vegetables on a sheet pan.
    Print Pin
    Be the first to rate!

    Sheet Pan Chicken and Vegetables

    This Sheet Pan Chicken and Vegetables recipe is the perfect blend of simplicity and flavor! Simple ingredients, and even the perfect base to add more of your favorite seasonings.  
    Course Dinner
    Cuisine American
    Diet Low Calorie
    Prep Time 30 minutes minutes
    Cook Time 30 minutes minutes
    Total Time 1 hour hour
    Servings 6
    Calories 476kcal
    Author Jessica Burgess

    Ingredients

    Chicken and vegetables:

    • 2-3 boneless skinless chicken breasts cut into ½-inch pieces
    • 4 cups Yukon gold potatoes quartered
    • 3 large carrots sliced
    • 1 large red onion cut into thin wedges
    • 1 zucchini sliced into halves
    • 1 yellow squash sliced into halves
    • 2 tablespoons olive oil
    • Salt & pepper to taste
    • optional seasonings such as, garlic butter, lemon-pepper, seasoning blends such as Mrs. Dash's, parmesan cheese

    Marinade:

    • ¼ cup olive oil
    • 5 cloves chopped garlic
    • 2 teaspoons lemon juice
    • 1 teaspoon oregano
    • 1 teaspoon salt
    • ½ teaspoon pepper

    Instructions

    • In a small bowl, combine all marinade ingredients. Add diced chicken pieces to a large bowl or plastic bag. Pour marinade over chicken and coat completely. Place in the refrigerator to marinate until needed (30 minutes minimum).
    • On a large baking pan, toss in the potatoes, carrots, red onion, zucchini, and squash with olive oil, salt, and pepper to taste.
    • Bake at 400°F for 15-20 minutes.
    • Remove vegetables from the oven, stir, and arrange chicken among the vegetables.
    • Drizzle any remaining marinade over the chicken and season with optional other seasonings if desired.
    • Bake for another 15-20 minutes or until the chicken reaches an internal temperature of 165°F and the vegetables are tender.
    • Garnish with fresh chopped parsley and lemon wedges, if desired. Serve while hot.

    Notes

    • If you start marinating the chicken before preparing the vegetables, the chicken will be more tender because of the longer marinating time.
    • To make things easier, use the plastic zip-loc bag to marinate the chicken.
    • The seasonings and amount of vegetables can be adjusted to your liking. This recipe is lightly seasoned/flavored, to not overwhelm picky palates. Adding your favorite seasonings or sauces may be required. 

    Nutrition

    Calories: 476kcal | Carbohydrates: 52g | Protein: 19g | Fat: 23g | Saturated Fat: 3g | Polyunsaturated Fat: 3g | Monounsaturated Fat: 15g | Trans Fat: 0.01g | Cholesterol: 36mg | Sodium: 699mg | Potassium: 1660mg | Fiber: 8g | Sugar: 8g | Vitamin A: 7871IU | Vitamin C: 70mg | Calcium: 78mg | Iron: 3mg

    Air Fryer Carrots

    June 24, 2024

    Close up of cooked air fryer carrot slices.

    This Air Fryer Carrots recipe is not only an easy, quick, side dish recipe, but they’re absolutely delicious because they’re coated with cinnamon, maple syrup, and a few other simple ingredients!

    In just 15 minutes, these carrots pair perfectly with dishes such as baked chicken cutlets and Crock Pot pork tenderloin.

    Slices of cooked air fryer carrots.

    If you are new to your Air Fryer, check out my collection of 25+ Easy Air Fryer Recipes for Beginners that are perfect to get the hang of your new gadget. Or for another simple side dish using the Air Fryer, try these Frozen Sweet Potato Fries in the Air Fryer.

    [feast_advanced_jump_to]

    Why You’ll Love This Recipe

    • Versatility: These perfect air fryer carrots can accompany a wide range of main dishes, fitting perfectly into almost any meal. Whether it’s a fancy holiday dinner or a simple weeknight meal, they add a touch of elegance and a burst of flavor. 
    • Effortless cleanup: Thanks to the air fryer, there’s minimum fuss and mess in the kitchen. You’ll find yourself with more free time and less dishwashing, making this recipe a true win-win for the entire family.

    Ingredients Needed

    I’ve highlighted a couple of key ingredients below with some notes. Aside from this, the ingredients needed are pretty basic.

    Labeled ingredients for carrots that are roasted in the air fryer.
    • Carrots – Choose large carrots that are bright orange, firm to the touch, and of uniform size for even cooking. Remember to peel them before starting the recipe to remove any dirt and to promote a smoother texture. 
    • Maple Syrup – Always opt for pure maple syrup rather than artificial or flavored ones. The pure form has a distinct, rich flavor that cannot be matched by substitutes and will give your carrots an irresistibly natural sweetness. 
    • Ground Cinnamon – Just a pinch of cinnamon can inject a warm, spicy undertone to the carrots. Be careful not to overdo it - a little goes a long way. Store your ground cinnamon in a cool, dark place to maintain its potency.

    Substitutions

    Sometimes substitutions are necessary because of ingredients that are unavailable or needed for dietary restrictions. Here are some suggestions that can help:

    • Carrots – If you’re out of whole carrots, parsnips make a good substitute as they have a similar texture when cooked and a slightly sweet flavor. 
    • Maple Syrup – If you don’t have maple syrup, honey can be used as a sweetener instead. Be aware that honey has a somewhat stronger flavor that may slightly change the overall taste of the dish.
    • Ground Cinnamon – If you don’t have ground cinnamon, you can use ground nutmeg or allspice. Both have a warm, sweet flavor somewhat similar to cinnamon.
    • Parsley – If you don’t have parsley, cilantro or chives can be used as a garnish instead. Both offer a fresh, vibrant flavor, with cilantro adding a slight citrusy note and chives contributing a mild onion-like taste.

    Variations

    • Spice it up- Add a hint of heat by sprinkling red pepper flakes over the carrots before air frying them. It can balance the sweetness and bring an exciting flavor contrast.
    • Herb Carrots- Mix in some dried or fresh herbs like rosemary or thyme to the carrots before cooking to infuse them with a delightful savory note.
    • Citrusy Carrots- Give your carrots a bright, tangy twist by adding a splash of lemon juice or orange zest before cooking. The citrusy flavor pairs incredibly well with the sweetness of maple syrup.
    • Cheesy Carrots- Before the final minutes of cooking, sprinkle some Parmesan cheese on top of the carrots for a delectably cheesy crunch.
    • Balsamic Glaze- Replace maple syrup with balsamic glaze for a more tangy and sophisticated flavor profile. Remember, balsamic glaze is quite potent, so use sparingly.

    How to Make Air Fryer Carrots

    *Be sure to see the recipe card below for the full ingredients list & instructions!*

    STEP 1: Heat your Air Fryer. Preheat your Air Fryer to 375°F.  

    STEP 2: Prepare the carrots. Cut the peeled carrots into 3-inch pieces. Quarter these and place carrots in a large mixing bowl.  

    STEP 3: Make the dressing. In a small bowl, combine 1 tablespoon of extra virgin olive oil with 2 tablespoons of maple syrup. Mix until well combined.  

    Image collage showing steps 1-4 of how to make carrots in the air fryer.

    STEP 4: Coat the carrots. Pour this mixture over the carrots in a large bowl. Ensure each carrot piece is coated.  

    STEP 5: Season the carrots. Add ½ teaspoon of kosher salt, ¼ teaspoon of black pepper, and ¼ teaspoon of ground cinnamon to the carrots. toss carrots until all the carrot pieces are evenly seasoned.  

    Cooked carrots in the air fryer basket.

    STEP 6: Cook in the Air Fryer. Transfer the seasoned carrots to the Air Fryer basket. Bake at 375°F for about 15 minutes, or until they are tender when pierced with a fork.  

    STEP 7: Garnish and serve. Sprinkle flat-leaf parsley on the cooked carrots as garnish. Serve while hot.

    Cooked air fryer carrots on a white plate, sitting in front of the air fryer.

    Recipe Pro Tips

    • Evenly cut carrots: Cutting the carrots into even pieces will help ensure that they all cook at the same rate. Uneven pieces may result in some carrots being overcooked while others are undercooked. 
    • Never crowd the air fryer: Piling too many carrots in the air fryer at once can result in them not cooking evenly. It’s best to cook in batches if necessary to ensure each carrot piece crisps up nicely.
    • Shake the basket: Halfway through the cooking time, shake the basket to turn the carrots. This will help them to cook evenly and achieve a perfect, crispy texture.
    • Taste and adjust: After the carrots are cooked, taste one and adjust the seasoning if needed. Remember, the flavor of the carrots intensifies as they cool so a little seasoning goes a long way.
    • Serve immediately: Air fryer carrots are best served immediately while they’re still warm and crispy. If they sit too long, they can become soft.

    Recipe FAQs

    Can I use baby carrots for this recipe?  

    Absolutely, you can substitute full-sized carrots with baby carrots. However, you might need to adjust the cooking time as they could cook faster due to their smaller size.

    My carrots turned out a bit too soft. What did I do wrong? 

    It’s possible that the carrots were cut too thin or they were left to cook for too long. Make sure to cut the carrots into even pieces, and always check on the carrots a bit earlier than the recommended cooking time to ensure they have reached your desired level of tenderness.

    Can I use a different type of oil instead of olive oil?   

    Yes, you can replace olive oil with other types of oil like canola oil, vegetable oil, or avocado oil. However, keep in mind that different oils can subtly affect the final flavor of this easy side dish.

    Do I need to peel the carrots before air-frying them?  

    Peeling the carrots is recommended for this recipe as it removes any dirt and promotes a smoother texture. However, if you prefer, you can thoroughly wash and scrub the carrots instead of peeling them.

    Can I use this recipe with other vegetables? 

    Absolutely! This recipe works great with other root vegetables such as parsnips, beetroot, or sweet potatoes. Just be aware that different vegetables may require different cooking times.

    Cooked carrots on a fork, ready to eat.

    Storage

    Leftover Air Fryer Carrots can be stored in an airtight container in the refrigerator for up to 5 days. Make sure the carrots are fully cooled before storing them to avoid condensation, which can make them soggy.

    While you can technically freeze cooked carrots, it is not highly recommended for this recipe. Freezing and thawing may alter the texture of the carrots, causing them to become soft and lose their crispiness. 

    More Carrot Recipes You’ll Love

    Have some carrots left after making this recipe? You could try this Carrot Walnut Cake that’s a great sweet treat that is still packed with the goodness of carrots.  Or for another simple side dish, make some Carrot Salad that pairs well with loads of main courses for the whole family. Or, here are other recipes that use carrots that you’ll love:

    • Close up of cooked carrots covered in a butter brown sugar glaze and garnished with fresh parsley
      Candied Carrots
    • KFC Coleslaw in small white bowl.
      KFC Coleslaw (Copycat Recipe)
    • Chicken Bolognese on spaghetti noodles.
      Chicken Bolognese Recipe
    • Instant Pot Broccoli Cheddar Soup on spoon over bowl of soup
      Instant Pot Broccoli Cheddar Soup

    Did you make this? I’d be so grateful if you left a “star” rating below to let me know what you thought! Then, the next time you need a quick and easy recipe, come back to Fantabulosity to browse all of my easy recipes!

    Recipe

    Close up of cooked air fryer carrot slices.
    Print Pin
    Be the first to rate!

    Air Fryer Carrots

    Air Fryer Carrots are easy to make, ready in about 20 minutes, and seasoned perfectly with ingredients like cinnamon and maple syrup.
    Course Side Dish
    Cuisine American
    Prep Time 5 minutes minutes
    Cook Time 15 minutes minutes
    Total Time 20 minutes minutes
    Servings 4
    Calories 152kcal
    Author Jessica Burgess

    Ingredients

    • 32 ounces carrots peeled
    • 1 tablespoon extra virgin olive oil
    • 2 tablespoons maple syrup
    • ½ teaspoon kosher salt
    • ¼ teaspoon black pepper
    • ¼ teaspoon ground cinnamon
    • Flat-leaf parsley for garnish optional

    Instructions

    • Preheat the Air Fryer to 375°F.
    • Next cut the peeled carrots into 3-inch pieces and then quarter the 3-inch sections. Then place in a large mixing bowl.
    • In a separate small mixing bowl, add 1 tablespoon extra virgin olive oil, and 2 tablespoons of maple syrup and whisk together until well blended.
    • Then pour the wet ingredients over the prepared carrots and toss until all of the cut carrots are coated.
    • Then season – add ½ teaspoon kosher salt, ¼ teaspoon black pepper, ¼ teaspoon ground cinnamon to the bowl of cut carrots and toss until all of the carrots are coated with seasoning.
    • Place the seasoned carrots in the basket and bake at 375°F for 15 minutes or until tender when pierced with a fork.
    • Garnish with flat-leaf parsley if desired, and serve hot

    Notes

    TIP: Take care when cutting the carrots into quarters so that they are not too thin. The taste will not be affected however thinner quarters will tend to shrivel when fully cooked.

    Nutrition

    Serving: 1serving | Calories: 152kcal | Carbohydrates: 29g | Protein: 2g | Fat: 4g | Saturated Fat: 1g | Polyunsaturated Fat: 1g | Monounsaturated Fat: 3g | Sodium: 448mg | Potassium: 751mg | Fiber: 6g | Sugar: 17g | Vitamin A: 37890IU | Vitamin C: 13mg | Calcium: 88mg | Iron: 1mg

    Banana Pudding Poke Cake

    June 21, 2024

    Slice of banana pudding poke cake on white plate.

    Banana Pudding Poke Cake is made using a yellow cake mix, banana pudding, Cool Whip, and a few other ingredients to create this easy cake recipe that is incredibly moist, and delicious any time of year.

    The ingredients used are simple and commonly on hand, so this can be a dessert recipe that you can turn to when you need something to make in a pinch. (Just make sure to allow at least 3 hours of resting time to allow the pudding to absorb in to the cake.)

    Slice of banana pudding poke cake on a spatula.

    My old fashioned banana pudding recipe is a favorite in our house, so when this banana pudding poke cake made an appearance, I knew it would be a hit. It adds a whole new texture to a banana pudding recipe, and when served cooled, it’s an incredible summer recipe too. This coconut poke cake was also a big hit with its tropical flavor and creamy texture.

    These banana pudding brownies, and this banana pudding dip are two other recipes that tend to show up in the summertime!

    This recipe is part of my collection of potluck dessert ideas that are easy to make and easy to serve.

    Banana pudding poke cake in rectangular baking dish.

    Banana Pudding Poke Cake Ingredients

    You’ll see below which ingredients are used to make this easy banana cake recipe but I'll provide notes below on some of the key ingredients.

    Ingredients for banana pudding poke cake.
    • Cake Mix – I use a yellow cake mix for this recipe and it’s recommended. However I’m sure a different flavor, such as white, would work well too.
    • Pudding – This recipe calls for the 5.1 ounce box. If you can’t find it, you can use 2 of the 3.4 ounce packages with the amount of milk needed to make the pudding on the back of the packages. Make sure your pudding layer on top isn't too thick though because you’ll want it thin enough to drip down inside of the holes. So once it gets to your desired thickness, stop pouring and enjoy the rest of the pudding as is.
    • Bananas – You can omit the bananas. They add a beautiful touch to the cake, but after a few hours the bananas start to brown and it's not so pretty anymore. Have extra bananas? Consider this banana bread pudding or this banana cream pie.
    • Milk – This recipe works with whole milk, skim milk, and oat milk.

    How to Make Banana Pudding Poke Cake

    It’s very easy to make this poke cake! I’ll walk you through how to put this together!

    How to make banana pudding poke cake in 9x13 baking dish.
    1. Preheat your oven to 350℉ and grease your baking dish.
    2. Make the cake by stirring together the cake mix, 3 eggs, vegetable oil, and water until there are no clumps and it's smooth.
    3. Pour the cake mixture into your dish and bake for about 30 minutes, test with a toothpick to make sure it's done. Remove from the oven and allow to cool. You can either allow it to cool some, or totally before moving forward. Some prefer a warmer cake to add the pudding mixture to (next couple of steps) as a warm cake may allow the pudding to soak in more.
    4. While the cake is cooling, make the pudding by whisking together the pudding mix and milk until smooth and letting sit for about 5 minutes to start thickening, then fold in 1 (8 ounce) container of cool whip.
    5. Poke small holes in the cake with a fork or bottom of a spoon. (A wooden spoon works great too!) The holes should be as large or small as you want, around ¼" to ½" should be good, but make sure they’re not too close or too far away. About 1 inch apart is great.
    Frosting for banana pudding poke cake.
    1. Pour the pudding mixture onto the top of the cake. There will be plenty on top, that is fine as long as it gets into the holes in the cake. Then allow it to chill in the fridge for 1+ hours.
    2. Top with the other Cool Whip and let chill for 2+ hours.
    3. Top with vanilla wafers and bananas (if desired – and not concerned about brownies) before serving, and enjoy!

    Banana Pudding Poke Cake Tips

    • Browning Bananas: If worried about the bananas browning, you can omit those, or even slice them right before serving the cake, and put banana slices on individual slices.
    • Additional Topping Ideas: Serve this cake alone or with vanilla ice cream, or even strawberries and chocolate syrup for a banana split flavor. Just keep in mind it’s best to serve strawberries on individual servings, so they don’t “run” and cause red streaks on the top of the whole cake.
    Slice of banana pudding poke cake on white plate, with slices of bananas on top, and vanilla wafers.

    How to Store Banana Pudding Poke Cake

    Remove the sliced bananas if used, cover the baking dish with plastic wrap, and store in the fridge for up to 4-5 days. Or place the slices of cake in an airtight container and store in the fridge.

    More Poke Cake Recipes

    Love poke cakes? I do too. Here are some of our favorites:

    • Slice of lemon poke cake on white plate, with lemon wedge on top.
      Lemon Poke Cake
    • Slice of pumpkin poke cake on plate with fork
      Pumpkin Poke Cake
    • A square of carrot walnut cake.
      Carrot Cake Poke Cake
    • Pineapple Sunshine Cake
      Pineapple Sunshine Cake

    Recipe

    Slice of banana pudding poke cake on white plate.
    Print Pin
    Be the first to rate!

    Banana Pudding Poke Cake

    Banana pudding poke cake has all the flavors you love, using a cake mix, pudding mix, and a few other ingredints to create a delicious, moist cake.
    Course Dessert
    Cuisine American
    Prep Time 25 minutes minutes
    Cook Time 30 minutes minutes
    Chill Time 3 hours hours
    Total Time 3 hours hours 55 minutes minutes
    Servings 12 slices
    Calories 420kcal
    Author Jessica Burgess

    Ingredients

    • 15.25 ounce box yellow cake mix 13.25 ounce box will work fine too!
    • 3 eggs
    • ⅓ cup vegetable oil
    • 1 cup water
    • 5.1 ounce box banana pudding mix See post if needing to use 3.4 ounce boxes instead
    • 3 cups whole milk cold
    • 16 ounces Cool Whip thawed
    • 1½ cups Vanilla Wafers crushed
    • 2 bananas sliced (If desired. See post for caution with bananas.)

    Instructions

    • Preheat your oven to 350℉ and grease a 9×13 baking dish.
    • Make the cake by mixing together the cake mix, 3 eggs, vegetable oil, and water in a mixing bowl until there are no clumps and it's smooth.
    • Pour the cake mixture into your dish and bake for about 30 minutes, and test by sticking a toothpick in the center, and removing it. If the toothpick is clean, the cake is done. If batter has stuck to the toothpick, it needs to bake a little longer.)
      Remove the cake from the oven and set the cake aside, and allow it to cool. You can allow the cake to cool completely or also allow the cake to cool just a little, and then move forward with the steps of adding the pudding mixture on top below.
    • While the cake is cooling, make the pudding by whisking together the pudding mix and milk until smooth and letting sit for about 5 minutes to start thickening, then fold in 1 (8 ounce) container of cool whip.
    • Poke small holes in the cake with a fork or bottom of a wooden spoon, making sure the holes are about 1-inch apart, and then pour the pudding on to the cake, spreading it evenly. There will be plenty on top, and that is fine as long as it also gets into the holes in the cake.
    • Allow the cake to chill in the fridge for 1+ hours.
    • Top with the other Cool Whip and let chill for 2+ hours.
    • Top with vanilla wafers and bananas before serving, if desired, and enjoy!

    Video

    Nutrition

    Serving: 1slice | Calories: 420kcal | Carbohydrates: 68g | Protein: 7g | Fat: 14g | Saturated Fat: 5g | Polyunsaturated Fat: 5g | Monounsaturated Fat: 3g | Trans Fat: 0.2g | Cholesterol: 54mg | Sodium: 565mg | Potassium: 248mg | Fiber: 1g | Sugar: 41g | Vitamin A: 237IU | Vitamin C: 2mg | Calcium: 200mg | Iron: 1mg

    Cool Whip Fruit Dip

    June 20, 2024

    Cool Whip fruit dip with strawberry ham, in a white bowl.

    This Cool Whip Fruit Dip is creamy, dreamy, and perfect to dip your favorite fruit or sweet crackers in to. Perfect as a party food or even just a snack to enjoy at home.

    This sweet dip recipe is ready in just a few minutes and only uses marshmallow fluff, strawberry jam, yogurt, and of course, Cool Whip!

    Cool Whip Fruit Dip in white bowl, with strawberry and graham cracker on top.

    This delicious fruit dip recipe is a go-to recipe that can be made quickly, and has a lot of different variations you can come up with. I’ll provide more tips and suggestions below on what you can do, if you’re looking to kick things up a notch.

    Cool Whip Fruit Dip being scooped up with a hand holding a graham cracker.

    What’s not to love about a sweet and creamy dip, made of just a few ingredients? Not only is it so good to eat, it looks absolutely beautiful on a fruit board since it has a gorgeous pink color.

    Interested in trying other dessert dips for fruit? Check out my 3-ingredient fruit dip and this peanut butter yogurt dip!

    Fruit Dip Ingredients

    Here's what you need to make this fruit dip with Cool Whip, and some details about the ingredients:

    Ingredients for Cool Whip Fruit Dip on kitchen counter.

    Complete list of ingredients and amounts can be found in the recipe card below.

    • Cool Whip – Make sure to thaw the Cool Whip in the refrigerator overnight for the best results. Avoid microwaving it, as this can cause it to become too runny.
    • Vanilla Yogurt – I suggest using Greek vanilla yogurt, however you can substitute regular vanilla yogurt in this recipe. However, keep in mind that Greek yogurt tends to be thicker and creamier, so the texture of the dip may be slightly different.
    • Jam – Not a fan of strawberry flavors? You can use your favorite jam flavor to add the color and flavor you’re looking for in this dip.

    How to Make Fruit Dip with Cool Whip

    1. Gather all the ingredients:  jam, marshmallow fluff, Greek vanilla yogurt, and Cool Whip. Ensure the Cool Whip is thawed properly by refrigerating it overnight.
    2. In a mixing bowl, add the jam, marshmallow fluff and Greek vanilla yogurt.
    Marshmallow Fluff, jam, and yogurt in a clear, glass bowl to start making the fruit dip.
    1. Using a whisk or spatula, mix it all together until they are well combined and smooth in texture. This may take a minute or two to fully incorporate.
    2. Once the jam, marshmallow fluff and Greek yogurt are mixed, gently fold in the thawed Cool Whip. Use a spatula to fold the Cool Whip into the mixture until everything is evenly combined.
    Cool Whip poured in to glass mixing bowl to finish fruit dip.
    1. If time allows, you can chill the dip in the refrigerator for about 30 minutes to allow the flavors to meld together and the dip to firm up slightly. However, you can also serve it immediately if desired.
    Cool Whip folded in to ingredients to make fruit dip.
    1. Transfer the Cool Whip fruit dip to a serving bowl or platter. Garnish with additional toppings if desired, such as fresh fruit, mint or a sprinkle of cinnamon.
    Cool Whip Fruit Dip in clear glass bowl, with strawberry on top.

    Dip Variations

    • Chocolate Swirl: Drizzle melted chocolate over the top of the dip before serving for a decadent twist.
    • Fruity Flavors: Experiment with different flavors of jam or yogurt. Also, feel free to customize the dip by adding flavorings or extracts such as vanilla extract, almond extract, or even a splash of citrus juice for a tangy twist. Experiment with different flavors to suit your taste preferences.
    • Nutty Addition: Sprinkle chopped nuts, such as almonds or pecans, over the dip for added crunch and flavor.

    Recipe Tips

    • Sweetness: Feel free to adjust the sweetness of the dip to your liking. You can add more marshmallow fluff for a sweeter flavor or reduce it for a less sweet taste.
    • Make it even better: For the most refreshing experience, chill the dip in the refrigerator for at least 30 minutes before serving. This allows the flavors to meld together and the dip to firm up slightly.
    • Make Ahead: You can prepare this dip ahead of time and store it in the refrigerator until you’re ready to serve. Just make sure to give it a good stir before serving to ensure it’s well-mixed.

    What to Serve with Cool Whip Fruit Dip

    • Fresh fruit (strawberries, apples, bananas, etc.)
    • Graham crackers
    • Pretzel sticks
    • Vanilla wafers
    • Oreo cookies
    • Animal crackers

    How to Store Fruit Dip

    • Leftovers: Store any leftovers in an airtight container in the refrigerator for up to 3 days. Stir well before serving.
    • Freeze: While this dip can be frozen, the texture may change slightly upon thawing, it’s best enjoyed fresh.

    Similar Recipes

    Love no-bake dip recipes like this one? You’ll also love this hot cocoa dip and these other creamy favorites:

    • A bowl of Oreo dip with an Oreo in it and crumbled Oreos on top.
      Oreo Dip
    • A bowl of booty dip surrounded by crackers and with two graham crackers in the dip.
      Booty Dip
    • banana pudding dip on serving tray with crackers and fresh fruit
      Banana Pudding Dip
    • Peanut butter fluff in a large white bowl.
      Peanut Butter Fluff

    Recipe

    Cool Whip fruit dip with strawberry ham, in a white bowl.
    Print Pin
    Be the first to rate!

    Cool Whip Fruit Dip

    This Cool Whip Fruit Dip is the ultimate blend of creamy, fluffy, and sweet. It's incredibly easy to whip up, requiring just four simple ingredients and a few minutes of your time.
    Course Appetizer, Dessert, Snack
    Cuisine American
    Diet Vegetarian
    Prep Time 5 minutes minutes
    Total Time 5 minutes minutes
    Servings 8 servings
    Calories 100kcal
    Author Jessica Burgess

    Ingredients

    • 3 Tablespoons strawberry jam or other jam of choice
    • ½ cup marshmallow fluff
    • ½ cup Greek vanilla yogurt or regular vanilla yogurt (although dip may be thinner and sweeter)
    • 3 cups Cool Whip thawed

    Instructions

    • Make sure to allow time for the Cool Whip to thaw.
    • In a mixing bowl, add the jam, marshmallow fluff and Greek vanilla yogurt.
    • Using a whisk or spatula, mix together until it's well combined and smooth in texture. This may take a minute or two to fully incorporate.
    • Gently fold in the thawed Cool Whip. Use a spatula to fold the Cool Whip into the mixture until everything is evenly combined.
      If time allows, you can chill the dip in the refrigerator for about 30 minutes to allow the flavors to meld together and the dip to firm up slightly. However, you can also serve it immediately if desired.

    Video

    Notes

    Feel free to add different variations to this recipe, such as:
    • Using different flavors of jam
    • Greek vanilla yogurt tends to be thicker and creates a creamy, fluffy dip but regular vanilla yogurt works too.
    • Making your own whipped cream will work although it could result in a different texture.
     
    What to Serve with this Cool Whip Dip:
    • strawberries, apples, bananas, grapes and more!
    • graham crackers
    • animal crackers
    • chocolate cookies
    • pretzels

    Nutrition

    Serving: 1serving | Calories: 100kcal | Carbohydrates: 21g | Protein: 2g | Fat: 2g | Saturated Fat: 1g | Polyunsaturated Fat: 0.1g | Monounsaturated Fat: 0.4g | Cholesterol: 5mg | Sodium: 27mg | Potassium: 36mg | Fiber: 0.3g | Sugar: 14g | Vitamin A: 59IU | Vitamin C: 1mg | Calcium: 46mg | Iron: 0.04mg

    KFC Coleslaw (Copycat Recipe)

    June 19, 2024

    KFC Coleslaw in small white bowl.

    Love KFC Coleslaw? This copycat recipe is so easy to make at home, and serve alongside your own fried chicken recipe and buttermilk biscuits, or as a side dish recipe for your favorite summer dinner, and maybe to these copycat KFC Zinger burgers!

    KFC coleslaw copycat in a small white bowl, sitting on a white fabric napkin.

    When I think of KFC, I can’t help but think of their coleslaw. It’s creamy and delicious, and now that I’ve figured out how to make it at home, I no longer need to count on going to the restaurant to get my fix!

    This recipe uses simple ingredients, comes together in just a few minutes, and is also a great side dish to serve along with barbecue favorites like slow cooked pulled pork, or bratwursts baked in the oven.

    Bite of KFC Coleslaw on a fork, being held above small bowl of coleslaw.

    How to Make KFC Coleslaw

    It’s a matter of chopping cabbage and carrots (using a food processor is best), combing a delicious creamy sauce, mixing it all together and chilling for a few hours. That’s it!

    What You’ll Need:

    It doesn’t take much to make this coleslaw recipe but I’ll provide notes below on some of the key ingredients.

    Ingredients needed to make KFC Coleslaw recipe.
    • Cabbage – I prefer chopping my own cabbage and carrots for this recipe although you can buy the prepackaged coleslaw mix if you’re pressed for time. A medium cabbage yields about 8 cups of chopped cabbage.
    • Carrot – If you use the coleslaw mix instead of chopping your own, you can omit the carrot from this recipe. Save the carrots and make this carrot salad recipe too!
    • Vinegar – White, distilled vinegar is the type you’ll want to use for this recipe to get the flavor as close to the KFC coleslaw as possible.
    • Mayo – Hellman’s or Best Foods brands are my favorite mayo to use for this recipe.
    • Sugar – White granulated sugar is what I recommend for this coleslaw.

    Complete list of ingredients and amounts can be found in the recipe card below.

    The Directions:

    Directions on how to make KFC Coleslaw.
    1. If chopping your own cabbage and carrots, cut the cabbage in half, and remove the core/stem of the cabbage and discard.
    2. Cut the cabbage in to smaller pieces so it fits nicely in to the food processor. You may have to split the cabbage pieces up, and blend a few times if all of the cabbage won’t fit in the processor at once.
    3. Turn on the processor and allow it to chop until it is finely chopped, to resemble step 3 in the process images above. Empty cabbage (you should have about 8 cups of chopped cabbage at this point) in to a large mixing or serving bowl.
    4. Cut carrot up in to small pieces and place in food processor (it’s ok if the bowl of the processor still has a trace of cabbage since it will all mix together anyway) and process the carrots until it’s chopped in to small pieces like the cabbage.
    5. Empty the chopped carrot in to the same bowl with the chopped cabbage. (If you don’t want to chop your onion, you can add the onion to your processor at this point and chop it. However, with it being a small amount, I find it’s easier just to chop it very fine with a knife.)
    6. In a medium-sized mixing bowl, combine the mayo, onion, vinegar, sugar, seasonings, milk, and buttermilk to make the copycat KFC coleslaw dressing.
    7. Using a whisk, mix together until evenly blended.
    8. Pour the wet mixture on to the cabbage and carrots and mix together to coat the cabbage and carrots in the creamy sauce. Cover, and place in the refrigerator for at least 2 hours but up to 8 hours.

    Important Notes for This Coleslaw Recipe

    • Make sure you allow enough time for the coleslaw to rest in the refrigerator before serving. The cabbage and carrots need to absorb and soak in the juices for ultimate flavor. (Two hours at a minimum, and even up to 8 hours to allow the flavors to blend.)
    • Feel free to stir the coleslaw a few times while it’s resting in the refrigerator to help incorporate the flavors even more.
    • Enjoy this coleslaw within 4-5 days of making, to ensure its freshness.
    KFC Coleslaw in white bowl, sitting next to big bowl.

    More Recipes You’ll Love

    • Close up of red skin potato salad in white bowl, with wooden spoon.
      Easy Red Skin Potato Salad
    • Instant Pot Mashed Potatoes
      Instant Pot Mashed Potatoes
    • Chopped Asian Salad - in a white bowl with mandarin oranges on top
      Asian Chopped Salad
    • Thai Salad with Noodles and Cabbage is packed full of flavor and texture.
      Thai Salad Recipe with Noodles and Cabbage

    Enjoy making your own KFC coleslaw at home now! Make sure to give this recipe a star rating below and don't forget to pin it so more people can enjoy it too.

    Recipe

    KFC Coleslaw in small white bowl.
    Print Pin
    5 from 1 vote

    KFC Coleslaw (Copycat Recipe)

    This KFC Coleslaw copycat recipe is just like the restaurant! So simple, and easy to make too.
    Course Side Dish
    Cuisine American
    Diet Vegetarian
    Prep Time 10 minutes minutes
    Chill Time 2 hours hours
    Total Time 2 hours hours 10 minutes minutes
    Servings 10 servings
    Calories 134kcal
    Author Jessica Burgess

    Equipment

    • Food Processor

    Ingredients

    • 1 head cabbage or 8 cups of finely diced cabbage (or 16 oz. package of coleslaw mix)
    • ¼ cup carrot finely diced (Omit if using pre-chopped cabbage mixture)
    • 1 Tablespoon onion chopped finely
    • ⅓ cup white granulated sugar
    • ½ cup mayonnaise
    • 1 teaspoon white vinegar
    • ¼ cup buttermilk
    • ¼ cup whole milk
    • ½ teaspoon salt
    • ⅛ teaspoon black pepper

    Instructions

    • If chopping your own cabbage and carrots, cut the cabbage in half, and remove the core/stem of the cabbage and discard.
    • Cut the cabbage in to smaller pieces so it fits nicely in to the food processor. You may have to split the cabbage pieces up, and blend a few times if all of the cabbage won't fit in the processor at once.
    • Turn on the processor and allow it to chop until it is finely chopped, to resemble step 3 in the process images above. Empty cabbage (you should have about 8 cups of chopped cabbage at this point) in to a large mixing or serving bowl.
    • Cut carrot up in to small pieces and place in food processor (it's ok if the bowl of the processor still has a trace of cabbage since it will all mix together anyway) and process the carrots until it's chopped in to small pieces like the cabbage.
    • Empty the chopped carrot in to the same bowl with the chopped cabbage. (If you don't want to chop your onion, you can add the onion to your processor at this point and chop it. However, with it being a small amount, I find it's easier just to chop it very fine with a knife.)
    • In a medium-sized mixing bowl, combine the mayo, onion, vinegar, sugar, seasonings, milk, and buttermilk to make the copycat KFC coleslaw dressing.
    • Using a whisk, mix together until evenly blended.
    • Pour the wet mixture on to the cabbage and carrots and mix together to coat the cabbage and carrots in the creamy sauce.
    • Cover, and place in the refrigerator for at least 2 hours but up to 8 hours.

    Video

    Notes

    Feel free to stir the coleslaw a few times while it’s resting in the refrigerator to help incorporate the flavors even more.
    Enjoy this coleslaw within 4-5 days of making, it to ensure its freshness.

    Nutrition

    Serving: 1g | Calories: 134kcal | Carbohydrates: 13g | Protein: 2g | Fat: 9g | Saturated Fat: 2g | Polyunsaturated Fat: 5g | Monounsaturated Fat: 2g | Trans Fat: 0.02g | Cholesterol: 6mg | Sodium: 215mg | Potassium: 186mg | Fiber: 2g | Sugar: 10g | Vitamin A: 651IU | Vitamin C: 33mg | Calcium: 53mg | Iron: 0.5mg

    Corned Beef Sliders

    June 18, 2024

    Corned beef sliders stacked on top of one another, sitting on a white plate.

    These Corned beef sliders, or “Reuben sliders“, are ready in only 30 minutes! Delicious deli corned beef, sauerkraut, cheese, and a few other simple ingredients on a Hawaiian bun, are the ultimate slider that’s perfect for a party food or an easy dinner!

    Corned beef sliders stacked on top of one another, sitting on a white plate.

    I love making sliders! They are perfect as appetizers or your main dish, and they taste great at any temperature. Serve them hot but then you can totally enjoy the leftovers cold!

    If you want more beefy options, cheeseburger sliders are a classic take. Need more sauce? Try out some sloppy joe sliders, too! These rolls also make mini breakfast sandwiches for grab-and-go goodness.

    [feast_advanced_jump_to]

    Why You’ll Love This Recipe

    • It uses a few ingredients: Just grab some items from the deli and you are all set to go!
    • Make-ahead recipe: You can absolutely assemble and freeze to pull these out on a busy night.
    • Ready in only 30 minutes: Just layer, bake, and enjoy!

    Ingredients Needed

    Here’s what you’ll need to make these corned beef sliders.

    Labeled ingredients for the ingredients needed to make corned beef sliders.
    • Rolls – The sweet Hawaiian flavor pairs so nicely with the tangy filling ingredients.
    • Meat – Corned beef is a great deli favorite.
    • Cheese – Swiss is a traditional corned beef pairing, but feel free to use any tangy cheese you have on hand.
    • Sauerkraut – Make sure and drain this off so that your sliders aren’t soggy.
    • Dressing – I love a good thousand island here, but you can go in a new direction and try out some ranch.

    *Be sure to see the recipe card below for the full ingredients list & instructions!*

    How to Make Mini Corned Beef Sandwiches

    Steps on how to make corned beef sliders.

    STEP 1. Slice tolls. We are going to slice the rolls in half horizontally, leaving the individual rolls connected.

    STEP 2. Begin layering. Arrange the beef slices in an even layer and top with the drained sauerkraut.

    Tip: Be careful slicing the rolls. Try and cut directly through the middle of them, and leave the tops and bottom in large slabs. This allows everything to bake up evenly without everything “sliding” out the sides.

    Steps on how to make roast beef sliders.

    STEP 3. Finish assembly. Top with slices of cheese and your desired dressing.

    STEP 4. Top and bake. Add the top buns, then brush with butter and sprinkle on poppy seeds. Bake until cheese melts and buns are golden.

    Recipe Pro Tips

    • Switch it up. Use everything bagel seasoning on top instead! You can also use sesame seeds or leave them plain.
    • Wrap it up. Got leftovers? Wrap tightly in plastic wrap before adding to a bag in the freezer. This way you can easily grab a single serving at a time.
    Corned beef cabbage sliders on white platter.

    Recipe FAQs

    What other fillings can I use?

    Use this recipe as a framework! Select any type of deli meat or cheese, and pair with your favorite dressing. The beauty of this recipe is that it shows you the basic assembly and cooking instructions, but you can play chef and use anything inside or on top.

    Can I use different rolls?

    Absolutely! The Hawaiian are easy to find and everyone loves the taste. They are also more likely to stay together in a slab. However, you can use any type of buns and just nestle them in next to each other. Be aware that larger buns may require more filling or a longer cook time.

    What type of pan is best for baking sliders?

    You can either place these in the center of a baking sheet or they fit beautifully in a 9×13 dish. It all depends what you have in your kitchen. Using a baking dish means no filling will leak out the sides, which is sometimes beneficial if you overstuff them or use lots of cheese.

    Hand holding corned beef slider, up above pan of sliders.

    What to Serve with Corned Beef Sliders

    I recommend a veggie tray and fruit salad, plus of course a bag of your favorite chips! If you’re turning this into a complete meal, try some sweet potato fries in the air fryer!

    Storage

    Serve these sliders piping hot! The melted cheese is so good. You can place any leftovers in an airtight container in the fridge for up to 2 days. Enjoy them cold or reheat in the toaster oven.

    For longer storage, or to meal prep, assemble the sliders right on aluminum foil. This way you can just set it right onto a baking sheet and bake from frozen, adding a few extra minutes to thaw all the way through.

    More Slider Recipes You’ll Love

    • Chicken salad with grapes and apples, sitting on bread.
      Harvest Chicken Salad
    • Buffalo chicken sliders on wooden cutting board.
      Buffalo Chicken Sliders
    • Fish sliders on white plate.
      Fish Sliders
    • Fried chicken sliders on white plate, topped with mayo, lettuce and pickles.
      Fried Chicken Sliders

    Did you make this? I’d be so grateful if you left a “star” rating below to let me know what you thought! Then, the next time you need a quick and easy recipe, come back to Fantabulosity to browse all of my easy recipes!

    Recipe

    Corned beef sliders stacked on top of one another, sitting on a white plate.
    Print Pin
    Be the first to rate!

    Corned Beef Sliders

    Corned beef sliders, or "reuben sliders" are an amazing party food or even an easy dinner idea, that's a great twist from a traditional slider recipe.
    Course Appetizer, Main Course
    Cuisine American
    Prep Time 15 minutes minutes
    Cook Time 15 minutes minutes
    Total Time 30 minutes minutes
    Servings 12 sliders
    Calories 238kcal
    Author Jessica Burgess

    Ingredients

    • 12 Hawaiian rolls
    • 12 slices deli corned beef about ½ pound
    • 1 cup sauerkraut lightly strained
    • ¾ cup thousand island dressing
    • 6-8 slices Swiss cheese
    • 2 tablespoons unsalted butter melted
    • poppy seeds

    Instructions

    • Preheat oven to 350°F.
    • Cover a rimmed baking sheet with parchment paper or aluminum foil (note: if using foil spray lightly with a non-stick spray).
    • Leaving the rolls intact, slice them in half on the horizon.
    • Starting with the bottom buns placed on the baking sheet, layer the corned beef, sauerkraut, thousand island dressing, Swiss cheese, followed by the top of the buns.
    • In a microwave safe bowl melt 2 tablespoons butter and brush over the top of the buns and sprinkle with poppy seeds.
    • Place tin foil over, loosely, and bake for 15-20 minutes. Remove the foil to brown the tops slightly, and enjoy!

    Notes

    Store leftovers for up to 2 days, and you can easily reheat the sliders the toaster oven if you have one! (Or a microwave or even reheat at a low temperature in the oven.)

    Nutrition

    Serving: 1slider | Calories: 238kcal | Carbohydrates: 18g | Protein: 8g | Fat: 15g | Saturated Fat: 5g | Polyunsaturated Fat: 3g | Monounsaturated Fat: 4g | Trans Fat: 0.1g | Cholesterol: 37mg | Sodium: 559mg | Potassium: 100mg | Fiber: 0.5g | Sugar: 7g | Vitamin A: 164IU | Vitamin C: 7mg | Calcium: 84mg | Iron: 1mg

    Taquito Casserole

    June 17, 2024

    Serving of taquito casserole on a white, square plate.

    This Taquito Casserole comes together in about 30 minutes, using frozen taquitos, and a few other ingredients that you probably already have on hand, or that you can easily grab at almost any grocery store!

    Taquito casserole in white 9x13 inch baking dish.

    This is an easy casserole recipe for dinner that your family will ask for again and again! Having an easy dinner recipe like this one that you can have on repeat, is a great way to keep meal planning dinner a breeze!

    Ingredients for Taquito Casserole

    You can see below, that only 5 ingredients (2 cans of enchilada sauce) are used for this casserole recipe! How easy, and affordable is this?

    Packaged ingredients on kitchen counter, to make taquito casserole.

    Great to Know: You can see that cheese is the only perishable ingredient, and cheese tends to be an ingredient that is commonly on hand, so this means that this is a dinner recipe that can be used for those last-minute dinner ideas!

    • Frozen taquitos – I bought the chicken taquitos but feel free to use your favorite kind! You’ll also bake these right from frozen, so no need to thaw beforehand. Substitution Ideas: You can more than likely use frozen chimichangas or frozen burritos if you desire, although the baking time may change if they’re thicker than taquitos, so make sure to check the instructions on the box.
    • Canned goods – make sure to drain your corn and drain and rinse your black beans, before adding them to the dish.
    • Cheese – shredding your own cheese is recommended, although not required. The pre-shredded cheese from the store is easy and saves time for sure, although it’s not as creamy as when you shred your own.

    How to Make Taquito Casserole

    Ready for one of the easiest casserole recipes there is? See below how to put this together in just a couple of minutes.

    Four image collage showing the steps on how to make this taquito casserole recipe.
    1. Grease a 9×13 baking dish, and arrange all of the taquitos in to the bottom of the dish. (Save the box for instructions later.)
    2. Next, pour the drained corn and drained and rinsed beans on top of the taquitos.
    3. Pour both cans of enchilada sauce over the top of the beans and corn.
    4. Finally, sprinkle shredded cheese on top of everything.
    5. Lastly, place the casserole in to the oven and bake the casserole according to the directions stated on the box of the taquitos, and add 5 minutes to the suggested bake time. (This is so it allows enough time to melt the cheese and cook the additional ingredients that have been added.)

    TIP: When I make this, I make 23 chicken taquitos – and I bake this casserole at 400° for 20-25 minutes or until heated through.

    Serving of taquito casserole on white square plate, sitting on a yellow napkin.

    Serve this delicious casserole once removed from the oven, and enjoy warm!

    Additional Topping Ideas for this Casserole

    If you choose to add more toppings to this casserole (although it’s delicious as is) here are a few suggestions:

    • sour cream
    • salsa
    • shredded lettuce
    • jalapenos
    • chopped onions
    • more cheese
    • chopped tomatoes
    • black olives
    • green chilies
    • cilantro

    What to Serve with this Casserole Recipe

    Many things go great as side dishes for this recipe! However, serving this easy guacamole recipe, taco dip or even Rotel salsa are my favorite options.

    Related Recipes

    Love Mexican dishes? Here are a few of my family’s favorites:

    • Walking Taco Casserole being lifted out of baking dish with spoon.
      Walking Taco Casserole
    • Beef and Cheese Burritos on plate.
      Beef and Cheese Burritos
    • Crispy chicken tacos baked on baking sheet.
      Crispy Chicken Tacos
    • Spoonful of hot taco dip in dish.
      Hot Taco Dip

    Recipe

    Serving of taquito casserole on a white, square plate.
    Print Pin
    5 from 1 vote

    Taquito Casserole

    Taquito casserole uses frozen taquitos, and only 4 other ingredients to make this delicious, comforting recipe!
    Course Dinner, Main Course
    Cuisine Mexican
    Prep Time 5 minutes minutes
    Cook Time 20 minutes minutes
    Total Time 25 minutes minutes
    Servings 5 people
    Calories 661kcal
    Author Jessica Burgess

    Ingredients

    • 23 frozen taquitos or similar amount of chicken or preferred flavor of taquitos
    • 2 cups red enchilada sauce
    • 15 ounces can corn drained
    • 15 ounces black beans rinsed and drained
    • 2 cups shredded cheddar cheese

    Instructions

    • Preheat oven to temperature that's suggested on the box of the frozen taquitos.
    • Grease a 9×13 baking dish.
    • Pour frozen taquitos in to baking dish, and spread them out so they aren't overlapping.
    • Pour drained corn and drained and rinsed black beans on top of taquitos.
    • Next, pour enchilada sauce on top of all of the ingredients in the baking dish, trying to pour it evenly.
    • Sprinkle 2 cups of shredded cheese across the top of the other ingredients.
    • Place baking dish in oven and bake for the time that is instructed on the box of taquitos, and add 5 minutes to the cook time.
      NOTE: For my casserole and frozen taquitos, I bake a 23 count box of frozen chicken taquitos, and bake the casserole at 400° for 20-25 minutes or until it's heated through.

    Notes

    Variations: Feel free to switch out chimichangas, or burritos for the taquitos if needed. However, do note that you’ll want to follow the directions on the box for whichever you choose so it bakes long enough. 
    Salsa instead of enchilada sauce: Instead of enchilada sauce, you can use salsa.

    Nutrition

    Serving: 1serving | Calories: 661kcal | Carbohydrates: 75g | Protein: 25g | Fat: 29g | Saturated Fat: 13g | Polyunsaturated Fat: 4g | Monounsaturated Fat: 8g | Trans Fat: 0.1g | Cholesterol: 45mg | Sodium: 1446mg | Potassium: 563mg | Fiber: 13g | Sugar: 7g | Vitamin A: 1108IU | Vitamin C: 3mg | Calcium: 399mg | Iron: 4mg

    Lemon Meringue Pie

    June 13, 2024

    Slice of lemon meringue pie on small plate, with slice of lemon laying beside it.

    This classic lemon meringue pie is a vintage recipe that’s perfect for cooler months, is made with simple ingredients, and uses REAL lemon flavor, making it one of the BEST lemon pies out there.

    Side view of a slice of lemon meringue pie,  on a small plate, sitting next to a slice of lemon.

    My Top Tip: Remember lemons give the most juice when room temp, not cold, and rolling them on the counter a few times first will also help release more juice. Read on for more!

    I love comfort food – who doesn’t? If you are a looking for a show-stopping dessert that’s also tasty, look no further. This will remind you of your grandma’s baking for sure.

    Lemon desserts like this lemon puppy chow and lemon brownies, are perfect for the warmer months, for a refreshing snack. This lemon bundt cake and lemon poke cake are other lemon desserts that are great for gatherings.

    Ingredients You’ll Need

    Overhead shot of ingredients to make lemon meringue pie.
    • Pie crust – Make your own, or buy one at the store. It isn’t the star of the show here. If you do get the refrigerated pie crust, two usually come in a package. You can use the other pie crust to make this vintage buttermilk pie or make these sugar cinnamon pie crust cookies with the second crust.
    • Lemons – Since you need to grate your own zest here, It is worth it to also squeeze the lemons for fresh juice. This will give you the best taste. I use this same method for these lemon blondies too. This takes about 3 large lemons or 5 small lemons.
    • Cornstarch – This helps thicken our lemon filling. It is a sort of insurance that you will achieve the right consistency, rather than depending on heat alone.
    • Vanilla – Always use pure vanilla extract in your baking. It complements all flavors really well. Even if you don’t taste vanilla per se, you would miss it if it weren’t there as a finishing touch.

    How to Make Lemon Meringue Pie

    Do you know the term “docking”? This is why so many crackers have little holes in them (think buttery rounds or graham crackers). This process helps steam release and keeps the dough from puffing up. You can dock well or use pie weights (even dried beans you keep for this purpose!) to keep your pie crust from rising up while baking.

    Another fun term you might not be familiar with is “blind baking.” That’s what we are doing here where we pre-bake the crust before filling. If the filling was added to raw crust it wouldn’t cook through and would be soggy and saggy. No one wants a saggy pie slice!

    Step by Step process images showing how to make lemon meringue pie.

    Lemon meringue pie is essentially a custard. Heat carefully and always be stirring. This way you won’t have scrambled eggs in your filling! It will remain nice and smooth if you heat gently and keep stirring.

    Step by step showing how to make lemon pie and the meringue to go on top.

    Whip those whites! The cream of tartar helps stabilize the finished product so you can make pretty swirls and so it lasts in the fridge.

    Overhead shots of before and after baking the lemon meringue pie.

    I prefer to bake my meringue, but if you are skilled with a kitchen torch, by all means, use it! People also pop it under the broiler quickly for deep color, but there’s a chance to get distracted.

    Pro Tip: Each lemon can give 2-3 tablespoons of juice, depending on size. Always zest first, then slice in half to juice. Remember that they give the most juice when room temp, not cold, and rolling them on the counter a few times first will also help release more juice. Pick up 3-4 lemons for this pie just to be safe.

    Straight on shot of a slice of lemon meringue pie on a small white plate, being cut with a fork.

    Recipe Pro Tips

    • Separate eggs carefully. Any fat from the yolk in the whites will keep them from whipping nicely. I recommend separating each egg into a small bowl first so you can inspect it before adding to the other eggs in a large bowl!
    • Special ingredients. Don’t skip out on the cream of tartar – this is what will stabilize your whipped egg whites!

    Storage Instructions

    Store in the fridge, covered. I don’t recommend storing much past 2 days, though. The meringue can start to “weep” or break down, or begin sliding off the filling if the pie has been cut and some is missing.

    Do I have to use store-bought pie crust or can I make my own for lemon meringue?

    You can absolutely make your own pie crust. Follow your favorite recipe and make sure to bake your crust fully before adding your lemon filling. If you're short on time, a premade pie crust is there to save the day.  

    Can I make lemon meringue pie ahead of time and freeze it?

    You can make this pie a day ahead and store it in the refrigerator before serving. Use a few toothpicks to create a tent on top of the pie with cling wrap so you don't disturb your beautiful meringue and nobody will ever know that you didn't bake it that day. Unfortunately, this isn't a recipe that will freeze well. 

    More Pie Recipes

    • A slice of caramel cream pie on a round plate, with a fork lying next to it.
      Caramel Cream Pie
    • A slice of chocolate chip cookie pie on a plate with a fork.
      Chocolate Chip Cookie Pie
    • A slice of apple butter pie topped with cinnamon whipped cream, sitting on a round plate.
      Apple Butter Pie
    • Fried Chocolate Pies stacked on a plate.
      Fried Chocolate Pies

    Recipe

    Slice of lemon meringue pie on small plate, with slice of lemon laying beside it.
    Print Pin
    5 from 1 vote

    Lemon Meringue Pie

    Lemon Meringue Pie is a classic, diner-inspired pie that everyone should know how to make! It might seem intimidating, but the technique is straightforward to learn.
    Course Dessert
    Cuisine American
    Prep Time 30 minutes minutes
    Cook Time 20 minutes minutes
    Chill 2 hours hours
    Total Time 2 hours hours 50 minutes minutes
    Servings 8 slices
    Calories 402kcal
    Author Jessica Burgess

    Ingredients

    For the crust:

    • 1 package refrigerated pie crust

    For the lemon filling:

    • 1 ¼ cup water room temperature
    • 1 ¼ cups granulated sugar
    • 1 tablespoon lemon zest about 1 lemon
    • ⅔ cup lemon juice freshly squeezed (about 3 large lemons, or 5 small)
    • ¼ cup cornstarch
    • ¼ cup unsalted butter
    • 1 teaspoon vanilla extract
    • ½ teaspoon salt
    • 5 egg yolks beaten lightly

    For the meringue:

    • ¼ teaspoon cream of tartar
    • 5 egg whites room temp
    • ⅔ cup granulated sugar
    • Pinch of salt

    Instructions

    For the crust:

    • Line a 10 inch (40 ounce) deep dish pie pan with one thawed pie crust, crump the edges, and bake according to package instructions. Make sure to weigh your crust down with parchment paper and beads or sugar.
    • While the pie crust is baking, make your filling.

    For the lemon filling:

    • Preheat your oven to 350°F.
    • In a saucepan over medium heat, whisk the water, sugar, lemon zest and lemon juice, cornstarch, butter, vanilla and salt.
    • Stir continuously until the butter is melted, sugar has dissolved and it's slightly thick (about 5 minutes).
    • Once thickened, reduce heat to low.
    • In a mixing bowl, add the egg yolks.
    • While stirring, slowly ladle in about ¼ cup of the lemon mixture.
    • Stirring constantly, slowly stream this mixture back into the saucepan.
    • Turn the heat back to medium and heat and stir until smooth and slightly bubbly. Your mixture will be even thicker now, the consistency of pudding.
    • Spread the lemon filling into the pie crust and set aside but keep warm.

    For the meringue:

    • Using a hand or stand mixer with a whisk attachment on low, beat together the cream of tartar and egg whites together just until peaks start to form (about 2-3 minutes)
    • Continue to mix while slowly adding the sugar and salt, turn the mixer up to medium, and mix until stiff smooth peaks form (about 5-6 minutes) and the mixture looks shiny. Note: I find that my stand mixer works best for this.
    • Spread the meringue over the warm pie filling and use the back of a spoon to form swirls and wisps.
    • Bake on the lowest rack for 20 minutes or until the tips of the meringue swirls start to lightly brown.
    • Cool completely on your counter then allow to set in the refrigerator for at least 2 hours before serving.

    Video

    Notes

    • I find it’s best to measure out all of the ingredients that I need before starting on this pie, so I can be timely with the warm pie and meringue connection.
    • It's important to bake your pie crust before adding the filling. If you don’t, the crust won't cook all the way through in the time it takes to bake the filling and it will also become a soggy mess
    • Make sure to work quickly when building your meringue. If you allow the lemon filling to cool too much before adding the meringue on top it won't  fuse together well and will separate. 
    • This pie is best served chilled. 

    Nutrition

    Calories: 402kcal | Carbohydrates: 64g | Protein: 5g | Fat: 15g | Saturated Fat: 6g | Polyunsaturated Fat: 1g | Monounsaturated Fat: 5g | Trans Fat: 0.2g | Cholesterol: 137mg | Sodium: 274mg | Potassium: 105mg | Fiber: 1g | Sugar: 49g | Vitamin A: 341IU | Vitamin C: 9mg | Calcium: 26mg | Iron: 1mg

    Breakfast Cookies

    June 10, 2024

    Breakfast cookies sitting on wire cooling rack.

    These breakfast cookies are made with ingredients you probably already have on hand, and are incredibly easy to make! Bake them in the oven, and serve them alongside a hot cup of coffee, or a glass of milk for the kids!

    Simply mix together the ingredients (dry and wet separately first) and then bake! You’ll have breakfast or a snack, in just minutes!

    Baked breakfast cookies on wire baking sheet.

    More Breakfast Recipes You’ll Love:

    • Easy Peach Turnovers
    • Easy Cinnamon French Toast Sticks
    • Mini Waffle Breakfast Sandwiches

    Breakfast around here usually consists of bacon in the oven, eggs, breakfast sliders, or the classic bowl of cereal.

    Every once in a while, I’ll throw in a batch of these Butternut Squash Pancakes because the kids can’t get enough of them, and I love that they’re eating squash for breakfast.

    But these breakfast cookies are so great to make in advance, so the kids can just grab them and go in the morning, or so they can have a great snack in the afternoon.

    What You’ll Need to Make These Breakfast Cookies:

    Basic ingredients are used in this recipe but I’ll make a few notes about some of the key ingredients below, that you may find helpful.

    Overhead shot of labeled ingredients sitting on counter.
    • Oats – I used old-fashioned oats for this recipe but you can use a different type of oat if needed.
    • Applesauce – I use regular applesauce but if you only have cinnamon on hand, that’s ok too!
    • Peanut butter – creamy or crunchy work for this recipe. Just the type you’d prefer.
    • Chocolate chips – regular or mini chocolate chips. You can even use butterscotch or white chocolate chips.

    How to Make Breakfast Cookies

    Preheat your oven to 350 degrees F.

    Dry goods mixed together in glass mixing bowl.

    In a large mixing bowl, add oats, flour, flaxseed, cinnamon, baking soda and chocolate chips. Stir to combine.

    Wet ingredients mixed together in glass mixing bowl, for breakfast cookies.

    Then, in a medium mixing bowl, add peanut butter, applesauce, honey, brown sugar, and egg. Stir to combine.

    Wet and dry ingredients mixed together in glass bowl.

    Add the wet ingredients to the dry ingredients and stir well to incorporate all ingredients, and they’re ready for baking!

    Breakfast cookies scooped in round balls, and placed on a baking sheet.

    Scoop out small, round, balls of the cookie dough, and place them at least 2 inches apart on the baking sheet.

    Breakfast cookies mashed on baking sheet, ready for baking.

    Next, using your hand, or the bottom of a greased drinking glass, gently press down on each cookie to flatten. (You don’t have to flatten a lot, just a little to make a cookie shape.)

    Breakfast cookie on counter, sitting next to small plate of more breakfast cookies.

    Bake the cookies for 9-11 minutes and remove from the oven.

    Allow the cookies to rest on the cookie sheet for a couple of minutes, and then move to a wire cooling rack to finish cooling. Enjoy!

    Love peanut butter in your cookies? Then you’ll also love these cake mix peanut butter cookies too!

    More Breakfast Recipes

    • Bagel French Toast casserole in the crock pot.
      Crock Pot Bagel French Toast Casserole
    • Crock Pot rice pudding in small bowl.
      Crock Pot Rice Pudding
    • White gravy recipe on top of biscuits next to bacon on a vintage plate.
      White Gravy Recipe
    • A slice of Amish applesauce cake on plate with fork.
      Amish Applesauce Cake

    Recipe

    Breakfast cookies sitting on wire cooling rack.
    Print Pin
    5 from 2 votes

    Oatmeal Breakfast Cookies

    Oatmeal Breakfast Cookies – This easy recipe is a great way to start your day, and even perfect for the kiddos for a quick bite before school!
    Course Breakfast
    Cuisine American
    Prep Time 10 minutes minutes
    Cook Time 11 minutes minutes
    Total Time 21 minutes minutes
    Servings 24 cookies
    Calories 123kcal
    Author Jessica Burgess

    Ingredients

    • 2¼ cups old-fashioned rolled oats
    • 1 cup all-purpose flour
    • 2 teaspoon cinnamon
    • 1 Tablespoon ground flaxseed
    • 1 teaspoon baking soda
    • ½ cup chocolate chips
    • ½ cup natural creamy peanut butter
    • ⅔ cups unsweetened apple sauce
    • ¼ cup honey
    • 3 Tablespoons brown sugar
    • 1 teaspoon vanilla extract
    • 1 large egg

    Instructions

    • Preheat oven to 350 degrees F. Line a large baking sheet with parchment paper and set aside.
    • In a large mixing bowl, add oats, flour, flaxseed, cinnamon, baking soda, and chocolate chips. Stir to combine.
    • In a medium mixing bowl, add peanut butter, applesauce, honey, brown sugar, and egg. Stir to combine.
    • Add the wet ingredients to the dry ingredients and stir well to incorporate all ingredients.
    • Scoop a heaping tablespoon of cookie dough and place it onto the prepared baking sheet. Using clean hands or the bottom of a cup or bowl, smash the cookie so it flattens. The cookies do not spread out much during the baking process, so this step helps get the cookie shape. Add a few more chocolate chips on top for presentation.
    • Bake for 9-11 minutes or until cookies are a golden brown and have firmed up a bit.
    • Allow cookies to cool on baking sheet for 2 minutes before transferring them to a wire rack to cool. Store in an airtight container for 3-4 days.

    Video

    Notes

    This makes a great hearty cookie for breakfast or snacks on-the-go, a guilt-free dessert option, or a high protein after school snack. Chocolate chips may be substitutes for raisins or similar dried fruit, or even nuts.

    Nutrition

    Serving: 1cookie | Calories: 123kcal | Carbohydrates: 18g | Protein: 3g | Fat: 4g | Saturated Fat: 1g | Cholesterol: 8mg | Sodium: 77mg | Potassium: 79mg | Fiber: 2g | Sugar: 8g | Vitamin A: 20IU | Vitamin C: 0.1mg | Calcium: 19mg | Iron: 0.8mg

    • « Go to Previous Page
    • Page 1
    • Interim pages omitted …
    • Page 5
    • Page 6
    • Page 7
    • Page 8
    • Page 9
    • Interim pages omitted …
    • Page 25
    • Go to Next Page »

    Primary Sidebar

    Jessica Burgess of Fantabulosity, slicing an avocado.

    Hi, I'm Jessica! - Owner and Creator of the blog and brand, Fantabulosity.

    I’m here to help you make easy comfort food and nostalgic recipes, using simple ingredients, that everyone will love.

    More about me →

    Potluck Recipes

    • A slice of strawberry jello cake, topped with a strawberry slice, sitting on a round plate.
      Strawberry Jello Cake (Easy, Moist Strawberry Cake)
    • Crack green beans on wooden spoon.
      Crack Green Beans
    • Old fashioned potluck cake recipes collage.
      Old-Fashioned Cakes That Still Show Up at Every Potluck
    • Collage of potluck desserts.
      Easy Potluck Desserts (Simple Recipes That Always Get Asked For)
    • Cold Pasta Salad Recipes Collage.
      Cold Pasta Salad Recipes
    • Chicken Casserole recipes image collage.
      20 Chicken Casserole Recipes

    Popular Recipes

    • bread pudding in baking dish
      Bread Pudding Recipe: Easy Old Fashioned Recipe (With Video!)
    • Burger baked in the oven, steamed in aluminum foil, and placed on white plate.
      Burgers in the Oven
    • two tuna salad sandwiches stacked on top of each other
      The BEST Tuna Salad Recipe
    • Sliced banana bread on white platter
      Best Banana Bread
    • Strawberry brownies on white marble cutting board.
      Strawberry Brownies Recipe
    • Cheeseburger Sliders
      Cheeseburger Sliders with Hawaiian Rolls

    Footer

    ↑ back to top

    Featured In

    About

    • About Jessica
    • Contact
    • Collaborate
    • Dinner System

    Easy Recipes

    • All Recipes
    • Vintage Recipes
    • Dinner Recipes
    • Desserts

    How to Cook

    • Oven-Baked
    • Stove-Top
    • No Bake
    • Cooking Basics

    Privacy Policy |Accessibility Copyright © 2026 Fantabulosity | Terms & Conditions | FTC
    All recipes, photos, and content are copyrighted and may not be reproduced, republished, or distributed without written permission.

    Rate This Recipe

    Your vote:


    A rating is required
    A name is required
    An email is required