• Skip to primary navigation
  • Skip to main content
  • Skip to primary sidebar

Fantabulosity logo

  • All Recipes
  • Vintage Recipes
  • Holiday
  • Dinner Theme System
  • About
  • Navigation Menu: Social Icons

    • Facebook
    • Instagram
    • Pinterest
    • TikTok
    • YouTube
menu icon
go to homepage
  • Recipes
  • Desserts
  • Dinners
  • Gatherings
  • Holidays
  • About Jessica
    • Facebook
    • Instagram
    • Pinterest
    • TikTok
    • YouTube
  • search icon
    Homepage link
    • Recipes
    • Desserts
    • Dinners
    • Gatherings
    • Holidays
    • About Jessica
    • Facebook
    • Instagram
    • Pinterest
    • TikTok
    • YouTube
  • ×
    Home » Recipes

    Hot Dogs in the Oven

    Hot Dogs in the Oven

    June 2, 2024

    Oven baked hot dogs, on hot dog buns.

    Cooking hot dogs in the oven is so easy, and is a favorite way to cook them! No constant flipping on a grill, make a large batch if needed, and it creates a delicious outside and juicy center.

    Hot dogs that were cooked in the oven, on buns.

    Baking hot dogs only takes about 10 minutes in the oven! See my tip in the recipe card to give your hot dogs that perfect sizzle – and how to make the very best hot dogs by wrapping the buns, hot dogs, and cheese, in foil like we do with our burgers in the oven recipe!

    There are many ways to cook hot dogs. Popular ways to cook them are on the grill, in the microwave, boil them, or cook them over a fire. I even love wrapping hot dogs in cheese and a slice of bread to make Wiener Winks from time-to-time. But if you haven’t tried baking hot dogs in the oven, you’ll want to try it for sure.

    Why Bake Hot Dogs in the Oven?

    • It’s easy – No tossing or turning, as you would on a grill or a fire.
    • Large quantities – Such a great way to cook a large batch of hot dogs for a party, especially if making a hot dog bar.
    • Perfectly cooked – They have a great outside texture and a juicy center, that you can’t get with boiling or microwaving hot dogs.

    Which Brand of Hot Dogs is Best?

    Well, this depends on your preference, but I believe Kirkland Signature Beef hot dogs from Costco are the best. Then, Ball Park® Franks are my favorite after those. My son thinks Nathan’s® Famous hot dogs are superior to all. We use either of these brands in this mini corn dogs recipe too!

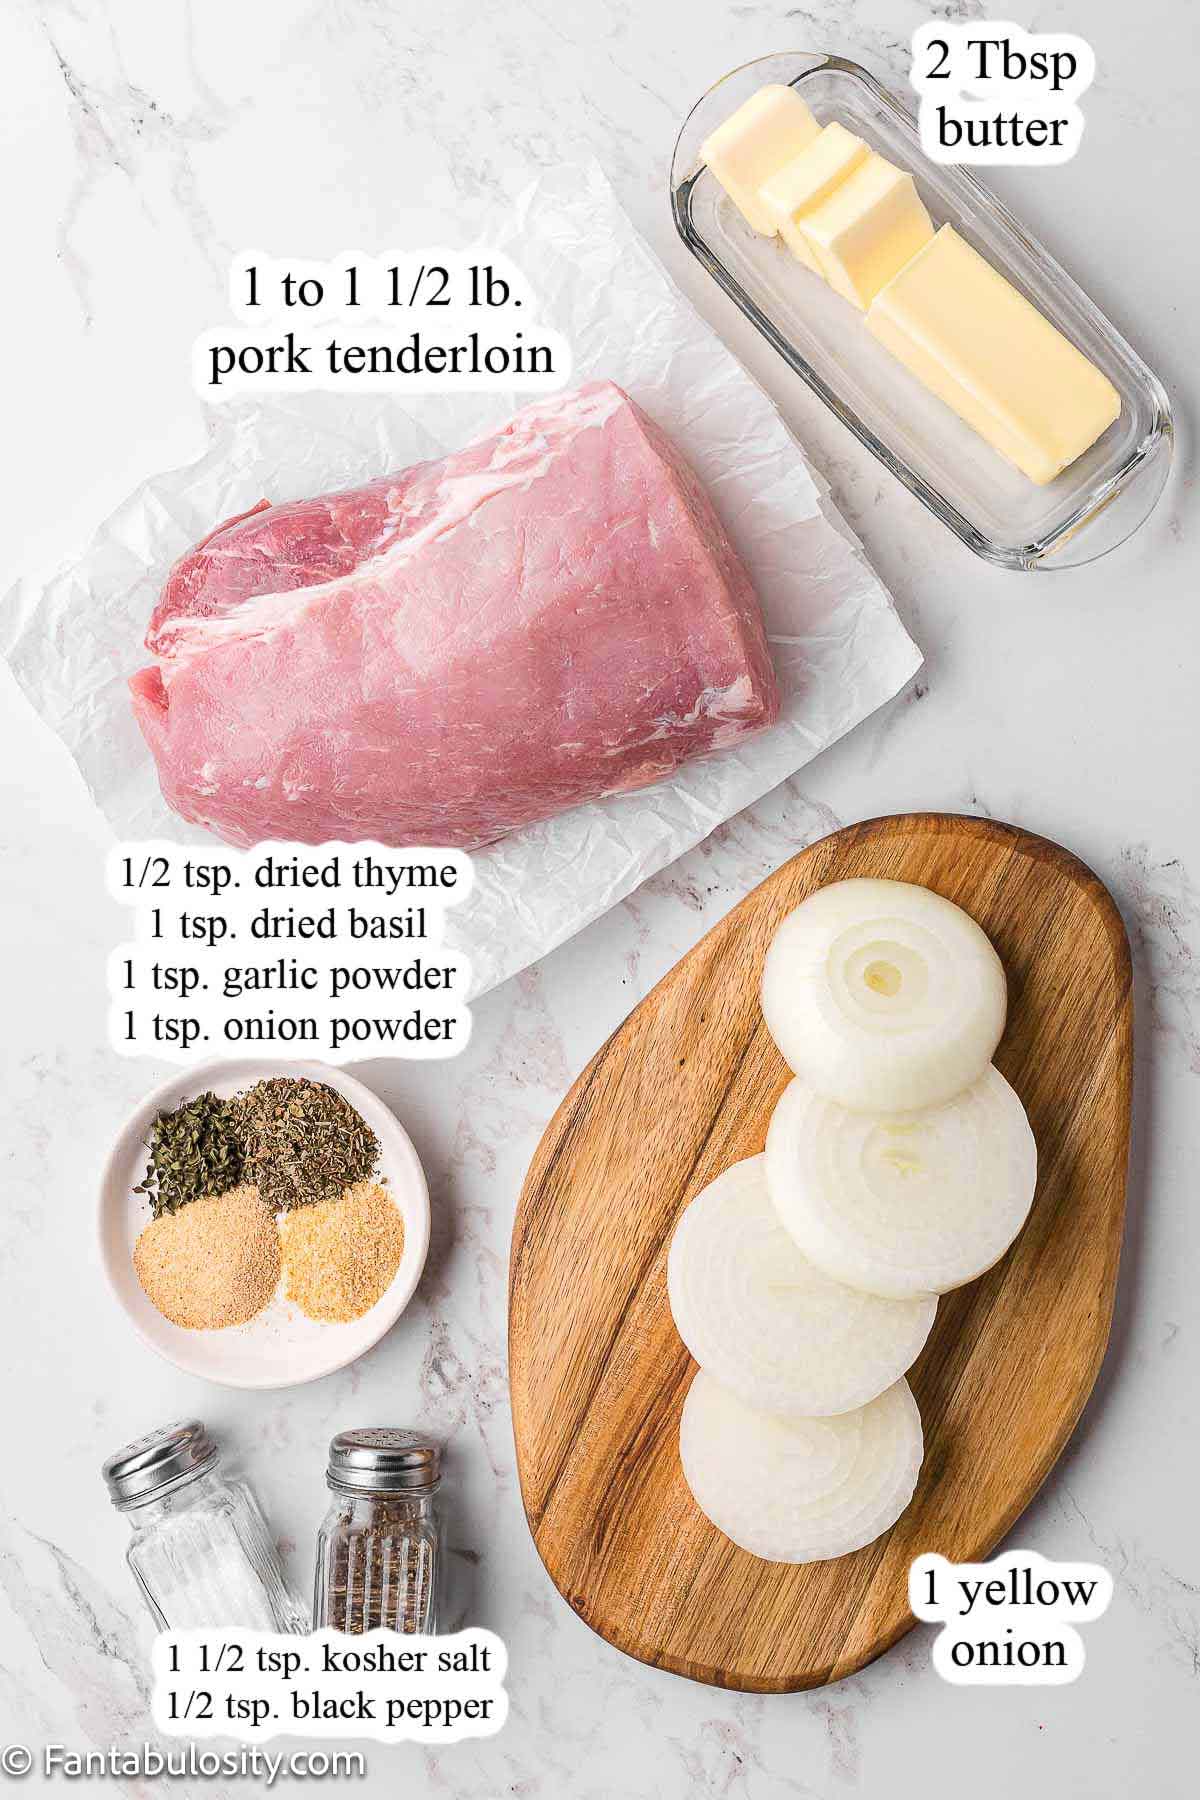
    What You’ll Need to Make Baked Hot Dogs

    It’s really simple. Just the hot dogs, and a baking sheet. However, you can use aluminum foil, parchment paper, or a Silpat mat on the baking sheet to keep clean-up a breeze. (You may want to use aluminum foil for my “trick” later anyway, to make the most delicious hot dogs on buns.)

    Uncooked hot dogs lined up on a baking sheet, that's lined with a silpat mat.

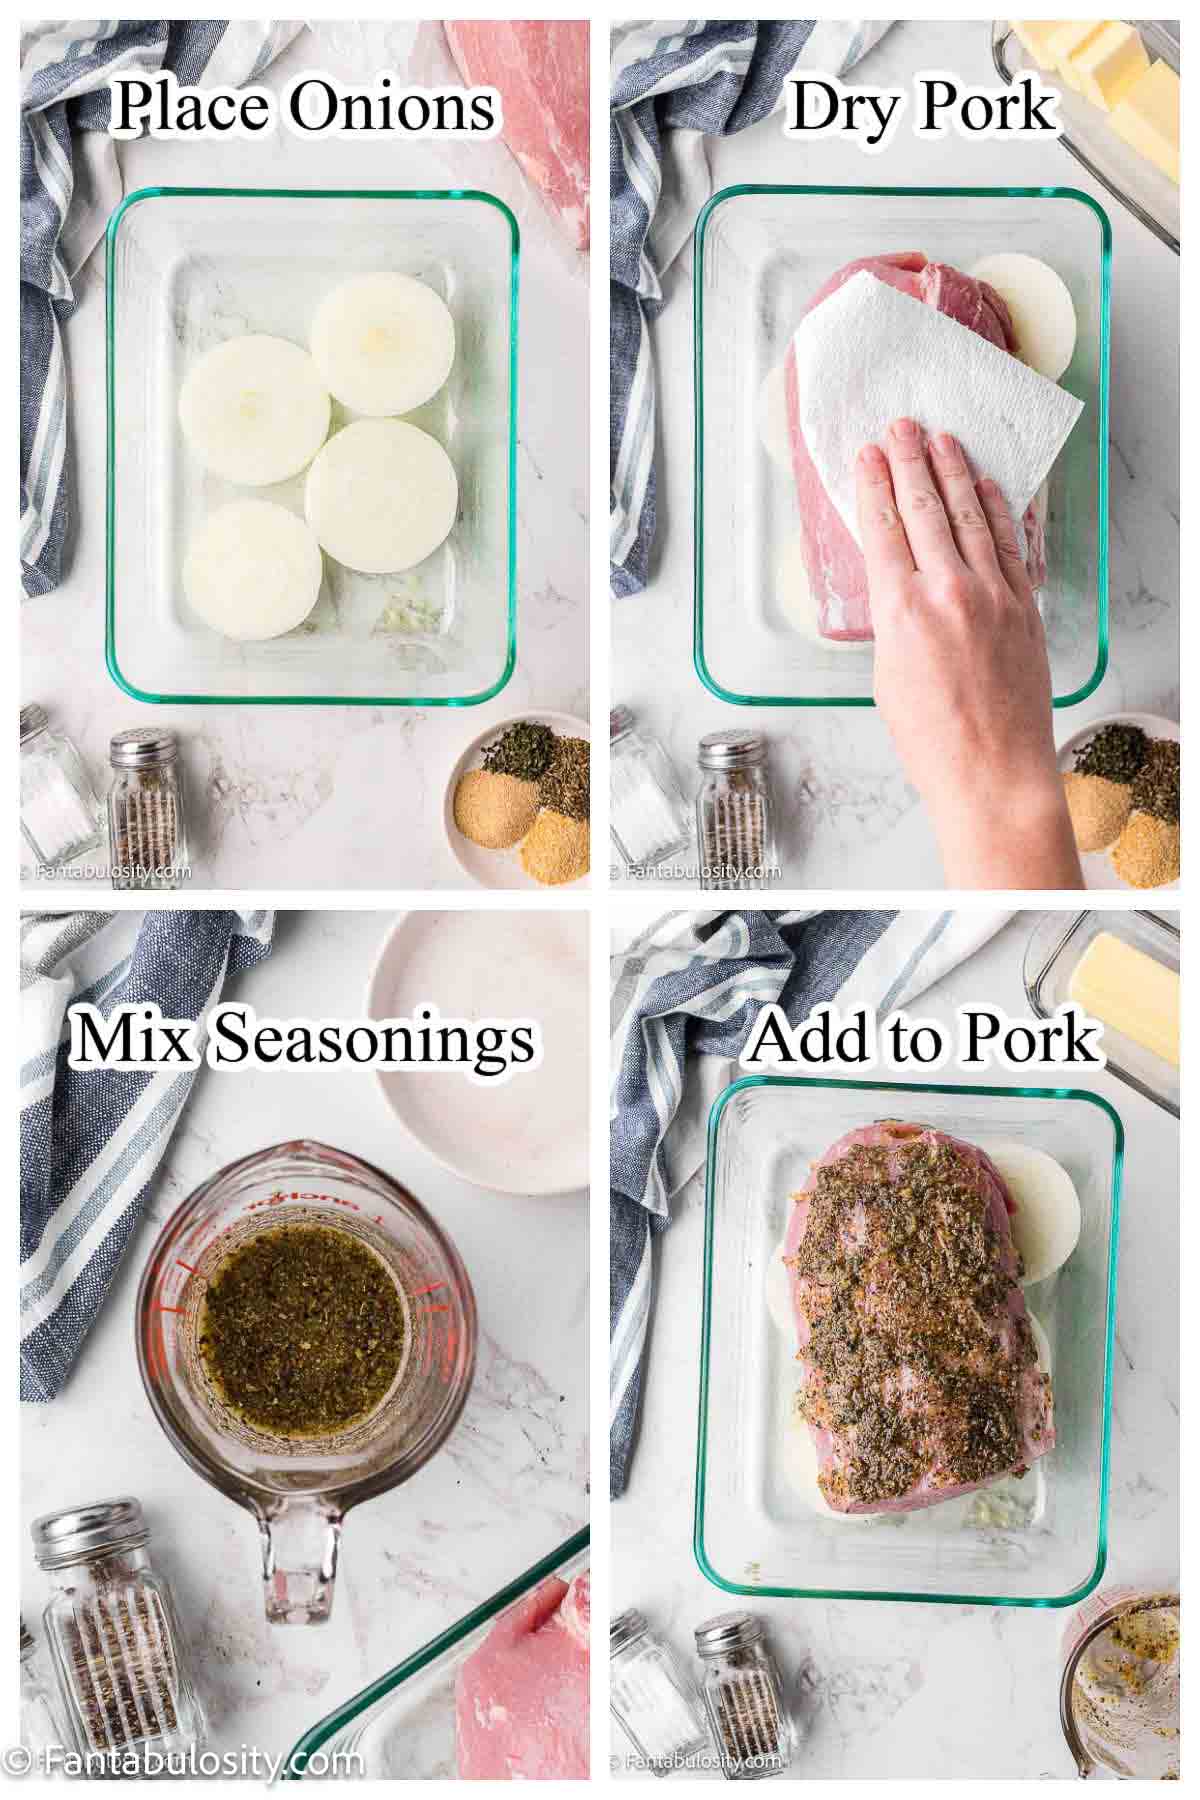
    How to Bake Hot Dogs

    Make sure to check out the recipe card below that has all of the details in one spot!

    • Preheat your oven to 400° F.
    • Line a baking sheet with parchment paper, aluminum foil or a silpat mat. (If desired.)
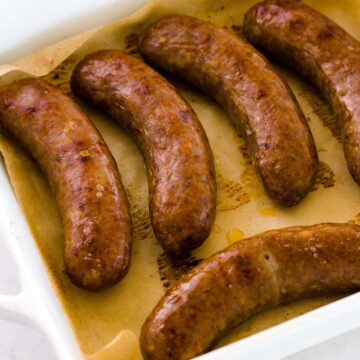
    • Line hot dogs on the baking sheet, trying to make sure they don’t touch. (They’ll roll, and it’s ok if they do touch but they’ll cook more evenly if not touching.)
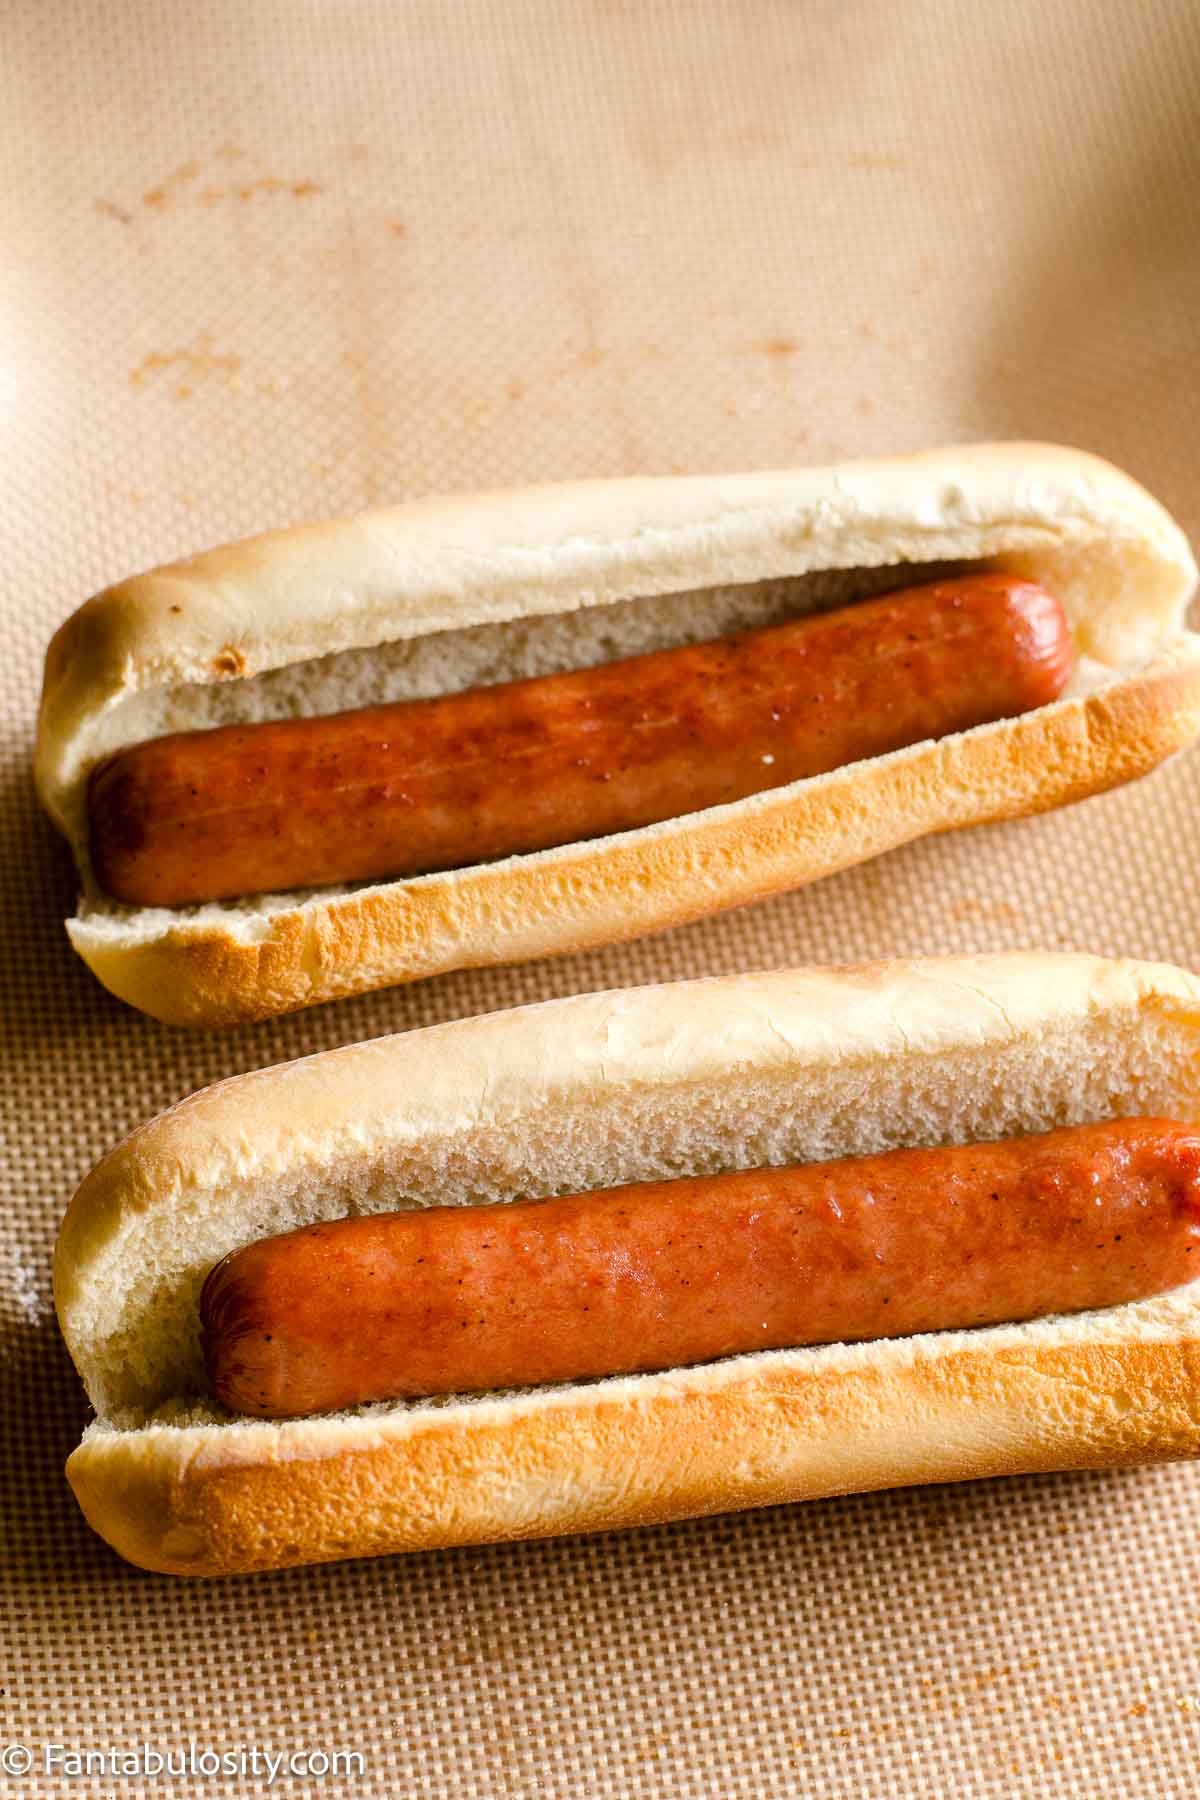
    • Bake at 400° F for 10 minutes.

    PRO TIP: To get that perfect “sizzle” on the hot dogs, turn the oven to “broil” for about a minute. (Keep an eye on them so they don’t overcook!)

    Baked hot dogs on a baking sheet.

    Tricks for the BEST Hot Dogs

    • For a toasted bun: place baked hot dogs on buns, and place back in the oven, on 400° F for 1-2 minutes, until the buns have toasted. See image below for toasted buns…
    Baked hot dogs in buns on baking sheet.
    • For melted cheese and steamed bun: Like I do with my burgers in the oven, build your hot dog on the bun, and add sliced American cheese (if desired), and individually wrap the hot dogs that are on buns, in small pieces of aluminum foil. Place the wrapped hot dogs on buns, back in to the warm oven, and let them steam and melt for a 2-3 minutes. The result is a soft bun, with melted cheese. See image below...
    Cheese melted on hot dog and bun, that was wrapped in aluminum foil.

    Hot Dog Topping Ideas

    What I love about hot dogs is that they’re so versatile and everyone can add their favorite toppings to them! Here are some of our favorites to provide when hosting a group, or just making them at home:

    • Hot Dog Sauce
    • American Cheese
    • Cheese Sauce
    • Mustard
    • Ketchup
    • Relish
    • Chopped Onions
    • Barbecue Sauce

    Or, for some out-of-the-box topping ideas, you’ll love the idea of buffalo chicken hot dogs, pizza dogs, and even this BLT hot dog.

    Baked hot dogs on hot dog buns, sitting on white plate.

    More Oven-Baked Recipes

    Cooking meat in the oven, instead of other traditional methods, can make clean-up easier, help you make larger batches, and even sometimes all you to “set it and forget it” making things super easy. Here are other oven-baked recipes you’ll love:

    • Baked Italian sausages in baking dish.
      How to Cook Italian Sausages in the Oven
    • Chicken drumsticks baked in oven
      Juicy Chicken Drumsticks in the Oven
    • bratwursts on bun with toppings
      How to Cook Brats in the Oven
    • Baked BBQ Pork Steaks on white plate
      Pork Steaks in the Oven

    Recipe

    Oven baked hot dogs, on hot dog buns.
    Print Pin
    5 from 2 votes

    Hot Dogs in the Oven

    Baking hot dogs in the oven is such an easy way to make a small or large batch, and the oven gives the perfect texture on the outside and leaves a juicy center!
    Course Dinner, Lunch, Main Course
    Cuisine American
    Prep Time 0 minutes minutes
    Cook Time 10 minutes minutes
    Total Time 10 minutes minutes
    Servings 8 hot dogs
    Calories 111kcal
    Author Jessica Burgess

    Equipment

    • baking sheet

    Ingredients

    • 8 hot dogs or the amount needed – cooking time won't differ.
    • sliced American cheese optional

    Instructions

    • Preheat oven to 400° F.
    • Line baking sheet with parchment paper or aluminum foil if desired.
    • Line baking sheet with hot dogs, trying to make sure they don't touch.
    • Place in preheated oven and bake at 400° F for 10 minutes.
    • Optional: Turn oven to "broil" to give the hot dogs a "sizzle" but watch carefully not to overcook.
    • To Toast (optional): Place baked hot dogs on buns, and place back on baking sheet and back in to the oven for 1-2 minutes to slightly toast the buns.
    • To Steam (optional): Place baked hot dogs on buns, and top with American cheese slices. Individually wrap hot dog on the buns, in a piece of aluminum foil. Place wrapped hot dogs back in hot oven for 2-3 minutes, to allow the cheese to melt and the bun to steam in the foil.

    Video

    Notes

    Make Ahead for Large Groups: Bake hot dogs and leave them in the oven on “warm” until ready to serve.
    Easy Serving for Parties: You an also wrap each assembled hot dog in aluminum foil as mentioned above, so they’re easy for guests to grab and go!

    Nutrition

    Serving: 1hot dog | Calories: 111kcal | Carbohydrates: 8g | Protein: 5g | Fat: 7g | Saturated Fat: 2g | Polyunsaturated Fat: 1g | Monounsaturated Fat: 3g | Cholesterol: 20mg | Sodium: 308mg | Potassium: 66mg | Vitamin C: 0.04mg | Calcium: 11mg | Iron: 1mg

    Rotel Salsa

    May 28, 2024

    Rotel salsa in white bowl, surrounded by tortilla chips.

    Rotel Salsa is the perfect recipe to keep on hand for those last-minute snack cravings or appetizer recipes when someone comes over!

    It also goes great as a quick side dish for an easy lunch recipe like delicious sandwiches, yummy crispy tacos, and this burger recipe.

    Rotel salsa in white bowl, next to tortilla chips.

    Did you know it was this easy to make a quick salsa? Sure, you can make a homemade salsa from scratch but the idea of this recipe is for something quick, delicious, and something you can keep on hand for those last-minute needs.

    [feast_advanced_jump_to]

    Why is it Called “Rotel” Salsa?

    It’s called “Rotel” salsa because it uses canned Rotel to give it the easy of using tomatoes and diced green chilies and other ingredients that we can keep in the pantry. We always keep Rotel on hand to make dishes like this Rotel pasta, of course this Rotel dip, Rotel Chicken Spaghetti, and this Taco Chicken Casserole.

    Ingredients You’ll Need

    The only thing you may need to buy for this, is the fresh cilantro, since it’s hard to keep that on hand all of the time. (But I have a suggestion for that below.)

    I’ll touch on a few of the key ingredients but make sure to check the recipe card below for exact measurements and instructions.

    Ingredients on kitchen counter for making Rotel salsa.
    • Taco seasoning: It’s nice to keep packages of this on hand for taco night or for quick snacks like this one. (We also use it in this hot taco dip and taco layer dip.) But you can also make your own taco seasoning!
    • Fresh cilantro: Gosh, there’s nothing like using fresh for this recipe. But I know that it may not be something you can always keep on hand. So in a pinch, you can use dried cilantro, even though it’s not the same. Maybe consider buying the fresh, refrigerated cilantro paste to keep on hand so it stays fresh, longer.
    • Rotel: To add some heat, you can buy the “hot” diced tomatoes with green chilies if you prefer.

    How to Make Rotel Salsa

    It’s not difficult to make this recipe at all! It does require a blender, but a food processor could work as well. I’ll walk you through the process but make sure to check out the recipe card below for ingredient amounts and full instructions too.

    Rotel salsa ingredients in a blender.

    Simply combine all of the ingredients (except salt) in to the blender and blend for as least 30 seconds, or until the salsa has reached the consistency of your favorite salsa texture.

    Chip dipped in to blender that has salsa inside of it.

    Grab a chip, and dip and taste-test the salsa.

    • Is it the texture you like? Does it need blended more?
    • Does it have enough salt? Sometimes taco seasonings can be more salty than others. That’s why it’s best to wait to add any salt.
    • This is also a great time to add any additional flavors you may feel like this salsa is missing. (i.e. diced jalapenos for heat, more lime juice?)
    Rotel salsa in small white bowl, on a plate next to tortilla chips.

    How to Store Salsa

    Once the salsa is just how you like it, it’s ready to serve! Eat right away or store in the refrigerator for later! Store it in an airtight container and enjoy within 3-5 days.

    What to Serve with Salsa?

    Of course tortilla chips are a must… but have you tried flavored tortilla chips? Lime flavored is my favorite. But there are also fun flavors out there like “garden salsa” that are a close second.

    Salsa also goes amazing on top of beef and cheese burritos, fried tacos, and steak quesadillas.

    Recipe

    Rotel salsa in white bowl, surrounded by tortilla chips.
    Print Pin
    5 from 1 vote

    Rotel Salsa

    Rotel Salsa: The quick and easy salsa recipe that can be made in less than a minute! It's a perfect snack or party food that you can easily keep the ingredients on hand for!
    Course Appetizer, Side Dish, Snack
    Cuisine Mexican
    Prep Time 5 minutes minutes
    Total Time 5 minutes minutes
    Servings 3 cups
    Author Jessica Burgess

    Equipment

    • Blender

    Ingredients

    • 10 ounce can rotel diced tomatoes and green chilies
    • 14.5 ounce can diced tomatoes
    • 1 packet taco seasoning
    • 1 pinch fresh cilantro about 1 tablespoon or more/less depending on your preference
    • 1 teaspoon lime juice
    • salt optional (Remember that taco seasoning has salt too.)

    Instructions

    • Place all ingredients, except salt, in to blender and cover with lid. Blend for 30 seconds, or until the consistency of the salsa resembles the texture you prefer.
    • If desired, add in salt if needed. (Taco seasonings can differ in salt, so it's better to add, than put in too much.)
    • Taste test the salsa to see if it needs more salt .

    Notes

    Don’t have fresh cilantro? Keep the cilantro paste on hand to help out with that!
    Make this Rotel salsa to keep on hand for a snack, side dish, or to add on to your favorite Mexican dishes.

    Nutrition

    Serving: 12cup

    How to Cook Bacon in the Oven

    May 27, 2024

    Close up of cooked bacon slices on baking sheet lined with parchment paper.

    This is my favorite way of how to cook bacon in the oven, especially when making large batches! In only about 10 minutes, we have bacon ready for breakfast or to add it to another recipe! Plus, no stove-top mess!

    What to serve bacon with? So many things! It’s amazing with sweet dishes, like this brown sugar french toast and these strawberry cinnamon rolls. Or, with savory dishes such as these fried potatoes and onions.

    Oven baked bacon slices on paper towel-lined plate.

    We cook a lot of bacon in our house, whether it be turkey bacon or pork bacon. We also cook it different ways, such as frying bacon in the air fryer or cooking bacon in a George Foreman Grill. But baking bacon in the oven, has been the best way for cooking enough bacon for our family at once.

    [feast_advanced_jump_to]

    *Be sure to see the recipe card below for the full ingredients list & instructions!*

    How to Cook Bacon in the Oven

    Uncooked bacon slices on parchment-lined baking sheet.

    Depending on how much bacon you’ll be baking, will determine the size of the baking sheet.

    1. Preheat your oven to 400° F.
    2. Line your baking dish with parchment paper.
    3. Next, place the bacon pieces on the parchment paper-lined baking sheet, without overlapping bacon pieces.
    4. Place bacon in the preheated oven and bake for 10 minutes. (Thicker bacon pieces may need to bake longer, depending on if you like crispy or floppy bacon.)
    Bacon slices cooked in the oven on a baking sheet.
    1. Remove bacon from the backing sheet, and place on to a paper towel-lined plate, to drain excess grease.

    Baked Bacon Pro Tips

    • Parchment paper. I love using parchment paper for multiple reasons. One being, it helps keep the baking sheet clean. Two, when the bacon grease cools, it’s easy to wrap up the grease and throw the entire thing in the trash.
    • Save bacon grease. I love saving my bacon grease for other dishes like my white gravy recipe! So once I remove the bacon strips from the baking sheet, I’ll tip the baking sheet or parchment paper up, and pour it in to a container to store in the freezer.
    Hand holding a slice of cooked bacon.

    How to Use Cooked Bacon

    If you have leftover bacon (is there even really such a thing?) here are some of my favorite dishes to use bacon in to!

    • scoop of chicken bacon ranch pasta
      Chicken Bacon Ranch Pasta
    • Chicken bacon ranch sandwich on white plate.
      Chicken Bacon Ranch Sandwich Recipe
    • Deviled Eggs with Candied Bacon
      Deviled Eggs with Candied Bacon
    • Close up of chicken bacon ranch slider being pulled from cutting board.
      Chicken Bacon Ranch Sliders

    Storage

    Store any leftover bacon in the refrigerator once it has cooled off. Storing it in an airtight container or bag is best.

    If you love cooking bacon just to eat it or to serve it on your favorite sandwiches or recipes, make sure you try this smoked candied bacon too.

    Did you make this? I’d be so grateful if you left a “star” rating below to let me know what you thought! Then, the next time you need a quick and easy recipe, come back to Fantabulosity to browse all of my easy recipes!

    Recipe

    Close up of cooked bacon slices on baking sheet lined with parchment paper.
    Print Pin
    Be the first to rate!

    How to Cook Bacon in the Oven

    Cooking bacon in the oven is a great way to cook it in large batches! In only about 10 minutes, you can have bacon ready for breakfast or to use in other recipes.
    Course Breakfast, Side Dish
    Cuisine American
    Prep Time 2 minutes minutes
    Cook Time 10 minutes minutes
    Total Time 12 minutes minutes
    Servings 7 slices
    Calories 642kcal
    Author Jessica Burgess

    Equipment

    • baking sheet

    Ingredients

    • 7 slices bacon or however many slices you need to make! The time and temperature will not change.

    Instructions

    • Preheat oven to 400° F.
    • Line baking sheet that's large enough to hold your 7 slices bacon, with parchment paper.
    • Arrange bacon slices on the parchment paper-lined baking sheet, without overlapping the slices.
    • Place bacon in the preheated oven and bake for 10 minutes. (NOTE: Oven temperatures can differ, thickness of bacon can differ, and the desired crispiness can differ. It's best to watch the bacon closely to see when it has reached your preferred doneness.)

    Video

    Notes

    When bacon has finished cooking, remove bacon from baking sheet with tongs, and place on a plate lined with papertowels so it drains the grease.

    Nutrition

    Serving: 1slice | Calories: 642kcal | Carbohydrates: 2g | Protein: 19g | Fat: 61g | Saturated Fat: 20g | Polyunsaturated Fat: 10g | Monounsaturated Fat: 27g | Trans Fat: 0.2g | Cholesterol: 102mg | Sodium: 1019mg | Potassium: 305mg | Vitamin A: 57IU | Calcium: 8mg | Iron: 1mg

    Devils Food Cookies

    May 26, 2024

    Overhead shot of devils food cookies stacked in a pile on a plate.

    These Devils Food Cookies are made using a cake mix, and only 3 other ingredients! YES! These are 4-ingredient cookies!

    Then, in just minutes, you’ll have these warm cookies ready for serving with a glass of milk.

    Overhead shot of devils food cookies stacked on top of one another, on a white plate.

    Love chocolate cake mix cookies? Then make sure you also try these chocolate gooey butter cookies, these turtle cookies, and of course these rocky road cookies, too!

    [feast_advanced_jump_to]

    Ingredients You’ll Need:

    It’s not a lot… so this easy cookie recipe is to the rescue! Make sure to check the recipe card below for exact amounts and full instructions!

    Overhead shot of devils food cookie ingredients.
    • chocolate cake mix
    • eggs
    • vegetable oil
    • chocolate chips

    How to Make Devil’s Food Cookies

    These cookies are as easy as they look! Simply mix the batter (even with a spoon!), scoop cookie dough balls on to the cookie sheet, and bake. That’s it!

    Four image collage of overhead shots of the steps on how to make devils food cookies.

    Allow the baked devil’s food cookies to cool for about 1-2 minutes before removing them to a cooling rack, and then enjoy!

    Baked devils food cookies on cooling rack.

    The result of the baked chocolate cake mix cookies is a soft, chewy, rich cookie that is absolutely delicious.

    Hand holding broken cookie, to show inside gooeyness.

    Cookie Tips

    • Don’t overbake your cookies. Overbaking the cookies can cause them to be dry and crumbly.
    • Line your baking sheet. I used parchment paper for these but I also have a silicone mat that works lovely too!
    • Keep soft. When storing, place a piece of bread in the container or bag, to help keep the cookies soft.

    Storage

    Leftovers: Allow cookies to fully cool before storing them in an airtight container or in a storage bag for up to 5 days.

    To freeze: These cookies can be frozen for up to 3 months, once the cookies have fully cooled. Store in a freezer-safe container, or bag. Note: I love freezing cookies when they’re wrapped in Glad Press’n Seal, and then in a freezer-safe Ziploc.

    More Chocolate Recipes

    If you love devil’s food cake mix, you’ll love the cake recipes below. If you love chocolate in general, you’ll love the bars and cupcakes below too! But make sure you check out all of my easy comfort food desserts too.

    • Ding Dong Cake
    • Chocolate peanut butter cake, a round, layered cake with toffee bits and salted caramel drizzled on top.
      Chocolate Peanut Butter Cake
    • A stack of no bake chocolate peanut butter bars.
      No Bake Chocolate Peanut Butter Bars
    • A plate full of Dirt Cupcakes with gummy worms is centered and surrounded by plastic spiders, Oreo crumbs and a glass of milk
      Dirt Cupcakes

    Recipe

    Overhead shot of devils food cookies stacked in a pile on a plate.
    Print Pin
    5 from 4 votes

    Devil’s Food Cookies

    Using a Devils Food cake mix, these cookies can be made with only 4 ingredients! A chewy chocoalte cookie is ready in just minutes!
    Course Dessert
    Cuisine American
    Prep Time 5 minutes minutes
    Cook Time 8 minutes minutes
    Total Time 13 minutes minutes
    Servings 30 cookies
    Calories 113kcal
    Author Jessica Burgess

    Ingredients

    • 15.25 ounces devil's food cake mix
    • ½ cup vegetable oil
    • 2 eggs
    • ½ cup chocolate chips

    Instructions

    • Preheat oven to 350° F.
    • In a medium-sized mixing bowl, combine cake mix, 2 eggs, ½ cup and vegetable oil with a spoon.
    • Next, add the chocolate chips and stir those in until fully incorporated.
    • Using a cookie scoop, (or a spoon, and rolling the cookie dough in to balls), spoon out cookie dough balls on to a lined baking sheet, placing the balls, 2 inches apart.
    • Place the baking sheet in to the preheated oven, and bake for 8 minutes. Allow the cookies to cool on the baking sheet for 1-2 minutes before removing them, carefully, to a cooling rack. Allow the cookies to cool slightly before enjoying!

    Video

    Notes

    To Store: Store any leftover cookies in an airtight container (after they’ve cooled) and enjoy within 5 days. Tip: Place a piece of bread in the container with the cookies to help keep the cookies soft.
    To Freeze: Place in freezer-safe container for up to 3 months. (See post for best freezing tips.)

    Nutrition

    Serving: 1cookie | Calories: 113kcal | Carbohydrates: 13g | Protein: 1g | Fat: 7g | Saturated Fat: 2g | Polyunsaturated Fat: 3g | Monounsaturated Fat: 2g | Trans Fat: 0.03g | Cholesterol: 11mg | Sodium: 125mg | Potassium: 52mg | Fiber: 0.4g | Sugar: 7g | Vitamin A: 23IU | Vitamin C: 0.02mg | Calcium: 27mg | Iron: 1mg

    Blue Cheese Burgers

    May 25, 2024

    Blue cheese burger on pretzel bun, with lettuce leaf, sitting next to french fries on plate.

    Blue Cheese Burgers are taking your burger game to the next level. The ground beef filled with blue cheese crumbles gives the burger a juicy bite, with the perfect flavor of cheese. Pair it with a pretzel bun, and it’s mouth-watering central.

    Blue Cheese burger on pretzel bun, sitting on square plate with french fries.

    Although I’ve cooked this blue cheese burgers recipe in a cast-iron on the stove, you can use a nonstick skillet or you can even bake burgers in the oven, or make burgers in an electric skillet, grilled burgers, or burgers in the air fryer. (Or your favorite method of course!)

    If you love stepping up your burger game, you’re also going to love this Aloha burger recipe and this Juicy Lucy Burger!

    [feast_advanced_jump_to]

    Ingredients You’ll Need

    As you can see below, not much is required to make this delicious burger recipe! I’ve included notes on the key ingredients below. Make sure to check the recipe card below for exact measurements.

    Overhead view of ingredients on counter for blue cheese burgers.
    • Ground beef: I typically use more of a lean ground beef, since we have a beef butchered every year. But you should be able to use your favorite type of ground beef for this recipe.
    • Blue cheese: You can actually use too much blue cheese in this recipe. (Or at least my husband said when I was testing this recipe. I preferred more but he said it was too much. So if you find that you want more blue cheese, go for it!) You can also use Gorgonzola if that’s what you have!
    • Pretzel buns: You don’t have to use pretzel buns but my goodness the flavor is so good! But we’ve used regular hamburger buns and they’re delicious too.

    How to Make Blue Cheese Burgers

    Raw, uncooked burgers in cast iron skillet.
    • Combine the ground beef, blue cheese, and spices in a bowl, and mix until evenly combined.
    • Place seasoned burgers in skillet (I did add a little butter since using a cast iron but you can use nonstick spray or your favorite item to use to keep burgers from sticking) and cook for 3-5 minutes and then flip. Cook for an additional 3-5 minutes or until the juices run clear.
    Cooked blue cheese burgers in cast iron skillet.

    Topping Ideas

    When the burgers are finished cooking, it’s time to build your burger! We chose to use pretzel buns and lettuce leaves. The blue cheese crumbles are enough cheese for me. However, here are some other ideas:

    • mustard
    • ketchup
    • onion
    • pickles (or go wild and make this fried pickle chips recipe!)
    • bacon
    • onion rings (like in my cowboy burger recipe)
    • bbq sauce
    Side view of blue cheese burger on pretzel bun, with lettuce leaf, sitting next to french fries.

    Can we talk about how delicious that blue cheese cooks in to that burger, above. You can see the crispy little golden blue cheese nuggets on the outside edge there!

    Storage

    If you have leftover blue cheese burgers, allow them to cool before storing them in an airtight container or storage bag, and place them in the refrigerator. Enjoy within 3-4 days.

    More Burger Recipes You’ll Also Love:

    Love hamburger recipes as much as we do? Then you’ll love these:

    • Smoked Burgers
    • Donut burgers
    • Baked Turkey Burgers

    So tell me… did you try these? Did you like them?  They make another great weeknight meal! As you know from my other dinner recipes, quick & easy is my favorite! Or if you have ground beef in the freezer, get your meal-planning game on with these ground beef dinners!

    More Easy Recipes You’ll Love:

    • Church supper recipes collage.
      Church Supper Recipes
    • Close up of cooked salmon patties on a plate, with fresh parsley sprinkled on top.
      Old-Fashioned Salmon Patties Recipe
    • A sliced, boneless pork chop that was baked in the oven, sitting on a plate.
      How to Cook Pork Chops in the Oven (Bone-In & Boneless Guide)
    • A wooden spoon dishing out a serving of meatball casserole in a 9x13 baking dish.
      Meatball Casserole

    Recipe

    Blue cheese burger on pretzel bun, with lettuce leaf, sitting next to french fries on plate.
    Print Pin
    5 from 1 vote

    Blue Cheese Burgers

    Juicy blue cheese burgers are easy to make, and add a twist to the traditional cheeseburger! Pile on your favorite toppings, and a pretzel bun for a delicious burger.
    Course Main Course
    Cuisine American
    Prep Time 10 minutes minutes
    Cook Time 10 minutes minutes
    Total Time 20 minutes minutes
    Servings 4 hamburgers
    Calories 356kcal
    Author Jessica Burgess

    Ingredients

    • 1 pound ground beef
    • ½ cup blue cheese crumbles
    • 1 teaspoon salt
    • ½ teaspoon black pepper or to taste
    • 1 Tablespoon garlic powder
    • 4 pretzel buns
    • your favorite burger toppings

    Instructions

    • In a medium-sized bowl, mix together ground beef, blue cheese crumbles, and spices.
    • Form burger patties into 4 equal-sized patties.
    • Place in a skillet and cook one side of the burger over medium heat for 3-5 minutes, and then flip to cook the other side for 3-5 minutes, or until the juices run clear.
      (I do also add about one Tablespoon of butter or spray the pan before cooking to prevent sticking.)
    • DO NOT mash down the burgers while cooking. This will release the juices that you want to stay in.
    • Assemble the burgers and top with additional toppings of your preference.

    Notes

    This recipe can easily be doubled for leftovers later! 
    Make sure to allow the burgers to cool before storing leftovers in the refrigerator.

    Nutrition

    Serving: 1burger (with pretzel bun) | Calories: 356kcal | Carbohydrates: 2g | Protein: 23g | Fat: 27g | Saturated Fat: 11g | Cholesterol: 93mg | Sodium: 913mg | Potassium: 373mg | Vitamin A: 130IU | Calcium: 109mg | Iron: 2.5mg

    Reuben Dip Recipe

    May 25, 2024

    Reuben dip being scooped out of baking dish with metal spoon.

    This Reuben Dip is like the popular restaurant Reuben sandwich, in appetizer form! A mixture of flavors and textures using ingredients such as sauerkraut, corned beef, Swiss cheese, and a few other simple ingredients make this creamy dip a hit with chips, bread or veggies.

    Reuben dip in white serving dish, with a cracker dipped in.

    Other similar recipes that you may find online, may be too sweet. This one uses ingredients that help this one be more savory than sweet. Savory dips can be the perfect party food. You may also love making other dips with this one for a party, like this hot taco dip, pepperoni dip, and the classic Rotel dip.

    [feast_advanced_jump_to]

    Ingredients for Reuben Dip

    This Reuben dip is made with easy-to-find ingredients. Here are a few notes on some of the key ingredients. See the recipe card below for the measurements!

    Overhead shot of ingredients for reuben dip, sitting on marble counter.
    • Dressing: Kraft Thousand Island brand is preferred and was used in this recipe.
    • Sauerkraut: You can use canned or bagged sauerkraut. However, it's important not to rinse the sauerkraut after squeezing the juice out to retain more flavor.  Also, don’t squeeze it until it is COMPLETELY dry. Just squeeze until it isn’t so wet and doesn't add too much liquid to the dip.
    • Corned Beef: What you see here, is corned beef that the butcher sliced in to ⅛ inch slices and then chopped at home so it wasn't too thin. You could also buy it deli sliced at the store for sandwiches and chop that as well.

    How to Make Reuben Dip

    You’ll be using the stove-top for the first part, to saute the onions but you’ll finish the dish by baking it in the oven. Make sure to see the recipe card below for all of the directions and details!

    Overhead shots showing 4 steps to making reuben dip.
    • Cooking the butter and onions is the first step.
    • Next, mix the ingredients together to prep for baking.
    • Arrange dip in a pie plate, and bake!
    Overhead shot of baked reuben dip, in white pie dish.

    Reuben Dip in the Crock Pot

    The crock pot is a great way to cook the dip or to serve it and keep it warm.  To cook in the crock pot, combine ingredients according to recipe directions and heat on low for 2-3 hours, stirring occasionally.

    Storage:

    1. Refrigerate: Let the dip cool before refrigerating.  It should be refrigerated within 2 hours of serving and will keep in the fridge covered for 3-4 days.
    2. To Freeze: You can freeze leftovers, but with the cream cheese in the dip, the quality may not be as high after freezing.  The dip can be frozen for up to two months for best quality.
    3. Make Ahead: This dip can be made 1-2 days in advance before baking.  Follow the recipe directions before baking and place in the refrigerator in a covered container until ready to bake.
    4. Reheat: You can reheat the dip in the microwave or oven. Place the dip in a heat-safe container, in the oven at 300 degrees Fahrenheit for 15 to 20 minutes or microwave at 30-second intervals until warm.  
    Reuben dip in white pie dish, and a spoon scooping out a serving.

    What to Serve with this Dip:

    There are many great options for dipping foods for a Reuben dip.

    For dippers:

    • hearty crackers
    • toasted bread (such as this toasted Italian bread recipe)
    • pretzels
    • bagel crisps
    • multi-grain crackers
    • rye or pumpernickel toast
    • rye crackers
    • Triscuits or other thick crackers
    • pita chips
    • cucumber slices
    • celery sticks

    Related Recipes:

    If you like this hot and cheesy reuben dip then you’ll love this Frito chili pie, it’s another one of our game day favorites along with these cheesy broccoli casserole recipe! Or, if you love when beer is added to dips, this beer cream cheese pretzel dip recipe is amazing too!

    Recipe

    Reuben dip being scooped out of baking dish with metal spoon.
    Print Pin
    5 from 1 vote

    Reuben Dip

    Reuben dip is a twist on the classic, popular sandwich. Serve it as an appetizer with chips, crostinis, or veggies!
    Course Appetizer
    Cuisine American
    Prep Time 15 minutes minutes
    Cook Time 20 minutes minutes
    Total Time 35 minutes minutes
    Servings 8 servings
    Calories 308kcal
    Author Jessica Burgess

    Ingredients

    • 1 Tablespoon butter
    • ½ cup chopped onion
    • 8 ounces cream cheese softened
    • ½ cup sour cream
    • ½ cup Thousand Island dressing
    • 2 cups chopped deli-sliced corned beef about 12 ounces
    • 16 ounces sauerkraut or about 1 ¼ cups (Drained, squeezed dry)
    • 8 ounces Swiss cheese shredded
    • 2 Tablespoons dill relish
    • ⅛ teaspoon Worcestershire sauce
    • chopped parsley optional, for garnish
    • coursely ground pepper optional, for garnish

    Instructions

    • Preheat the oven to 400 degrees Fahrenheit.
    • Place a skillet on medium-low heat and add butter to melt.  Add the onions and saute for about 5 minutes until softened and translucent, turning frequently to avoid burning.  Transfer onions onto a plate to cool.
    • Using a stand mixer or a handheld mixer and a large bowl, beat the cream cheese until smooth. Add in the sour cream and Thousand Island dressing and mix to combine.
    • Stir in the remaining ingredients: the cooked onions, corned beef, sauerkraut, swiss cheese, dill relish, and Worcestershire sauce.
    • Pour dip and spread evenly into a 9-inch pie pan or baking dish.
    • Place the dip into the preheated oven and bake for 20 minutes until the edges are golden brown and the dip is warmed through.
    • Add parsley and pepper garnish if desired.
    • Serve warm with a variety of foods for dipping including crackers, pretzels, bagel crisps, vegetables, and toasted rye or pumpernickel bread.

    Nutrition

    Serving: 1serving (with dipping bread) | Calories: 308kcal | Carbohydrates: 7g | Protein: 12g | Fat: 26g | Saturated Fat: 12g | Polyunsaturated Fat: 3g | Monounsaturated Fat: 7g | Trans Fat: 0.05g | Cholesterol: 69mg | Sodium: 855mg | Potassium: 233mg | Fiber: 2g | Sugar: 4g | Vitamin A: 639IU | Vitamin C: 14mg | Calcium: 255mg | Iron: 1mg

    Baked Beans with Ground Beef

    May 24, 2024

    Baked beans with ground beef in a skillet with a large spoon scooping out a serving.

    Making baked beans with ground beef is such a hearty side dish for any BBQ, holiday gathering, or potluck.

    This recipe uses simple ingredients, and the hamburger adds a heartiness that gives traditional baked beans more texture and beefy flavor!

    Baked beans with ground beef in a skillet with a large spoon.

    If you love the idea of adding non-traditional ingredients to baked beans, wait until you try these apple pie baked beans and these Dr. Pepper Baked Beans! Who knew adding fruit and/or soda to baked beans like that would make such an awesome difference!

    If you love having beans as a side dish, you’ll also love this crack green beans recipe!

    [feast_advanced_jump_to]

    Ingredients Needed

    Ingredients on counter to make baked beans with ground beef.

    These baked beans are made with easy-to-find ingredients and you may even have most of them on-hand! Here are a few notes on some of the key ingredients.

    • Canned Baked Beans – There are different flavors of baked beans and although you can use those instead of original, be cautious of how much sugar you may add, and other flavors that may be too much, if the beans already come with extra flavors. But you can also use canned pork and beans instead.
    • Brown Sugar – This calls for dark brown sugar but light brown sugar can be used too.
    • Mustard – Regular or Dijon mustard can be used instead if you prefer.
    • Liquid Smoke – This adds incredible flavor but you can leave this out if you want to.
    • Bacon – Want to use ham in these instead of bacon? No problem. They would both be great additions with the ground beef.

    How to Make Baked Beans with Ground Beef

    Just a few steps and these baked beans are ready for the oven.

    Image collage of baked beans with ground beef.
    • Prep. Preheat the oven to 350°F. 
    • Sauté the aromatics. Melt the butter over medium heat in a large, oven-safe skillet or Dutch oven. Add the onion and sauté until translucent. Add the garlic and sauté until fragrant. 
    • Brown the beef. Add the beef to the same skillet, mix with the onion garlic mixture, and cook until nicely browned. Break it apart with a spatula or spoon as you go. Drain the grease from the skillet but keep or return the ground beef in the skillet.
    • Put it all together. Mix the baked beans, brown sugar, honey mustard, Worcestershire sauce, liquid smoke, BBQ sauce, and bacon into the ground beef mixture.
    • Bake. Bake, uncovered, for 45 minutes or until the edges are starting to bubble and the baked beans are hot throughout. Check on the baked beans around 30 minutes, sometimes if the skillet is wide and shallow the dish will cook a bit faster.
    Baked beans with ground beef in pot, with large spoon scooping serving.

    What size of skillet should I use? A dutch oven was used here but a deep 12-inch oven-safe skillet will also work. 

    How to Cook Baked Beans in the Crock Pot Instead

    Instead of baking, transfer the browned beef and sauteed aromatics along with the baked beans, brown sugar, Dijon, Worcestershire sauce, liquid smoke, BBQ sauce, and bacon to a crockpot and cook on low for 2 hours. 

    Storage

    • To store. Seal any fully cooled leftovers in an airtight container. You can store them in the fridge for up to 4 days or in the freezer for up to 3 months. 
    • To reheat. Allow the leftover baked beans with hamburger to thaw in the fridge (if applicable) before transferring them to a saucepan and reheating over medium-low heat, stirring occasionally, until warm. Alternatively, microwave smaller portions in 30-second intervals, stirring between each, until heated through. 
    • Can I make this ahead of time and freeze it? You can. Just before baking, transfer the contents of the skillet to an airtight container. You can freeze it for up to 3 months. When you are ready to enjoy, allow the mixture to thaw in the fridge before baking just as you normally would. Alternatively, you can also prepare the whole recipe from start to finish and freeze it that way. Just allow it to cool before freezing.  

    More BBQ Side Dishes

    Love easy and delicious recipes that are perfect for large groups or for a bbq? Here are some of my favorites to make for that:

    • Close up of red skin potato salad in white bowl, with wooden spoon.
      Easy Red Skin Potato Salad
    • Macaroni and Tomatoes in white bowl.
      Macaroni and Tomatoes
    • Chicken macaroni salad in a bowl.
      The BEST Chicken Macaroni Salad
    • Hamburger hashbrown casserole in baking dish with ladle resting in it.
      Hamburger Hashbrown Casserole

    Did you make this? I’d be so grateful if you left a “star” rating below to let me know what you thought! Then, the next time you need a quick and easy recipe, come back to Fantabulosity to browse all of my easy recipes!

    Recipe

    Baked beans with ground beef in a skillet with a large spoon scooping out a serving.
    Print Pin
    5 from 1 vote

    Baked Beans with Ground Beef

    This baked beans with ground beef recipe is a heart side dish for barbeques, holiday gatherings and potlucks! It's so easy to make and it uses simple ingredients too!
    Course Side Dish
    Cuisine American
    Prep Time 10 minutes minutes
    Cook Time 55 minutes minutes
    Total Time 1 hour hour 5 minutes minutes
    Servings 6 1 cup servings
    Calories 922kcal
    Author Jessica Burgess

    Ingredients

    • 1 pound ground beef 80/20 recommended
    • 45 ounces canned original baked beans
    • 1 large sweet onion diced
    • 1 Tablespoon garlic minced
    • 2 Tablespoons butter
    • ½ cup dark brown sugar
    • 2 Tablespoons honey mustard
    • 2 Tablespoons Worcestershire sauce
    • ½ teaspoon liquid smoke
    • 1 cup bbq sauce
    • 1 pound bacon cooked and crumbled

    Instructions

    • Prep. Preheat the oven to 350°F. 
    • Sauté the aromatics. Melt the butter over medium heat in a large, oven-safe skillet or Dutch oven. Add the onion and sauté until translucent. Add the garlic and sauté until fragrant.
    • Brown the beef. Add the beef to the same skillet, mix with the onion garlic mixture, and cook until nicely browned. Break it apart with a spatula or spoon as you go. Drain the grease from the skillet but keep or return the ground beef in the skillet.
    • Put it all together. Mix the baked beans, brown sugar, honey mustard, Worcestershire sauce, liquid smoke, BBQ sauce, and bacon into the ground beef mixture.
    • Bake. Bake, uncovered, for 45 minutes or until the edges are starting to bubble and the baked beans are hot throughout. Check on the baked beans around 30 minutes, sometimes if the skillet is wide and shallow the dish will cook a bit faster.

    Video

    Notes

    For Crock Pot Method: Instead of baking, transfer the browned beef and sauteed aromatics along with the baked beans, brown sugar, Dijon, Worcestershire sauce, liquid smoke, BBQ sauce, and bacon to a crockpot and cook on low for 2 hours. 

    Nutrition

    Serving: 1cup | Calories: 922kcal | Carbohydrates: 89g | Protein: 36g | Fat: 49g | Saturated Fat: 18g | Polyunsaturated Fat: 6g | Monounsaturated Fat: 21g | Trans Fat: 1g | Cholesterol: 126mg | Sodium: 2061mg | Potassium: 1282mg | Fiber: 13g | Sugar: 38g | Vitamin A: 257IU | Vitamin C: 8mg | Calcium: 179mg | Iron: 6mg

    Brown Sugar French Toast

    May 22, 2024

    Brown sugar french toast on white plate, with syrup and butter on top.

    Brown Sugar French Toast: As if traditional French toast wasn’t good enough… combining it with the deliciousness of brown sugar takes it to a whole new level.

    With simple ingredients and 30 minutes, breakfast will be on the table and a newfound love of French toast will be served.

    Slices of brown sugar french toast on white plates.

    A Fabulous Reader Review…

    The best French toast I have eaten. I made it vegan using just for egg, vegan heavy cream and homemade sourdough bread. Delicious highly recommend. – Michelle

    If you want to try more variations of this easy breakfast recipe, check out my Stuffed French Toast as one idea. This hands-off Crock Pot Bagel French Toast Casserole, or you could make some EASY Cinnamon French Toast Sticks that work for breakfast or as a sweet treat for the whole family at any time.

    [feast_advanced_jump_to]

    Why You’ll Love This Recipe

    • Perfectly balanced sweetness: The brown sugar in this recipe lends a sublime sweetness that isn’t overpoweringly sugary; it’s just right.
    • Ideal for special occasions: Whether it’s a classy brunch, a festive holiday breakfast, or a treat-yourself decadent breakfast on a regular day, this Brown Sugar French Toast serves as a luxurious treat that’s sure to impress.

    Ingredients Needed

    This French toast is made with easy-to-find ingredients. Here are a few notes on some of the key ingredients. See the recipe card below for the measurements.

    Labeled ingredients on white counter for brown sugar french toast.
    • Brioche Bread – Opt for a thick-cut brioche for this recipe. Its rich, buttery flavor and soft, fluffy texture make it the perfect choice for French toast. Plus, it absorbs the egg mixture well, which results in a decadently soft and creamy interior while the outside gets beautifully crispy.
    • Eggs – For the most flavorful French toast, use the freshest eggs you can find. Farm-fresh or organic eggs often have more vibrant yolks which can subtly enhance the taste of your dish. Also, ensure that your eggs are properly whisked to create a smooth, lump-free mixture for soaking the bread.
    • Light Brown Sugar – Light brown sugar is your go-to sugar for this recipe due to its deep, rich flavor that’s not too overpowering. It caramelizes beautifully, giving the toast that irresistible golden-brown crust. Remember to store brown sugar in a cool, dark place to prevent it from clumping or hardening.

    Substitutions

    Sometimes substitutions are necessary because of ingredients that are unavailable or needed for dietary restrictions. Here are some suggestions that can help:

    • Brioche Bread – While brioche is the best bread for this recipe, don’t stress if you can’t find it at the local supermarket. A good quality Challah or a dense white bread can step into its shoes nicely. It’s all about finding a type of bread that can hold its own when soaking up our delicious egg mixture.
    • Half and Half – If you’ve used the last of your half and half in your morning coffee, fear not! You can replace it with a mixture of milk and heavy cream in a 1:1 ratio. Or, for a dairy-free version, try using almond milk, coconut milk, or coconut cream instead.
    • Vanilla Extract – Ran out of vanilla extract? You can use maple syrup or honey as a replacement to add that hint of sweetness. If you want to keep the vanilla flavor, try using a small amount of vanilla bean paste or even the scraped insides of a vanilla pod.
    • Light Brown Sugar – If you’ve run out of light brown sugar mid-recipe, you can use dark brown sugar instead. It has a slightly more intense molasses flavor, but will still give your French toast that delicious caramelized crust. Alternatively, a mixture of white sugar and molasses can work as a DIY replacement.
    • Cinnamon – Just realized there’s no cinnamon in your pantry? You can substitute it with nutmeg or allspice for a slightly different, but equally yummy twist! If you’re out of spices entirely, a little bit of maple syrup can lend a sweet, comforting note to your French toast.

    Variations

    Looking for ways to mix up this delightful breakfast staple? Here are some creative twists you can try:

    1. Chocolate Lover’s Delight: For the chocoholics out there, add a handful of chocolate chips to the egg mixture before soaking the bread. It’s like having dessert for breakfast!
    2. Tropical Paradise: Transport your taste buds to a tropical island by adding shredded coconut and sliced pineapple as toppings. Or, blend a ripe banana into the egg mixture for a tropical twist.
    3. Berry Bonanza: Fresh berries are a fantastic addition to this French toast. You can either scatter a handful over the top just before serving or simmer them into a delicious compote while your toast is cooking. Either way, it’s berry delicious!
    4. Autumn Spice: Add some autumnal flavor to your French toast by incorporating pumpkin spice into the egg mixture. Top it off with a dollop of whipped cream and a light dusting of extra spice. Hello, fall!
    5. Savory Switch: Not all French toast has to be sweet. Try making a savory version by adding grated cheese and chopped herbs to the egg mixture, then topping your finished toast with a dollop of sour cream and some fresh chives. It’s a brunch game-changer!

    How to Make Brown Sugar French Toast

    This French toast recipe is broken into 2 components:

    • Prepare the mixture
    • Cook the toast

    *Be sure to see the recipe card below for the full ingredients list & instructions!*

    STEP 1: Mix the eggs. Combine eggs and half-and-half in a shallow bowl, whisking until smooth. (Images 1-2)

    STEP 2: Add the spices. Stir in vanilla, brown sugar, cinnamon, and salt, ensuring these ingredients blend well with the egg mixture. (Image 3)

    Steps 1-4 brown sugar french toast.

    STEP 3: Add butter to the skillet. Melt butter in a heated skillet or griddle, making sure the entire bottom surface is covered.

    STEP 4: Dip the bread. Dip each slice of bread into the egg mixture, coating both sides and allow any excess to drip off before moving to the frying pan. (Image 4)

    Slice of cooked brown sugar french toast in skillet.

    STEP 5: Cook the toast. Cook each soaked bread slice in the hot, buttered pan over medium heat for 1-2 minutes on each side until golden brown. Adjust cooking times based on the heat level of your pan. Add more butter to the pan if required.

    STEP 6: Add toppings. Serve the cooked French toast with your preferred toppings such as butter, maple syrup, powdered sugar, or fresh berries. Enjoy your delicious Brown Sugar French Toast!

    Cooked brown sugar french toast on white plate with fruit and syrup on top.

    Recipe Pro Tips

    • Don’t rush the soak: For exceptionally flavorful and moist French toast, let your thick slices spend some quality time in the egg mixture. A good 15-20 second dip per side should do the trick. But remember, we don’t want the bread to be overly soggy, so don’t leave it in there for too long!
    • Low and slow is the way to go: Resist the temptation to crank up the heat. Cooking your French toast on medium-low heat ensures a crispy outside while allowing the inside to cook through. Patience is key here!
    • Use the right tools: For easy flipping, use a wide spatula. It may seem like a minor detail, but trust me, it can make your French toast cooking experience so much smoother.
    • Fresh is best: If you’re using fresh fruit as toppings, add them right before serving to maintain their freshness and vibrant colors. It’s all about that perfect Instagrammable moment, ladies!
    • Change it up: If you’re feeling adventurous, try different types of bread like sourdough or a multi-grain loaf. Each bread brings its own unique flavor and texture to the French toast, making breakfast time an exciting adventure.
    • Make ahead: For the best results for those super-busy mornings, save time by preparing the egg mixture the night before. Just give it a quick whisk in the morning before you dip your bread. Voila - a stress-free, delicious breakfast in no time!
    Bite of brown sugar french toast on fork, being held above plate of slices.

    Recipe FAQs

    What is the most common mistake in making French toast?

    The most common mistake is using too much heat, which can burn the outside of the toast while leaving the inside uncooked. Remember to cook on medium-low heat for optimal results!

    Can I use stale bread for French toast?

    Absolutely! In fact, slightly stale bread can actually make better French toast. It tends to soak up the egg mixture better without falling apart, giving you a lovely, custardy center.

    Can I make this recipe gluten-free?

    Yes, you can! Simply swap out the bread for your favorite gluten-free loaf. The rest of the recipe remains the same. Remember, the key to great French toast lies in the soak, so make sure to give your gluten-free bread
     slices enough time to absorb the egg mixture.

    Can I make this recipe vegan?

    Definitely! To make vegan French toast, replace the eggs with a mashed ripe banana or a flax egg. Use plant-based milk instead of half and half, and ensure your bread is vegan.

    What if my French toast is soggy?

    If your French toast turns out soggy, it could mean that your bread was overly soaked or the heat was too high during cooking. Next time, try reducing the soaking time and cooking on medium-low heat.

    What can I use instead of butter for cooking the toast?

    If you’re out of butter or prefer a healthier option, you can use coconut oil or a non-stick cooking spray. Both work well to prevent the toast from sticking to the pan and add a slightly different flavor profile.

    What to Serve with Brown Sugar French Toast

    For a balanced and hearty breakfast, serve your Brown Sugar French Toast with a side of lean proteins such as breakfast sausage baked in the oven. A refreshing side of fruit salad can also complement the sweetness of the toast perfectly. 

    If you’re a fan of dairy, consider adding a dollop of Greek yogurt on the side – it’s a great source of protein and calcium and pairs wonderfully with the warm, cinnamon-infused French toast. And to top it all off, why not add a freshly brewed cup of your favorite coffee or a glass of freshly squeezed orange juice? 

    ❄️ Storage

    Leftovers: Storing uneaten Brown Sugar French Toast is a breeze! Simply let it cool down completely, then place the slices in a zip-top bag or airtight container and pop it into the refrigerator. It will stay fresh for up to 2-3 days. When you’re ready to reheat, just give it a quick zap in the microwave or warm it up in an oven or toaster oven for a few minutes until heated through.

    To Freeze: You can definitely freeze it too! Arrange the cooled french toast slices on a baking sheet, pop them in the freezer for a couple of hours until each slice is frozen solid, then transfer them to a freezer-safe bag or container. Be sure to squeeze out any excess air to prevent freezer burn. This method ensures that the slices don’t stick together, and you can just grab however many slices you want when you’re ready to enjoy them again. 

    Reheat: Frozen French toast can last for up to 2 months in the freezer. To reheat, you don’t even need to thaw – just pop them straight into the oven or toaster oven until they’re hot and crispy again. Now, isn’t that a breakfast lifesaver for those hectic mornings!

    🍳 More Breakfast Recipes You’ll Love

    Want to try something else that’s a little different for breakfast? How about making a Breakfast Waffle Charcuterie Board? Or you could stick with the bread theme and make everyone a Hawaiian Breakfast Sandwich for a tasty start to the day.

    • Bagel French Toast casserole in the crock pot.
      Crock Pot Bagel French Toast Casserole
    • Crock Pot rice pudding in small bowl.
      Crock Pot Rice Pudding
    • White gravy recipe on top of biscuits next to bacon on a vintage plate.
      White Gravy Recipe
    • A slice of Amish applesauce cake on plate with fork.
      Amish Applesauce Cake

    Did you make this? I’d be so grateful if you left a “star” rating below to let me know what you thought! Then, the next time you need a quick and easy recipe, come back to Fantabulosity to browse all of my easy recipes!

    Recipe

    Brown sugar french toast on white plate, with syrup and butter on top.
    Print Pin
    5 from 1 vote

    Brown Sugar French Toast

    Brown sugar French toast is a spin on the classic that may set new breakfast expectations for all French toast mornings!
    Course Breakfast
    Cuisine American
    Prep Time 5 minutes minutes
    Cook Time 25 minutes minutes
    Total Time 30 minutes minutes
    Servings 10 slices
    Calories 49kcal
    Author Jessica Burgess

    Ingredients

    • 1 loaf thick sliced Brioche bread
    • 5 eggs
    • ½ cup half and half
    • 1 teaspoon vanilla extract
    • ½ cup firmly packed light brown sugar
    • ½ teaspoon cinnamon
    • ¼ teaspoon salt
    • Butter
    • Optional: powered sugar
    • Optional: maple syrup, whipped cream, strawberries/blueberries

    Instructions

    • In a shallow bowl combine eggs and half and half. Whisk until combined.
    • Add vanilla, brown sugar, cinnamon and salt and whisk until all ingredients are well combined.
    • Add butter to heated skillet or griddle and spread to ensure bottom is fully covered.
    • Place one piece of bread in the egg mixture, flipping over to cover both sides.
    • Allow excess egg mixture to drip off before placing in pan.
    • Add bread to hot, buttered pan and cook on medium heat for 1-2 minutes
    • Flip over and cook onsecond side 1-2 minutes. Time will vary depending on how hot your pan is.
    • Add additional butter to skillet as needed.
    • Serve with toppings of your choice such as butter, maple syrup, powdered sugar, or berries.

    Notes

    Other bread suggestions include cinnamon swirl bread, thick-cut Texas toast, and Challah.
    You can substitute heavy cream for the half and half for a richer custard but decrease the measurement to ¾ cups.

    Nutrition

    Calories: 49kcal | Carbohydrates: 1g | Protein: 3g | Fat: 3g | Saturated Fat: 2g | Polyunsaturated Fat: 0.5g | Monounsaturated Fat: 1g | Trans Fat: 0.01g | Cholesterol: 86mg | Sodium: 97mg | Potassium: 47mg | Fiber: 0.1g | Sugar: 1g | Vitamin A: 162IU | Vitamin C: 0.1mg | Calcium: 26mg | Iron: 0.4mg

    Ham and Cheese Sliders

    May 21, 2024

    Ham and cheese sliders stacked on top of one another.

    Ham and cheese sliders with Dijon mustard (sometimes called “funeral sandwiches“) are a combination of savory and tangy flavors that create a truly irresistible sandwich recipe. Serve them as a party appetizer or for an easy dinner idea that’s ready in only 20 minutes!

    Ham and cheese sliders stacked on top of one another.

    Whether you like to serve sliders as an appetizer recipe or a main dish, they are a crowd-pleasing winner! Super easy to make, plus the flavors just meld so beautifully. Smoky ham paired with tangy cheese and sharp Dijon just make for a party.

    If ham isn’t your favorite, no worries! Turkey sliders are a very neutral option. Enjoy cheeseburger sliders inside when the weather isn’t great for grilling! Or branch out with these Reuben sliders for some added flavor! Then add flair to your Friday fish fry by tucking fish filets into slider rolls.

    [feast_advanced_jump_to]

    Why You’ll Love This Recipe

    • It uses a few ingredients: A quick trip to the deli is all you need to complete this recipe!
    • Make-ahead recipe: Did you know that you can freeze these sliders? I love to wrap them in pairs for a quick lunch.
    • Easy to customize: Use any deli meat and cheese and swap out your mustard as well for a true family favorite.

    Ingredients Needed

    Here’s what you’ll need to make these ham and cheese sliders:

    Labeled ingredients for ham and cheese sliders sitting on kitchen counter.
    • Ham – I find that shaved or super thin deli meats are best here. That will allow you to easily create an even layer of meat across the entire set of rolls. I use the same type of ham in my hot ham and cheese sandwiches!
    • Cheese – Swiss is of course the classic ham pairing – but you can use any cheese you like! Again, thin slices are best so you can cover all of the meat.
    • Dijon mustard – The little bite here will pair so nicely with the ham and Swiss! If you aren’t a fan you can feel free to use yellow mustard or a stone ground mustard. If you buy Dijon mustard just for this recipe, use more making these sloppy joe sliders!

    *Be sure to see the recipe card below for the full ingredients list & instructions!*

    How to Make Deli Ham Sliders

    Image collage showing how to make ham and cheese sliders.

    STEP 1. Slice the rolls. Use a serrated bread knife to carefully slice the entire slab of rolls across the horizon.

    STEP 2. Add spread. Spread the softened butter and mustard evenly across the rolls.

    Tip: It’s ok if your rolls fall apart a little bit! Place them close to each other in your pan so that they remain cohesive.

    Ham and cheese sliders brushed with butter, and sprinkles with poppyseeds, ready for baking

    STEP 3. Layer the meat and cheese. Add the ham in an even layer, whether that means flat out in rounds or scrunching it up on each roll. Add the cheese slices on top.

    STEP 4. Cover and bake. Spread melted butter on top and sprinkle on seeds, then tent with foil and bake.

    Recipe Pro Tips

    • Use a baking dish. If you use a dish rather than a baking sheet, you ensure your cheese doesn’t melt out the sides.
    • Flavor swap. Get creative on your toppings. Use sesame seeds, poppy seeds, or even everything seasoning!
    Baked ham and cheese sliders being pulled apart, showing cheese stretching.

    Recipe FAQs

    Can I use homemade rolls?

    Definitely! The key here is to have your rolls, whatever type they may be, squished up together on your pan. This makes it easier to layer the fillings. So as long as your sliced rolls can sit neatly next to each other, they should work here.

    Can I freeze ham and cheese sliders?

    Yup! You can wrap the entire package up in foil and then bake later on. Thaw in the fridge overnight before baking. You can also wrap individual servings to take as a packed lunch.

    What to Serve with Deli Meat Sliders

    Chips, dips, and veggies are perfect. If you are serving as appetizers then you can include chicken wings or bbq meatballs in your spread. I love stuffed celery sticks as a vegetarian offering.

    Storage

    Store any leftover sliders in the fridge in an airtight container for up to 3 days. Reheat by popping them into the toaster oven to get crisped up.

    More Slider Recipes You’ll Love

    • Close up of pizza sliders on white plate.
      Pizza Sliders
    • Salmond slider with garlic aioli, tomato and lettuce.
      Salmon Sliders
    • Buffalo chicken sliders on wooden cutting board.
      Buffalo Chicken Sliders
    • Chicken salad with grapes and apples, sitting on bread.
      Harvest Chicken Salad

    Did you make this? I’d be so grateful if you left a “star” rating below to let me know what you thought! Then, the next time you need a quick and easy recipe, come back to Fantabulosity to browse all of my easy recipes!

    Recipe

    Ham and cheese sliders stacked on top of one another.
    Print Pin
    5 from 1 vote

    Ham and Cheese Sliders

    Ham and cheese sliders on Hawaiian rolls with Dijon mustard are a combo of savory and tangy flavors that create a truly irresistible bite.
    Course Appetizer
    Cuisine American
    Prep Time 5 minutes minutes
    Cook Time 15 minutes minutes
    Total Time 20 minutes minutes
    Servings 12 servings
    Calories 321kcal
    Author Jessica Burgess

    Equipment

    • 1 rimmed baking sheet large enough to hold 12 Hawaiian rolls
    • parchment paper
    • 1 small microwave-safe bowl
    • aluminum foil
    • pastry brush

    Ingredients

    • 12 Hawaiian rolls
    • 24 slices deli ham
    • 8 ounces Swiss cheese
    • 6 – 8 tablespoons Dijon mustard or more
    • 2 tablespoons unsalted butter melted
    • poppy seeds

    Instructions

    • Preheat oven to 350°F.
    • Cover a rimmed baking sheet with parchment paper or aluminum foil (note: if using foil spray lightly with a non-stick spray).
    • Leaving the rolls intact, slice them in half on the horizon.
      12 Hawaiian rolls
    • Melt the butter in a microwave safe bowl and brush the inside of the rolls, followed by a thin layer Dijon mustard. Place the bottom buns on the baking sheet, layer the ham and Swiss cheese followed by the tops of the buns. Lightly brush the tops of the buns before placing on each slider, then lightly sprinkle with some poppy seeds.
      24 slices deli ham, 8 ounces Swiss cheese, 2 tablespoons unsalted butter, poppy seeds, 6 – 8 tablespoons Dijon mustard
    • Cover sliders with aluminum foil loosely over sliders and bake in oven at 350F for 15-20 minutes. Remove foil then place back in oven until tops are golden and enjoy!

    Notes

    • You can use any meat and cheese here if you prefer a different type.
    • Not a fan of Dijon? Use stone-ground or yellow mustard.
    • You can also use “everything but the bagel seasoning” on top of the sliders instead of poppy seeds

    Nutrition

    Serving: 1slider | Calories: 321kcal | Carbohydrates: 16g | Protein: 20g | Fat: 19g | Saturated Fat: 9g | Polyunsaturated Fat: 1g | Monounsaturated Fat: 6g | Trans Fat: 0.1g | Cholesterol: 67mg | Sodium: 866mg | Potassium: 185mg | Fiber: 0.3g | Sugar: 4g | Vitamin A: 221IU | Vitamin C: 0.03mg | Calcium: 177mg | Iron: 1mg

    Cranberry Orange Scones

    May 19, 2024

    Stacked cranberry orange scones.

    Cranberry Orange Scones that use frozen cranberries, orange juice, and orange zest with a few other simple ingredients to create a breakfast pastry that’s beautiful for brunch and delicious enough for a weekend breakfast.

    In only 30 minutes, you’ll have scones ready to enjoy with your morning coffee.

    Stack of 3 cranberry orange scones.

    For years, breakfast has been my favorite meal of the day to make. There’s something about feeding everyone when they wake up hungry, especially when they see warm, sweet treats on the table like these scones.

    The flavors of the orange and cranberry together in these are such a nice change from your typical flavors. This cranberry cake with butter sauce features the same tartness from the cranberries, with a rich butter sauce drizzled on top. Though it’s more of a dessert, I’ve been known to eat it for breakfast.

    [feast_advanced_jump_to]

    Ingredients You’ll Need

    Overhead shot of cranberry orange scones ingredients.

    These scones are made with easy-to-find ingredients. Here are a few notes on some of the key ingredients. See the recipe card below for the measurements.

    • Baking powder: Be sure to check the expiration date to make sure it’s fresh for optimal performance.
    • Frozen unsalted butter: Cube or grate the butter and keep it cold. Use cold ingredients, including chilled butter and heavy cream, to achieve a flaky and tender texture in the scones.

    For another scone recipe, try these strawberry scones. You might also like all of my other easy breakfast recipes!

    How to Make Cranberry Orange Scones

    Here’s an overview of how to make these scones. You can jump to the recipe for full instructions.

    Step by step instructions on how to make cranberry orange scones.
    • Preheat: Preheat your oven to 400°F. Line a baking sheet with parchment paper.
    • Dry ingredients + butter: Whisk together dry ingredients and then add cold butter. Use a pastry cutter or your fingers to incorporate the butter until the mixture resembles coarse crumbs.
    • Orange + cranberries: Stir in the mixture.
    • Wet ingredients: Whisk together wet ingredients.
    • Combine: Pour the wet ingredients into the dry ingredients and mix.
    Step by step process of making cranberry orange scones.
    • Shape: Shape the dough and slice.
    • Bake: for 12 – 15 minutes.
    • Make glaze: Whisk together powdered sugar, orange juice, and orange zest.
    • Cool and drizzle: Allow scones to cool and drizzle.

    Glaze Tips:
    If your glaze is too thick, gradually add a teaspoon of orange juice until it reaches the desired consistency. If it’s too thin, gradually add small amounts of powdered sugar and mix in, until it reaches the thickness desired.

    Overhead shot of orange glaze drizzled over scones.

    Recipe Pro Tips

    • Handle the flour with care. Overmixing the dough can lead to dense scones. Mix until just combined to maintain a light texture.
    • Distribute. Distribute the cranberries evenly throughout the dough to ensure that each bite contains a burst of tartness.

    Storage Instructions

    Store leftover scones in an airtight container at room temperature for up to two days. Refresh them by warming briefly in the oven or microwave.

    What is the secret to making good scones??

    Making sure your ingredients are really cold is key for scone success! You can even chill your equipment (bowls, etc.) to help keep the dough as cold as possible.

    What can I use if I don’t have heavy cream or milk??

    Mixing butter and milk together (whole milk or even half-and-half work best), you can make your own heavy cream! To make ½ cup of heavy cream, gently melt 2 Tablespoons of butter and then slowly whisk in 6 Tablespoons of milk. 

    More Breakfast Pastry Recipes

    • Strawberry Cinnamon Rolls
    • Cinnamon Biscuits
    • Strawberry Chocolate Muffins
    • Peach Turnovers
    • Chocolate Bronuts

    Recipe

    Stacked cranberry orange scones.
    Print Pin
    5 from 11 votes

    Cranberry Orange Scones

    Cranberry Orange Scones that use frozen cranberries, orange juice, and orange zest with a few other simple ingredients to create a breakfast pastry that's beautiful for brunch and delicious enough for a weekend breakfast.
    In only 30 minutes, you'll have scones ready to enjoy with your morning coffee.
    Course Breakfast
    Cuisine American
    Prep Time 15 minutes minutes
    Cook Time 15 minutes minutes
    Total Time 30 minutes minutes
    Servings 8 scones
    Calories 446kcal
    Author Jessica Burgess

    Ingredients

    • 2 cups all-purpose flour
    • ½ cup granulated sugar
    • 1 Tablespoon baking powder
    • ½ teaspoon kosher salt
    • 3 Tablespoons fresh orange juice Divided (1 Tablespoon + 2 Tablespoons)
    • zest of 1 orange (reserve 1 teaspoon for icing)
    • ½ cup frozen unsalted butter 1 stick – cubed or grated
    • ½ cup heavy whipping cream cold
    • 1 large egg
    • 1 teaspoon pure vanilla extract
    • 1 cup frozen cranberries halved
    • 1 cup powdered sugar

    Instructions

    • Preheat your oven to 400°F. Line a baking sheet with parchment paper.
    • In a large bowl, whisk together 2 cups of all-purpose flour, ¼ cup of granulated sugar, 1 tablespoon of baking powder, and ½ teaspoon of kosher salt. Then add ½ cup cold, cubed butter to the dry ingredients. Use a pastry cutter or your fingers to incorporate the butter until the mixture resembles coarse crumbs.
    • Stir in the orange zest and 1 cup of halved cranberries, ensuring they are evenly distributed throughout the mixture.
    • In a separate bowl, whisk together ½ cup of heavy cream, 1 large egg, 1 tablespoon of orange juice, and 1 teaspoon of pure vanilla extract until well combined.
    • Pour the wet ingredients into the dry ingredients. Mix until just combined. Be careful not to overmix; the dough should be slightly sticky.
    • Turn the dough out onto a floured surface. Gently pat it into a circle about 1 inch thick. Using a sharp knife or a floured round cutter, cut the dough into 8 equal wedges or as many rounds as you can make. Place the scones on the prepared baking sheet. Brush the tops with a little extra heavy cream.
    • Bake for 12 – 15 minutes or until the scones are golden brown.
    • While the scones are baking, whisk together 1 cup of powdered sugar, 2 tablespoons of fresh orange juice, and 1 teaspoon of orange zest (if using) to make the glaze.
    • Once the scones are done baking, let them cool on a cooling rack for a few minutes. Drizzle the orange glaze over the warm scones.
    • Allow the glaze to set for a few minutes before serving. Enjoy your homemade Cranberry Orange Scones with a cup of tea or coffee!

    Video

    Nutrition

    Serving: 1scone (with icing) | Calories: 446kcal | Carbohydrates: 68g | Protein: 5g | Fat: 18g | Saturated Fat: 11g | Polyunsaturated Fat: 1g | Monounsaturated Fat: 5g | Trans Fat: 0.5g | Cholesterol: 71mg | Sodium: 321mg | Potassium: 88mg | Fiber: 1g | Sugar: 41g | Vitamin A: 630IU | Vitamin C: 17mg | Calcium: 114mg | Iron: 2mg

    Strawberry Shortcake Cookies

    May 15, 2024

    Strawberry shortcake cookies stacked on top of one another.

    These strawberry shortcake cookies have a texture reminiscent of strawberry scones, where each bite is a delightful blend of buttery goodness and juicy strawberries. In only 30 minutes, (including the “cool-down” time) you’ll be eating delicious cookies in your own kitchen!

    Strawberry shortcake cookies stacked on top of one another.

    I love cookies! There is so much variety in them, whether it is the texture or what you choose to stir into the dough. These cookies aren’t overly sweet on their own, but the addition of the fresh strawberries enhances their sweetness and moisture, making each bite a delightful treat. They’re a unique twist on the classic dessert, bringing the essence of strawberry shortcake to a convenient cookie form.

    If you really enjoy fresh strawberries, think about making a strawberry crumble for dessert as well. It’s also really easy to have Strawberry Crunch Cake or perfectly pink strawberry brownies!

    [feast_advanced_jump_to]

    Ingredients Needed

    Here’s what you’ll need to make these fabulous cookies:

    Labeled ingredients for strawberry shortcake cookies recipe.
    • Flour – Regular all-purpose is great here. Make sure to always measure flour by spooning it into the cup and leveling off with a straight edge!
    • Sugar – These cookies don’t have a ton of sugar compared to other recipes, allowing the strawberries to shine.
    • Heavy cream – Start with ½ cup and add more as needed to make the dough come together.
    • Butter – Many cookies start with softened butter, but because this is more of a scone dough, the butter needs to be cold!
    • Strawberries – Dice up fresh strawberries into bite-sized pieces. This will ensure every cookie has a taste.

    *Be sure to see the recipe card below for the full ingredients list & instructions!*

    How to Make Mini Strawberry Scones

    Image collage showing how to make strawberry shortcake cookies.

    STEP 1. Combine dry ingredients. Whisk the dry ingredients together, then add the butter to resemble coarse crumbs.

    STEP 2. Make batter. Add the cream, in batches, until your dough just comes together.

    Tip: Kids can help here! If your strawberries are ripe, they might be able to be sliced with a butter knife, giving them confidence in the kitchen.

    Rolled strawberry shortcake cookies on baking sheet.

    STEP 3. Add strawberries. Gently fold in the diced strawberries, being careful not to mash them.

    STEP 4. Bake and enjoy. Bake in a preheated oven until just set – you don’t want to dry them out.

    Baked strawberry shortcake cookies on baking sheet.

    Recipe Pro Tips

    • Use a scoop. A cookie scoop is a great tool to have on hand because your cookies will look professionally made! This allows them to be uniform in size, so that they bake evenly.
    • Line the pan. I love using parchment paper for cookies because it’s an easy cleanup. It also makes for a non-stick surface even if your pan isn’t quite as slippery any more!
    Baked strawberry shortcake cookies, stacked on top of one another.

    Recipe FAQs

    Why are my cookies too wet?

    The amount of juice in the strawberries will add to the moisture of the cookies.  If they are too juicy, you can cut back on the whipping cream a little.  If they aren't as juicy, you can increase the whipping cream starting with a tablespoon at a time.

    Can I use frozen strawberries instead of fresh?

    Frozen strawberries aren't recommended for this recipe due to the amount of moisture in frozen strawberries. These cookies are supposed to have a drier texture than most cookies, similar to that of a biscuit or scone.

    Storage

    It is best to eat these cookies the same day but if you need to store them, place them in an air-tight container at room temperature for 1-2 days.  The longer they sit the soggier they will get. 

    More Cookie Recipes You’ll Love

    • Close up image of one oatmeal cookie on a plate of cookies.
      The BEST Oatmeal Raisin Cookies
    • Close up of rocky road cookie.
      Rocky Road Cookies
    • Peanut butter cookies with the classic criss-cross pattern on top.
      Easy Peanut Butter Cookie Recipe
    • Monster Cookies
      Monster Cookies

    Did you make this? I’d be so grateful if you left a “star” rating below to let me know what you thought! Then, the next time you need a quick and easy recipe, come back to Fantabulosity to browse all of my easy recipes!

    Recipe

    Strawberry shortcake cookies stacked on top of one another.
    Print Pin
    5 from 1 vote

    Strawberry Shortcake Cookies

    These strawberry shortcake cookies have a texture reminiscent of scones. Each bite is a delightful blend of buttery goodness and juicy strawberries. 
    Course Dessert
    Cuisine American
    Prep Time 10 minutes minutes
    Cook Time 15 minutes minutes
    Total Time 25 minutes minutes
    Servings 24 cookies
    Calories 92kcal
    Author Jessica Burgess

    Ingredients

    • 1 ¾ cup all purpose flour
    • 1 ½ teaspoons baking powder
    • ½ teaspoon salt
    • ¾ cup granulated sugar
    • ¼ cup unsalted butter chilled and cut into small pieces
    • ½ cup + 1 – 2 tablespoons heavy whipping cream
    • ½ cup strawberries hulled and chopped

    Instructions

    • Preheat your oven to 350 degrees. Line a baking sheet with parchment paper and set it aside.
    • In a large mixing bowl, whisk together the flour, baking powder, salt, and sugar until they are well combined.
    • Add the pieces of butter to the dry ingredients. Use a pastry cutter or your hands to blend the ingredients together until the mixture becomes crumbly.
    • Slowly pour in ½ cup of whipping cream and gently incorporate it into the mixture with a spatula. If the mixture remains dry, add 1 tablespoon of whipping cream at a time, and if necessary, use your hands to thoroughly combine the dry ingredients into the dough.
    • Gently fold in the strawberries, being careful to not crush the berries.
    • Use a cookie scoop to drop the cookies onto the prepared cookie sheet, spacing them about 1 inch apart.
    • Bake for 15 minutes, or until the edges of the cookies are slightly browned.
    • Allow the cookies to cool on a cooling rack for 5 minutes before enjoying.

    Notes

    • The juicier the strawberries that more wet the consistency will be. This may result in a flatter cookie. They still have a great flavor but they won't have a biscuit/scone type texture.
    • These cookies will have a biscuit or a scone like texture, so they will be a little drier than a traditional cookie.
    • Variation: You could add vanilla, white chocolate chips or even a powdered sugar glaze to give them a slightly different taste.

    Nutrition

    Serving: 1cookie | Calories: 92kcal | Carbohydrates: 14g | Protein: 1g | Fat: 4g | Saturated Fat: 2g | Polyunsaturated Fat: 0.2g | Monounsaturated Fat: 1g | Trans Fat: 0.1g | Cholesterol: 11mg | Sodium: 77mg | Potassium: 20mg | Fiber: 0.3g | Sugar: 7g | Vitamin A: 133IU | Vitamin C: 2mg | Calcium: 20mg | Iron: 0.5mg

    Maid-Rite Sandwiches

    May 13, 2024

    Maid Rite sandwich sitting on white plate.

    Learn the history behind this amazing loose meat sandwich recipe that is simply made right! Your family will go nuts for the new-to-them classic Maid Rite sandwich, which are also referred to as “loose meat sandwiches.”

    These sandwiches are perfect for an easy dinner recipe and are ready to enjoy a dinner in under 30 minutes!

    Close up of maid rite sandwich sitting on white plate.

    Tired of the same old recipes? Look no further – this loose meat sandwich brings lots of great flavor to the table, and has a fun story to boot! Your family will be intrigued by this new type of burger recipe as they load up on their favorite toppings.

    I love using ground beef for dinner as it’s an economical cut and a favorite of many. If sandwiches are on your dinner meal plan, you can also make some easy Cheeseburger Sliders. They are perfect for game day, too. In the mood for pasta? Skip the box mix and make your own skillet cheeseburger mac.

    [feast_advanced_jump_to]

    Why You’ll Love This Recipe

    • Fun tradition: Share in this classic sandwich recipe with your family and tell them the origins.
    • Feed a crowd: You can easily double this to make a lot for a crowd or to have leftovers throughout the week. Sandwich dinners like this are classic old-fashioned comfort food meals.
    • Ready in only 30 minutes: Cooking ground beef is all you need to do, so it’s perfect for those busy nights.

    Ingredients Needed

    I’ve highlighted a couple of ingredients below with some relevant notes. Aside from this, the ingredients needed are pretty basic.

    Labeled ingredients for maid rite recipe.
    • Ground beef – Use 85/15 to stay true to the original recipe for maid rites. You can swap it out though if you only have leaner cuts at the store.
    • Beef bouillon – A cube gives us extra salt and lots of flavor. We are using less water than called for on the jar for that extra flavor. Be sure and dissolve it in hot water before adding to the pan to make sure it’s completely dissolved!
    • Worcestershire – If you don’t normally keep this on hand, try steak sauce or soy sauce for the boost of umami.
    • Onion – Finely diced, this brings a great bit of texture to the loose meat.
    • Buns – Go all in with classic white burger buns!

    Substitutions

    Sometimes substitutions are necessary because of ingredients that are unavailable or needed for dietary restrictions. Here are some suggestions that can help:

    • White Onions – if you’re in a pinch, throw in some dehydrated onions instead.
    • Meat – you can use ground chicken or turkey here, but it won’t be the classic recipe. This is a great way to reduce the fat content though.
    • Bouillon – no cubes? I don’t recommend simply using a half cup of beef broth as it won’t taste the same. An option is to use the amount of Better Than Bouillon that yields one cup of broth, but using only ½ cup of water.

    How to Make Original Maid-Rites

    You’re in for a treat here! One skillet and ready in under 30 minutes.

    *Be sure to see the recipe card below for the full ingredients list & instructions!*

    Image collage showing steps 1-4 of how to make maid rite sandwiches.

    STEP 1. Make broth. Dissolve the bouillon cube in hot water (Image 1). This allows you to make sure it is all dissolved!

    Tip: 85/15 ground beef tastes the most authentic. If this is too greasy for you, feel free to drain off the excess before serving.

    STEP 2. Make sauce. Add remaining ingredients except beef and onions, and combine well (Image 2).

    Cooked maid rite in skillet.

    STEP 3. Brown beef. Add ground beef and break it up with a wooden spoon as it cooks (Image 3).

    STEP 4. Add onions. Once the beef is cooked through and the liquid is evaporated, add diced onions. Cook until softened (Image 4).

    Maid Rite meat piled on hamburger buns, and sitting on white plate.

    Recipe Pro Tips

    • Let the liquid cook off. This is a “loose meat” sandwich and isn’t meant to be sloppy and saucy.
    • Toppings galore. This is a fun meal to make for a crowd because you can set out an entire “burger bar” of toppings as these are essentially loose meat burgers. You can even make these easy fried pickles to serve on the sandwich or alongside of them.
    Maid Rite sandwich topped with mustard, ketchup and pickles.

    Recipe FAQs

    What is the original Maid-Rite?

    As the story goes, an Iowa butcher combined various cuts of meat with seasonings until he liked what he had. When a delivery man had a taste, he proclaimed the sandwich was “made right” and it is made the same to this day!

    What is the difference between Maid-Rite and sloppy joes?

    There really is no comparison! A traditional sloppy joe recipe has a tomato sauce, and is, as the name goes, messy to eat. Meanwhile a maid-rite sandwich, you cook off the liquid so it is quite dry overall, and is topped like a hamburger patty.

    What is the difference between sloppy joes and loose meat?

    A sloppy joe has sauce, enough so that the sandwich is considered wet and can soak into the bun. Loose meat is basically eating a hamburger but in crumbles. While the meat is cooked in flavorful liquid so it isn’t a bad sort of dry, all that liquid does evaporate or cook into the meat, so that your sandwich is essentially dry.

    What to Serve with This Simple Maid Rite Recipe

    I love to serve french fries or chips with sandwiches. Think outside the box, too, and give eggplant fries a chance! If frozen fries are more your speed, you can make fries easily in the air fryer. Dip your choice of fries in a nice Chipotle aioli! You can also add this red potato salad or a quick green salad.

    Or if you love restaurant-style side dishes, these easy fried pickles are a hit.

    Maid Rite sandwich sitting on white plate, next to cooked french fries.

    Storage

    Store cooled leftovers in an airtight container in the fridge for up to 3 days. Reheat on the stove or microwave, splashing in more broth or water as necessary.

    More Sandwich Recipes You’ll Love

    • Subway Crab Sandwich on white plate.
      Subway Crab Sandwich Recipe
    • Fried Bologna and Egg Sandwich
      Fried Bologna and Egg Sandwich
    • Chicken Grilled Cheese Sandwich
      Chicken Grilled Cheese
    • Cheeseburger sub on white plate.
      Cheeseburger Subs

    Did you make this? I’d be so grateful if you left a “star” rating below to let me know what you thought! Then, the next time you need a quick and easy recipe, come back to Fantabulosity to browse all of my easy recipes!

    Recipe

    Maid Rite sandwich sitting on white plate.
    Print Pin
    Be the first to rate!

    Maid Rite Sandwiches (Loose Meat) Copycat

    Maid Rite Sandwiches: Ready in under 30 minutes, your family will go nuts for this easy to make sandwich recipe that's great for dinner or even to feed a crowd.
    Course Dinner
    Cuisine American
    Prep Time 5 minutes minutes
    Cook Time 20 minutes minutes
    Total Time 25 minutes minutes
    Servings 4 sandwiches
    Calories 382kcal
    Author Jessica Burgess

    Ingredients

    • 1 cube beef bouillon
    • ½ cup hot water
    • 1 pound ground beef
    • 1 tablespoon Worcestershire sauce
    • 1 teaspoon sugar
    • 1 tablespoon yellow mustard
    • ¼ teaspoon black pepper
    • ½ teaspoon salt
    • ½ cup onion finely diced
    • 4 hamburger buns

    Optional Toppings:

    • Mustard
    • Ketchup
    • Pickles

    Instructions

    • Dissolve bouillon cube in hot water. Set aside.
    • In a skillet over medium high heat, add the bouillon mixture, Worcestershire, sugar, mustard, pepper, and salt. Stir to combine.
    • Add the ground beef and chop it up with a wooden spoon as it cooks.
    • Once liquid is evaporated, stir in onions and cook for 1-2 minutes until onions are just softened. Drain any grease if necessary.
    • Serve on hamburger buns with your favorite toppings.

    Video

    Notes

    • Steak sauce or soy sauce may be substituted for the Worcestershire sauce.
    • Using a ground beef that is not super lean, such as 85/15, will give this dish a more authentic taste.
    • We like to top ours with mayo, ketchup, and pickles, but you could also use lettuce, tomato, mayo, cheese, extra onion, or anything you like on a hamburger.

    Nutrition

    Serving: 1sandwich | Calories: 382kcal | Carbohydrates: 26g | Protein: 26g | Fat: 19g | Saturated Fat: 7g | Polyunsaturated Fat: 1g | Monounsaturated Fat: 8g | Trans Fat: 1g | Cholesterol: 77mg | Sodium: 679mg | Potassium: 458mg | Fiber: 1g | Sugar: 5g | Vitamin A: 8IU | Vitamin C: 3mg | Calcium: 91mg | Iron: 4mg

    Pizza Fries

    May 12, 2024

    French fries with melted cheese, pepperoni, and pizza sauce.

    Everyone always enjoys a plate of loaded French fries – but have you ever turned it on its side and made Pizza Fries? Melted cheese, pizza sauce, pepperoni… all piled on crispy French fries, is a flavor combo that is a family-favorite!

    Baked pizza fries on baking sheet.

    We are taking a shortcut here and using frozen fries. Why wouldn’t we when they are delicious as-is and we are taking it up a notch with toppings? I also love throwing frozen sweet potato fries in the air fryer!

    If you want to show off your knife skills, try eggplant fries, also in the air fryer. I highly recommend a classic sloppy Joe sandwich if you are keeping your fries plain, or you can serve the pizza French fries up with a side salad.

    [feast_advanced_jump_to]

    Why You’ll Love This Recipe

    • It uses a few ingredients: Most people have these ingredients on hand already!
    • Switch it up: Just like topping your own homemade pizza, add your favorites to these fries.
    • Works for any meal: Whether you want a fun appetizer with friends (and beer?) or you want a quick kid-friendly meal, this fits the bill.

    Ingredients Needed

    Here’s what you’ll need to make delicious pepperoni pizza fries!

    Ingredients on kitchen counter with their names by each item.
    • Fries – Use your favorite brand here. I love crinkle cut as they hold onto the toppings nicely! Straight cut will also work here but I don’t recommend anything that’s already seasoned as it will compete with the pizza flavors.
    • Cheese – Mozzarella is of course the iconic pizza cheese, but feel free to use a cheddar blend or some Colby Jack.
    • Pepperoni – I love pepperoni! Use pork or turkey, whatever you prefer. You could also use sausage or diced ham, but make sure your meat is already fully cooked.
    • Sauce – We are going to drizzle some over the top of the fries, so you can even find a squeeze bottle at the store to make it easy!

    *Be sure to see the recipe card below for the full ingredients list & instructions!*

    How to Make Loaded Pizza Fries

    Just a simple two steps here – bake, then top!

    Collage of how to make pizza fries.

    STEP 1. Cook fries. Bake, according to bag instructions. I like to line the baking sheet first!

    STEP 2. Layer cheese. Once the fries are crispy, add half the cheese in an even layer.

    Tip: Line your baking sheet for easy cleanup! No stuck cheese here! I also like to use a sheet that just fits the fries closely together. This allows the toppings to stay right where they belong.

    STEP 3. Sauce it up. Add sauce in lines over the cheese. Don’t add too much or your fries will turn soggy!

    STEP 4. Top and bake. Place pepperoni and remaining cheese over top, then bake to melt the cheese. Serve!

    Baked pizza fries, sitting on baking sheet.

    Recipe Pro Tips

    • Don’t use too much sauce. Layering cheese before sauce creates a barrier – adding too much sauce here can make your fries soggy! Use more sauce for dipping if desired.
    • Crisp first! Make sure your fries are cooked to the perfect crispness before adding toppings. They will not get any crispier once coated in cheese so give one a bite test before topping to make sure they are ready.
    • Fun Dinner Idea: Add these Pizza French Fries to your Dinner Theme System for a fun night with your family!
    French fries baked on baking sheet with cheese, pepperoni and pizza sauce.

    Recipe FAQs

    Can I make pizza fries ahead?

    Unfortunately, these fries do not do as well as leftovers. We recommend serving them immediately from the oven. If they should cool off a bit too long outside the oven, feel free to turn the oven back on to 350 degrees F and reheat them in there for a few minutes.

    What other toppings can I use?

    Any of your favorite veggies or meat that you normally order on pizza will go really well here. However, you must make sure they are fully cooked before using. Once topped, the fries aren’t in the oven long enough to cook raw meat. Also with veggies, cooking them first will remove the excess water content which would otherwise make your fries soggy!

    How do I serve pizza fries?

    This would be perfect set on the table as-is for a group of friends to share while chatting. You can also use smaller pans for everyone to make their own! Bake the fries on a regular large baking sheet first, then divide them up in smaller cast iron skillets or baking dishes for everyone to top to their liking before melting the cheese.

    What to Serve with Loaded Pizza Fries

    I love these on their own as an appetizer, or you can bulk up your meal by serving a green salad while they bake. Make a fun “alternative pizza night” by serving alongside pizza sliders! Then have an Oreo pizza ready for dessert.

    More Appetizer Recipes You’ll Love

    • Hand dipping crostini in pepperoni dip.
      Pepperoni Dip
    • Soft Pretzels stacked on a plate.
      Soft Pretzel Recipe
    • Close up of chip dipping in to buffalo chicken dip.
      Buffalo Chicken Dip
    • air fryer fried shrimp on white plate
      Air Fryer Fried Shrimp with Cocktail Sauce

    Did you make this? I’d be so grateful if you left a “star” rating below to let me know what you thought! Then, the next time you need a quick and easy recipe, come back to Fantabulosity to browse all of my easy recipes!

    Recipe

    French fries with melted cheese, pepperoni, and pizza sauce.
    Print Pin
    Be the first to rate!

    Pizza Fries

    Everyone loves classic loaded fries – but try your favorite pizza toppings instead!
    Course Appetizer, Main Course
    Cuisine American
    Prep Time 5 minutes minutes
    Cook Time 30 minutes minutes
    Total Time 35 minutes minutes
    Servings 6 servings
    Calories 535kcal
    Author Jessica Burgess

    Ingredients

    • 32 ounces French Fries 1 regular package
    • Pinch of salt to taste
    • 8 ounces shredded mozzarella cheese
    • ½ cup pizza sauce plus additional to serve on the side
    • ¼ cup pepperoni
    • Other favorite pizza toppings such sausage, peppers, onions, mushrooms, etc. (optional)

    Additional toppings and garnishes (optional):

    • Parmesan
    • Red pepper flakes
    • Chopped parsley
    • Ranch dressing for dipping

    Instructions

    • Prepare the fries according to the instructions on the package.
    • Preheat the oven to 425F.
    • Transfer the cooked fries to a 9×13 pan lined with parchment paper. If using a sheet pan, you can pile them up in the same pan.
    • Sprinkle half of the cheese evenly over the fries.
    • Drizzle the pizza sauce over the cheese layer.
    • Add the remaining cheese on top of the fries.
    • Distribute the pepperoni and any other desired pizza toppings over the fries.
    • Bake for 9-11 minutes until the cheese is melted. For extra bubbly and melty cheese, you can broil on low for a minute or two, but be sure to monitor closely to prevent overcooking.
    • Once done, remove the fries from the oven and garnish with your favorite toppings. Serve immediately, and enjoy with extra pizza sauce on the side.

    Notes

    • Be sure to note that putting down half the cheese helps to create the perfect barrier between the fries and the sauce. Be careful not to overdo the sauce when adding it to the fries. Too much sauce can lead the fries to become soggy. It is recommended to serve extra sauce on the side.
    • You can opt for an 11×17 baking sheet when preparing the fries. While we used a smaller 9×13 sheet to stack them closely, you can do the same on the larger one.

    Nutrition

    Calories: 535kcal | Carbohydrates: 48g | Protein: 14g | Fat: 33g | Saturated Fat: 13g | Polyunsaturated Fat: 2g | Monounsaturated Fat: 17g | Trans Fat: 0.1g | Cholesterol: 34mg | Sodium: 1149mg | Potassium: 752mg | Fiber: 7g | Sugar: 1g | Vitamin A: 344IU | Vitamin C: 11mg | Calcium: 208mg | Iron: 2mg

    Stuffed Celery with Cream Cheese

    May 12, 2024

    Stuffed celery with cream cheese, and everything but the bagel seasoning on top, sitting on white plate.

    I’m always on the lookout for a fun new appetizer. These stuffed celery sticks with cream cheese have so much flavor and are easy to eat! Definitely an appetizer recipe that’s easy to make, and no cooking required!

    Stuffed celery with cream cheese and seasonings, sitting on white square plate, and yellow napkin.

    I don’t think of celery as diet food – I just love the crunch it adds to a dish! Sometimes a package of celery is quite large, and I want to make sure I don’t waste any of it. Stuffing it with cream cheese is perfect for using it up.

    Whether you like it on its own, ants on a log style, or prefer to mix it into a dish, celery adds the perfect texture. I love to mix it into a chicken pasta salad. And if you won’t use it all up right away, it’s easy to chop and freeze in pre-measured portions to add to your soup.

    [feast_advanced_jump_to]

    Why You’ll Love This Recipe

    • Simple ingredients: These are all easy, no-bake ingredients you can add to your weekly shopping list.
    • Packs well: Store the celery and filling in the fridge to add to a packed lunch!
    • Easy to make: Using whipped cream cheese means you don’t have to wait for it to soften before proceeding.

    Ingredients Needed

    Here’s what you’ll need to make this cream cheese stuffed celery.

    Labeled ingredients for stuffed celery recipe sitting on cutting board.
    • Celery – You can pick up pre-cut sticks or cut your own. I like to make them all the same size for a pretty presentation. Do you think celery is too tough to eat? Try peeling the outside first!
    • Cream Cheese – Whipped cream cheese gives us a great texture that can immediately be mixed up and spread. Want even more flavor? See if your store has a veggie flavor whipped cream cheese.
    • Bacon – Cook up some extra bacon next time you make breakfast. You can also cheat and used pre-cooked diced bacon. Just be sure it’s real bacon!

    *Be sure to see the recipe card below for the full ingredients list & instructions!*

    How to Make Stuffed Celery Sticks

    There’s hardly any prep to get these onto the serving platter!

    Process images showing the steps for making stuffed celery.

    STEP 1. Mix filling. Stir everything into the cream cheese until well combined.

    STEP 2. Prep celery. Chop off any leaves and wash and dry the celery.

    Tip: Make all your celery sticks the same length for the perfect presentation!

    Cream cheese stuffed celery sticks on white plate, sitting on yellow napkin.

    STEP 3. Stuff. Carefully spread the cream cheese into each celery stick.

    STEP 4. Serve. Add more everything seasoning on top so there’s no doubt what flavor your filling is!

    Recipe Pro Tips

    • Use whipped cream cheese. Due to the air in the mix, this really does spread much better into the celery!
    • Small dice. Make sure your bacon and green onion are diced small enough to fit inside the celery sticks.

    Recipe FAQs

    How do I store stuffed celery sticks?

    I don’t recommend stuffing them ahead of time as the filling is more likely to slide right out. You can definitely mix up the cream cheese ahead though! I would also prepare the celery sticks right before stuffing. They can dry out if you prepare them in advance.

    Can I reduce the fat in these celery sticks?

    Feel free to use a reduced cream cheese if you like. I don’t recommend fat free though as the flavor and texture just aren’t the same.

    What to Serve with Everything Stuffed Celery

    Mix up some Everything But The Bagel Dip! This would be a great addition to a vegetable tray or charcuterie board. Add in more celery and some carrot sticks, plus crackers and focaccia slices.

    More Appetizer Recipes You’ll Love

    • Close up of chip dipping in to buffalo chicken dip.
      Buffalo Chicken Dip
    • Soft Pretzels stacked on a plate.
      Soft Pretzel Recipe
    • Cheese dip in sauce pan, with soft pretzels surrounding it.
      Pretzel Cheese Dip
    • Hand pulling a piece of cheesy pull apart bread off of loaf.
      Cheesy Pull Apart Bread

    Did you make this? I’d be so grateful if you left a “star” rating below to let me know what you thought! Then, the next time you need a quick and easy recipe, come back to Fantabulosity to browse all of my easy recipes!

    Recipe

    Stuffed celery with cream cheese, and everything but the bagel seasoning on top, sitting on white plate.
    Print Pin
    5 from 1 vote

    Stuffed Celery

    This stuffed celery recipe is not only easy to make but it's the perfect appetizer recipe or snack, that can be made ahead of time!
    Course Appetizer
    Cuisine American
    Prep Time 15 minutes minutes
    Total Time 15 minutes minutes
    Servings 20 sticks
    Calories 48kcal
    Author Jessica Burgess

    Ingredients

    • 8 ounces short celery sticks
    • 8 ounces whipped cream cheese
    • ¼ cup cooked bacon pieces
    • ¼ teaspoon salt
    • ¼ teaspoon pepper
    • 4 dashes hot sauce or more if desired
    • 1 teaspoon everything but the bagel seasoning plus more on top
    • 2 green onions chopped

    Instructions

    • If needed, cut off brown ends of celery hearts, and remove any leaves.
    • Wash celery, and dry sticks with paper towel. (This is very important, or the cream cheese may not spread in to the celery stick well.)
    • In a small bowl, mix together cream cheese, bacon pieces, salt, pepper, hot sauce, everything but the bagel seasoning, and green onions. Stir until combined.
    • Using about 1 tablespoon of filling for each celery stick, spread the filling inside. This mixture should be enough to fill all of the celery but some packages may differ in size.
    • If desired, sprinkle extra "everything but the bagel" seasoning on top of each celery stick.

    Notes

    • Use whipped cream cheese as it is easier to mix together as well as fill!
    • Always dry your celery thoroughly or your filling will just slide right out.

    Nutrition

    Serving: 1g | Calories: 48kcal | Carbohydrates: 1g | Protein: 1g | Fat: 4g | Saturated Fat: 2g | Polyunsaturated Fat: 0.3g | Monounsaturated Fat: 1g | Trans Fat: 0.002g | Cholesterol: 13mg | Sodium: 111mg | Potassium: 55mg | Fiber: 0.2g | Sugar: 1g | Vitamin A: 216IU | Vitamin C: 1mg | Calcium: 17mg | Iron: 0.1mg

    Chicken Bacon Ranch Sliders

    April 23, 2024

    Close up of chicken bacon ranch slider being pulled from cutting board.

    These chicken bacon ranch sliders are a quick and filling meal for any hungry kid or adult, and a smaller version of this chicken bacon ranch sandwich! This easy slider recipe is perfect for any family gathering, football party, or holiday potluck!

    Chicken bacon ranch slider being lifted from batch of sliders.

    Game day or dinner time, I’ve got you covered. Sliders are the ultimate comfort food and easy to enjoy – no utensils necessary. This classic combination has shown up in pasta salad recipe often, but now you get to have it in slider form.

    Want to make a whole spread of chicken sliders? That way everyone can have their favorites – like my cheeseburger sliders, or try spicy buffalo sliders or a classic fried chicken sliders. Change things up by scooping chicken salad on pretzel buns.

    [feast_advanced_jump_to]

    Why You’ll Love This Recipe

    • Customize your flavor: With 3 types of cheese, you can use whatever is on hand!
    • Easy prep: Use up leftovers here by making extra chicken with dinner one night or saving some bacon from breakfast. Or, if you have leftover filling from these crack chicken sandwiches, you could make sliders the next night.
    • Ready in a flash: Whether you make these in advance or right before serving, they are really quick to make.

    Ingredients Needed

    I’ve highlighted a couple of ingredients below with some relevant notes. Aside from this, the ingredients needed are pretty basic.

    Labeled ingredients for chicken bacon ranch sliders.
    • Rolls – The sweetness of the Hawaiian rolls pairs nicely with savory dishes. Use other flavors if you like, but find rolls that are all connected in one piece.
    • Chicken – These sliders are only being heated and not long enough to cook from raw. Be sure to use cooked chicken!
    • Bacon – Salty bacon helps amp up the flavor of plain chicken.
    • Ranch – Both the dry mix and prepared dressing are used here for a large burst of flavor.
    • Cheese – Yes! Three types of cheeses all bring their best flavors. Sliced, shredded, and grated are all applied.
    • Butter – You can’t have great flavor or browning if you don’t brush on butter!

    Substitutions

    Sometimes substitutions are necessary because of ingredients that are unavailable or needed for dietary restrictions. Here are some suggestions that can help:

    • Cheese – the types here are just a suggestion – use any types you have on hand and enjoy! However, I do recommend using a sliced cheese on the bottom as it gives the shredded chicken a solid layer underneath.
    • Meat – try out ham, turkey, or chicken deli meat instead of shredded chicken.
    • Topping – add even more ranch by mixing some into the grated Parm on top. You could also try a sprinkle of Italian seasoning instead.

    How to Make Chicken Bacon Ranch Sliders in the Oven

    You can use any brand of rolls, but make sure they are “baked together” into a single mass and not individual rolls.

    *Be sure to see the recipe card below for the full ingredients list & instructions!*

    Steps 1-4 of how to make chicken bacon ranch sliders.

    STEP 1. Slice the bread. Carefully slice the rolls into one slab of tops and bottoms (Image 1). Brush melted butter with ranch seasoning over the bottom half (Image 2).

    Tip: Use a sharp serrated knife and carefully cut through the slab of rolls horizontally. If you try and stand on edge to slice that way you risk the rolls breaking apart.

    STEP 2. Start layering Add sliced Colby jack cheese to cover the rolls (Image 3). Next, add cooked, shredded chicken to cover all of the cheese (Image 4).

    Steps 5-8 of how to make chicken bacon ranch sliders.

    STEP 3. Add flavor. Drizzle prepared ranch dressing over the chicken, and top with crumbled bacon (Images 5 and 6).

    STEP 4. Cheese it up. Add shredded cheese on top before placing the top buns (Image 7). Now brush on melted butter and Parmesan, then bake! (Image 8)

    Sliders with parmesan cheese sprinkled on top of the buns.

    Recipe Pro Tips

    • Serve with dip. These siders are perfect for dipping into your choice of ranch, salsa, or blue cheese dressing.
    • Cooked ingredients. The sandwiches are only cooked long enough to heat through and melt cheese – NOT to cook ingredients from raw. Ensure you are using cooked chicken and bacon to assemble.
    Chicken bacon ranch sliders on baking sheet.

    Recipe FAQs

    What pan can I use to bake sandwiches?

    The slab of rolls will also fit in a 9×13 baking dish to help catch any butter or melted cheese. Feel free to use any sort of dish or pan to cook these sliders. I always recommend lining with parchment paper for easy removal. This way you can pull the entire set of sandwiches from the pan for easy slicing.

    Can I use precooked bacon in chicken bacon ranch sliders?

    Definitely! If you aren’t a fan of cooking bacon, feel free to use microwaveable slices (just cook and crumble) or even the bag of real bacon crumbles. Anything works here and it’s all about keeping it easy.

    What to Serve with Shredded Chicken Bacon Ranch Sliders

    Serve up chips or air fryer sweet potato fries with these sliders. A quick green salad can round out your dinner, or serve these alone as part of a game day appetizer spread.

    Chicken bacon ranch sliders being pulled apart with cheese stretching.

    Storage

    You can make these several hours in advance, and refrigerate. Perform all the steps except brushing butter on top of the rolls. Pull out of the fridge while the oven preheats, then add topping and bake as directed.

    You can reheat leftovers in the oven, but keep in mind they may have soggy bottoms from resting!

    Chicken bacon ranch sliders stacked on top of one another.

    More Slider Recipes You’ll Love

    • A close up photo of a stack of breakfast slider sandwiches
      Hawaiian Roll Breakfast Sliders
    • Salmond slider with garlic aioli, tomato and lettuce.
      Salmon Sliders
    • Turkey slider sitting on top of other turkey sliders with cheese.
      Turkey Sliders
    • Sloppy joe sliders with melted cheese on white marble cutting board
      Sloppy Joe Sliders

    Did you make this? I’d be so grateful if you left a “star” rating below to let me know what you thought! Then, the next time you need a quick and easy recipe, come back to Fantabulosity to browse all of my easy recipes!

    Recipe

    Close up of chicken bacon ranch slider being pulled from cutting board.
    Print Pin
    5 from 1 vote

    Chicken Bacon Ranch Sliders

    Chicken Bacon Ranch Sliders: These sliders are a quick and filling meal for the family and are a great appetizer for game day.
    Course Appetizer, Dinner
    Cuisine American
    Prep Time 15 minutes minutes
    Cook Time 25 minutes minutes
    Total Time 40 minutes minutes
    Servings 12
    Calories 298kcal
    Author Jessica Burgess

    Ingredients

    • 12 Hawaiian rolls
    • 6 tablespoons butter
    • 2 tablespoons dry ranch seasoning mix
    • 6 slices Colby Jack cheese
    • 2-3 cups cooked shredded chicken
    • ¼ cup ranch dressing
    • ½ cup cooked bacon crumbled
    • ⅓ cup shredded sharp Cheddar cheese
    • 1 teaspoon grated Parmesan cheese

    Instructions

    • Preheat oven to 325°F.
    • Line a small baking sheet with parchment paper.
    • Place Hawaiian rolls on a cutting board. Without separating the rolls individually, use a serrated knife and slice the buns across (making tops and bottoms). The tops of your buns will be in one layer, and the bottoms will be in their own separate layer.
    • Place the bottom layer of your rolls onto the parchment paper.
    • Melt the butter in microwave-safe bowl for 1 minute, stirring halfway.
    • Add the dry ranch seasoning to the melted butter and stir to combine.
    • With a pastry brush, cover the bottom layer of buns with the butter mixture (using about half of the mixture).
    • Place your sliced Colby Jack cheese over the butter layer.
    • Cover the cheese layer with your shredded chicken.
    • Drizzle the ranch dressing over the chicken evenly.
    • On top of the ranch dressing layer, sprinkle the crumbled bacon evenly.
    • Top with the shredded sharp Cheddar cheese.
    • Place the tops of the Hawaiian rolls over the shredded cheese layer.
    • With the pastry brush, cover the tops of the rolls with the remaining butter mixture.
    • Sprinkle with grated Parmesan.
    • Cover the rolls loosely with aluminum foil. Bake at 325°F for 15 minutes. Remove the foil and continue to cook the sliders for 8-10 minutes or until warmed throughout and the tops are golden. Slice the sliders and serve warm. (Sprinkle with some chopped parsley for an optional garnish.)

    Notes

    • Can I prep the chicken bacon ranch sliders ahead of time? Sure! Prepare the sandwiches and place the top of the Hawaiian rolls over the cheddar cheese layer. Do not add the butter mixture. Refrigerate. When ready to cook, finish the remaining steps, starting with the butter mixture.

    Nutrition

    Calories: 298kcal | Carbohydrates: 17g | Protein: 15g | Fat: 19g | Saturated Fat: 9g | Polyunsaturated Fat: 2g | Monounsaturated Fat: 5g | Trans Fat: 0.2g | Cholesterol: 65mg | Sodium: 570mg | Potassium: 103mg | Sugar: 4g | Vitamin A: 362IU | Calcium: 128mg | Iron: 0.5mg

    Bagel Breakfast Sliders

    April 20, 2024

    Mini bagel breakfast sliders stacked on top of one another on a white plate.

    Yum! This take on bagel breakfast sliders has so much flavor. Make these ahead for a quick grab-and-go breakfast, and rotate this sausage gravy breakfast pizza for an easy breakfast recipe too!

    Mini bagel breakfast sliders stacked on top of one another on a white plate.

    These mini bagels are loaded with bacon, eggs, and two types of cheese! What more could you ask for? I love having a handy sandwich recipe, especially on busy mornings. These are also perfect for breakfast for dinner!

    You can also make up breakfast sliders using Hawaiian rolls! This way you can use whatever ingredients you have on hand. Hungry? Make traditional breakfast sandwiches on brioche rolls. And if you’re looking for something really new and unusual, take your sandwich fillings and wrap them up in breakfast egg rolls.

    [feast_advanced_jump_to]

    Why You’ll Love This Recipe

    • It uses a few ingredients: You likely always have these breakfast staples on hand so it’s easy to layer up some sandwiches.
    • Make-ahead recipe: Keep reading, I’ll show you how to wrap these up ahead of time for busy mornings.
    • Everyone’s favorite: Bacon and eggs are a breakfast staple for a reason – stuff them inside cheesy bagels for a fun new twist!

    Ingredients Needed

    Here’s what you’ll need to make these awesome bagel breakfast sandwiches!

    Ingredients sitting on counter to make mini bagel breakfast sandwiches, that are labeled with their names in text.
    • Mini Bagels – I used plain, but you can feel free to use everything or onion flavored for even more fun! I have even seen Hawaiian bagels at some stores. You could even make a bigger version and make this homemade bagel recipe.
    • Eggs – Scrambled eggs are super quick and easy to make, and they are easy to eat inside the bagels. Have more eggs on hand? Whip up this egg salad recipe for lunch.
    • Cheese – I use cream cheese on the bagels, which helps the eggs to stick. Then, I cover everything with a layer of cheddar cheese because I always say more cheese is better!
    • Bacon – Use your favorite, whether it’s thick, thin, maple, or smoked. Cook it nice and crisp so it crumbles. I think it’s so much easier to have crumbled bacon rather than slices inside a sandwich.
    • Seasoning – To really gives these sandwiches ample flavor, I’m topping the plain bagels with everything bagel seasoning. You can also use poppy seeds, sesame seeds, or minced onions. Feel free to skip this if you use flavored bagels.

    *Be sure to see the recipe card below for the full ingredients list & instructions!*

    How to Make Mini Bagel Breakfast Sandwiches

    Image collage showing first steps of how to make breakfast sliders.

    STEP 1. Make eggs. Whisk the eggs and season well before adding to a hot pan and scrambling.

    STEP 2. Prepare bagels. Spread a thin layer of cream cheese on the bagel bottoms and nestle them into a baking dish. Carefully add cooked eggs on top of each bagel half.

    Final steps for making bagel breakfast sliders.

    Tip: Use the cream cheese to your advantage – it will help the scrambled eggs stick to the sandwiches so they aren’t falling all over!

    STEP 3. Add layers. Add crumbled bacon over the eggs, and then top with a layer of shredded cheddar cheese.

    STEP 4. Top and bake. Place the bagel tops over the filling, then brush with melted butter. Sprinkle on your desired topping and bake!

    Recipe Pro Tips

    • Allow to fully cool. Making these ahead of time to freeze? Make sure they cool off completely before wrapping tightly.
    • Cooked ingredients. Basically when we bake the sandwiches it is just to melt the cheese and heat the sandwiches through. Ensure the eggs and bacon are cooked to your desired finished product before adding to the bagels.
    Baked bagel sliders in baking dish.

    Recipe FAQs

    How do I make bagel sliders ahead of time?

    These work amazing as a freezer meal. Allow bagel sliders to cool completely. Wrap each bagel individually in cling wrap (parchment paper will also work) and then place wrapped sliders in freezer-safe container.

    How do I reheat sliders?

    Leftovers can be stored in an airtight container in the refrigerator for 3-4 days, gently reheating in the microwave for about 15-20 seconds. (If you cook them too long in the microwave, the bagels can become very tough and chewy.)
    To thaw/cook frozen bagel sliders, remove plastic wrapping from one slider. Wrap the bagel slider using a damp paper towel, and place the slider on a plate, and in to the microwave and cook for 30 seconds.

    What else can I put in sliders?

    Feel free to layer on Canadian bacon instead of regular bacon slices! It’s just like layering deli meats in our appetizer sliders. If you love veggies, feel free to add diced peppers or onions to the eggs as well!

    Bagel breakfast sliders stacked on top of one another on a plate.

    What to Serve with Breakfast Sliders

    Hashbrown patties are always a great breakfast side dish idea, and so on breakfast potatoes, made in the air fryer! Or if you’re feeling super fun, whip up a batch of this chorizo gravy to dip the sliders in!

    Storage

    If freezing, cool completely before wrapping each sandwich tightly in plastic wrap. This way the sandwiches will freeze individually inside a bag or container.

    Bagel breakfast sliders packaged up in a freezer-safe bag for freezing.

    More Breakfast Recipes You’ll Love

    • A close up of a slice of biscuit and gravy casserole.
      Biscuit and Gravy Casserole
    • Baking pan of strawberry cinnamon rolls.
      Strawberry Sweet Rolls
    • sausage and egg casserole being lifted out of baking dish
      Sausage and Egg Casserole
    • Blueberry waffles on a plate, drenched in syrup.
      Blueberry Waffles Recipe

    Did you make this? I’d be so grateful if you left a “star” rating below to let me know what you thought! Then, the next time you need a quick and easy recipe, come back to Fantabulosity to browse all of my easy recipes!

    Recipe

    Mini bagel breakfast sliders stacked on top of one another on a white plate.
    Print Pin
    Be the first to rate!

    Bagel Breakfast Sliders

    Yum! This take on breakfast sliders has so much flavor. Make these ahead for a quick grab and go breakfast.
    Course Breakfast
    Cuisine American
    Prep Time 20 minutes minutes
    Cook Time 30 minutes minutes
    Servings 10 sandwiches
    Calories 359kcal
    Author Jessica Burgess

    Ingredients

    • 10 mini bagels
    • 8 eggs
    • 8 slices bacon cooked thoroughly and chopped in to small pieces
    • 4 Tablespoons cream cheese
    • 1 ½ – 2 cups shredded cheddar cheese
    • 3 Tablespoons melted butter
    • 2 Tablespoons everything but the bagel seasoning
    • pinch salt
    • pinch pepper

    Instructions

    • Preheat oven to 350 F.
    • In a medium size bowl, add cracked eggs, salt, and pepper and whisk.
    • In a medium-sized, non-stick skillet, pour in the eggs and cook over low-medium heat, stirring often, until eggs become cooked solid and scrambled. (About 3-4 minutes.) Remove from heat.
    • Separate bagels in to top and bottom pieces, and place bottom pieces in a 9×13 baking dish. Spread about a teaspoon or so of cream cheese on each bottom bagel half.
    • Pour cooked, scrambled eggs on top of cream cheese bagels.
    • Next, place cooked bacon pieces on top of the eggs.
    • Sprinkle the shredded cheese on top of the bacon pieces.
    • Place tops of bagel halves on top of the cheese.
    • Brush tops of bagels with melted butter (you may not need to use all of the butter) and sprinkle the Everything But the Bagel Seasoning on top of the buttered bagels.
    • Place baking dish in preheated oven, and bake bagel sliders for about 20 minutes or until it looks as if the cheese has melted the tops of the bagels have turns a slightly golden brown.

    Notes

    • These work amazing as a freezer meal. Allow bagel sliders to cool completely. Wrap each bagel individually in cling wrap (parchment paper will also work) and then place wrapped sliders in freezer-safe container.

    Nutrition

    Calories: 359kcal | Carbohydrates: 24g | Protein: 15g | Fat: 22g | Saturated Fat: 10g | Polyunsaturated Fat: 3g | Monounsaturated Fat: 7g | Trans Fat: 0.2g | Cholesterol: 174mg | Sodium: 704mg | Potassium: 148mg | Fiber: 1g | Sugar: 0.4g | Vitamin A: 549IU | Calcium: 155mg | Iron: 1mg

    Grinder Salad

    April 16, 2024

    Close up of grinder salad in a white bowl, ready for eating.

    Who doesn’t love a classic grinder sub sandwich? Sometimes though, you want all that amazing filling without the bread. Enter – the Grinder Salad! I love salad recipes, and this one is no exception.

    Grinder salad in white bowl, sitting on counter.

    I am a huge fan of a big crisp salad! I know not everyone is, so I appreciate that “salad” covers a lot of different foods. The ham is great in this grinder salad, but if you prefer less lettuce I’d recommend a classic diner ham salad.

    If you’re big on the Italian flavors here, then an Italian Chopped Salad is also the perfect idea! You could make both and serve them up at a potluck. Adding pasta to your salad is a great way to stretch both salad AND pasta – so I recommend a Caesar chicken pasta salad as the best of both worlds.

    [feast_advanced_jump_to]

    Why You’ll Love This Recipe

    • Comes together quickly: This salad tastes amazing right when you mix it, no need to wait.
    • Customizable: I tend to a creamy Italian dressing, but you can swap in your best vinaigrette!
    • Get kids cooking: There aren’t any “hard” ingredients here, so it’s perfect to let kids practice with a knife or even kitchen scissors.

    Ingredients Needed

    Here’s what you’ll need to make this Italian grinder salad.

    Labeled ingredients for grinder salad on kitchen counter.
    • Lettuce – Use iceberg or romaine, whichever you prefer. I think romaine has a bit more flavor, but iceberg has that classic crunch. You can generally find already chopped Romaine, too, to save even more time!
    • Meat – Deli ham and salami are the classic Italian meats, but you can adjust this however you like! Prefer turkey – I say, why not? Try pepperoni in place of salami.
    • Cheese – Provolone is a mild cheese but not boring. And fresh Parmesan has a “bite” to it. Use Swiss and Asiago for fun swaps! You could also small dice a block of cheese instead of using slices.
    • Pepperoncini – These mild peppers just scream Italian cuisine, so don’t skip them! Banana peppers are also tasty here.
    • Salad Dressing – I made my own by adding lots of seasoning and spices to mayo. Feel free to use your own family recipe or grab a bottle of creamy Italian dressing at the store. You can also use a regular Italian or vinaigrette of choice.

    *Be sure to see the recipe card below for the full ingredients list & instructions!*

    How to Make a Chopped Grinder Salad

    Cut, mix, toss, and serve!

    Grinder salad process images, showing how to make the recipe in steps.

    STEP 1. Make dressing. If you are making your own dressing, do that first so the flavors marry while you continue.

    STEP 2. Chop everything. Get going on practicing your knife skills! Cut everything into similar bite-sized pieces so that you can easily get many flavors on the fork at once.

    Tip: Prefer less mayo? Use less mayo and drizzle in some olive oil to thin things out and make it less of a creamy dressing.

    Close up of grinder salad in white bowl with serving serving utensils.

    STEP 3. Grab a bowl. Add the chopped ingredients to your biggest salad bowl.

    STEP 4. Dress and toss. Spread the dressing over the salad and give it a great big toss!

    Recipe Pro Tips

    • Use a new bowl. Use your biggest bowl so you have room to evenly toss the ingredients without making a mess. Then, transfer the tossed salad to a clean bowl that fits the salad juuuust right. This gives you a beautiful presentation that is worth the extra dirty dish!
    • Keep cold. For food safety, don’t let this salad sit out too long. Depending on fridge space, it might be easier to keep the salad and dressing separate in smaller containers, and then toss right before serving.
    Bite of grinder salad on a fork, next to bowl of salad.

    Recipe FAQs

    Can I lighten up the dressing?

    For less fat and more protein, try swapping out half or all of the mayo for plain Greek yogurt! It is slightly thicker than mayo, so you may need to play around a bit with your ratios. Also try adding a touch of olive oil to thin things out if necessary.

    How should I store leftovers?

    For optimal freshness, it is recommended to enjoy this salad immediately. If storing for later, add the dressing separately and store the salad in an airtight container. This way, the salad should last for a couple of days, and you can add the dressing when ready to eat.

    What alternatives can I use for creamy Italian dressing?

    Feel free to use various salad dressings as alternatives. Regular Italian dressing or vinaigrette are both suitable choices. Experiment with different dressings to find the flavor that suits your preference.

    Meal prep grinder salad in a container.

    Storage for Meal Prep

    Look at this cute idea! These little containers are perfect for meal prepping. Add your salad ingredients in a couple of these and put the dressing separately in little cups. Then you are all set with packed lunches for the week!

    What to Serve with Grinder Salad

    I personally love a big hunk of French bread or Italian bread with butter next to my salad. Yes, I know we are making a salad without the bread – but if you’re still craving bread then go for it! You can also add croutons to the salad if you prefer.

    More Salad Recipes You’ll Love

    • Summer Side Salad fantabulosity.com
      Summer Side Salad
    • Curry chicken salad with grapes in a white bowl.
      Curry Chicken Salad
    • side salad on white plate drizzled with ranch
      The BEST Side Salad Recipe
    • Carrot salad in small round bowl, by blue fabric napkin.
      Carrot Salad

    Did you make this? I’d be so grateful if you left a “star” rating below to let me know what you thought! Then, the next time you need a quick and easy recipe, come back to Fantabulosity to browse all of my easy recipes!

    Recipe

    Close up of grinder salad in a white bowl, ready for eating.
    Print Pin
    Be the first to rate!

    Grinder Salad

    All the best parts of a grinder sandwich – without the bread!
    Course Salad
    Cuisine American
    Prep Time 15 minutes minutes
    Cook Time 15 minutes minutes
    Total Time 30 minutes minutes
    Servings 6
    Calories 509kcal
    Author Jessica Burgess

    Ingredients

    Salad

    • 1 head iceberg lettuce or Romaine lettuce shredded
    • ½ red onion chopped
    • ¾ cup cherry tomatoes halved
    • ½ cup pepperoncini sliced
    • 6 ounces deli ham sliced
    • 4 ounces salami sliced
    • 6 slices provolone cheese
    • ¼ cup shredded parmesan cheese
    • Salad dressing homemade or a bottle
    • Croutons optional

    Salad Dressing

    • 1 cup mayonnaise
    • 2 tablespoons red wine vinegar
    • 2 teaspoons Italian seasoning
    • ½ teaspoon salt
    • ½ teaspoon black pepper
    • ½ teaspoon garlic powder

    Instructions

    Dressing:

    • In a bowl whisk together mayonnaise, red wine vinegar, Italian seasoning, salt, pepper, and garlic powder. Cover and place in the refrigerator. This can be done up to two days in advance.

    Salad:

    • Prep all the ingredients by making sure everything is cut into bit-sized pieces.
    • In a large bowl add the shredded lettuce.
    • Add the cherry tomatoes, pepperoncini, ham, salami, provolone cheese, and parmesan on top of the lettuce.
    • Drizzle dressing over the salad ingredients and gently toss the salad ingredients together with the dressing.
    • Serve and enjoy immediately!

    Notes

    • Use the included homemade dressing, or about 1 cup from a bottle of ready made dressing. Regular Italian or a vinaigrette both work nicely.

    Nutrition

    Calories: 509kcal | Carbohydrates: 7g | Protein: 18g | Fat: 45g | Saturated Fat: 12g | Polyunsaturated Fat: 18g | Monounsaturated Fat: 13g | Trans Fat: 0.1g | Cholesterol: 64mg | Sodium: 1413mg | Potassium: 413mg | Fiber: 2g | Sugar: 3g | Vitamin A: 814IU | Vitamin C: 16mg | Calcium: 234mg | Iron: 2mg

    The BEST Bruschetta Recipe

    April 10, 2024

    Bruschetta slice sitting on wooden cutting board.

    Bruschetta Recipe – The BEST recipe there is! Whether you’re serving this on a slice of bread, or on top of chicken, you’ll love the fresh flavors in this easy to make recipe!

    Bruschetta slices on a wooden cutting board, surrounded by fresh parsley.

    I have a “go-to” appetizer recipe when I’m having guests over, and you’re lookin’ at it.

    Easy Bruschetta Recipe

    Bruschetta is one of the quickest & easiest appetizers to throw together when we are having people over, and if you’re having people over, don’t forget to save my free party planning checklist, to make sure you don’t forget the most important things!

    Whether a small dinner party or a large crowd, this recipe is a hit. It’s classy, easy to pick up and eat, and the guests drool over its deliciousness.

    I mean, look at this comment that sweet Kimberly said below in the comments on this recipe:

    “Great for my Law School Study Group and Brunch At My Brother's!! Everyone raves about it. Each person ate no less than 4-6 each and thought I catered it. It was so pretty and so tasty!! I am your BIGGEST FAN & that of the BRUSCHETTA too, of course!!! Thank you so much. Please keep sharing!! We need you!!!”

    The best part?  It gives an impressive appearance that looks like it took a long time to prepare.
    (But it doesn’t!)

    More Easy Appetizer Recipes You’ll Love:

    • The BEST Guacamole Recipe
    • Easy Pico de Gallo
    • Strawberry Bruschetta Recipe

    What is Bruschetta?

    Well if you ask Wikipedia, it pretty much says that it’s toasted bread with olive oil, garlic, and tomatoes. Or you can even do a “breakfast” version and do an avocado tomato “bruschetta” toast!

    The BEST Bruschetta Recipe

    But if you ask me, the best bruschetta consists of a little butter, French bread, a little cheese (mozzarella, provolone, parmesan or whatever your favorite choosing is) spices and fresh herbs. Here’s what you’ll need:

    (Full recipe card and instructions below!)

    • Roma tomatoes
    • Olive oil
    • Fresh parsley
    • Fresh basil
    • Cloves of garlic
    • Salt (I love using Kosher Salt, but table salt would work just fine)
    • Crushed red pepper flakes (to add a slight kick)
    • Black pepper
    • Shredded parmesan cheese (grated works too)
    • French baguette (or make this Italian bread recipe as it would be delicious too!) (
      If buying store-bought, I use the mini loaves, for a smaller “bite-size” appetizer.)
    • Butter
    Ingredients to make bruschetta sitting on counter.

    Some love balsamic vinegar drizzled across their bruschetta, so feel free to do so… but I’m not a fan, so I leave that off and I’ve NEVER heard one of my guests wish they had it.

    How to Make Bruschetta

    It’s easy and perfect for any beginner in the kitchen! (Full recipe card and instructions at the bottom of this post!)

    Toast Bread:

    You’ll start by slicing your bread in to small pieces – about a half an inch thick but don’t measure too hard. Just a good size for biting.

    Slice bread in to small pieces.

    Toasting your French baguette with the butter and melted cheese. Set aside and let cool. (If you have any leftover bread, you should consider making cheese avocado toast the next morning!)

    Melted cheese on small pieces of toasted bread.

    Chop and Mix Tomato Bruschetta Ingredients:

    While cooling, this is the perfect time to chop and combine the ingredients for the bruschetta topping.

    Bruschetta topping ingredients in a glass bowl.

    Easily Assemble Bruschetta:

    Spoon a tablespoon or so of the bruschetta mixture on top of the golden brown toast.

    TIP: Do not top bread with bruschetta mixture until right before serving, so it keeps from getting soggy!

    Bruschetta complete and ready to eat, on a white platter.

    Tip for Tomato Bruschetta

    When it comes to the tomatoes, although it’s tempting to make ahead, refrigerating the tomato bruschetta mixture is not recommended. Refrigerating really takes the flavor out of the tomatoes.

    “Can I Use Dried Herbs?”

    You can, but if you’re able… the fresh herbs give this bruschetta recipe the BEST flavor.

    Bruschetta Chicken

    One of my favorite chicken recipes is the Salt & Pepper Chicken Bites that I shared with you. If you’re looking for low-carb and keto recipes, consider combining the tomato bruschetta mixture with the salt & pepper chicken bites for a fresh, quick and delicious dinner!

    More Easy Appetizer Recipes

    If you’re hosting and looking for more recipes to serve your guests, you’re going to LOVE these bacon-wrapped dates! The saltiness of the bacon, sweetness of the dates and the creaminess of the cheese, all combine to make a bite-size flavor that’s perfect for guests!

    Rate This Recipe

    Did you love it as much as we do?! We’d love to hear from you and see your “star rating” in the recipe card above!

    For more, easy recipes, head to the archives and pin your favorites to your Pinterest boards to have them for your meal planning!

    Recipe

    Bruschetta slice sitting on wooden cutting board.
    Print Pin
    4.28 from 33 votes

    Easy Bruschetta Recipe

    Easy Bruschetta Recipe – The BEST + So Addicting: Whether you’re serving this on a slice of bread, or on top of chicken, you’ll find this one of the best bruschetta recipes there is!
    Course Appetizer
    Cuisine Italian
    Prep Time 10 minutes minutes
    Cook Time 1 minute minute
    Total Time 11 minutes minutes
    Servings 10 servings (20 bruschetta bites)
    Calories 130kcal
    Author Jessica Burgess

    Ingredients

    Toasted Bread:

    • 1 French baguette sliced into ½ inch slices (I use the mini loaves, for a smaller “bite-size” appetizer.)
    • 2 Tablespoons butter for spreading not necessary but recommended
    • 5 slices provolone cheese cut into fourths, can substitute with another white cheese

    Bruschetta:

    • 4 Roma tomatoes chopped, (or other type of tomato is fine!)
    • 3 Tablespoons olive oil
    • 2 Tablespoons fresh parsley minced
    • ¼ cup fresh basil minced
    • 3 cloves garlic minced and chopped
    • ⅛ teaspoon salt I love using Kosher Salt, but table salt would work just fine
    • ⅛ teaspoon crushed red pepper flakes or to taste
    • ⅛ teaspoon black pepper
    • ½ cup shredded parmesan cheese (grated works too)

    Instructions

    • Spread a small dab of butter on sliced baguettes, and top each baguette with a slice of the quartered cheese.
    • Place the baguettes on an ungreased baking sheet, and broil in the oven for 1 minute (or until the cheese is melted, and the bread is slightly toasted.)
    • Combine all ingredients for bruschetta.
    • Top each baguette slice with about a Tablespoon of the tomato-herbed mixture, and serve immediately!

    Video

    Notes

    Make-Ahead: Although tempting, do not refrigerate the tomato-bruschetta mixture. The tomatoes lose flavor.
    Fresh is Best: Use fresh herbs for the ultimate fresh taste!

    Nutrition

    Serving: 2bruschetta bites | Calories: 130kcal | Carbohydrates: 14g | Protein: 4g | Fat: 6g | Saturated Fat: 1g | Cholesterol: 3mg | Sodium: 264mg | Potassium: 98mg | Vitamin A: 350IU | Vitamin C: 4.9mg | Calcium: 85mg | Iron: 0.9mg

    Bacon on George Foreman Grill

    April 8, 2024

    Cooked bacon on the George Foreman Grill.

    How to Cook Bacon on the George Foreman Grill: I love bacon – but what I don’t love is the mess of cooking it! Keep the grease contained by cooking up your bacon on a George Foreman Grill and watch it turn out perfectly delicious.

    Cooked bacon on George Foreman Grill.

    I’ve already showed how to cook bacon in the air fryer, and I wanted to explore what other great ways there are.

    If you don’t eat pork, you can easily cook up turkey bacon in the oven as well. Any way you slice it, adding protein to your morning, or with breakfast for dinner, is the perfect pick-me-up!

    [feast_advanced_jump_to]

    Why You’ll Love This Recipe

    • New uses: How many of you have a George Foreman around that you aren’t utilizing? Here’s a great way to pick it back up!
    • Choose your doneness: It’s really easy to keep an eye on things here to achieve your favorite level of crispiness.
    • Ready in only 10 minutes: Most bacon will be done in 10 minutes, depending on thickness.

    Ingredients Needed

    I’ve highlighted a couple of ingredients below with some relevant notes. Aside from this, the ingredients needed are pretty basic.

    Package of bacon, sitting in front of George Foreman Grill
    • Bacon – Thick or thin, smoked, peppered, the sky’s the limit. Whatever bacon you enjoy (or whatever is on sale this week) will work here.

    Equipment

    Much like the various air fryers out there, there are several types of George Foreman grills. Some have temperature controls and some don’t. Mine is a larger one with a temperature dial, so that’s what I’m using to walk you through this method.

    How to Make Indoor Grilled Bacon

    You can make bacon ahead and reheat in the microwave. You can also cook it up right when you need it since it’s so fast!

    *Be sure to see the recipe card below for the full ingredients list & instructions!*

    George Foreman preheated to 425 degrees.

    STEP 1. Preheat grill. I’m going with 425° to achieve my perfect crispness.

    Tip: If your grill is narrow, go ahead and slice your bacon in half so it fits!

    Raw bacon on George Foreman Grill.

    STEP 2. Line it up. Add bacon in a single layer. It’s ok if it touches some as it will shrink up and apart. Just don’t overlap too much or they will fuse together when cooking.

    Cooked bacon on white platter, on top of paper towel.

    STEP 3. Drain. Once cooked, remove to a paper-towel-lined plate to drain off any excess grease.

    Recipe Pro Tips

    • Roll your bacon. Open the package, and gently roll the bacon up from the short edge. This will help the slices separate easily!
    • Correct temperature. Allow the grill to fully preheat before cooking.

    Recipe FAQs

    Can you make bacon on the George Foreman?

    It’s so easy – because there’s a lid, splatters are contained. Most models also have a convenient drip tray for catching grease. Remember to check the tray between adding new slices of bacon, to be sure it doesn’t overflow.

    How long do you grill bacon for?

    Start checking at 8 minutes if you like your bacon soft, or if it’s a thinner cut. Try at 10-12 for crispy bacon. And, there’s no need to flip! Your grill is cooking and pressing from both sides!

    What temperature do you cook bacon on the George Foreman grill?

    I like 425°. That seems to be the sweet spot for cooking through to crispy without burning any edges.

    What to Serve with Grilled Bacon

    Of course, you can easily serve this alongside scrambled eggs or pancakes. Add to breakfast sandwiches, breakfast egg rolls, or burritos.

    Storage

    Once your package of bacon is open, I recommend cooking it all at once. You don’t want to have to deal with raw meat in the fridge.

    Store leftovers in an airtight container for up to 3 days. You can easily reheat a slice for 10-15 seconds on paper towel in the microwave.

    More Bacon Recipes You’ll Love

    • close up of bacon ranch pasta salad in gray bowl
      Easy Bacon Ranch Pasta Salad
    • Bacon Wrapped Asparagus
      Bacon Wrapped Asparagus
    • Bacon Wrapped Dates with Blue Cheese
      Bacon Wrapped Dates with Blue Cheese
    • Bacon Egg and Cheese
      Bacon Egg and Cheese Sandwich

    Have a smoker? This smoked candied bacon is such a delicious treat.

    Did you make this? I’d be so grateful if you left a “star” rating below to let me know what you thought! Then, the next time you need a quick and easy recipe, come back to Fantabulosity to browse all of my easy recipes!

    Recipe

    Cooked bacon on the George Foreman Grill.
    Print Pin
    5 from 1 vote

    Bacon on George Foreman Grill

    Keep the mess contained by cooking bacon inside a George Foreman grill for perfectly delicious bacon!
    Course Breakfast
    Cuisine American
    Cook Time 10 minutes minutes
    Total Time 10 minutes minutes
    Servings 8 servings
    Calories 230kcal
    Author Jessica Burgess

    Equipment

    • George Foreman Grill

    Ingredients

    • 1 package bacon your choice of thick or thin

    Instructions

    • Preheat the George Foreman grill to 425°F.
    • Add bacon slices in a single layer to the grill and close the lid.
    • Check bacon starting at 8 minutes for floppy slices, or up to 12 minutes for crispy.

    Notes

    • Thicker bacon will take longer to cook.
    • If your grill is narrow, slice raw bacon in half before cooking.

    Nutrition

    Calories: 230kcal | Carbohydrates: 1g | Protein: 7g | Fat: 22g | Saturated Fat: 7g | Polyunsaturated Fat: 4g | Monounsaturated Fat: 10g | Trans Fat: 0.1g | Cholesterol: 36mg | Sodium: 366mg | Potassium: 109mg | Vitamin A: 20IU | Calcium: 3mg | Iron: 0.2mg

    Rotel Pasta

    April 7, 2024

    Close up of Rotel pasta in skillet, ready for serving.

    Rotel Pasta Recipe: Rotel dip is a crowd-pleaser on game day, and you can easily turn it into a full pasta dish with the same great flavors, without using Velveeta, and in only 25 minutes! Why wouldn’t pasta combined with a delicious cheese dip be amazing?

    Close up of Rotel pasta in skillet.

    Everyone loves appetizers, so why not turn them into a meal the family will rave about? Keeping on with the “Rotel” flavors, this Chicken Spaghetti with Rotel is incredible as well, and a family-favorite.

    Similar to Taco Pasta, you can customize the heat level in this Rotel pasta.

    If you’re looking for other family favorites, a cream cheese pasta is easy for those that don’t like heat. For the traditionalists, a sausage pasta bake or this baked ravioli is filled with cheesy goodness.

    [feast_advanced_jump_to]

    Why You’ll Love This Recipe

    • Seasoned but not spicy: Rotel has a very mild heat, but you can always use plain diced tomatoes or adjust the seasoning to your taste.
    • Make-ahead recipe: Easily reheat this on the stovetop whether you are using leftovers or making the entire meal in advance.
    • Ready in only 30 minutes: The perfect weeknight meal! Cook the pasta while you brown the sausage and dinner is ready in no time.

    Ingredients Needed

    Here’s what you’ll need to make this Cheesy Rotel Pasta.

    Labeled ingredients for Rotel pasta on counter.
    • Pasta – I love how penne looks in this dish, but any short cut will work. Use what you have on hand! I also love rotini or cavatappi.
    • Ground sausage – Ground sausage makes for a great flavor, but if you don’t eat pork you can also try ground beef or turkey.
    • Cheese – I combined full fat cream cheese with shredded cheddar. You could also use 4 oz of velveeta in place of the cheddar.
    • Milk – Whole milk is perfect here, but you may also use half and half for a richer taste. And if all you have on hand is 2% then there’s no need to buy something special!

    *Be sure to see the recipe card below for the full ingredients list & instructions!*

    How to Make Rotel Pasta

    I love to make easy pasta dishes like this where you simply cook the parts and combine to serve!

    Image collage of process steps for making Rotel pasta recipe.

    STEP 1. Cook sausage. Cook the sausage in a skillet until completely cooked through.

    STEP 2. Cook pasta. Follow the box directions to cook the pasta.

    Tip: Start with softened cream cheese so it combines better. Especially if using full-fat it will melt down into a nice and creamy mixture.

    Rotel pasta in skillet, ready for eating.

    STEP 3. Make sauce. In your sausage skillet, combine the sauce ingredients until smooth.

    STEP 4. Combine. Add the sausage and pasta to the sauce and stir to combine, then serve!

    Recipe Pro Tips

    • Don’t overcook. Make sure your pasta isn’t over cooked so it doesn’t turn to mush. Especially if trying the oven or crockpot mentioned below, you may even want to cut a minute off the pasta cooking time.
    • Full fat. I always recommend full fat cream cheese and whole milk. This ensures your sauce has a smooth, creamy texture. You can reduce the fat if you’d like, but keep in mind it may change the texture.
    Close up of Rotel pasta in serving bowl, ready for eating.

    Recipe FAQs

    What if I can’t find Rotel?

    Feel free to mix canned diced tomatoes with diced green chiles. You can mix one can of each and then use half in this recipe and freeze the other half for another time!

    Can I cook this in other ways?

    This recipe is really versatile. After browning the sausage, stir it with the sauce and cooked pasta and bake in a dish at 350°F for about 20 minutes. You can also cook this mixture in a crockpot for 2 hours on low.

    What to Serve with Rotel Pasta

    I love a crisp green salad with a rich pasta dish to balance out the meal.

    Storage

    • To store. Once it's cooled to room temperature, seal the saucy pasta in an airtight container. You can store it in the fridge for up to 4 days or in the freezer for up to 3 months. 
    • To reheat. Allow the pasta to thaw in the fridge (if applicable) before adding it to a saucepan along with a little broth or milk. Cook over medium heat, stirring consistently, until heated through. You could also reheat this pasta in a baking dish, covered, in the oven at 350°F for 15-20 minutes or in the microwave in 30-second intervals, stirring between each, until heated through. 

    More Pasta Recipes You’ll Love

    • Taco Pasta Recipe
    • Close-up of chicken and broccoli pasta with creamy sauce.
      Chicken and Broccoli Pasta
    • Baked Feta Pasta Recipe
      Baked Feta Pasta Recipe
    • Instant Pot Buffalo Chicken Pasta

    Did you make this? I’d be so grateful if you left a “star” rating below to let me know what you thought! Then, the next time you need a quick and easy recipe, come back to Fantabulosity to browse all of my easy recipes!

    Recipe

    Close up of Rotel pasta in skillet, ready for serving.
    Print Pin
    Be the first to rate!

    Rotel Pasta Recipe

    This pasta recipe is like your favorite appetizer dip in pasta form! So quick and easy for a weeknight and the kids love it too!
    Course Main Course
    Cuisine American
    Prep Time 10 minutes minutes
    Cook Time 15 minutes minutes
    Total Time 25 minutes minutes
    Servings 5
    Calories 634kcal
    Author Jessica Burgess

    Ingredients

    • 2 cups penne pasta
    • 1 pound ground sausage
    • ½ tablespoon minced garlic
    • 2 teaspoon onion powder
    • 1 tablespoon Italian seasoning
    • ¼ cup whole milk
    • 10 oz Rotel drained
    • 6 oz cream cheese
    • ½ cup shredded cheddar cheese
    • 1 ½ teaspoons smoked paprika
    • ½ teaspoon salt
    • ½ teaspoon pepper
    • Chopped parsley for garnish

    Instructions

    • Heat the olive oil over medium-high heat in a skillet. Add the sausage and saute until nice and brown and cooked through, breaking it up with a wooden spoon as you go. Drain the grease from the meat, remove it from the skillet, and set aside.
    • Cook the pasta following the package instructions, and then set aside.
    • In the same skillet you made the sausage in, whisk together the garlic, onion powder, Italian seasoning, milk, Rotel, cream cheese, cheddar, smoked paprika, salt, and pepper and cook over medium-low heat, stirring occasionally, until the cheese has melted. Some cheese brands are harder to melt, so if the sauce is too thick and the cheese becomes stringy, you can add a couple more tablespoons of milk help break it up and thin it out.
    • Stir the cooked pasta and cooked sausage into the sauce until everything is well incorporated.
    • Serve garnished with fresh parsley if desired.

    Notes

    • I recommend full fat cream cheese for the best texture.
    • Substitute any short cut pasta.

    Nutrition

    Calories: 634kcal | Carbohydrates: 41g | Protein: 25g | Fat: 41g | Saturated Fat: 17g | Polyunsaturated Fat: 4g | Monounsaturated Fat: 15g | Trans Fat: 0.2g | Cholesterol: 112mg | Sodium: 1005mg | Potassium: 544mg | Fiber: 3g | Sugar: 5g | Vitamin A: 1038IU | Vitamin C: 6mg | Calcium: 186mg | Iron: 3mg

    Crock Pot Pork Tenderloin

    April 4, 2024

    Crock Pot Pork Tenderloin, sliced on white plate next to broccoli and rice.

    Crock Pot Pork Tenderloin: Sometimes you want to hit the easy button and just set it and forget it. This amazing pork tenderloin slow cooker recipe is sure to be enjoyed by the entire table! Cook the pork and make the optional sauce, or this easy pork gravy, for a perfect dinner.

    Sliced, pork tenderloin on white plate covered in glaze, sitting next to broccoli.

    I’m a big fan of using basic cuts of meat and dressing them up with sauce. I also made creamy pork chops in the crock pot, that creates a gravy that delicious served over mashed potatoes too.

    If you aren’t a fan of the crock pot, you can also roast pork tenderloin in the oven. Pulled pork in the slow cooker is a great crowd-pleasing idea as you can make sandwiches or serve over baked potatoes. If a one-pot beef dish is more your style, you can’t go wrong with Dutch Oven Pot Roast!

    [feast_advanced_jump_to]

    Why You’ll Love This Recipe

    • Basic recipe: This “cooking liquid” is just enough to add some flavor so the pork isn’t bland, but not so much you can’t add any sauce you like!
    • Quick cooking: Yes, we are using a slow cooker, but this one is done in just 2-3 hours, making it a great option for dinner.
    • Company ready: Since you are making slices to serve, this can be stretched with several side dishes to serve a crowd.

    Ingredients Needed

    I’ve highlighted a couple of ingredients below with some relevant notes. Aside from this, the ingredients needed are pretty basic.

    Labeled ingredients for crock pot pork tenderloin.
    • Pork tenderloin – Aim for about 2-3 pounds here, depending on how many you are serving and if you want leftovers.
    • Soy sauce – Low sodium is my choice to ensure great flavor without extra salt.
    • Balsamic vinegar – This is a great tangy taste that pairs well with pork.
    • Honey – The sweetness will balance the salt and tang of the other ingredients!
    • Water – You need just enough water to ensure there isn’t burning or sticking before the pork releases its own liquid during cooking.

    Sauce Ingredients, if Desired

    Labeled ingredients for pork tenderloin cooked in the slow cooker.
    • Oil – Olive, vegetable, or canola will all work here as nice neutral options.
    • Balsamic vinegar – This adds a quick tang!
    • Honey – The texture works well here to help create a thick sauce that will coat your pork.
    • Soy sauce – I almost always use reduced-sodium to get the great flavor without excessive saltiness.
    • Cornstarch – A perfect thickening agent without changing the flavor.

    Equipment

    I like a 6 or 7 quart slow cooker, to make sure I can fit large cuts of meat like pork tenderloin. It’s ok to have it curved inside the liner. You can also use crock pot liners if you prefer, for easy cleanup.

    Variations

    This is a sentence or two about some variations that can take place if applicable. If nothing to put here, it can be removed.

    • Meat – if you aren’t a fan of pork, these flavors also pair wonderfully with chicken! Just use breasts or thighs and use a thermometer. Chicken should be 165°F in the thickest part for safest cooking and serving.

    How to Make Simple Pork Tenderloin in the Slow Cooker

    This simple “marinade” with the pork gives you a basic tenderloin that can be served with any sort of sauce. I’ve included a honey soy sauce to get you started, but you can leave it off or make something else!

    *Be sure to see the recipe card below for the full ingredients list & instructions!*

    Steps 1-4 of how to make slow cooker pork tenderloin.

    STEP 1. Combine. In a small bowl, mix together the liquid ingredients for the meat (Image 1). Set the pork, fatty side up, in a greased crock pot (Image 2).

    STEP 2. Cook.  Pour the liquid ingredients over top (Image 3). Add the lid and cook for 2-3 hours (Image 4).

    Sauce Recipe, if Desired

    Steps 5-8 of how to make pork loin sauce.

    STEP 3. Combine. Add sauce ingredients to a bowl and whisk (Image 5). Heat garlic in olive oil in a saucepan (Image 6).

    Tip: The sauce has sugar, which means there is a risk of both boiling over and burning. Do not walk away while making this sauce as it comes together quickly! Stir constantly while boiling and keep an eye on the heat.

    STEP 4. Thicken. Add liquid to the oil and boil for 2 minutes (Image 7). Once thickened and smooth, remove from the heat (Image 8).

    Cooked pork tenderloin on white platter.

    Recipe Pro Tips

    • Don’t overcook. Because pork is quite lean, it can easily dry out.
    • Watch for burning. Garlic cooks quickly, so don’t let it burn, and the sauce contains sugar, which can also burn!
    Glaze being drizzled over cooked pork tenderloin.

    Recipe FAQs

    How do I store leftovers?

    The meat will keep for 3-4 days in the fridge. The sauce will thicken up when cold, but should thin out some when reheated. You can always add more water if it is still too thick.

    Should pork be covered with liquid in the slow cooker?

    Nope – up to ¼ of the tenderloin can be sitting in liquid, but you don’t want much more than that. The pork releases liquid as it cooks, so you need room for that.

    How do you know when pork tenderloin is done in a crock pot?

    Always, always use an instant-read thermometer when cooking any type of meat. This is the safest and surest way to know your meat has cooked to a safe temperature. Did you know that some cuts of pork may still look pink inside when safely cooked? That’s why you want to make sure your thermometer says at least 145°F when inserted into the center of your tenderloin. Never go by color or feel.

    What to Serve with Pork Tenderloin

    This pork tenderloin recipe goes well with anything you’d like! I go simple with a quick veggie and rice. The soy sauce has an Asian flair, so I love using rice to get all the extra sauce off the plate.

    If you love easy dishes, try adding green beans and potatoes to the Instant Pot! Let your appliances do the work. Instant Pot Mashed Potatoes are also a great crowd-pleaser.

    Piece of cooked pork tenderloin on white plate, being sliced in to bite size pieces.

    More Pork Recipes You’ll Love

    • Close up of southern fried pork chops on white plate, with a pork gravy poured on top.
      Southern Fried Pork Chops
    • Baked BBQ Pork Chops in the Oven
    • Cooked Instant Pot pork butt in white bowl, sitting next to barbecue sauce.
      Instant Pot Pork Butt
    • Grilled pork chop on plate next to asparagus.
      Grilled Pork Chops Recipe

    Did you make this? I’d be so grateful if you left a “star” rating below to let me know what you thought! Then, the next time you need a quick and easy recipe, come back to Fantabulosity to browse all of my easy recipes!

    Recipe

    Crock Pot Pork Tenderloin, sliced on white plate next to broccoli and rice.
    Print Pin
    Be the first to rate!

    Crock Pot Pork Tenderloin

    Make the perfect, juicy pork tenderloin every time by making it in the slow cooker!
    Course Main Course
    Cuisine Asian
    Prep Time 15 minutes minutes
    Cook Time 3 hours hours
    Total Time 3 hours hours 15 minutes minutes
    Servings 6
    Calories 341kcal
    Author Jessica Burgess

    Ingredients

    • 2-3 pounds boneless pork tenderloin
    • ⅓ cup honey
    • ¼ cup water
    • 3 tablespoons reduced sodium soy sauce
    • 1 tablespoon balsamic vinegar
    • ¼ teaspoon garlic powder
    • ⅛ teaspoon black pepper
    • Green onion for garnish chopped, optional

    Sauce:

    • ½ cup reduced sodium soy sauce
    • ⅓ cup honey
    • ¼ cup balsamic vinegar
    • 2 tablespoons cornstarch
    • 1 tablespoon olive oil
    • 3 garlic cloves minced

    Instructions

    • Spray a 6-quart slow cooker liner with cooking spray.
    • Combine the honey, water, soy sauce, and balsamic vinegar in a small bowl.
    • Set pork tenderloin in the slow cooker, with the fatty side facing up.
    • Pour honey mixture over the meat and sprinkle with the garlic powder and pepper.
    • Cook on high for 2-3 hours or low for 4-6 hours. Use an instant-read thermometer to confirm the pork is at least 145°F before serving.

    Make sauce:

    • In a small bowl, whisk together the soy sauce, honey, balsamic vinegar, and cornstarch. Ensure there are no lumps.
    • In a small saucepan, heat olive oil. Add garlic and sauté for 30 seconds, stirring constantly.
    • Add the soy sauce mixture and stir until it boils. Continue at a rolling boil for 2 minutes, stirring constantly, until slightly thickened.
    • Slice pork tenderloin and place on a serving platter. Drizzle with sauce or serve on the side. Add chopped green onions as garnish if desired.

    Notes

    • Because there is a lot of soy sauce in this recipe, reduced sodium is a must so that the dish isn’t too salty overall.
    • You can use a slow cooker liner if you prefer, but still spray it with oil.
    • Since the sauce contains sugar, there is a risk of boiling over. Keep an eye on it and stir constantly so it doesn’t burn or boil over.

    Nutrition

    Calories: 341kcal | Carbohydrates: 38g | Protein: 35g | Fat: 6g | Saturated Fat: 1g | Polyunsaturated Fat: 1g | Monounsaturated Fat: 3g | Trans Fat: 0.03g | Cholesterol: 98mg | Sodium: 1139mg | Potassium: 749mg | Fiber: 0.4g | Sugar: 33g | Vitamin A: 0.4IU | Vitamin C: 1mg | Calcium: 26mg | Iron: 2mg

    Bread Pudding Recipe: Easy Old Fashioned Recipe (With Video!)

    March 11, 2024

    bread pudding in baking dish

    Bread Pudding Recipe: An easy old fashioned recipe is the BEST, and this recipe resembles the old-fashioned dessert recipe that we all love! It’s basic, and uses everyday ingredients and an optional brown-buttered vanilla sauce, or this vanilla sauce for bread pudding, to drizzle on top!

    If you're looking for more desserts that work well for sharing, you'll find my favorite potluck desserts here.

    Bread Pudding with Vanilla Sauce

    Looking for quick and easy dessert recipes to add to your Pinterest boards? Then you’ll also LOVE this peach cobbler made with Bisquick, the BEST Banana Bread, and this easy pound cake recipe!

    [feast_advanced_jump_to]

    I’m so glad that you’re here for this bread pudding. It may just change your decadent dessert life.

    But if this is your first time here, you’re going to find tons of quick and easy recipes around here!

    What is Bread Pudding?

    Well it’s not the “pudding” you’re probably thinking of. Rather it’s a recipe that uses old, stale bread, combined with a creamy custard that consists of things like sugar, butter, milk, eggs, cinnamon, vanilla, and then bake it all. The outside edges may have a slight crisp, while the middle is a soft, custard-like texture.

    Bread pudding serving in small white bowl

    Where did bread pudding come from?

    New Orleans is famous for its bread pudding! However, bread pudding originated in England (UK) and was actually created as “poor man’s pudding” since it used very little ingredients. Since then, other ingredients were added to enhance the flavor.

    I found out about it because my grandma used to make this old-fashioned dessert and I fell in love with it from the first moment I had it!

    When I wanted to make this for the first time, I found a few good recipes for bread pudding in my old cookbooks, but they all had something that didn’t tickle my fancy. (Such as raisins – although you can add these if you like.)

    So… I gathered all of the recipes up and came up with my own plan and I have to admit, using simple ingredients helped make this the BEST bread pudding!

    Ingredients for Bread Pudding

    Front view of bread pudding ingredients, sitting on kitchen counter.

    This bread pudding is made with easy-to-find ingredients. Here are a few notes on some of the key ingredients. See the recipe card below for the measurements.

    • Bread: Stale bread is best so it really soaks up the custard mixture, instead of it settling in the bottom and cooking the eggs separately.
    • Butter: I’ve used salted and unsalted for this recipe and it turns out great each time.
    • Milk: Feel free to try half & half or heavy cream if that’s what you have!
    • Sugar: I use white granulated sugar for this but brown sugar for the optional sauce.
    • Vanilla extract: If you can use pure vanilla, that’s the best. But I’ve used imitation vanilla in a pinch.

    What Kind of Bread is Best for Bread Pudding?

    French bread is a great bread for this recipe although I’ve used leftover sandwich bread, hot dog buns, hamburger buns, and more, and it always turns out great! (Or if you have stale donuts, you may want to make this donut bread pudding recipe!) Check out all the different types of bread readers have used over the years, in the comments!

    How to Make Stale Bread

    If you’re craving bread pudding, but don’t have the leftover bread or the stale bread to use for it, no worries!

    Grab some fresh bread and either pop it in the toaster for a bit, or cut in to bread cubes (about 1-inch pieces) and bake it in the oven on 350° for about 5-10 minutes. (Don’t burn it or turn it brown. You’re just removing as much moisture from it as you can.)

    Dish of Bread Pudding

    I love this recipe, and I really do think it’s the best because it only includes items I usually have on hand, resembles the old-fashioned recipe that we’ve all known to love, and I had it all put together and in the oven in a matter of minutes.

    How to Make Bread Pudding from Scratch

    1. Begin by preheating your oven to 350 degrees.
    2. Then you’ll start by buttering your 8×8 baking dish (or 9×13 casserole dish if doubling the recipe) and breaking up the bread into about 1-inch cubes.
    Spreading butter stick on baking dish
    1. Toss the bread into the buttered dish.
    Uncooked bread cubes in baking dish
    1. Melt your remaining 2 tablespoons of butter, and drizzle melted butter over bread pieces and set aside.
    eggs, milk, cinnamon, sugar, butter in large mixing bowl ready to be mixed
    1. Next, in a large mixing bowl, mix together the eggs, milk, sugar, cinnamon, and vanilla.
    Egg custard mixture in bowl, ready to pour over bread pieces
    1. Next, simply pour the egg mixture over the bread pieces and make sure each piece has been covered or submerged to let that bread soak up that amazing custard mixture!
    Close-up image of egg custard batter pouring out of mixing bowl on to top of bread

    Oh my… doesn’t that photo of the egg mixture just make you drool!? It does me, every stinking time I look at it.

    Bread cubes soaking pudding mixture in baking dish

    How Long to Bake Bread Pudding

    1. Toss that baby in the oven and let it bake the bread mixture uncovered for 40-45 minutes at 350º.
    Bread Pudding in dish without sauce

    FAQs and Expert Tips:

    How do you know when bread pudding is done?

    Just like almost any dessert, or bread that you’re baking, insert a clean knife into the center and see if it comes out clean!

    What is day-old bread?

    Well, it’s stale bread. Not super hard, and crispy… but bread that just wouldn’t be your favorite to use to make your favorite sandwich.
    The reason you want day-old or stale bread is because you’ll want the bread to soak up the batter/custard of the bread pudding mixture.

    Can you freeze bread pudding?

    Yep! It’s actually a great idea to make some of this ahead of time in case you need a last-minute dessert idea or to take a care package to a friend in need!
    Just bake it as normal, and once cooled, place in the freezer for up to 2 months. When ready to thaw it, place it in the refrigerator to thaw it out.

    Do you eat bread pudding warm or cold?

    You can enjoy bread pudding cold or warm, but if you prefer it warm after freezing/thawing, gently warm it to reheat.

    Can I prepare bread pudding the night before?

    Absolutely! I love make-ahead meals about as much as anyone, especially when entertaining! So if you want to make this ahead of time, feel free to!
    You can either mix it all together and refrigerate it overnight before baking, or bake it, let it cool, and then refrigerate.

    How to store leftovers

    For best results, if you have left-over bread pudding, cool it until becomes room temperature and store in an airtight container (or cover the dish with plastic wrap) for up to 5 days, in the refrigerator.

    Old-Fashioned Bread Pudding

    That golden-brown bread pudding will remind you of grandma’s old-fashioned recipe as soon as you pull it out of the oven.

    Serve it warm alone, with ice cream, or top it with the super-easy bread pudding sauce that I tell you about below…

    Bread pudding on a spoon over dish

    What to Serve with Bread Pudding?

    If you’re looking for a little something extra to serve with your new, easy bread pudding recipe, you might consider:

    Bread pudding with raisins in baking dish, sitting on table, on top of lace cloth.
    • raisins – as shown above
    • chocolate sauce
    • caramel ice cream topping
    • ice cream
    • whipped cream
    • candied nuts
    • dried fruit
    • powdered sugar
    • or this crazy-easy and delicious bread pudding sauce I whipped up for you…

    Amazing Bread Pudding Vanilla Sauce

    For years I shared this recipe without a sauce or a drizzle. But there have been tons of you who have made this recipe and left so many amazing reviews and comments below saying you’ve made a bourbon bread pudding, caramel sauce, or vanilla sauce, and I must say… you’ve inspired me.

    So when I remade this recipe to take new photos for the blog, I decided to whip up a quick buttery vanilla sauce to see how it would taste, and have also provided a creamy vanilla sauce recipe that you can top it with.

    The bread pudding is great as a stand-alone, but I’m a fan of this addition now, in a BIG way!

    How to Make Browned Butter Sauce:

    You’ll need the following, everyday ingredients to make this drizzle, that is more nutty, and a little less sweet than the custardy vanilla sauce option below:

    • butter (I used salted but unsalted butter works just fine!)
    • brown sugar
    • milk or heavy cream (or even water)
    • vanilla

    It’s super easy. Grab a small saucepan, and melt (on high) 3 Tablespoons of salted butter.

    Vanilla Sauce in sauce pan

    Once melted, turned it down to medium heat and wait a bit to let the butter brown. (Browned butter is my JAM!)

    Then, reduce heat to a simmer, and add in brown sugar, milk or cream, and then whisk for 1-2 minutes.

    Remove from heat and whisk in vanilla. Pour on top of the cooked bread pudding.

    Bread Pudding with vanilla sauce in dish

    How to Make Vanilla Sauce for Bread Pudding

    Get the creamy vanilla sauce recipe if you prefer a sauce that is more “custard” like, rich, and also called “crème anglaise,” instead of the browned butter sauce that I’ve made above.

    Bourbon Bread Pudding

    If you love the taste of bourbon in your bread pudding, you can easily add bourbon to the vanilla sauce recipe above by adding in a tablespoon of bourbon (less or more, depending on your taste) when you add in the sugar and vanilla.

    Related Recipes:

    We have a major sweet tooth and are HUGE fans of bread pudding recipes so make sure you check out our chocolate bread pudding recipe, donut bread pudding, sweet potato casserole bread pudding, and banana bread pudding to see which one is your favorite! Or, you may even love trying this croissant bread pudding!

    So tell me… did you make this bread pudding? Did you like it? Let me know below in the comments with the others, and give this a rating to let others know how much you love it!

    Recipe

    bread pudding in baking dish
    Print Pin
    4.92 from 1191 votes

    The BEST Bread Pudding Recipe

    This old-fashioned bread pudding recipe is so easy, traditional, and is the custard dessert recipe we all love! Plus, an optional vanilla sauce to drizzle on top!
    Course Dessert
    Cuisine American
    Prep Time 5 minutes minutes
    Cook Time 45 minutes minutes
    Total Time 50 minutes minutes
    Servings 6 servings
    Calories 316kcal
    Author Jessica Burgess

    Equipment

    • 1 8 x 8 Baking Dish
    • 1 Mixing bowl
    • 1 Saucepan Only if making sauce
    • 1 Whisk Only if making sauce

    Ingredients

    • 6 slices stale bread (Or about 4-5 cups of broken bread pieces or cubes. Some ideas to use are: french bread, buns, rolls, donuts, challah, toast or another type of bread.)
    • 3 tablespoons of butter 1 Tablespoon + 2 Tablespoons
    • 4 beaten eggs
    • 2 cups milk
    • ¾ cup white sugar
    • 1 teaspoon vanilla extract
    • 1 teaspoon cinnamon
    • raisins optional

    Optional Creamy Vanilla Sauce

    • vanilla sauce get my vanilla sauce recipe

    Optional Brown Sugar Butter Drizzle

    • 3 tablespoons butter salted (but unsalted is ok too!)
    • 1 tablespoon brown sugar
    • 1 teaspoon vanilla extract
    • 1-2 tablespoons milk or heavy cream – optional *see notes

    Instructions

    • Preheat oven to 350 degrees, and use 1 Tablespoon of butter to coat the inside of your 8 inch square baking dish.
    • Break your bread (I made larger pieces, rather than crumbling it up) in to the buttered baking dish.
    • Melt your remaining 2 tablespoons of butter, and drizzle over bread pieces.
    • In a bowl, mix remaining ingredients (don't forget to beat your eggs first) until mixed well.
      4 beaten eggs, 2 cups milk, ¾ cup white sugar, 1 teaspoon vanilla extract, 1 teaspoon cinnamon
    • Pour this mixture over the bread, making sure to evenly coat each piece.
    • Bake for 45 minutes, or until the top of the bread pudding springs back after lightly touching it with a fork.

    Optional Buttery Brown Sugar Sauce

    • Grab a small saucepan, and melt (on high) 3 Tablespoons of salted butter.
      Once melted, turned it down to medium heat and wait a bit to let the butter brown.
    • Turn down to a simmer. Then, add in a tablespoon of brown sugar and the 1 to 2 tablespoons of milk/cream.
      Whisk to combine and simmer/whisk for 1-2 minutes. Remove from heat and whisk in vanilla.
      Serve over entire bread pudding in dish before serving or over individual servings.

    Video

    Notes

    Helpful Info:
    • Which sauce to make? This bread pudding is great even without an optional sauce. However, if you want a sauce, I recommend picking one of the two. The browned butter sauce is more of an “accent” drizzle, and less rich/sweet than the vanilla sauce. I’ve recently added heavy cream as optional ingredient to help smooth the sauce out. If you prefer the older method, simply leave the cream out. The vanilla sauce is rich, more creamy, and more of a major topper for the bread pudding. Both are optional and not necessary for a delicious bread pudding.
    • If your bread is really stale, soaking before baking is ideal, so it allows time for the bread to soak up the mixture. If the bread is older but not crusty, you can bake it right away. 
    • How do you know when bread pudding is done? Just like almost any dessert, or bread that you're baking, insert a clean knife into the center and see if it comes out clean!
    • Can you freeze bread pudding? Yes! Bake it as normal, and once cooled, place in the freezer for up to 2 months. When ready to thaw it, place it in the refrigerator to thaw it out.
    • Can I prepare bread pudding the night before? Yes! You can either mix it all together and refrigerate it overnight before baking, or bake it, let it cool, and then refrigerate.
    • How to store leftovers For best results, store it in an airtight container for up to 5 days, in the refrigerator.

    Nutrition

    Serving: 1serving (⅙ recipe) | Calories: 316kcal | Carbohydrates: 43g | Protein: 9g | Fat: 12g | Saturated Fat: 6g | Cholesterol: 132mg | Sodium: 272mg | Potassium: 198mg | Fiber: 1g | Sugar: 30g | Vitamin A: 465IU | Calcium: 152mg | Iron: 1.5mg

    Sausage Gravy Breakfast Pizza

    March 9, 2024

    Close-up of a piece of sausage gravy breakfast pizza on a cutting board.

    Sausage Gravy Breakfast Pizza: Everyone loves biscuits and gravy – so what about making a pizza of all your breakfast favorites in one?

    Sausage gravy breakfast pizza slice on a wooden cutting board.

    It’s no secret I love breakfast sausage! I’ve baked it into a biscuit casserole or layered with egg for a quiche-like dish. This time I’ve added egg and cheese and layered it over a pizza crust!

    [feast_advanced_jump_to]

    Why You’ll Love This Recipe

    • Quick and easy: Use a store-bought crust for the ultimate convenience.
    • Make-ahead recipe: You can easily make all parts of this pizza ahead of time for a quick breakfast.
    • Enjoy at any time of day: Is there anyone that’s NOT a fan of breakfast for dinner?

    Ingredients Needed

    Here’s what you’ll need to make this sausage breakfast pizza.

    Ingredients for sausage gravy breakfast pizza, sitting on kitchen counter.
    • Gravy – I’ve perfected my own sausage gravy recipe and that’s what I use here. You can also use an envelope or your own family recipe.
    • Pizza Crust – Find this in the canned biscuit section. It’s super easy to roll out to size! You could also use homemade or a premade dough ball.
    • Eggs – Simply scramble with salt, pepper, and butter.
    • Cheese – I combined cheddar and pepper jack, but feel free to use whatever you have on hand or prefer.

    *Be sure to see the recipe card below for the full ingredients list & instructions!*

    How to Make Sausage Gravy Breakfast Pizza

    Four image collage of process steps of making sausage gravy breakfast pizza.

    STEP 1. Parbake crust. We’re going to bake the crust just a bit at first so it isn’t soggy under the toppings.

    STEP 2. Add gravy. Make your gravy and spread it on the crust, making sure to leave an edge.

    Close-up of corner of sausage gravy breakfast pizza on baking sheet.

    Tip: Customize this to your liking! Change out the gravy, toppings, way you cook your eggs, type of cheese… it’s truly endless!

    STEP 3. Cook eggs. Scramble the eggs to your desired taste and doneness, then add to the pizza.

    STEP 4. Bake. Top with cheese and bake until melted and the crust is browned.

    Recipe Pro Tips

    • Shred your own cheese. Pre-shredded cheese has fillers to prevent caking in the bag, which means they don’t always melt as smoothly as when you shred your own.
    • Make parts ahead. Go ahead and make your gravy and eggs the night before and pop in the fridge. Set them out to warm up some while the oven preheats, then assemble and bake!
    Slice of breakfast pizza sitting next to entire breakfast pizza on a cutting board.

    Recipe FAQs

    How do I store leftovers?

    Pop the cooked and cooled pizza slices in the fridge. I like to slice before storing because I think the toppings stay on better. Reheat in the toaster oven or enjoy cold! Serve with extra gravy for dipping.

    What’s the best pizza crust to use?

    I like the tube best because it’s quick and easy to roll out and doesn’t take a lot of stretching. You could use homemade or the fresh dough ball as well. I haven’t tried it, but I bet even the croissant sheet in the tube would be a great option!

    What size crust do you use?

    My baking sheet is about 10×15 inches here. You can make your crust as thick or thin as you like. And if it’s a premade crust like this one here, it will likely keep its shape even if it is too small for your pan. Just make it however you like – ensure that you bake the crust for about half the time on the package before adding toppings.

    What to Serve with Breakfast Pizza

    If you want to make the meal stretch further, serve it up with some fresh fruit salad or a smoothie. You can also make a breakfast for dinner and serve with a fresh green salad.

    More Breakfast Recipes You’ll Love

    • sausage and egg casserole being lifted out of baking dish
      Sausage and Egg Casserole
    • Air fryer apple fritters on cooling rack.
      Air Fryer Apple Fritters
    • A basket of homemade biscuits lined with a tea towel.
      Easy Homemade Buttermilk Biscuits
    • OMG YUUM!!! Ham, Pineapple, Egg and pepperjack cheese, on a Hawaiian bun!
      Hawaiian Breakfast Sandwich

    Did you make this? I’d be so grateful if you left a “star” rating below to let me know what you thought! Then, the next time you need a quick and easy recipe, come back to Fantabulosity to browse all of my easy recipes!

    Recipe

    Close-up of a piece of sausage gravy breakfast pizza on a cutting board.
    Print Pin
    5 from 2 votes

    Sausage Gravy Breakfast Pizza

    This sausage gravy breakfast pizza is the ultimate breakfast dish, to combine two favorite things! Breakfast and pizza!
    Course Breakfast
    Cuisine American
    Prep Time 10 minutes minutes
    Cook Time 20 minutes minutes
    Total Time 30 minutes minutes
    Servings 8
    Calories 279kcal
    Author Jessica Burgess

    Ingredients

    • 3 cups sausage gravy Get my sausage gravy recipe
    • 1 storebought refrigerated pizza crust
    • ½ cup shredded cheddar cheese
    • ½ cup shredded pepper jack cheese
    • 6 large eggs
    • 1 Tablespoon oil or butter for cooking eggs
    • Salt & pepper to taste, for eggs

    Instructions

    • Preheat oven to 400°F.
    • Spread raw pizza crust on greased baking sheet (mine was a 10×15-inch pan).
    • Bake empty crust for 8 minutes and remove.
    • Meanwhile, make scrambled eggs. Crack the eggs in a small bowl, whisk until blended and pour in to a skillet, and then cook on medium heat, stirring often until eggs have formed in to cooked, scrambled eggs.
    • If you haven't made your gravy ahead of time, do so now.
    • Top the baked crust with the gravy, spreading it nearly to the edge (leave room for crust edges) then the scrambled eggs, and finally the cheese.
    • Bake for 6-7 minutes. Slice into squares, and enjoy!

    Notes

    • I use this sausage gravy recipe for my pizza. It makes 4 cups, which I personally think is too much for this pizza. If you make it, save the final cup to serve with some biscuits!
    • Not feeling like gravy from scratch? Use 1 pound of pork breakfast sausage and a packet of white gravy mix. Brown the sausage and then follow the directions on the packet. This makes about 2 cups, but it will be just fine on the pizza.
    • I like to shred my own cheese for the best texture, but pre-shredded works fine. Feel free to swap out the cheese for your favorites.

    Nutrition

    Calories: 279kcal | Carbohydrates: 30g | Protein: 12g | Fat: 13g | Saturated Fat: 5g | Polyunsaturated Fat: 1g | Monounsaturated Fat: 3g | Trans Fat: 0.1g | Cholesterol: 157mg | Sodium: 1001mg | Potassium: 63mg | Fiber: 1g | Sugar: 6g | Vitamin A: 371IU | Calcium: 124mg | Iron: 2mg

    How to Make Butter

    March 8, 2024

    Close up of knife cutting through homemade butter.

    Nothing beats Homemade Butter! It’s super easy and almost feels like a trick. Heavy cream takes just 15 minutes to turn into rich butter, ready to spread.

    Take things to the next level after making your homemade butter, and make these flavored butters, and spread it on a oven toast or on your favorite biscuit recipe.

    Homemade butter on cutting board, with a knife scraping it.

    I don’t know about you, but I absolutely LOVE homemade bread with butter. Let’s take it a step further and add fresh butter to our slices!

    Use this butter to spread on your favorite fluffy pancakes or sweet blueberry waffles. It’s also perfect for frying a bologna sandwich.

    [feast_advanced_jump_to]

    Why You’ll Love This Recipe

    • It uses a few ingredients: Technically you only need one ingredient! Amazing!
    • Make-ahead recipe: Butter keeps in the freezer up to a year, so go ahead and make extra.
    • Ready in a flash: Super fast, you can make this up in no time. It’s a great project for the family.

    Ingredients Needed

    Here’s what you’ll need to make this creamy homemade butter.

    Labeled ingredients for homemade butter recipe.
    • Cream – Heavy cream, whipping cream, double cream. This goes by various names depending on where you live so just make sure the label states the fat content. Don’t use anything less than 35% fat.
    • Salt – You can choose to add salt or not, just like when you are selecting butter at the store.
    • Ice water – This will help the process!

    *Be sure to see the recipe card below for the full ingredients list & instructions!*

    How to Make Butter in a Mixer

    First process steps for making homemade butter.

    STEP 1. Whip cream. Add the whipping cream to a mixing bowl or your stand mixer and whip until it is whipped cream.

    STEP 2. Keep whipping. Now go past this stage until it “breaks” and starts to separate into butter and buttermilk.

    Final steps for making homemade butter.

    Tip: Keep it cold! Start with cold cream, and you can even store the bowl and beater in the fridge until you are ready to begin.

    STEP 3. Press. Press the butter together to remove it from the liquid, and transfer it to cheesecloth.

    STEP 4. Salt. If you want, after drying the butter, you can add salt by pressing it in with a wooden spoon.

    STEP 5. Shape. Shape into a block, sticks, or press it into a container for storage.

    Homemade butter stored in a small white dish, sitting on the counter.

    Recipe Pro Tips

    • Keep it cold. Everything needs to start cold, and stay cold! This will allow you to make butter easily.
    • Salt or not to salt. Salt acts as a preservative. If you are keeping the butter out, like in a butter bell, I highly recommend adding salt for longevity. If you are freezing right away, it isn’t necessary. Just label whatever you freeze so you know what you have!
    Homemade butter spread on pieces of bread that are sitting on a cutting board.

    Recipe FAQs

    How do I store homemade butter?

    Press the butter into an airtight container. You can store it at room temperature for up to 2 hours, in the fridge for 2-3 weeks, or in the freezer for up to 1 year. The key is to make sure its air tight. Wrapping the butter in parchment paper or plastic wrap is an easy way to ensure this, or I highly recommend storing it in a butter bell. 

    What are butter churns?

    Instead of using a mixer, you can use a butter churn. It's usually a jar or a jug with a hand crank. This will take a bit more effort, but the results will be the same. 

    What cream is best?

    The heavy cream you use to make homemade butter is very important. Select a product that is above 35% fat (the closer it is to 40% fat, the better). Do not try to use pasteurized grocery store whole milk. It doesn't contain enough fat and the process is lengthy. It is also helpful to avoid thickening agents or additives in your heavy cream. They will still churn into butter but the process takes longer because the additives are working to prevent the separation. 

    What to Serve with Butter

    The possibilities are endless! You can use it in recipes like butter from the store, such as Cowboy Cookies or Strawberry Scones. Since you’ve made a one-pound block, you’ll want to weigh your butter for baking. Remember that one stick of butter is 4 ounces.

    Using Buttermilk

    Don’t throw away the buttermilk in the mixing bowl! This can be used in place of water or milk in recipes like sheet pan pancakes or Bisquick biscuits. Keep in mind this is not like buttermilk you buy at the store. That is cultured and very thick while this is thinner like whey.

    Use Up Your Butter

    • An unbaked pie with a top crust. The pie has a design carved in the top to allow steam to escape.
      Buttery Pie Crust Recipe
    • Peanut butter cookies with the classic criss-cross pattern on top.
      Easy Peanut Butter Cookie Recipe
    • Slice of Gooey Butter Cake on a square plate, next to fork.
      Gooey Butter Cake
    • No bake cookies on aluminum foil.
      The BEST No Bake Cookies Recipe

    Did you make this? I’d be so grateful if you left a “star” rating below to let me know what you thought! Then, the next time you need a quick and easy recipe, come back to Fantabulosity to browse all of my easy recipes!

    Recipe

    Close up of knife cutting through homemade butter.
    Print Pin
    5 from 1 vote

    How to Make Butter Recipe

    Homemade butter is super easy! This tutorial for how to make butter will be delicious in and on so many foods!
    Course Side Dish
    Cuisine American
    Prep Time 15 minutes minutes
    Total Time 15 minutes minutes
    Servings 1 pound
    Calories 48kcal
    Author Jessica Burgess

    Ingredients

    • 4 cups cold water
    • 1 cup ice
    • 16 ounces heavy cream
    • ½ teaspoon salt
    • spices and herbs, if desired Get flavored butter recipes!

    Instructions

    • Fill a bowl with water and ice.
    • Place the cold heavy cream in a large mixing bowl and whip on medium speed (I used a stand mixer but you could use a hand mixer instead) until it turns to whipped cream. Whip past this point until it is yellow and chunky. It slightly resembles butter at this point but don't be fooled, you still have to allow the buttermilk to separate from the butter. Use a spatula to push down any cream that has splashed to the sides. Keep mixing until the buttercream separates from the butter. This happens very suddenly, you’ll see liquid appear separately from the solid butter.
    • Using a spoon or spatula, press the butter together and remove it from the buttermilk. Wrap it in a cheesecloth and place it in the ice water. Squeeze the butter in all directions to get the remaining buttermilk out of the butter. The water will turn cloudy, you can dump and refill the ice water multiple times until the water remains clear to make sure you are squeezing out all of the buttermilk.
    • Take the butter out of the cheesecloth and place it on a hard flat clean surface, like a cutting board. Pat it dry with a paper towel or cloth and then mix the salt into the butter by pressing and folding with your spatula. Feel free to also use your hands for this, but your hands are warm and will quickly melt the butter so work quickly!
    • Press the butter into any shape you wish with a spoon or spatula. A block of butter or you can pack the butter tightly into an airtight container and use it as desired.

    Notes

    • All ingredients must be very cold at all times or the butter will not solidify. You can pop it into the fridge for 10 minutes if it starts to melt. Some suggest using room temperature heavy cream but for me the very cold methods work best to quickly separate the buttercream.
    • It is very important to get the buttermilk out of the butter (by squeezing it in cold water) or it will go bad very quickly. You can also squeeze the butter under running cold water, but this ends up being messy.

    Nutrition

    Serving: 1tablespoon | Calories: 48kcal | Carbohydrates: 0.4g | Protein: 0.4g | Fat: 5g | Saturated Fat: 3g | Polyunsaturated Fat: 0.2g | Monounsaturated Fat: 1g | Cholesterol: 16mg | Sodium: 42mg | Potassium: 13mg | Sugar: 0.4g | Vitamin A: 208IU | Vitamin C: 0.1mg | Calcium: 10mg | Iron: 0.01mg

    Vanilla Sauce Recipe

    March 7, 2024

    Vanilla sauce drizzled on to bread pudding, in a small white dish.

    Vanilla Sauce Recipe: Look no further – this basic vanilla sauce for bread pudding, or any dessert will be the sauce that you want! Top my famous bread pudding recipe with it, or drizzle it on your favorite dessert recipe.

    Vanilla sauce drizzled on to a serving of bread pudding in a white dish.

    It also pairs beautifully with pancakes, waffles, cakes, crepes, ice cream, and even fresh fruit. (Not to mention, it’s perfect to have on the dessert table during the holidays.) The smooth, creamy texture and rich vanilla flavor make any dish extra delicious.

    This vanilla sauce is also delicious to drizzle on a homemade pound cake (or any cake recipe). In just a few minutes, this easy recipe is a delicious addition to your dessert table.

    Making your own vanilla sauce provides a fresh, natural taste compared to what some store-bought vanilla sauces provide. Plus, you can adjust the sweetness and consistency to your preference.

    [feast_advanced_jump_to]

    Why You’ll Love This Recipe

    • It uses a few ingredients: Most people keep all of these ingredients on hand! You may just need to pick up the heavy cream.
    • Make-ahead recipe: You can make this ahead and gently reheat when ready to serve.
    • The perfect basic skill: Learning how to make a vanilla dessert sauce will open you up to all of the dessert sauce options!

    Ingredients Needed

    Here’s what you’ll need to make this vanilla custard dessert sauce.

    Labeled ingredients for vanilla sauce, sitting on counter.
    • Milk – Mixing milk and cream gives you the perfect fat level without being too heavy. Heavy whipping cream will help give the best texture.
    • Butter – I always prefer using unsalted butter and then adding salt to the recipe. This helps control the exact level. If you only have salted you can go ahead and use it, but reduce the added salt to just a pinch.
    • Sugar – There’s just enough here to make a mildly sweet sauce, allowing you to pair with sweet desserts without going overboard. If you are adding it to a dish that isn’t so sweet, you can increase the sugar to ¾ cup.
    • Vanilla – Pure vanilla extract is what makes this sauce not so plain. If you are feeling fancy, try using vanilla bean powder or paste. It will add the classic flecks so you can see the vanilla!
    • Cornstarch – Making a slurry can help thicken your sauce to the perfect texture. Always add cornstarch to cool water first to dissolve before adding to any dish.

    *Be sure to see the recipe card below for the full ingredients list & instructions!*

    How to Make Vanilla Sauce

    This comes together quite quickly, so don’t walk away from the stove!

    Image collage showing 4 photos, with the steps on how to make a vanilla sauce.

    STEP 1. Melt. Begin by melting the butter and sugar into the milk.

    STEP 2. Dissolve. Dissolve the cornstarch into the water in a small bowl until totally smooth.

    Tip: I love a silicone whisk. I find it gets into the corners better since it’s more flexible than metal. Also, using non-metal utensils means they are safe for all of your pans so you won’t scratch them up!

    STEP 3. Whisk. Here’s where you don’t want to walk away! Whisk near constantly while cooking.

    STEP 4. Thicken. Add the slurry to the pudding in the pot. Keep in mind it will continue to thicken as it both cooks and cools.

    Recipe Pro Tips

    • Keep an eye on things. Dairy is notorious for boiling over, so don’t walk away while you are cooking! You don’t want a mess on the stove or a burned bottom of the pot.
    • Watch the salt. Salt is perfect for tempering sweet – that’s why we always add it even in dessert recipes. But if you are using salted butter, you won’t need to add as much salt.
    Vanilla sauce in a small gray bowl, with a spoon dripping it over the top.

    Recipe FAQs

    What is vanilla sauce made of?

    Vanilla sauce is a custard, which is essentially thickening milk with sugar! We add a cornstarch slurry, which some might consider cheating, but it can help you achieve the perfect texture.

    What are the 4 basic dessert sauces?

    It’s all so tasty! If you want to round out your recipe repertoire, you’ll want to know how to make custard (vanilla, like this one!), chocolate, fruit, and sugar-base (like caramel). Having this skill will allow you to make any dessert extra special.

    How do I store leftover vanilla sauce?

    Store any unused vanilla sauce in an airtight container in the fridge for up to 3 days. You will want to make sure it doesn't sit open inside the fridge. A dry layer/skin will form if the sauce is left open.

    Dish of Bread Pudding

    What to Serve with Vanilla Sauce

    Whether you choose an old-fashioned bread pudding recipe or change it up by using croissants in bread pudding, or on top of donut bread pudding, this is the perfect topping. It would also be a sweet treat to drizzle over some fresh berries.

    Vanilla sauce drizzled on top of bread pudding in a dish.

    More Dessert Recipes You’ll Love

    Old-fashioned dessert recipes are classics that are always a crowd-pleaser. Here are more of my favorite dessert recipes you’ll also love…

    • Cherry bread with cherry icing on wooden cutting board.
      Cherry Bread with Cherry Glaze
    • A collage of old-fashioned dessert recipes
      Old-Fashioned Desserts Everyone Knows and Loves
    • Blueberry dump cake, with serving spoon resting in pan.
      Blueberry Dump Cake (Easy, Buttery Dessert with Fresh Berries)
    • Cherry dump cake topped with homemade whipped cream, served in a dessert bowl.
      Cherry Dump Cake (Easy 3-Ingredient Dessert)

    Did you make this? I’d be so grateful if you left a “star” rating below to let me know what you thought! Then, the next time you need a quick and easy recipe, come back to Fantabulosity to browse all of my easy recipes!

    Recipe

    Vanilla sauce drizzled on to bread pudding, in a small white dish.
    Print Pin
    5 from 13 votes

    Vanilla Sauce for Bread Pudding

    This creamy vanilla sauce for bread pudding, cake, fruit or whatever you'd love to serve this on top of, is an easy recipe that's perfect for so many desserts.
    Course Dessert
    Cuisine American
    Prep Time 5 minutes minutes
    Cook Time 13 minutes minutes
    Total Time 18 minutes minutes
    Servings 6
    Calories 257kcal
    Author Jessica Burgess

    Equipment

    • Medium Saucepan
    • Small mixing bowl
    • Spoon
    • Whisk

    Ingredients

    • ½ cup milk 118 ml
    • ¾ cup heavy cream 177 ml
    • ½ cup granulated sugar 100 g
    • ¼ cup unsalted butter 58 g
    • 1 tablespoon cornstarch 10 g
    • 2 tablespoons water 30 ml
    • 1 tablespoon vanilla extract 15 ml
    • ½ teaspoon salt 3 g

    Instructions

    • In a medium saucepan add the milk, heavy cream, granulated sugar, and butter. Set the heat to medium and using a whisk stir until the butter melts (about 3 minutes).
      ½ cup milk, ¾ cup heavy cream, ½ cup granulated sugar, ¼ cup unsalted butter
    • Once the butter has melted, in a small bowl combine the water and cornstarch to create a slurry. Make sure the cornstarch and water is fully combined then add it to the cream mixture.
      1 tablespoon cornstarch, 2 tablespoons water
    • Stir to fully combine.
    • Using your whisk, continue to stir the mixture until it starts to thicken and bubble (about 3 minutes).
    • Once it starts to thicken and bubble, add the vanilla extract and salt.
    • Stir to fully combine the vanilla and salt into the mixture.
      1 tablespoon vanilla extract, ½ teaspoon salt
    • Allow the mixture to continue to thicken. You'll want to have a consistency of runny pudding for about 2 more minutes. Once you get to that consistency, remove from heat and allow to cool for a few minutes before topping the sauce over your bread pudding.

    Video

    Notes

    • Please note that the sauce will continue to thicken as it cools. If you want a runny sauce, omit the cornstarch slurry.
    • If you want a more intense vanilla flavor you can add a ½ teaspoon of vanilla bean powder. It will also give you the look of having vanilla specks in the sauce.

    Nutrition

    Calories: 257kcal | Carbohydrates: 20g | Protein: 2g | Fat: 19g | Saturated Fat: 12g | Polyunsaturated Fat: 1g | Monounsaturated Fat: 5g | Trans Fat: 0.3g | Cholesterol: 56mg | Sodium: 211mg | Potassium: 65mg | Fiber: 0.01g | Sugar: 19g | Vitamin A: 707IU | Vitamin C: 0.2mg | Calcium: 48mg | Iron: 0.1mg

    Big Mac Casserole

    March 6, 2024

    Big Mac Casserole in white baking dish, with wooden spoon dishing out casserole.

    Big Mac Casserole: I’m sure plenty of us can sing that jingle about what’s on a golden arches burger! Turn that secret sauce into the best Big Mac casserole topping, making this a family-favorite casserole recipe.

    Close up of big mac casserole in baking dish with all the toppings.

    Everyone loves a fast food burger and fries sometimes. Take all the freshest ingredients and combine them into a delicious casserole the entire family will love, at home!

    I also love a good chicken taco casserole on Taco Tuesday. And if you aren’t a casserole person, you can still use the oven and make crispy chicken tacos. However, having a hamburger casserole recipe on hand is perfect for the days you just can’t grill juicy Lucy burgers.

    [feast_advanced_jump_to]

    Why You’ll Love This Recipe

    • Mix it and forget it: After browning the beef, you simply pop this in the oven and wait! Get your chores done in that time or play a family game.
    • Make-ahead recipe: Save the toppings for later – you can make this casserole ahead and simply reheat!
    • Everyone’s favorite: Just like placing your burger order, everyone can add their favorite toppings to their plate.

    Ingredients Needed

    Here’s what you’ll need to make this Big Mac casserole.

    Labeled ingredients for big mac casserole sitting on counter.
    • Ground beef – I tend towards and 85/15 mix so it is still tender and flavorful but isn’t overly greasy. Be sure and drain any excess fat after browning and before mixing in the seasoning.
    • Potatoes – Peeled and diced russet potatoes hold up nicely to the saucy casserole. It lets you have your fries AND your burger all at once! If you aren’t up for all that chopping, feel free to use cubed frozen hash browns (2 cups). No need to thaw ahead.
    • Cheese – I love cheddar on a burger, but you can use any nicely melting cheese you prefer, or a blend. If you shred your own it will melt even better!
    • Secret sauce – Everyone knows the not-so-secret sauce is a blend of mayo, ketchup, and mustard with some seasonings. Mix this up and feel free to adjust to your liking!
    • Toppings – Set up a whole burger bar of toppings for everyone to add to their plate.

    *Be sure to see the recipe card below for the full ingredients list & instructions!*

    How to Make Cheeseburger Casserole

    Once you brown the beef, all that’s left is to mix everything up and bake.

    Image collage showing the first 4 steps of making Big Mac casserole.

    STEP 1. Brown the beef Brown the beef with onion and seasonings so that it tastes like a burger!

    STEP 2. Begin layers. Place the potatoes in a greased casserole dish, then add cooked beef plus beef broth.

    Four image collage showing last four process steps of Big Mac casserole.

    Tip: Always drain the beef before seasoning it. This way all your seasonings won’t go down the drain!

    STEP 3. Cheese it up. Add cheese and then bake until the potatoes are cooked through.

    STEP 4. Add toppings. If you are going to eat the entire casserole at once, you can add some toppings for the perfect presentation!

    Recipe Pro Tips

    • Toppings go last. If you don’t think you’ll eat the casserole all at once, save the toppings for plating.
    • Secret sauce. Add other seasonings or swap out the type of mustard used for your own secret recipe!
    Big Mac Casserole in white baking dish, with all the toppings.

    Recipe FAQs

    What other sauce can I use for a casserole?

    I love this perfect ratio of mayo, ketchup, and mustard. You can always dress it up by adding pickle relish, Worcestershire sauce, garlic or onion powder, or replacing the yellow mustard for a brown or spicy variety.

    What are the best toppings for a burger with secret sauce casserole?

    All your burger toppings! Lettuce, tomatoes, raw onion, the works! Pickles for the pickle lovers. Just be sure and add the toppings to each individual plate. You won’t want them on the casserole if you have leftovers because they won’t reheat nicely.

    What kind of potatoes should I use for Big Mac Casserole?

    Russet potatoes will hold up the best to the beef and sauce, so that’s really the only fresh potato I would use. If you’re pressed for time and don’t want to slice them, use a bag of frozen hash browns! The cooking time will be cut to 30-40 minutes if going this route.

    What to Serve with Cheeseburger Casserole

    A fresh green salad is the perfect side to a hot casserole! It’s my favorite way to serve it. You could also add a honey lime fruit salad. Finally, to round out the fast food experience, end the night with a cookies and cream shake.

    A serving of Big Mac casserole on a white plate, sitting by napkin and tomatoes.

    Storage

    Leftover casserole is great for up to 3 days in the fridge. Reheat in the oven or microwave. I recommend only adding toppings to your plates when serving – they won’t reheat well so don’t put them directly on the casserole.

    More Casserole Recipes You’ll Love

    • Walking Taco Casserole being lifted out of baking dish with spoon.
      Walking Taco Casserole
    • Close up photo of a spoonful of a creamy chicken and cheese casserole topped with crispy browned tater tots
      Chicken Tater Tot Casserole
    • Serving of John Wayne Casserole on a white plate.
      John Wayne Casserole
    • doritos chicken casserole on plate
      Doritos Chicken Casserole

    Did you make this? I’d be so grateful if you left a “star” rating below to let me know what you thought! Then, the next time you need a quick and easy recipe, come back to Fantabulosity to browse all of my easy recipes!

    Recipe

    Big Mac Casserole in white baking dish, with wooden spoon dishing out casserole.
    Print Pin
    5 from 1 vote

    Big Mac Casserole

    Big Mac Casserole: All the flavors of your favorite fast-food burger in a casserole! A perfect family dinner recipe or even a casserole for a potluck.
    Course Dinner
    Cuisine American
    Prep Time 10 minutes minutes
    Cook Time 50 minutes minutes
    Total Time 1 hour hour
    Servings 5
    Calories 638kcal
    Author Jessica Burgess

    Ingredients

    • 1 pound ground beef
    • 1 cup diced white onion
    • ½ cup beef broth
    • ½ teaspoon garlic powder
    • ½ teaspoon black pepper
    • 1 teaspoon salt
    • 1 teaspoon worcestershire sauce
    • 2-3 medium russet potatoes peeled and diced (about 2 cups)
    • 2 cups shredded cheddar cheese

    Sauce

    • ½ cup mayonnaise
    • ¼ cup ketchup
    • 2 teaspoons yellow mustard

    Toppings

    • 1 cup shredded lettuce
    • 1 medium tomato diced
    • ¼ cup hamburger dill pickles rough chopped
    • 2 tablespoons red or white onion diced

    Instructions

    • Prepare an 8X8 baking dish with non-stick spray and heat the oven to 350 degrees.
    • Place beef and onions into a skillet over medium heat. Cook until the meat is just done and the onions are translucent. Drain any fat from the pan.
    • Add the salt, pepper, garlic, and worcestershire sauce to the pan. Stir to incorporate then remove from heat.
    • Place diced potatoes in an even layer in the prepared baking dish. Then cover the potatoes with the cooked beef. Then pour the beef broth over the top.
    • Place into the preheated oven for 45-50 minutes or until the potatoes are soft and most of the liquid is absorbed.
    • Remove from the oven and sprinkle over shredded cheese. Cook for another 5 minutes until the cheese is melted.
    • Make the sauce. Mix the mayonnaise, ketchup, and mustard together until well combined.
    • Pour half of the sauce over the casserole. You can use more of the sauce if desired or use the extra when serving.
    • Lastly, sprinkle toppings onto the casserole and enjoy!

    Notes

    • Use frozen cubed hash browns (straight from frozen) instead of fresh potatoes. This will reduce your cooking time to 30-40 minutes.
    • Swap in water for the broth if you’re out.
    • Add more seasonings or use different mustard in the burger sauce if you prefer.

    Nutrition

    Serving: 1serving | Calories: 638kcal | Carbohydrates: 25g | Protein: 31g | Fat: 46g | Saturated Fat: 17g | Polyunsaturated Fat: 11g | Monounsaturated Fat: 13g | Trans Fat: 1g | Cholesterol: 116mg | Sodium: 1265mg | Potassium: 867mg | Fiber: 2g | Sugar: 6g | Vitamin A: 824IU | Vitamin C: 12mg | Calcium: 370mg | Iron: 3mg

    Pizza Sliders

    March 2, 2024

    Close up of pizza sliders on white plate.

    Pizza Sliders: Nothing beats biting into a hot pepperoni pizza but what about in sandwich form? These Pepperoni Sliders are easy to make and easy to eat.

    Close up of pizza sliders on wooden cutting board.

    The classic pairing of pepperoni and cheese – it’s my favorite pizza topping! I made it even easier to eat and share by sandwiching it inside slider rolls. The topping is out of this world and better than any crust addition!

    If you also can’t get enough pepperoni, I’ve baked it into a bubbly pizza dip as well as tossed it into a savory monkey bread. And if pork isn’t your thing, you can also make turkey sliders or use a quick Friday fish slider option!

    [feast_advanced_jump_to]

    Why You’ll Love This Recipe

    • It uses a few ingredients: Nothing is easier than layering meat and cheese on buns, then topping with standard pantry seasonings.
    • Make-ahead recipe: You can even freeze these individually to make quick lunches on the go.
    • Ready in only 30 minutes: This comes together so quickly you can make it on even your busiest nights.

    Ingredients Needed

    Here’s what you’ll need to make this pepperoni pizza slider recipe.

    Labeled ingredients for pizza sliders sitting on kitchen counter.
    • Rolls – Grab a pack of rolls that are all together in a slab. This makes for the easiest assembly of the sliders as you can overlap the toppings inside since you’ll be cutting them apart later. You can certainly use other rolls or homemade rolls, but you may want to carefully top each bun in that case.
    • Meat – Pepperoni is my favorite here, but try out salami or other cured meats. If you would like to use something like sausage or bacon, be sure and cook it first as the sandwiches don’t cook long enough to cook raw meat.
    • Cheese – The tang of provolone pairs perfectly with pepperoni, but feel free to use any of your favorite melty pizza cheese. Of course mozzarella is traditional on pizza, so we use that as well!
    • Pizza Sauce – It would be a dry, sad pizza without a layer of sauce! Just use whatever you prefer from the store to make this meal quick.
    • Seasoning – Melt some butter so your seasonings stick well. I tend to use Italian seasoning as well as some fresh parsley to really bring out the herbs.

    *Be sure to see the recipe card below for the full ingredients list & instructions!*

    How to Make Pizza Sliders

    Nothing is easier than layering and baking! Set everything up in easy reach so you can get them in the oven fast.

    Hawaiian buns sliced in half, to make sliders.

    Then it’s just a matter of layering!

    Image collage of process steps for making pizza sliders.

    STEP 1. Slice and sauce. Slice the slab of rolls horizontally and place on a baking sheet. Add sauce.

    STEP 2. Begin layering. Start with sliced cheese for a sturdy base, then layer on the pepperoni evenly.

    Top buns and seasoned butter added to top of buns, sitting on cookie sheet.

    Tip: Carefully slice the slab of rolls so they remain intact. This ensures your toppings don’t melt out all over the place.

    STEP 3. More cheese. Top with the shredded cheese and Italian seasoning.

    STEP 4. Close it up. Add the top bun, then coat in melted butter. Finally, add more seasoning and the remaining cheese and you are ready to bake!

    Recipe Pro Tips

    • Line the baking sheet. For easiest cleanup, line your baking sheet with parchment or foil so the sandwiches peel right up.
    • Use unsalted butter. I strongly prefer unsalted butter here as the seasonings, meat, and cheese all bring a lot of strong flavors.
    Pizza slider being pulled away from slider buns, with a cheese pull.

    Recipe FAQs

    What type of baking dish is best?

    You can make these on a baking sheet or inside a 9×13 baking dish. It all depends what you have on hand and what you prefer. The baking sheet allows some cheese to ooze out the edges, giving you crispy bits. The sliders stay more contained in a baking dish. You might also have an easier time covering a dish with foil for baking rather than rolls on a sheet.

    How do I store leftover pizza rolls?

    Short-Term Storage (1-3 Days): Allow the pizza sliders to cool to room temperature before storing them. This helps prevent condensation, which can make the sliders soggy. Place the leftover pizza sliders in an airtight container or wrap them tightly with plastic wrap. Store in the refrigerator for up to 1-3 days. If stacking the sliders, separate layers with parchment paper or plastic wrap to prevent them from sticking together. Consider labeling the container with the date to keep track of freshness.
    Long-Term Storage (Beyond 3 Days): If you don’t plan to consume the pizza sliders within 3 days, it’s best to freeze them for longer storage. Wrap each slider individually in plastic wrap and place them in a zip-top freezer bag or an airtight container. Label the container with the date and contents for easy identification.

    How do I reheat these pepperoni sliders?

    When ready to eat, thaw the frozen pizza sliders in the refrigerator overnight. Gradual thawing helps maintain their texture. Reheat the pizza sliders in an oven, toaster oven, microwave, or air fryer, depending on your preference. Consider using an oven or air fryer for a few minutes to restore crispiness.

    What to Serve with Pepperoni Sliders

    Fresh fruit and a salad is my go-to to round out a quick dinner like this. Setting out freshly cut produce means everyone can grab their favorites!

    Close up of cheese pull from pizza slider being lifted up.

    More Slider Recipes You’ll Love

    • Stack of roast beef sliders.
      Roast Beef Sliders
    • Chicken salad with grapes and apples, sitting on bread.
      Harvest Chicken Salad
    • Cheeseburger Sliders
      Cheeseburger Sliders with Hawaiian Rolls
    • Fried chicken sliders on white plate, topped with mayo, lettuce and pickles.
      Fried Chicken Sliders

    Did you make this? I’d be so grateful if you left a “star” rating below to let me know what you thought! Then, the next time you need a quick and easy recipe, come back to Fantabulosity to browse all of my easy recipes!

    Recipe

    Close up of pizza sliders on white plate.
    Print Pin
    Be the first to rate!

    Pizza Sliders

    Pizza sliders are the taste of an amazing pizza in a bite-sized sandwich!
    Course Appetizer, Dinner
    Cuisine American
    Prep Time 10 minutes minutes
    Cook Time 20 minutes minutes
    Total Time 30 minutes minutes
    Servings 6
    Calories 615kcal
    Author Jessica Burgess

    Ingredients

    • 1 package King's Hawaiian Roll 12 slider buns
    • 1 cup store bought pizza sauce
    • 6 slices provolone halved
    • 6 ounces sliced pepperoni
    • 2 cups shredded mozzarella cheese
    • ½ cup grated parmesan cheese divided
    • 1 teaspoon Italian seasoning

    Topping:

    • 4 tablespoons unsalted butter melted
    • 1 teaspoon garlic powder
    • 1 teaspoon dried oregano
    • 1 tablespoon freshly chopped flat-leaf parsley

    Instructions

    • Preheat your oven to 350°F. Prepare a baking pan or sheet with parchment paper.
    • Slice the Hawaiian sweet rolls in half horizontally, creating a top and bottom layer. Place the bottom half in a baking dish.
    • Spread 1 cup pizza sauce over the bottom halves of the rolls, spreading it evenly. Place a piece of provolone over the sauce. Add a layer of sliced pepperoni on top. Sprinkle 2 cups shredded mozzarella cheese and ½ cup grated parmesan over the sauce. Sprinkle with 1 teaspoon of Italian seasoning. Place the top half of the Hawaiian rolls over the toppings.
    • Mix 4 tablespoons of melted butter, 1 teaspoon of garlic powder, 1 teaspoon of dried oregano, and 1 tablespoon of chopped parsley in a small bowl. Brush the butter and herb mixture evenly over the tops of the rolls.
    • Cover the baking dish with aluminum foil and bake in the oven for about 15 – 20 minutes or until the cheese is melted and the sliders are heated through.
    • Once done, remove them from the oven and let them cool slightly. Sprinkle grated Parmesan cheese over the top before serving.

    Notes

    • These pizza sliders make for a great appetizer, snack, or even a party dish. Feel free to customize the ingredients based on your preferences.

    Nutrition

    Calories: 615kcal | Carbohydrates: 35g | Protein: 28g | Fat: 41g | Saturated Fat: 21g | Polyunsaturated Fat: 2g | Monounsaturated Fat: 12g | Trans Fat: 1g | Cholesterol: 117mg | Sodium: 1329mg | Potassium: 289mg | Fiber: 1g | Sugar: 10g | Vitamin A: 969IU | Vitamin C: 4mg | Calcium: 431mg | Iron: 1mg

    Sweet Potato Bread Pudding

    February 28, 2024

    Serving of sweet potato bread pudding on a white plate, topped with vanilla ice cream.

    Sweet Potato Bread Pudding: This recipe is where Southern charm meets classic comfort. With my popular bread pudding recipe, I knew we had to make a fun spin and this came to mind!

    Each bite is a perfect blend of tender brioche, subtly spiced sweet potatoes, and a caramel-infused sauce that everyone will love for dessert!

    Sweet potato bread pudding serving on a white plate, with a caramel drizzle.

    Still have some sweet potatoes left after making the bread pudding? You could make some Sweet Potato Crunch or this candied yams recipe for a tasty light meal or side dish. Or, if you’ve never made a classic sweet potato pie, it may be a good time to try it!

    [feast_advanced_jump_to]

    Why You’ll Love This Recipe

    • Comfort food at its best: The rich flavors and soft, pudding-like texture provide a cozy and satisfying eating experience, perfect for chilly evenings or as a special treat.
    • Customizable to taste: Whether adding pecans for crunch or experimenting with different spices, this bread pudding can be tailored to your flavor preferences.
    • Impress your guests: This dessert is not only delicious but also presents beautifully, making it an excellent choice for dinner parties or festive gatherings.

    What is Bread Pudding?

    Bread pudding is a timeless dessert that originated as a means to use up stale bread, transforming it into something spectacular with a few simple additions. At its core, bread pudding consists of cubed bread soaked in a sweet custard mixture made of milk, eggs, sugar, and flavorings, then baked until golden and set. 

    I’ve even shared this donut bread pudding with you, and this banana bread pudding, to give you an idea of the different variations you can make!

    🧾 Ingredients Needed

    I’ve highlighted a couple of ingredients with some relevant notes. Aside from this, the ingredients needed are pretty basic.

    Labeled ingredients for sweet potato bread pudding recipe.
    • Day-old Brioche – The texture of day-old brioche is ideal for bread pudding as it soaks up the custard mixture without falling apart, creating pockets of creamy goodness. If you only have fresh bread, lightly toasting it can help achieve a similar texture.
    • Sweet Potatoes – Roasting the sweet potatoes before incorporating them will intensify their natural sweetness and give a deeper flavor to the dish. Be sure to mash them well to achieve a smooth and even distribution through the pudding.
    • Light Brown Sugar – The molasses present in light brown sugar adds a rich and subtle caramel flavor that complements the sweet potatoes. Packing the sugar when measuring ensures consistent sweetness in every batch.

    *Be sure to see the recipe card below for the full ingredients list & instructions!*

    📖 Substitutions

    Sometimes, substitutions are necessary because of ingredients that are unavailable or needed for dietary restrictions. Here are some suggestions that can help:

    • Brioche Bread – If brioche is hard to come by, challah or any rich, eggy bread makes an excellent substitute. For a different spin, croissants in bread pudding will add an extra buttery note to the pudding.
    • Sweet Potatoes – In the absence of sweet potatoes, butternut squash or pumpkin puree can be used. These options still provide the desired creaminess and sweetness, with a subtle variation in flavor profile.
    • Ground Cinnamon – No ground cinnamon? You can substitute with an equal amount of allspice or pumpkin pie spice to maintain the warm and cozy flavors that are characteristic of this dessert.

    📖 Variations

    • Chocolate Chip Addition: For chocolate lovers, stir in a cup of semi-sweet or dark chocolate chips for a gooey and indulgent twist.
    • Fruit Infusion: Give the dish a fruity dimension by incorporating a layer of apple slices or pear chunks spiced with cinnamon between the bread layers.
    • Nutty Topping: A crunchy streusel topping made from a mix of oats, nuts, and brown sugar can add texture and contrast to the soft pudding beneath.
    • Vegan Alteration: Replace dairy milk with almond or coconut milk, use a vegan butter substitute, and swap out eggs for a plant-based egg replacer to cater to a vegan diet.
    • Spirited Sauce: Infuse the sauce with a splash of bourbon or rum for an elevated flavor that pairs perfectly with the spices in the pudding.
    • Holiday Flavors: Mix in some cranberries or raisins soaked in orange liqueur for a festive zing suitable for holiday occasions.

    👩🏻‍🍳 How to Make Sweet Potato Bread Pudding

    This sweet potato pudding is broken into 3 components:

    • prepare the ingredients
    • make the pudding
    • cook and serve
    4 image collage of the process steps to make sweet potato bread pudding recipe.

    STEP 1: Oven Preparation: Begin by preheating your oven to a temperature of 350°F. Prepare a 9 ½-inch casserole dish by lightly spraying it with cooking spray to prevent sticking.

    STEP 2: Bread Cubing: Take your day-old loaf of brioche or French bread and cube it until you have approximately 6 cups. Place the cubed bread evenly into the greased casserole dish.

    STEP 3: Sweet Potato Preparation: Peel and dice some sweet potatoes. Boil them for around 10 minutes in a medium saucepan until they soften. Mash the boiled sweet potatoes in a large bowl and measure out exactly 1 ½ cups for the recipe.

    STEP 4: Sweet Potato Mixture: In a large mixing bowl, combine the following ingredients by whisking together: ½ cup of melted butter, 1 cup of light brown sugar, 1 ½ cups of mashed sweet potatoes, 4 large eggs, 2 cups of whole milk, 1 teaspoon of pure vanilla extract, 1 teaspoon of ground cinnamon, ½ teaspoon of ground nutmeg, and ¼ teaspoon of kosher salt. Ensure the mixture is uniform.

    Image collage showing how to make an easy praline topping for sweet potato bread pudding.

    STEP 5: Assembling the Bread Pudding: Evenly pour the sweet potato mixture over the prepared bread cubes, pressing gently to ensure the bread is thoroughly soaked. Optionally, scatter 1 cup of chopped pecans or walnuts atop the pudding.

    STEP 6: Baking: Transfer the casserole dish to the preheated oven and bake for a duration of 45 – 50 minutes until the top appears golden brown and the center of the pudding has set.

    STEP 7: Sauce Preparation: While the bread pudding bakes, prepare the sauce in a saucepan by melting ½ cup of unsalted butter over a medium heat setting. Stir in 1 cup of light brown sugar, ½ cup of granulated sugar, ¼ cup of heavy cream, 1 teaspoon of pure vanilla extract, and a pinch of salt, ensuring continuous stirring for the sugars to fully dissolve. Allow the mixture to simmer for approximately 5 minutes to slightly thicken.

    STEP 8: Serving: After removing the bread pudding from the oven, immediately drizzle the warm sauce over the top. Allow it to rest for about 10 minutes before serving to let the flavors meld together.

    💭 Recipe Pro Tips

    • Even Distribution: Make sure to press down on the bread cubes after adding the sweet potato mixture to ensure every piece absorbs the custard evenly for a moist and uniform final product.
    • Stick Test: Insert a toothpick or knife into the center of the pudding to check for doneness. It should come out clean or with a few moist crumbs attached, but not wet.
    • Resting Time: Allowing the bread pudding to rest before serving not only lets it cool slightly but also helps the layers set properly for easier slicing.
    • Reuse Heat: The residual heat from the oven after baking the pudding can be utilized to gently warm plates for serving, adding a cozy touch to your dessert experience.
    • Sauce Thickness: If you prefer a thicker sauce, allow it to simmer an additional minute or two, but watch closely to avoid burning. For a thinner sauce, simply add a splash of cream.
    • Advance Prep: You can prepare this dish ahead of time and refrigerate it overnight. If you do, let it stand at room temperature for about 30 minutes before baking.
    Sweet potato bread pudding serving on white plate, with praline sauce drizzled on top.

    📋 Recipe FAQs

    Can I use a different type of milk in the recipe?

    Yes, you can substitute whole milk with other varieties such as 2% milk, skim milk, or a non-dairy alternative like soy, oat, or almond milk in this sweet potato casserole. Keep in mind that changing the type of milk may alter the creaminess and flavor of the pudding.

    Is it necessary to use day-old bread?

    Using day-old bread is recommended as it tends to absorb the sweet potato mixture better without becoming too soggy. Fresh bread can result in a denser pudding, as it may not soak up the custard as effectively.

    Can I make this recipe gluten-free?

    Absolutely! To make this pudding gluten-free, simply use your favorite gluten-free bread in place of brioche or French bread. Ensure all other ingredients are gluten-free as well.

    How do I know if my sweet potatoes are cooked enough?

    Sweet potatoes are ready when they can be easily pierced with a fork or knife and are tender enough to mash. They should not be overly mushy to maintain some texture.

    Can I add additional spices to the recipe?

    You are welcome to customize the spices according to your taste. Consider adding ginger, cloves, or cardamom for a unique twist on the flavor profile.

    What if I don’t have a casserole dish?

    If you don’t have a casserole dish, you can use any oven-proof dish of a similar size. Just make sure it’s deep enough to hold all the ingredients without overflowing as the pudding bakes.

    🍽 What to Serve with Sweet Potato Bread Pudding

    Sweet Potato Bread Pudding is a rich and comforting dessert that pairs marvelously with a variety of accompaniments. For a luxurious finish, consider a dollop of vanilla bean ice cream or a swath of freshly whipped cream. 

    If leaning towards a contrast in flavor, tangy crème fraîche or a scoop of citrus-infused mascarpone can add a refreshing twist. For those looking to balance the sweetness, a side of salted caramel or bourbon-soaked figs offers a salty depth. 

    Lastly, for a simple yet elegant accompaniment, a drizzle of maple syrup or a sprinkle of toasted coconut elevates the dish’s overall warmth and complexity.

    ❄️ Storage

    To best store the Sweet Potato Bread Pudding, allow it to cool completely before covering it with plastic wrap or aluminum foil. Refrigerate for up to 5 days. 

    For freezing, wrap the pudding tightly with both plastic wrap and foil to prevent freezer burn, and freeze for up to 3 months. Thaw in the refrigerator overnight before reheating in the oven at a low temperature until warmed through.

    🥮 More Pudding Recipes You’ll Love

    If you want to try the classic bread pudding, try this Bread Pudding Recipe: Easy Old Fashioned Recipe (With Video!). Or for another variation, grab your favorite chocolate and make the Chocolate Bread Pudding.

    • A serving of 3-ingredient dump cake in a bowl with a dollop of homemade whipped cream.
      Dump Cake Recipe (Easy 3-Ingredient Dessert That Always Works)
    • Orange upside down cake sliced on spatula.
      Orange Upside Down Cake
    • A slice of peach cobbler cheesecake sitting on a plate next to a fork.
      Peach Cobbler Cheesecake (Easy Baked Recipe with Streusel Topping)
    • A slice of Westhaven cake on a round plate.
      Westhaven Cake

    Did you make this? I’d be so grateful if you left a “star” rating below to let me know what you thought! Then, the next time you need a quick and easy recipe, come back to Fantabulosity to browse all of my easy recipes!

    Recipe

    Serving of sweet potato bread pudding on a white plate, topped with vanilla ice cream.
    Print Pin
    4.50 from 6 votes

    Sweet Potato Bread Pudding

    Indulge in the comforting embrace of this delightful Sweet Potato Bread Pudding, a recipe where Southern charm meets classic comfort. Each bite is a perfect blend of tender brioche, subtly spiced sweet potatoes, and a caramel-infused sauce that everyone will love! 
    Course Breakfast
    Cuisine American
    Prep Time 20 minutes minutes
    Cook Time 50 minutes minutes
    Total Time 1 hour hour 10 minutes minutes
    Servings 8 servings
    Calories 837kcal
    Author Jessica Burgess

    Ingredients

    • 14 ounce loaf day-old brioche or French bread
    • 2 medium-sized sweet potatoes
    • ½ cup unsalted butter melted
    • 1 cup light brown sugar packed
    • 4 large eggs
    • 2 cups whole milk
    • 1 teaspoon pure vanilla extract
    • 1 teaspoon ground cinnamon
    • ½ teaspoon ground nutmeg
    • ¼ teaspoon kosher salt
    • 1 cup chopped pecans or walnuts optional

    For the sauce:

    • ½ cup unsalted butter
    • 1 cup light brown sugar packed
    • ½ cup granulated sugar
    • ¼ cup heavy cream
    • 1 teaspoon pure vanilla extract
    • 1 Pinch of kosher salt

    Instructions

    • Oven Preparation: Begin by preheating your oven to a temperature of 350°F. Prepare a 9 ½-inch casserole dish by lightly spraying it with cooking spray to prevent sticking.
    • Bread Cubing: Take your day-old loaf of brioche or French bread and cube it until you have approximately 6 cups. Place the cubed bread evenly into the greased casserole dish.
    • Sweet Potato Preparation: Peel and dice some sweet potatoes. Boil them for around 10 minutes in a medium saucepan until they soften. Mash the boiled sweet potatoes in a large bowl and measure out exactly 1 ½ cups for the recipe.
    • Sweet Potato Mixture: In a large mixing bowl, combine the following ingredients by whisking together: ½ cup of melted butter, 1 cup of light brown sugar, 1 ½ cups of mashed sweet potatoes, 4 large eggs, 2 cups of whole milk, 1 teaspoon of pure vanilla extract, 1 teaspoon of ground cinnamon, ½ teaspoon of ground nutmeg, and ¼ teaspoon of kosher salt. Ensure the mixture is uniform.
    • Assembling the Bread Pudding: Evenly pour the sweet potato mixture over the prepared bread cubes, pressing gently to ensure the bread is thoroughly soaked. Optionally, scatter 1 cup of chopped pecans or walnuts atop the pudding.
    • Baking: Transfer the casserole dish to the preheated oven and bake for a duration of 45 – 50 minutes until the top appears golden brown and the center of the pudding has set.
    • Sauce Preparation: While the bread pudding bakes, prepare the sauce in a saucepan by melting ½ cup of unsalted butter over a medium heat setting. Stir in 1 cup of light brown sugar, ½ cup of granulated sugar, ¼ cup of heavy cream, 1 teaspoon of pure vanilla extract, and a pinch of salt, ensuring continuous stirring for the sugars to fully dissolve. Allow the mixture to simmer for approximately 5 minutes to slightly thicken.
    • Serving: After removing the bread pudding from the oven, immediately drizzle the warm sauce over the top. Allow it to rest for about 10 minutes before serving to let the flavors meld together.

    Notes

    • Even Distribution: Make sure to press down on the bread cubes after adding the sweet potato mixture to ensure every piece absorbs the custard evenly for a moist and uniform final product.
    • Stick Test: Insert a toothpick or knife into the center of the pudding to check for doneness. It should come out clean or with a few moist crumbs attached, but not wet.
    • Resting Time: Allowing the bread pudding to rest before serving not only lets it cool slightly but also helps the layers set properly for easier slicing.
    • Reuse Heat: The residual heat from the oven after baking the pudding can be utilized to gently warm plates for serving, adding a cozy touch to your dessert experience.
    • Sauce Thickness: If you prefer a thicker sauce, allow it to simmer an additional minute or two, but watch closely to avoid burning. For a thinner sauce, simply add a splash of cream.
    • Advance Prep: You can prepare this dish ahead of time and refrigerate it overnight. If you do, let it stand at room temperature for about 30 minutes before baking.

    Nutrition

    Serving: 1serving (⅛ recipe) | Calories: 837kcal | Carbohydrates: 109g | Protein: 14g | Fat: 41g | Saturated Fat: 19g | Polyunsaturated Fat: 9g | Monounsaturated Fat: 9g | Trans Fat: 1g | Cholesterol: 159mg | Sodium: 483mg | Potassium: 525mg | Fiber: 4g | Sugar: 74g | Vitamin A: 9055IU | Vitamin C: 2mg | Calcium: 205mg | Iron: 4mg

    Crockpot Chicken and Stuffing

    February 22, 2024

    Close up of slow cooker Stove Top chicken and stuffing.

    Sometimes you just want to hit the easy button on dinner. This Crockpot Chicken and Stuffing Recipe uses just 4 ingredients and is completely hands-off! It’s a slow cooker recipe that you’ll want to add to your dinner rotation, pronto!

    Slow cooker chicken and stuffing on white plate, sitting in front of Crock Pot.

    Stovetop stuffing is a classic side dish – but have you ever made it to put on top of your protein? It cooks up into a fluffy, soft topping for chicken breast and the soup makes a delicious gravy.

    You can easily make this same Stove-Top chicken casserole in the oven if you prefer firmer stuffing! I also love to use tater tots in a casserole, and you can make regular chicken and gravy and serve over the carb of your choice.

    [feast_advanced_jump_to]

    Why You’ll Love This Recipe

    • It uses a few ingredients: With only 4 ingredients, this recipe uses items that you may even have on hand.
    • Easy leftovers: This reheats wonderfully, making it perfect to have leftovers for lunch the next day!
    • Hands off: Using your crockpot means you can set it and forget it. Let dinner cook while you get chores done. (Similar to the garlic parmesan chicken pasta.)

    Ingredients Needed

    I’ve highlighted a couple of ingredients below with some relevant notes. Aside from this, the ingredients needed are pretty basic.

    Ingredients for slow cooker chicken and stuffing on kitchen counter.
    • Chicken breast – I always buy the best quality chicken I can find. This gives you the best flavor and texture.
    • Stuffing – Chicken flavor pairs the best. You want a regular-size box, not a family size. If you have a different flavor of Stove Top Stuffing, you can still use it, or you can make this Stove Top Stuffing Meatloaf recipe with it.
    • Broth – Chicken broth helps moisten the stuffing so none of it is crunchy. This is my homemade chicken broth recipe if you’d like to make your own.
    • Cream soup – Add tons of flavor and seasoning to the dish with this!

    Substitutions

    Sometimes substitutions are necessary because of ingredients that are unavailable or needed for dietary restrictions. Here are some suggestions that can help:

    • Stuffing – you can use any flavor you have on hand, whether it’s turkey or herb.
    • Soup – any creamy condensed soup will work here, so feel free to adjust your dish by using cream of mushroom soup or cream of celery.

    Variations

    • Cook Method – if you prefer to use the oven, I’ve got a very similar recipe for Stove Top Stuffing Casserole!

    How to Make Slow Cooker Chicken with Stuffing

    This easy crock pot chicken recipe only requires you to layer and cook, making it great for kids to help out, too! No hot stove for them to contend with.

    *Be sure to see the recipe card below for the full ingredients list & instructions!*

    Image collage of how to make slow cooker chicken and stuffing.

    STEP 1. Add chicken. Place the chicken in the bottom of the slow cooker (Image 1).

    Cooked chicken in slow cooker with stove top stuffing.

    Tip: Be sure to use a rubber spatula to completely cover the top of the chicken, ensuring it will stay moist while cooking.

    STEP 2. Add soup. Spread the soup evenly over the chicken (Image 2). Use the condensed soup as-is; do not dilute!

    Chicken breast being held by spatula over slow cooker.

    STEP 3. Make stuffing. Much like making it on the stovetop, we are adding the broth to the stuffing to soften it up. Do this in a separate bowl (Image 3).

    STEP 4. Top and cook. Spread the softened stuffing over the chicken and let cook for 3 hours (Image 4).

    Cooked chicken and stove top stuffing on white plate, in front of Crock Pot.

    Recipe Pro Tips

    • Fully coat the chicken. To ensure the chicken breast doesn’t dry out, make sure and evenly spread the soup over the chicken, completely coating it.
    • Correct temperature. Use an instant-read thermometer to ensure the chicken is cooked to 165°F.
    Stove Top Stuffing on top of chicken breast, sitting on white plate.

    Recipe FAQs

    How do I store leftover crockpot chicken and stuffing?

    Once dinner is over, let the remainder cool completely then pop in airtight container in the fridge for up to 4 days. You can also freeze for 3 months. Reheat in the oven or on the stovetop, splashing in more chicken broth as needed.

    What type of chicken should I use for the crockpot?

    I prefer boneless skinless chicken breasts because they are nice and lean – chicken tenders also work. Covering them with the soup keeps them from drying out. If you prefer dark meat, make sure it is boneless! It will also take a bit longer to cook, so a thermometer is your best bed to make sure it is cooked through.

    Can I make this chicken and stuffing gluten-free?

    I haven’t tested it to be sure, but I don’t see why not! Make sure both your stuffing and soup are gluten-free, as many cream soups contain flour as a thickener.

    What to Serve with 4-Ingredient Slow Cooker Chicken with Stuffing

    This slow cooker chicken and stuffing works well with a green salad, or roast up your favorite veggies on the side. This is the perfect comfort food!

    Bite of slow cooker chicken with stove top stuffing.

    More Chicken Casserole Recipes You’ll Love

    • Spatula holding up a piece of cheesy chicken.
      Cheesy Chicken
    • Baked chicken and rice casserole in baking dish.
      Old Fashioned Chicken and Rice Casserole
    • Chicken Pot Pie Casserole in white baking dish
      Chicken Pot Pie Casserole
    • Taco Chicken Casserole on a plate.
      Taco Chicken Casserole

    Did you make this? I’d be so grateful if you left a “star” rating below to let me know what you thought! Then, the next time you need a quick and easy recipe, come back to Fantabulosity to browse all of my easy recipes!

    Recipe

    Close up of slow cooker Stove Top chicken and stuffing.
    Print Pin
    4.80 from 5 votes

    Crockpot Chicken and Stuffing

    Nothing beats the ease of this 4-ingredient meal! Everyone will enjoy this easy crockpot chicken and stuffing meal that cooks while you wait.
    Course Main Course
    Cuisine American
    Prep Time 10 minutes minutes
    Cook Time 3 hours hours
    Total Time 3 hours hours 10 minutes minutes
    Servings 4
    Calories 335kcal
    Author Jessica Burgess

    Equipment

    • slow cooker

    Ingredients

    • 2 pounds boneless skinless chicken breasts
    • 1 box chicken stuffing mix 6 oz
    • 2 cups chicken broth
    • 1 can cream of chicken soup 10.5 oz

    Instructions

    • Lightly coat slow cooker with cooking spray and place chicken inside.
    • Spread condensed soup over chicken (do not dilute).
    • In a bowl, combine stuffing and chicken broth. Mix together and allow to sit for a couple of minutes while stuffing soaks up the broth a little bit.
    • Pour stuffing on top of chicken. Cover and cook on low for 3 hours.

    Video

    Notes

    • To store: Allow to cool and place in airtight container and in the refrigerator for 3-4 days.
    • To freeze: You can freeze this for 3-4 months.

    Nutrition

    Calories: 335kcal | Carbohydrates: 6g | Protein: 51g | Fat: 11g | Saturated Fat: 3g | Polyunsaturated Fat: 2g | Monounsaturated Fat: 3g | Trans Fat: 0.03g | Cholesterol: 154mg | Sodium: 1238mg | Potassium: 898mg | Fiber: 0.01g | Sugar: 1g | Vitamin A: 209IU | Vitamin C: 3mg | Calcium: 27mg | Iron: 2mg

    Apple Pie Baked Beans

    February 14, 2024

    Close up of apple pie baked beans in skillet, with wooden spoon.

    Apple Pie Baked Beans: Everyone loves baked beans – but have you upped the ante with apples? No special equipment is needed to knock these beans out of the park, and the flavor has a southern vibe that’s delicious alone or as a side dish recipe with your favorite BBQ main dish recipe.

    Apple pie baked beans in cast iron skillet, with wooden spoon resting inside.

    These are a great side dish for your summer barbecues, or they can even be transformed into a full lunch depending on what you add, like when we add ground beef to baked beans. I love to serve them up because everyone can take as little or as much as they like.

    Complete your spread by serving these up with some brats cooked in the air fryer and a side of red potato salad. Don’t forget this honey lime fruit salad! And if you want a true BBQ party, don’t sleep on cherry cola pulled pork.

    [feast_advanced_jump_to]

    Why You’ll Love This Recipe

    • Pantry ingredients: Once you try these, you’ll always keep beans and apples on hand!
    • Make-ahead recipe: These only taste better as the ingredients mingle and the flavor develops, so go ahead and make them in advance.
    • Hands off: Saute a couple of ingredients then even toss them in the slow cooker for the ultimate convenience.

    Ingredients Needed

    Here’s what you’ll need to make these apple pie baked beans!

    Labeled ingredients for apple pie baked beans.
    • Beans – Select your favorite canned baked beans. Be it maple, bourbon, even vegetarian. Whichever type you already enjoy plain will love to be doctored up.
    • BBQ Sauce – Again, choose your favorite. Because we are adding a few types of sugar, I try and pick a less sweet option to balance things out.
    • Bacon – Don’t overcook this. You want it to crumble but not disappear. You could also substitute with a ground meat of choice OR add ground beef, pork, etc. to turn this into a full meal.
    • Pie filling – Pick up a can at the store or use home-canned if you have your own family recipe. I think a homemade pie filling just adds to the down-home good feelings of this dish.

    *Be sure to see the recipe card below for the full ingredients list & instructions!*

    How to Make Baked Beans With Apple Pie Filling

    Sauté some ingredients to release their flavors, and then you are just stirring and simmering!

    Image collage of process steps for apple pie baked beans.

    STEP 1. Sauté onions. No one wants to bite into raw onions, so go ahead and saute them up until soft.

    STEP 2. Combine. Add remaining ingredients (except bacon) and stir well to combine.

    Apple pie baked beans in a cast iron skillet, sitting by apples and a dish towel.

    Tip: Dice the onion small. It adds a ton of flavor, but no one really likes a giant bite in their bowl. This will also make them cook faster so you get to simmering!

    STEP 3. Simmer. Add the bacon last so it doesn’t fall completely apart, then simmer until thickened and heated through.

    Recipe Pro Tips

    • Try a crock pot. Sauté the onions in a skillet, then combine everything in a slow cooker and heat on low for 2 hours. This is also a great way to keep them warm at a gathering.
    • Layers of flavor. Select beans, bbq sauce, and pie filling that all play nicely together. They each bring their unique flavors!
    Close up of apple slices in baked beans in skillet.

    Recipe FAQs

    Can I turn this into a full meal?

    Definitely! Add ground beef, sausage, or pork to the skillet with the onions and cook through. Drain any grease before proceeding with the recipe. This adds even more protein and will help stretch the pot to feed more mouths.

    How do I store leftovers?

    These will keep for up to 3 days in the fridge if stored in an airtight container. You can also freeze for up to 3 months.

    What to Serve with Apple Baked Beans

    These are the perfect summer party side dish. To find another side dish recipe that goes with apple pie baked beans, this KFC coleslaw recipe is amazing alongside a sweet and hearty side dish.

    I also recommend a marshmallow fruit dip with fresh fruit. For dessert, try your hand at some mini trifles, and wash everything down with freshly made fruit punch.

    Make Ahead and Freeze

    Sauté the onions in butter and then combine them with the remaining ingredients in a large freezer bag. You can freeze them for up to 3 months. When you are ready to enjoy, allow the contents of the bag to thaw before transferring them to a baking dish and baking at 325°F for 45 minutes.

    More Bean Recipes You’ll Love

    • Dr. Pepper baked beans in a cast iron and wooden spoon spooning out a serving.
      Dr. Pepper Baked Beans
    • Instant Pot Green Beans and Potatoes in a white serving dish
      Instant Pot Green Beans and Potatoes
    • Bowl of ham and beans with spoon, and cornbread sitting on side of bowl.
      Ham and Beans Recipe
    • 3 bean salad recipe - cilantro lime, black beans, dark red kidney beans, pinto
      3 Bean Salad Recipe – Mexican Side Dish

    Did you make this? I’d be so grateful if you left a “star” rating below to let me know what you thought! Then, the next time you need a quick and easy recipe, come back to Fantabulosity to browse all of my easy recipes!

    Recipe

    Close up of apple pie baked beans in skillet, with wooden spoon.
    Print Pin
    5 from 2 votes

    Apple Pie Baked Beans

    You won't need anything fancy to knock these apple pie baked beans out of the park, and your guests will be asking for the recipe for their next BBQ!
    Course Side Dish
    Cuisine American
    Prep Time 5 minutes minutes
    Cook Time 50 minutes minutes
    Total Time 55 minutes minutes
    Servings 5
    Calories 625kcal
    Author Jessica Burgess

    Ingredients

    • ½ small sweet onion diced
    • 1 tablespoon butter
    • 21 ounces canned apple pie filling
    • 28 ounces original baked beans
    • ¾ cup BBQ sauce
    • 8 strips bacon cooked to crispy and loosely crumbled
    • ¼ cup maple syrup
    • 1 teaspoon cinnamon
    • ¼ cup dark brown sugar

    Instructions

    • Preheat the oven to 325°F.
    • In a heavy-bottomed skillet or cast iron skillet (cast iron is ideal), melt the butter over medium heat. Add the onions and sauté until translucent.
    • Add the apple pie filling, baked beans, BBQ sauce, maple syrup, cinnamon, and brown sugar to the skillet and stir until well combined. Next, add the bacon and stir once more. Adding the bacon after the other ingredients ensures that the bacon doesn't crumble too much.
    • Bake for 45 minutes or until completely warm throughout and bubbly on the edges.

    Video

    Notes

    • Feel free to make your own apple pie filling to use here!
    • You can also use homemade baked beans if you are feeling ambitious.
    • Want a little extra something? Try adding ½ cup bourbon when sautéing the onions.

    Nutrition

    Calories: 625kcal | Carbohydrates: 105g | Protein: 13g | Fat: 19g | Saturated Fat: 7g | Polyunsaturated Fat: 3g | Monounsaturated Fat: 8g | Trans Fat: 0.1g | Cholesterol: 40mg | Sodium: 1413mg | Potassium: 806mg | Fiber: 11g | Sugar: 53g | Vitamin A: 209IU | Vitamin C: 7mg | Calcium: 143mg | Iron: 4mg

    Pork Tenderloin in the Oven

    February 9, 2024

    Roasted pork tenderloin sliced on platter, surrounded by onions.

    Pork Tenderloin in the Oven: Easy ingredients such as onions, butter, salt, pepper, thyme, basil, garlic, and onion powder… the flavor packs a punch!

    Roasted pork tenderloin on platter with cooked onions.

    Tenderloin recipes are one of our favorite cuts of meat around here, so make sure to check out our beef tenderloin and deer tenderloin recipes too! Pork tenderloin also comes out great as a slow cooker recipe.

    Hey Fantabulosity readers! It's Meg from Meg’s Everyday Indulgence, again checking in with a ridiculously delicious and easy roasted pork tenderloin.

    [feast_advanced_jump_to]

    Why You’ll Love This Recipe

    • It uses a few ingredients: I'm betting you have all the ingredients for this juicy pork tenderloin (except for maybe the pork) in your pantry and refrigerator already.
    • Amazing flavor: This roasted pork starts with a sliced onion on the bottom of your pan. This provides a delicious little rack for the pork so it doesn't sit in the juices while it roasts, adds some flavor, and gives a yummy little accompaniment to the pork when it's finished.
    • Effortless yet impressive: Despite its simplicity, this recipe creates a tenderloin that is mouth-wateringly succulent and brimming with flavor, making it an impressive main dish for any occasion. It’s the perfect go-to when you want to present an elegant meal without spending hours in the kitchen.

    How to Cook Pork Tenderloin Perfectly

    This best baked pork tenderloin recipe only takes about 35 minutes to roast in the oven at 400°.

    I don't know about you all but pork was a meat I always used to struggle to cook. It was either underdone or cooked so long it resembled jerky when chewing it. I just couldn't seem to find the sweet spot when it came to pork.

    What changed things for me? A digital meat thermometer with a temperature alert feature. You set the temperature you would like your food to be cooked, insert the probe in the thickest part of the meat, and put it in the oven (or grill or slow cooker). It's oven safe and an alert will go off when the desired temperature has been reached.

    I'm telling you, the instant-read thermometer is a complete game-changer. Especially when it comes to pork.

    The safe temperature to cook pork to is now 145 degrees F so I set it to that temperature and then let it rest for 10 minutes after removing it from the oven.

    Letting the pork rest, allows the pork to redistribute the juices and will keep it juicy rather than everything running out when you slice it.

    TIP: The pork will also continue to cook in those 10 minutes so you could even set your thermometer to 140 degrees F instead if you want it cooked right to 145 degrees.

    For me, I like it a little more just because even though I know it's safe, the pink still freaks me out a little.

    You can tell by looking at this gorgeously roasted pork tenderloin that it's fancy enough to make for special dinner guests but you can also easily whip it up for your family on a Wednesday night too.

    Slow Cooker or Crock Pot Pork Tenderloin Option

    Although cooking pork tenderloin is rich and juicy when roasted in the oven, it's also a great option for the slow cooker. I tested it both ways and they yielded in amazing flavor and buttery goodness.

    So, if you need to be away from your oven, prepare the pork tenderloin exactly as stated in the instructions, just placing it in the slow cooker instead of a roasting pan. Cook on high for 4 hours and dinner will be ready to go.

    Ingredients Needed

    I’ve highlighted a couple of ingredients with some relevant notes. Aside from this, the ingredients needed are pretty basic.

    Labeled ingredients for roasted pork tenderloin sitting on counter.
    • Pork Tenderloin – It’s important to trim any excess fat from the pork tenderloin before seasoning and roasting. Though some fat can add flavor and juiciness to a lean cut of meat, too much may cause a greasy outcome which can overshadow the other flavors. 
    • Dried Thyme and Basil – Dried herbs such as thyme and basil pack a potent punch, so use them sparingly. They are ideal for roasting as they hold up well under high heat and infuse the meat with a rich, aromatic flavor profile. Remember, you can always add more, but you can’t take it away once it’s in there!
    • Butter – The ingredient image above shows 2 Tablespoons of butter. This was the original recipe, however, adding one more tablespoon of butter helps spread items around much easier, so 3 are recommended.
    • Garlic Powder – Garlic powder offers a smoother, less aggressive flavor than fresh garlic. It mixes well with other dry seasonings, providing a consistent garlic flavor throughout the dish. However, be careful not to confuse it with garlic salt, which would alter the salt content of your dish.
    • Water – although not shown in the ingredient photo, it’s best to add about ¼ cup of water to bottom of the pan so items don’t burn.

    *Be sure to see the recipe card below for the full ingredients list & instructions!*

    Substitutions

    Sometimes substitutions are necessary because of ingredients that are unavailable or needed for dietary restrictions. Here are some suggestions that can help:

    • Butter – If you’re looking for a lower-fat option, you can use olive oil, which adds a nice, rich flavor. For a dairy-free alternative, you can use coconut oil. It has a slight coconut taste but shouldn’t significantly affect the overall flavor of the dish.
    • Salt – For those watching their sodium intake, you can use a salt substitute or simply reduce the amount of salt used. Keep in mind that this may affect the overall taste.
    • Onion – If you’re out of onions, you can use shallots or even a bit of leek for a similar flavor. As an absolute last resort, a small amount of onion powder can be used, but fresh is best for this simple recipe. 
    • Dried Thyme and Basil – For a different flavor profile, you could use rosemary or oregano as an alternative. If you have fresh herbs, remember that you typically need to triple the amount as fresh herbs are less potent than dried. 
    • Garlic Powder and Onion Powder – If you don’t have these, you can substitute them with fresh garlic and onion, but remember that the flavor could be more intense. If you have granulated garlic or onion, you can use them in a 1:1 ratio.

    Variations

    • Spicy Pork Tenderloin: If you enjoy a little heat in your meals, incorporate some chili flakes, cayenne pepper, or a spice rub into your rub. The heat will contrast nicely with the richness of the pork.
    • Citrus Flavored Pork: Citrus flavors pair wonderfully with pork. Try adding some grated lemon or orange zest to your rub for a zesty twist.
    • Herb-Crusted Tenderloin: For an even more pronounced herb flavor, consider creating a dry rub crust of mixed herbs such as rosemary, oregano, and thyme. Press them onto the surface of the pork before roasting.
    • Honey Glazed Pork: For a sweet spin on the recipe, prepare a glaze using honey, Dijon mustard, and a bit of soy sauce. Brush this onto the pork in the last 10 minutes of cooking for a beautifully caramelized exterior.
    • Bacon-Wrapped Pork: For a truly indulgent variation, wrap your pork tenderloin in bacon before roasting. The bacon not only adds flavor but also keeps the pork moist and juicy.

    How to Make Roasted Pork Tenderloin

    This roast pork recipe is broken into 2 components:

    • Prepare the meat rub
    • Cook the tenderloin
    Image collage of roasted pork tenderloin showing steps of the process.

    STEP 1. Preheat oven. preheat oven temperature to 400 degrees F. Layer onion in the bottom of a small baking dish. Pat dry the pork.

    STEP 2. Prepare pork. Rub the pork evenly with butter and place on top of the onions. Add ¼ of a cup of water to the bottom of the pan to prevent the onions from burning.

    Baked pork tenderloin in baking dish.

    STEP 3. Make rub. In a small bowl, combine the salt, pepper, thyme, basil, garlic powder, and onion powder. Sprinkle evenly over the pork tenderloin and slightly press into the butter. 

    STEP 4. Bake. The cooking time is about 27 to 35 minutes, or until the internal temperature reaches 145 degrees F and is a nice golden brown. Remove from the hot oven and allow to rest for 10 minutes before slicing. Drizzle pan sauce over the pork when serving. 

    Recipe Pro Tips

    • Resting the Meat. For the best results, resting the pork tenderloin after it comes out of the oven is a crucial step. This allows the juices to redistribute throughout the meat, resulting in a moist and flavorful dish.
    • Quality of Ingredients. Using high-quality ingredients is the best way to enhance the taste of your dish. For instance, using fresh herbs instead of dried ones (where possible) can bring out more vibrant flavors.
    • Avoid Overcooking. Pork tenderloin can easily become dry if overcooked. To prevent this, use a meat thermometer and pull the pork out of the oven when it reaches 145 degrees F. Remember, the meat will continue to cook a little even after it’s removed from the oven due to residual heat.
    • Seasoning. Don’t rush the seasoning process. Allow the seasonings to meld with the pork for at least 15 minutes before cooking. If you have time, let it marinate in the fridge for a few hours for even better flavor.
    Sliced roasted pork tenderloin on platter, with spoon pouring gravy over the top.

    Recipe FAQs

    Can I use different cuts of meat?

    Yes, you can substitute pork loin for pork tenderloin in this recipe. However, pork loin is larger and therefore will require a longer cooking time. Always use a meat thermometer to ensure that the internal temperature
     reaches 145 degrees F
    .

    Can I make this recipe ahead of time?

    Yes, you can prepare the pork tenderloin and rub the day before cooking. Store it in the refrigerator and allow it to come to room temperature before cooking.

    Can I use fresh herbs instead of dried?

    Absolutely. Fresh herbs will give the dish a more vibrant flavor. Remember, you will need to triple the amount because fresh herbs are less potent than dried.

    What if I don’t have a meat thermometer?

    While it’s recommended to use a meat thermometer to ensure precise cooking, you can also make a small cut into the thickest part of the pork to check its doneness. If the juices run clear and the meat is only slightly pink, it’s usually done.

    Sliced pork tenderloin on white platter, with juices drizzled on top.

    What to Serve with Roasted Pork Tenderloin

    Most love serving this best pork tenderloin recipe with roasted vegetables or roasted potatoes as side dishes! Here are our favorites to serve with it:

    • Garlic Roasted Broccoli
    • Baked Fiesta Ranch Potato Wedges
    • Instant Pot Green Beans and Potatoes

    Or, serve this delicious roasted pork tenderloin with spring mix apple raspberry salad to create the ultimate spring meal.

    Storage

    You can store the leftover roasted pork tenderloin in an airtight container in the refrigerator for up to 3-4 days. The next time you are ready to eat, simply reheat in the oven or in a skillet over medium heat until warmed through. 

    As for freezing, yes, cooked pork tenderloin freezes well. Allow the pork to cool completely, then wrap it in aluminum foil and place it in a freezer-safe bag or container. It can be frozen for up to 3 months. When ready to eat, thaw in the refrigerator overnight before reheating.

    More Pork Recipes You’ll Love

    If you love pork recipes, you’ll absolutely go wild over this pork steak recipe and this one pan pork chops and veggies dish!

    • Close up of southern fried pork chops on white plate, with a pork gravy poured on top.
      Southern Fried Pork Chops
    • Cooked Instant Pot pork butt in white bowl, sitting next to barbecue sauce.
      Instant Pot Pork Butt
    • Slow Cooker Pulled Pork shredded with bbq sauce
      Cherry Coca-Cola Slow Cooker Pulled Pork
    • Pork gravy in white gravy boat with ladle spooning it in to the dish.
      Easy Homemade Pork Gravy Recipe with Drippings

    Did you make this? I’d be so grateful if you left a “star” rating below to let me know what you thought! Then, the next time you need a quick and easy recipe, come back to Fantabulosity to browse all of my easy recipes!

    Recipe

    Roasted pork tenderloin sliced on platter, surrounded by onions.
    Print Pin
    4.52 from 39 votes

    Pork Tenderloin in the Oven

    This Pork Tenderloin in the Oven recipe is simply covered with melted butter and spices, and then baked to a delicous perfection for an easy dinner!
    Course Main Course
    Cuisine American
    Prep Time 10 minutes minutes
    Cook Time 35 minutes minutes
    Total Time 45 minutes minutes
    Servings 4
    Calories 82kcal
    Author Jessica Burgess

    Ingredients

    • 1 large yellow onion peeled and sliced into 4 thick rings
    • 1 to 1 ½ pounds pork tenderloin
    • 3 Tablespoons butter, softened
    • 1 ½ teaspoons kosher salt
    • ½ teaspoon black pepper
    • ½ teaspoon dried thyme
    • 1 teaspoon dried basil
    • 1 teaspoon garlic powder
    • 1 teaspoon onion powder
    • ¼ cup water

    Instructions

    • Preheat oven to 400 degrees F. Layer onion in the bottom of a small roasting pan. Pat dry the pork. 
    • Rub the pork evenly with butter and place on top of the onions. Add ¼ of a cup of water to the bottom of the pan to prevent the onions from burning.
    • In a small bowl, combine the salt, pepper, thyme, basil, garlic powder and onion powder. Sprinkle evenly over the pork tenderloin and slightly press into the butter. 
    • Cook for 27 to 35 minutes, or until the internal temperature reaches 145 degrees F. Remove from the oven and allow to rest for 10 minutes before slicing. Drizzle pan sauce over the pork when serving. 

    Video

    Notes

    • Resting the Meat. Resting the pork tenderloin after it comes out of the oven is a crucial step. This allows the juices to redistribute throughout the meat, resulting in a moist and flavorful dish.
    • Quality of Ingredients. Using high-quality ingredients can significantly enhance the taste of your dish. For instance, using fresh herbs instead of dried ones (where possible) can bring out more vibrant flavors.
    • Avoid Overcooking. Pork tenderloin can easily become dry if overcooked. To prevent this, use a meat thermometer and pull the pork out of the oven when it reaches 145 degrees F. Remember, the meat will continue to cook a little even after it’s removed from the oven due to residual heat.
    • Seasoning. Don’t rush the seasoning process. Allow the seasonings to meld with the pork for at least 15 minutes before cooking. If you have time, let it marinate in the fridge for a few hours for even better flavor.

    Nutrition

    Serving: 1serving | Calories: 82kcal | Carbohydrates: 6g | Protein: 1g | Fat: 6g | Saturated Fat: 3g | Cholesterol: 15mg | Sodium: 773mg | Potassium: 113mg | Fiber: 1g | Sugar: 1g | Vitamin A: 210IU | Vitamin C: 3.4mg | Calcium: 55mg | Iron: 2.1mg

    Kielbasa Pasta

    February 8, 2024

    Close up of pasta recipe with kielbasa on white plate.

    Kielbasa Pasta: My kielbasa pasta is a one-pot dish of savory sausage, tender pasta, and a creamy, tomato-infused sauce that promises to delight your taste buds. 

    Pasta recipe with kielbasa on white plate.

    This Polish sausage pasta dish isn’t just an easy weeknight dinner -it’s a comforting hug in a bowl that’s sure to please everyone at the table. So grab your Dutch oven and let the flavors of this heartwarming meal bring smiles all around your dinner circle!

    Looking for more spicy sausage recipes? You could try this Kielbasa and Cabbage in the Instant Pot for an easy-to-make one-pot recipe. Or, for another spicy alternative, try my Instant Pot Cajun Pasta.

    [feast_advanced_jump_to]

    Why You’ll Love This Recipe

    • Family favorite: This cheesy kielbasa pasta recipe is a hit with both kids and adults. It’s got that cheesy pasta goodness that children love, while adults appreciate the robust flavors and the feeling of a full, satisfied tummy.
    • Versatile: I often switch up the cheeses or throw in different veggies that I have in the fridge, making each time a new adventure in taste. It’s the perfect recipe to get those creative kitchen juices flowing!
    • Leftover magic: If, by some miracle, there are leftovers, they taste even better the next day. The flavors meld and intensify, making lunchtime the highlight of your workday!

    Ingredients Needed

    I’ve highlighted a couple of simple ingredients with relevant notes. Other than this, the ingredients needed are pretty basic.

    Labeled ingredients for kielbasa pasta recipe.
    • Kielbasa – For that deep, smoky flavor we all adore, you can’t go wrong with a good kielbasa. Here’s a little tip: if you want to add an extra zing to your dish, try lightly searing the kielbasa before you toss it into the mix. 
    • Onion and Pepper Mix – Keep a bag of this frozen mix on hand, and you’ll always be ready to add a pop of color and nutrients to your meals. It’s a no-chop, no-fuss shortcut that catapults your cooking from simple to spectacular. 
    • Rotel Tomatoes – These little gems, which contain green chilies, bring a sassy kick to the table! Add them at any stage of the cooking process for a bit of cheeky boldness that will wake up your taste buds. 
    • Butter – We use unsalted for this recipe but you can use salted if you prefer. Just remember that you may want to reduce the amount of salt the recipe calls for if using salted butter.
    • Cream – Double (heavy) cream is best. Make sure it’s at room temperature if added in when cold, it will cause the caramel to split.

    *Be sure to see the recipe card below for the full ingredients list & instructions!*

    Substitutions

    Sometimes substitutions are necessary because of ingredients that are unavailable or needed for dietary restrictions. Here are some suggestions that can help:

    • Kielbasa – No kielbasa sausage? No problem! Try smoked sausage, bratwurst, or even turkey sausage for a lighter take that still packs a punch of flavor.
    • Rotel Tomatoes – If Rotel tomatoes aren’t on hand, dice up some fresh tomatoes and add a small can of green chilies. You’ll get that same vibrant taste that makes the dish pop!
    • Bowtie Pasta: Any type of pasta shape will work, be it fusilli, shells, or penne pasta. It’s just a fun way to play with texture and make each bite interesting!
    • Cheddar Cheese – Feeling adventurous with the cheese? Swap cheddar out for Monterey Jack for a melty, creamy experience or a mild Colby for a softer flavor profile. You can’t go wrong here-cheese is the glue that holds our culinary dreams together!

    Variations

    Variations to a recipe are like adding your own personal riff to a favorite song - it’s where the magic happens! Here are some fun twists you can try:

    • Go Veggie: Swap the kielasa for some hearty portobello mushrooms or eggplants for a vegetarian twist that still delivers on flavor. 
    • Cheese, Please: Try adding a scoop of ricotta for a creamy spin, or sprinkle on some mozzarella and put it under the broiler for a few minutes for a bubbly, golden topping that’s irresistibly Instagram-worthy. 
    • Spice it Up: For those who like a little fire in their forkful, slice in some jalapeños or sprinkle on red pepper flakes to turn up the heat.
    • Garden Fresh: With spring in full bloom, why not fold in some fresh spinach, bell peppers, or arugula right at the end? It adds a pop of color and a dash of freshness that elevates the whole experience. 

    How to Make Kielbasa Pasta

    This Kielbasa pasta is broken into 2 components:

    • Make the sauce
    • Cook the pasta and combine
    Image collage showing process images of kielbasa pasta recipe.

    STEP 1: Heat a Dutch Oven. Let it get nice and hot. Then, pop in a splash of oil, followed by the sausage, onions, and peppers. Let them sizzle undisturbed for 1-2 minutes to get that beautiful browning.

    STEP 2: Stir the ingredients. Give everything a good stir and let it cook for about five minutes more until the sausage is mostly browned and those peppers and onions are nice and tender.

    Final steps showing image collage of how to make kielbasa pasta recipe.

    STEP 3: Add seasoning. Sprinkle in the parsley, oregano, salt, and garlic or some Italian seasoning, and mix them in well. 

    STEP 4: Add tomatoes. It’s time for the Rotel tomatoes. Pour them in and stir, making sure to scrape up all those tasty browned bits from the bottom.

    STEP 5: Simmer, then add pasta. Turn down the heat to medium-low and pour in the broth and cream. Wait for it to start bubbling gently, then welcome the pasta into the pot.

    Close up of kielbasa pasta in pot, with a wooden spoon holding up a serving.

    STEP 6: Cook the pasta. Cover it and let it cook for 10-15 minutes. Peek in occasionally to stir things around and prevent any stickiness.

    STEP 7: Add the cheese. Test the pasta to make sure it’s cooked to your liking, then take the pot off the heat. Now for the grand finale - stir all that cheese into the cooked pasta.

    STEP 8: Add greens. For a bit more color and fresh crunch, throw some chopped green onions over the top as a garnish. 

    Recipe Pro Tips

    • Patience is Key: Resist the urge to stir the pot too frequently. Allowing it to cook uninterrupted means more deliciously crisp edges on your sausage and vegetables. 
    • Stock Matters: Opt for a good quality stock-it’s the secret to a rich, deeply flavored sauce. Home-made or your go-to brand will work wonders here.
    • Cheese Choices: For creaminess, freshly grated cheese blends that are smoother than pre-shredded varieties which often contain anti-caking agents.
    • Divine Leftovers: If you’ve got extra servings, let the flavors mingle overnight. Pasta dishes like this one often taste even better the next day.
    • Pasta Pointers: When combining your pasta with the sauce, undercook it by a minute or two-it’ll continue to absorb and will not get mushy.
    • Herb Hints: Fresh herbs can truly transform a dish. If you have them, use them. If not, dried herbs work, but remember they’re more potent, so use them sparingly.

    Recipe FAQs

    Can I make this Kielbasa pasta recipe ahead of time? 

    Sure thing! You can definitely prepare your veggies and sausage in advance. Keep them refrigerated until you’re ready to start cooking. The cheese sauce
     can also be made ahead and gently reheated when it’s time to mix with pasta. 

    Is this recipe adaptable to different dietary needs?

    Absolutely! It’s super flexible. Gluten-free pasta can be swapped in for a wheat-free option, and there are amazing dairy-free cheeses out there if you’re avoiding dairy. Just keep in mind to check the labels on your sausage as well for any hidden gluten or dairy.

    What kind of cream is best for this recipe?

    I usually go for heavy cream
     because it brings a lovely richness. But if you’re after something a bit lighter, half-and-half will still give you creaminess without the same level of fat. 

    How do I prevent my pasta from getting too soft?

    Remember, the pasta will continue to cook once you’ve added it to the sauce. To keep the perfect bite, cook it ‘al dente
    ‘ - firm to the bite - then it’ll be just right by the time you’re ready to serve. 

    What to Serve with Kielbasa Pasta

    When you’ve got a savory stunner like this Kielbasa pasta on your table, you might be wondering what to pair it with to round off this easy meal. Well, how about a light and crunchy garden salad? It’s a cinch to whip up, and the crisp freshness is the perfect counterbalance to the pasta’s rich, hearty flavors. 

    And for those extra toasty nights, why not chill some zesty lemonade to enjoy alongside? It’s like a little sunshine in a glass - and so ridiculously easy! Whether you’re gathering with family or having a cozy dinner for two, these simple additions turn your dinner time into a feast. 

    Storage

    Stashing away leftovers is a breeze. Simply let the pasta cool down, then transfer it to an airtight container and pop it in the fridge. It’ll stay fresh and tasty for about 3-4 days - perfect for those not-a-cooking-kind-of-night nights.

    This pasta freezes like a champ. Just make sure it’s in a freezer-safe container. I like to leave a little space at the top because it’ll expand slightly once frozen. 

    When you’re ready for a re-run, thaw it overnight in the fridge, then reheat gently on the stove to bring back that just-cooked deliciousness. 

    🍝 More Pasta Recipes You’ll Love

    For a simple meal that will feed the whole family, try this Easy Sausage Pasta Bake. Or, for a recipe that is packed with flavor and tons of color, try this Zesty Italian Pasta Salad Recipe.

    • A slice of shoofly cake sitting on round plate.
      Shoofly Cake
    • Old fashioned potluck cake recipes collage.
      Old-Fashioned Cakes That Still Show Up at Every Potluck
    • A slice of coconut poke cake on a spatula.
      Coconut Poke Cake Recipe
    • A slice of strawberry heaven cake dessert on a plate.
      Strawberry Heaven

    Did you make this? I’d be so grateful if you left a “star” rating below to let me know what you thought! Then, the next time you need a quick and easy recipe, come back to Fantabulosity to browse all of my easy recipes!

    Recipe

    Close up of pasta recipe with kielbasa on white plate.
    Print Pin
    5 from 2 votes

    Kielbasa Pasta Recipe

    This Kielbasa Pasta dish is a blend of savory sausage, tender pasta, and a creamy, tomato-infused sauce that's quick and comforting for an easy dinner recipe.
    Course Dinner, Main Course
    Cuisine American
    Prep Time 5 minutes minutes
    Cook Time 25 minutes minutes
    Total Time 30 minutes minutes
    Servings 6
    Calories 312kcal
    Author Jessica Burgess

    Ingredients

    • 1 Tablespoon Cooking Oil
    • 14 Ounce to 1 Pound Kielbasa Sausage Sliced into Rounds
    • 1 Cup Frozen Onion and Peppers Mix
    • ½ Teaspoon Garlic Powder
    • ½ Teaspoon Salt
    • 1 Teaspoon Parsley
    • 1 Teaspoon Oregano
    • 10 Ounce Can Rotel Tomatoes
    • 2 Cups Chicken Broth
    • ½ Cup Heavy Cream
    • 8 Ounces Bowtie Pasta Uncooked
    • 1 Cup Sharp Cheddar Cheese
    • Optional: ⅓ Cup Green Onion Sliced

    Instructions

    • Heat a Dutch Oven over medium high heat until hot. Once hot add in 1 tablespoon of oil, then add the sausage and onions and peppers. Cook for 2 to 3 minutes before stirring to allow the sausage to brown.
    • Stir, cooking for an additional five minutes until most of the sausage is brown, and peppers and onions are softened.
    • Next add in the parsley, oregano, salt, and garlic. Stir to combine.
    • Add the Rotel tomatoes, stir well. As you are stirring, scrape any browned bits from the bottom of the pan.
    • Reduce heat to medium low then add in the broth and the cream. Bring to a simmer then stir in the pasta.
    • Cover and cook for 10-15 minutes, stirring occasionally to prevent sticking.
    • Once the noodles are done remove from heat and stir in all of the cheese.
    • If desired, garnish with green onions.

    Notes

    5 cups of uncooked bowtie pasta is about 8 ounces. 
    What readers are saying: “Cooked this dish for second time today 3/2/25. Delicious! I did add full cup of heavy cream & 2 cans of broth which it needed to cook pasta and have extra sauce for bread dipping. Excellent, quick dish!”


    Nutrition

    Calories: 312kcal | Carbohydrates: 30g | Protein: 10g | Fat: 17g | Saturated Fat: 8g | Polyunsaturated Fat: 1g | Monounsaturated Fat: 5g | Trans Fat: 0.01g | Cholesterol: 43mg | Sodium: 615mg | Potassium: 139mg | Fiber: 1g | Sugar: 2g | Vitamin A: 489IU | Vitamin C: 0.2mg | Calcium: 163mg | Iron: 1mg

    Chicken and Broccoli Pasta

    January 28, 2024

    Close-up of chicken and broccoli pasta with creamy sauce.

    Delicious and creamy, Chicken and Broccoli Pasta is comfort food at its finest. No one will be mad about broccoli when it’s covered in sauce! A kid-friendly pasta dish that’s ready in just about 30 minutes, and also a great way to get the veggies in.

    Close up of chicken and broccoli pasta on white plate, with fork sticking in to the pasta.

    This creamy white sauce will have you reaching for bread to soak up every last drop from your bowl! It’s similar to Alfredo, but has less cheese than what I’d consider a true Alfredo sauce. If white sauce pastas are your thing, this Marry Me Chicken Pasta recipe and Alfredo chicken lasagna, are an absolute must.

    Craving more comfort food? Chicken and Noodles are ready in under 30 minutes on the stove. I love to make Macaroni and Tomatoes for Meatless Monday to take a break from meat. Or, if you’re a crockpot recipe fan, this crockpot chicken pasta is a must-make.

    [feast_advanced_jump_to]

    Why You’ll Love This Recipe

    • Easy to customize: Read on to see all of the ways you can make this into a family favorite.
    • Use what you have on hand: Change your pasta, meat, or veggies – use up what you have on hand, making this the ultimate easy meal.
    • Ready in only 30 minutes: Have dinner on the table in a flash for those busy nights when you forgot to plan ahead.

    Ingredients Needed

    Here’s what you’ll need to make this broccoli and chicken alfredo pasta.

    Labeled ingredients for making Chicken and Broccoli Pasta, sitting on counter.
    • Pasta – Use any short-cut pasta shape here, as it holds onto the sauce really well. You can definitely use gluten-free pasta! Increase the nutrition of the dish by using whole wheat pasta.
    • Cream – Heavy cream is my preference because the high-fat content allows the sauce to be smooth. You can use whole milk or half-and-half if you’d rather, but I don’t recommend reducing the fat much more than that. Same goes when making this easy Alfredo sauce.
    • Cream Cheese – This adds to the creaminess, and I highly recommend using full fat! However, you may use ⅓ reduced-fat cream cheese if you prefer.
    • Chicken – Boneless skinless chicken breast is most common, but you can substitute skinless chicken thighs if you want a juicier option.
    • Vegetables – I love broccoli, and it seems to be the most popular option with Alfredo. Any vegetable will work!

    *Be sure to see the recipe card below for the full ingredients list & instructions!*

    How to Make Chicken and Broccoli Pasta

    The steps are easy for this pasta recipe, and I’ll show you how to make it:

    Four image collage of process steps for making Chicken and Broccoli Pasta.

    STEP 1. Cook pasta and broccoli. Add broccoli to the boiling pasta for the final 3 minutes of cooking time. Drain and set aside.

    Tip: Read the box carefully for “al dente” on the pasta. About 3 minutes before that time is up is when you’ll want to add your veggies so they are heated through.

    STEP 2. Cook chicken. Season the chicken well and cook in an oiled pan. Make sure it is cooked through!

    STEP 3. Add flavor. Saute the onion until softened then add cream cheese. Stir until semi-melted.

    STEP 4. Make sauce. Slowly stir the chicken broth into the cream cheese, trying to smooth things out. Then, whisk in the cream. Now, whisk in the parmesan until melted.

    STEP 5. Assemble. Return the cooked chicken, broccoli, and pasta to the sauce. Stir to coat completely and serve!

    Final process steps in image collage for Chicken and Broccoli Pasta.
    Chicken and Broccoli Pasta mixed together in skillet.

    Recipe Pro Tips

    • Do not boil! Do not let the sauce come to a boil as this can cause it to “break.” Just let it get to a gentle simmer so everything melts and comes together.
    • Al dente. This Italian phrase means “to the tooth” so that your pasta still has some bite to it when eaten. The pasta will soften a bit more as it rests and then in the warm sauce, so be sure not to overcook it in water!

    Recipe FAQs

    How do you store broccoli with pasta and chicken?

    Store in an airtight container in the fridge for up to 3 days. The pasta will continue to absorb sauce, so you might want to splash in more milk when reheating.

    Can I make this meal vegetarian?

    Try drained and pressed extra firm tofu cut in cubes. Brown it a bit in the oil and seasoning just like the chicken. To make sure it doesn’t break apart, top your bowl with the tofu rather than stirring it into the pasta in the pot.

    What else can I add to the dish?

    Sun-dried tomatoes would add a great taste and texture if you stir them in at the end. Other vegetable ideas are mushrooms and peas. You can also try different hard Italian cheeses such as Romano or asiago.

    What Goes With Chicken and Broccoli Pasta

    I always love a crisp green salad with pasta! It balances out what can sometimes be a heavy dinner. You also can’t go wrong with this Chicken Alfredo Garlic Bread recipe, and a quick bowl of cut fruit is a great palate cleanser.

    Storage

    As stated above, it’s fine in the fridge for a few days! I don’t recommend freezing though, as cream-based sauces will have a drastic change in texture when thawed and will not be smooth.

    More Pasta Recipes You’ll Love

    • My husband said that I HAVE to make this again. It's so easy, so SURE! BBQ Chicken Pasta Recipe
      BBQ Chicken Pasta
    • Baked Feta Pasta Recipe
      Baked Feta Pasta Recipe
    • Taco Pasta Recipe
    • Sausage pasta bake in white baking dish.
      Easy Sausage Pasta Bake

    Did you make this? I’d be so grateful if you left a “star” rating below to let me know what you thought! Then, the next time you need a quick and easy recipe, come back to Fantabulosity to browse all of my easy recipes!

    Recipe

    Close-up of chicken and broccoli pasta with creamy sauce.
    Print Pin
    Be the first to rate!

    Chicken and Broccoli Pasta

    Delicious and creamy, Chicken and Broccoli Pasta is comfort food at its finest and ready in about 30 minutes for dinner.
    Course Main Course
    Cuisine American
    Prep Time 15 minutes minutes
    Cook Time 20 minutes minutes
    Total Time 35 minutes minutes
    Servings 6
    Calories 604kcal
    Author Jessica Burgess

    Ingredients

    • 3 cups penne pasta uncooked
    • 3 cups broccoli florets
    • 2 tablespoons olive oil
    • 2 boneless skinless chicken breasts cut into bite-sized pieces
    • 1 teaspoon garlic powder
    • 1 teaspoon dried Italian seasoning
    • 1 teaspoon salt
    • ½ teaspoon black pepper
    • 1 medium onion chopped
    • 4 ounces cream cheese softened
    • 1 cup chicken broth
    • 1 cup heavy cream
    • ½ cup grated Parmesan cheese
    • Red pepper flakes for a bit of heat optional

    Instructions

    • Cook to al dente per package directions. When the pasta has about 3 minutes remaining, add broccoli florets to the pot. Drain when pasta is done.
    • Heat olive oil in a large skillet over medium heat. Season chicken with garlic powder, salt, pepper, and Italian herbs. Add to the pan and allow to cook through completely. Set chicken aside and return pan to heat.
    • Add a little more olive oil to the pan if needed and sauté the chopped onion until softened and translucent.
    • Add cream cheese to the skillet. Stir to completely melt the cream cheese into the onion.
    • Slowly pour in the chicken broth, stirring constantly until all is added and smooth.
    • Stir in the heavy cream and allow to come to a simmer, but do not boil. Cook for a few minutes until slightly thickened.
    • Remove from the heat and add grated Parmesan cheese, stirring until the cheese melts and the sauce is smooth.
    • Return chicken, pasta, and broccoli to the skillet. Toss to evenly coat everything in sauce.
    • Taste and adjust seasoning as necessary.

    Notes

    • Make this gluten free by substituting a gluten free pasta of your choice!
    • Make sure not to overcook the pasta so it doesn’t become mushy and broken when stirred into the sauce.

    Nutrition

    Calories: 604kcal | Carbohydrates: 51g | Protein: 31g | Fat: 31g | Saturated Fat: 16g | Polyunsaturated Fat: 2g | Monounsaturated Fat: 10g | Trans Fat: 0.01g | Cholesterol: 122mg | Sodium: 860mg | Potassium: 685mg | Fiber: 4g | Sugar: 5g | Vitamin A: 1224IU | Vitamin C: 43mg | Calcium: 168mg | Iron: 2mg

    How to Cook Breakfast Sausage in the Oven

    January 26, 2024

    Breakfast sausage links, cooked, and sitting on a white plate.

    Cooking breakfast sausage in the oven is so easy, and my favorite way to cook it! No constant flipping in a skillet, guessing if it’s done, with grease popping all over the cooktop.

    Baking sausage links only takes about 12 minutes in the oven, and you only have to flip it once, and they turn out so juicy. See my tip in the recipe card to get your sausage links that perfect golden brown; similar to how I make sausage patties in the oven, and hot dogs in the oven.

    Oven baked breakfast sausage links sitting on white plate.

    Did you know that cooking meats in the oven can be so much easier than the stovetop? It’s true. Cooking burgers in the oven, bratwursts in the oven, bacon in the oven, and even pork steaks in the oven are my favorite ways to cook those meats!

    It’s so nice to be able to place the baking dish in the oven, and pull it out when it’s done! Not a ton of babysitting meats on the stove with big messes. So I knew cooking sausage links in the oven would be just as great as cooking any kind of sausages in the oven, or meats for that matter.

    [feast_advanced_jump_to]

    Why You’ll Love This Method

    • Breakfast side dish: While your fried potatoes and onions are cooking on the stovetop and your blueberry waffles are cooking in the waffle maker, the breakfast sausage can be cooking in the oven!
    • Large batch cooking: If you need large family breakfast ideas, you can cook a big batch of breakfast sausage links so easily in the oven! Just use a large baking dish or multiple baking dishes to make the amount that you need.

    Ingredients Needed

    All you’ll need is your favorite brand of sausage links for this! I’m a fan of Jimmy Dean breakfast sausage but any brand will do! (Note: Different brands can mean different sizes/thicknesses of your sausage links, so if yours are bigger than mine, the cook-time could be longer.)

    Raw, breakfast sausage links sitting on counter, next to baking dish.

    Equipment

    You'll need a baking sheet large enough to space out the breakfast links so that they aren't touching.

    If you don't have a traditional baking sheet, that’s ok! There are a few other types of baking pans that can work just as well for making oven-baked sausage links:

    • Cast Iron Skillet: This sturdy pan holds heat very well, which can give your sausage links a nice sear while they cook in the oven.
    • Silicone Baking Mat: It's non-stick and can easily fit into any baking sheet or pan you have.

    How to Make Breakfast Sausage in the Oven

    *Be sure to see the recipe card below for the full ingredients list & instructions!*

    Raw sausage breakfast links in baking dish.

    STEP 1. Preheat. Turn the oven on and preheat it to 350 degrees F.

    STEP 2. Arrange the meat. Arrange the sausage links on a baking pan or baking dish, trying to make sure that they’re not touching each other the best as you can. (You can use parchment paper if you prefer but it’s not necessary.)

    STEP 3: Cook the links. Preheat the oven to 350 degrees and bake for 12-15 minutes, flipping halfway through. For that perfect golden look, broil them for the last 3 minutes or so.

    Cooked, breakfast sausage links in baking dish.

    Recipe Pro Tips

    • Monitor the broiling closely: For the best results when broiling the sausage links for that perfect golden brown look, keep a close eye on them to prevent burning. Everyone's oven is different, and they can go from golden to burnt in no time.
    • Flipping Links: Use a spatula or tongs to flip the links.
    • Don't Overcrowd: Ensure the raw sausage links are not touching each other in the baking pan. This allows for even cooking and browning.
    • If you’re looking for another easy oven protein, see our complete guide on how to cook pork chops in the oven.

    Recipe FAQs

    How long to cook breakfast sausage in oven?

    Baking breakfast sausage at 350° F in the oven can take from 12-15 minutes.

    How do I know when breakfast sausage is fully cooked?

    Make sure the internal temperature reaches 160-170 degrees before serving.

    Can I use this oven method for cooking frozen sausage links?

    You can but the cooking time will be longer. Baking the sausage links at 350 for 18-20 minutes will be a great place to start but depending on the size/brand of your links, the cooking time could be longer. Just a reminder to make sure the internal temperature reaches 160-170 degrees before serving.

    What to Serve with Breakfast Sausage

    Breakfast sausage can be served alone, as a side dish recipe, or even as a part of another recipe, like in these breakfast pigs in a blanket.

    These sausage links go great with sweet breakfast dishes like these strawberry scones or this easy pancake recipe!

    Or of course, serving breakfast sausage links with the classic white gravy and homemade biscuits or these easy 3-ingredient biscuits.

    Storage

    If you happen to have leftover breakfast sausage, allow it to fully cool before placing it in an airtight container before placing it in the refrigerator. Consume the sausage within 3-4 days.

    Reheat any leftover sausage in the microwave, oven, or even in the air fryer.

    More Sausage Recipes You’ll Love

    If you’re hungry for more sausage recipes, here are some of my favorite breakfast sausage recipes using ground sausage!

    • Slice of bacon and sausage quiche on spatula.
      Bacon and Sausage Quiche
    • sausage and egg casserole being lifted out of baking dish
      Sausage and Egg Casserole
    • Jalapeno Sausage Gravy
      Jalapeno Sausage Gravy
    • A close up of a slice of biscuit and gravy casserole.
      Biscuit and Gravy Casserole

    Did you make this? I’d be so grateful if you left a “star” rating below to let me know what you thought! Then, the next time you need a quick and easy recipe, come back to Fantabulosity to browse all of my easy recipes!

    Recipe

    Breakfast sausage links, cooked, and sitting on a white plate.
    Print Pin
    5 from 3 votes

    How to Cook Breakfast Sausage in the Oven

    Cooking breakfast sausage in the oven is so easy and it comes out so juicy, and golden brown on the outside, plus no messy stove-top from grease!
    Course Breakfast, Side Dish
    Cuisine American
    Prep Time 1 minute minute
    Cook Time 12 minutes minutes
    Total Time 13 minutes minutes
    Servings 14 links
    Calories 61kcal
    Author Jessica Burgess

    Ingredients

    • 14 sausage links or feel free to cook as many as you need
    • black pepper optional (some like an extra sprinkle of pepper on their sausage links)

    Instructions

    • Preheat oven to 350°.
    • Line a baking dish or shallow baking pan with sausage links, trying to make sure they don't touch, as much as possible. (I used an 8×8 baking dish to fit 14 sausage links.)
    • Bake in the preheated oven for 12-15 minutes until browned and cooked through, making sure to turn them at least once about halfway through.
      Make sure the internal temperature of the sausage reaches 160-170° before serving.
      TIP: I did turn the oven to "broil" at during the last 3 minutes to get them golden brown. Watch carefully if doing this, so they do not burn, as ovens can cook differently, and baking pans and dishes can cook differently as well.

    Notes

    Cooking frozen sausage links in the oven: It’s possible to cook sausage links in the oven, even if they’re frozen. It will take longer, and the time can depend on the size/brand of breakfast sausage you’re cooking. However, it’s good to allow about 18-20 minutes to cook from frozen. Just keep an eye on it to make sure it doesn’t over cook, or that the internal temperature reaches 160-170°. 
    Storage: Store leftover breakfast sausage in an airtight container in the refrigerator once it has cooled off, for 3-4 days.

    Nutrition

    Serving: 2links | Calories: 61kcal | Protein: 3g | Fat: 5g | Saturated Fat: 2g | Polyunsaturated Fat: 1g | Monounsaturated Fat: 2g | Trans Fat: 0.04g | Cholesterol: 14mg | Sodium: 127mg | Potassium: 50mg | Vitamin A: 15IU | Vitamin C: 0.1mg | Calcium: 2mg | Iron: 0.2mg

    Hot Fudge Cake

    January 24, 2024

    Hot fudge cake sitting on white plate, with a scoop of vanilla ice cream on top.

    Hot Fudge Cake: This easy hot fudge cake (aka brownie pudding) is a crowd-pleaser filled with fudgy chocolate flavor! “Wow,” your guests with this decadent dessert (that is super quick and easy to make)!

    Hot fudge cake sitting on white, square plate with a scoop of vanilla ice cream on top.

    Why You’ll Love This Recipe

    If you like chocolate…or brownies…or chocolate cake…or hot fudge sauce…or all of the above, then this recipe was made for you! (Well, this recipe and this Ding Dong Cake for sure!)

    This hot fudge has all the chocolate flavor you want from a brownie or chocolate cake, and all the moist, gooey goodness of a hot fudge pudding cake. The hot fudge sauce (that makes itself right in the pan while it bakes) is the thing that puts this recipe over the top!

    This old-fashioned hot fudge cake recipe is very similar to a lava cake and it’s guaranteed to be a hit with anyone you share it with! (This old-fashioned chocolate cake is one to keep on hand too!)

    Be prepared for people to ask you for your recipe because this is truly the hot fudge cake to beat all chocolate fudge cakes!

    [feast_advanced_jump_to]

    Ingredients

    Can you believe you can make this gooey, decadent-looking dessert with simple ingredients that most of us keep as pantry staples? It’s true!

    *Be sure to see the recipe card below for the full ingredients list & instructions!*

    This is all you need to make hot fudge cake:

    Ingredients for hot fudge cake sitting on kitchen counter, labeled with measurements.

    Ingredient Notes:

    • Cocoa Powder – you’ll use 6 Tablespoons but not all at the same time. Make sure you use 4 Tablespoons in the first layer and then the remaining 2 in the second, powdery layer.
    • Milk – I used 1% milk but you can use whole, 2%, or skim! Or, you can even try using almond milk, coconut milk, or your favorite type of milk.
    • Brown Sugar – I lightly packed our brown sugar for this. (Meaning, I gently pressed it down in to the ½ cup measurement, before pouring it.)

    How to Make Hot Fudge Pudding Cake

    First 4 steps to making hot fudge cake.
    1. Heat oven to 350℉ and grease an 8 inch square cake pan or a rectangular pan that has a 2 quart (8 cup) capacity.
    2. In a medium bowl, whisk the flour, baking powder, salt, sugar and 4 Tablespoons of the cocoa powder.
    1. Add the milk, vanilla, and melted butter and stir until smooth. The batter will be thick. 
    1. Pour the batter into the prepared pan and spread evenly with an offset spatula.
    1. In a small bowl, combine the brown sugar and the remaining 2 Tablespoons of cocoa powder. Sprinkle the mixture evenly over the cake layer in the pan. 
    Final steps for making hot fudge cake.
    1. Pour hot water over the brown sugar mixture.
    1. Bake for 40-45 minutes at 350 degrees f. The cake should be set in the center and you will see the sauce bubble up around the edges when it’s finished. 
    1. Let cool for 5-10 minutes before serving. Serve your warm chocolate cake with a scoop of ice cream or whipped cream.
    Spoon scooping hot fudge cake in baking dish.

    Substitutions

    If you need to make a substitution, here are our suggestions:

    • Coffee for Water – instead of using water, you could pour cold brewed coffee over the brown sugar and cocoa mixture. The result will be a slight mocha flavor to your hot fudge cake!
    • Milk Swap – instead of using milk, you could use whole milk or heavy cream to create an even richer hot fudge cake! Also, if you have buttermilk in the fridge that works in place of the milk as well.

    Variations

    This recipe is AMAZING (it might be the greatest thing since apple pie) as it is, but we know some people will want to jazz it up a bit to make it their own. We love a good kitchen experiment, so here are some of our suggestions:

    • Extra Chocolate – if you want to take the fudge in hot fudge cake to a new level, try mixing in ½ cup of chocolate chips to your batter! Get creative and try it out with dark chocolate chips, milk chocolate chips, white chocolate chips or even butterscotch chips!
    • Mix-Ins – are you one of those folks that likes nuts in your brownies? Then you should definitely try mixing in ½-1 cup of chopped walnuts into the batter before baking!
    Hot fudge cake serving on a white plate, sitting next to baking dish.
    Serve with a side of ice cream!

    How should I serve hot fudge cake?

    You can serve your hot fudge cake just as it is, warm and gooey and delicious!

    You could also serve your hot fudge cake with a scoop of vanilla ice cream on the side.

    Or you could make yourself a hot fudge cake sundae! Put some ice cream in a bowl, crumble some hot fudge cake on top of it and drizzle a bit of chocolate sauce over it all! You can also add and of your other favorite ice cream toppings to this. Yum!

    Scoop of vanilla ice cream on top of chocolate hot fudge cake.

    Equipment

    You can use any dish that can hold 2 quarts for this recipe (a square baking pan, circular pan, or rectangular baking dish all work).

    Depending on how wide the dish is, you may need to start checking for doneness at the 30 minute mark.  I do not recommend using a 9×13 for this recipe because your batter would be spread out too thin. 

    Storage

    Any leftovers can be stored in an airtight container in the refrigerator. When you are ready to eat them, simply put your cake on a microwave-safe plate and reheat in the microwave for 20-30 seconds.

    Expert Tips

    • Baking Process: After baking for about 20 minutes, the cake will look done but keep watching for the sides to bubble up because the water is still baking underneath the cake. The center of the cake will also be lifting up and down while baking, and that’s ok too.
    • Cleaning Tip: You may want to place your pan on a larger baking sheet pan to catch any spillover since the sauce does bubble up slightly as the cake bakes. 

    FAQs

    How can I tell when my hot fudge cake is done?

    The cake should not look wet or jiggly in the center when it is done. You will see the sauce bubble up around the edges during the last 10 minutes of baking. 
    The toothpick test doesn’t work very well for this recipe. Your toothpick won't come out clean because of the sauce layer. 

    Should I eat this warm or cold?

    The hot fudge cake is best served warm, but it’s still a delicious dessert either way! The thing to know is that the colder the cake becomes, the thicker the sauce becomes. Hot cake with cold ice cream is my favorite way to serve this.

    Can I make my hot fudge cake ahead of time and freeze it?

    I don't recommend making this dessert ahead of time. The longer this dessert is stored, the more the sauce is soaked into the cake.

    Any leftovers will still be delicious, but you won’t have the benefit of the sauce remaining separate unless the dessert is served right away.

    I don’t have an 8×8 pan, can I use a round dish?

    As long as the dish can hold 2 quarts, you should be able to use it in this recipe. Depending on how wide the dish is, you may need to start checking for doneness at the 30 minute mark.  I do not recommend using a 9×13 for this recipe because your batter would spread out too thin. 

    What is the difference between hot fudge cake and chocolate cake?

    Both are delicious (give us all the chocolate), but they are actually very different. Chocolate cake is a light, airy dessert with a finer crumb.

    Hot fudge cake is a very dense, brownie-like cake with a fudge sauce!

    What is the difference between hot fudge and chocolate syrup?

    The big difference here, much like chocolate cake vs. fudge cake, is the density.

    Chocolate syrup is thinner and is usually made with cocoa powder and water as ingredients. Hot fudge is thicker and typically calls for chocolate and butter in the ingredients!

    Related Recipes

    If you’re looking for more delicious, easy recipes for desserts, check out our pineapple dump cake and our brownie mix cookies! Or, if chocolate cake is your favorite, these mini chocolate cakes are so fun to make and eat, and this Depression Cake uses vinegar of all things!

    Recipe

    Hot fudge cake sitting on white plate, with a scoop of vanilla ice cream on top.
    Print Pin
    5 from 18 votes

    Hot Fudge Cake

    Hot Fudge Cake: This easy hot fudge cake (aka brownie pudding) is a crowd pleaser filled with fudgy chocolate flavor! Wow your guests with this decadent dessert (that is super quick and easy to make)!
    Course Dessert, Snack
    Cuisine American
    Prep Time 10 minutes minutes
    Cook Time 45 minutes minutes
    Total Time 55 minutes minutes
    Servings 9 servings
    Calories 201kcal
    Author Jessica Burgess

    Ingredients

    • 1 cup all purpose flour
    • 2 teaspoons baking powder
    • ½ teaspoon salt
    • ¾ cup white sugar
    • 6 tablespoons cocoa powder divided
    • ½ cup milk
    • 1 teaspoon vanilla extract
    • 2 tablespoons unsalted butter melted
    • ½ cup light brown sugar
    • 1 ¾ cups hot water

    Instructions

    • Heat oven to 350℉ and grease an 8 inch square cake pan or a rectangular pan that has a 2 quart (8 cup) capacity.
    • In a medium bowl, whisk the flour, baking powder, salt, sugar and 4 Tablespoons of the cocoa powder.
    • Add the milk, vanilla, and melted butter and stir until smooth. The batter will be thick.
    • Pour the batter into the prepared pan and spread evenly with an offset spatula.
    • In a small bowl, combine the brown sugar and the remaining 2 Tablespoons of cocoa powder. Sprinkle the mixture evenly over the batter in the pan.
    • Pour hot water over the brown sugar mixture.
    • Bake for 40-45 minutes at 350 degrees f. The cake should be set in the center and you will see the sauce bubble up around the edges when it's finished.
    • Let cool for 5-10 minutes before serving. Serve warm with ice cream or whipped cream.

    Video

    Notes

    HOW TO TELL WHEN THE CAKE IS DONE: You will see the sauce bubble up around the edges during the last 5-10 minutes of baking, and this is how you’ll know it’s done. Don’t mistake the center of the cake looking done, for the entire cake being done. The water is still boiling/cooking underneath to turn in to the fudge sauce.
    STORAGE: Any leftovers can be stored in an airtight container in the refrigerator. 

    Nutrition

    Serving: 1serving | Calories: 201kcal | Carbohydrates: 42g | Protein: 3g | Fat: 4g | Saturated Fat: 2g | Polyunsaturated Fat: 1g | Monounsaturated Fat: 1g | Trans Fat: 1g | Cholesterol: 8mg | Sodium: 140mg | Potassium: 194mg | Fiber: 2g | Sugar: 29g | Vitamin A: 100IU | Calcium: 73mg | Iron: 1mg

    Snacks for the Beach

    January 20, 2024

    Nine images showing beach snack ideas.

    Summer beach days - is there anything better? Well, possibly snacks for the beach when you go!

    As long as I pack enough food and drink to keep me full and hydrated during the day, there is nothing like soaking up the sun all day long by the ocean. Here you’ll find a great list of recipes that are perfect for the beach.

    9 images showing beach snack ideas.

    What Makes a Good Snack for the Beach?

    A snack that doesn’t melt or or doesn’t have to be warmed up, makes a great snack for the beach!

    Plus, a mixture of sweet and savory snack ideas is always a good bet for when the right craving hits.

    You’ll also love these indoor picnic food ideas and this outdoor picnic set up.

    The Best Snacks for the Beach

    Pretzel Dip with Cream Cheese
    This creamy, tangy, and slightly boozy dip pairs perfectly with soft pretzels (or any snack of your choice) and is bound to be the star of your next get-together.  
    Pretzel Dip with Cream Cheese
    Ranch beer dip in tan bowl, next to pretzels and crackers.
    Fruity Pebble Treats
    Fruity Pebbles Treats: Your favorite classic no-bake dessert with a twist, using fruity rice cereal to make crispy treats!
    Fruity Pebble Treats
    fruity pebbles treats on white plate
    Air Fryer Apple Chips
    These Air Fryer Apple Chips are perfect easy and healthy snack the whole family will love. Simple to make with just three ingredients.
    Air Fryer Apple Chips
    Air fryer apple chips
    Ranger Cookies
    Ranger Cookies: These quick and easy ranger cookies (also called cowboy cookies) are crunchy on the outside and chewy on the inside. Corn flakes and crispy rice cereal give these chewy cookies a crunchy texture that will make them a family favorite in no time!
    Ranger Cookies
    Ranger cookies piled up on a cutting board.
    Everything But The Bagel Dip
    Everything But The Bagel Dip: This delicious dip uses simple ingredients to give you all the flavor of an everything bagel in convenient dip form. You only need 5 minutes and 4 simple ingredients, and the recipe only has 3 steps – it doesn't get easier than that!
    Everything But the Bagel Dip
    A bowl of everything but the bagel dip with vegetables and crackers around it.
    Homemade Popcorn in the Microwave
    How to Make Homemade Popcorn in the Microwave: A quick and easy way to pop microwave popcorn, without oil, in a brown bag, and it's ready in minutes!
    Homemade Popcorn Recipe
    Homemade popcorn with butter and seasonings sprinkled on.
    Cake Mix Peanut Butter Cookies
    Cake mix peanut butter cookies arex really easy, and it only takes 5 ingredients for a delicious chewy cookie!
    Cake Mix Peanut Butter Cookies
    Cake mix peanut butter cookies stacked.
    Peanut Butter Fluff
    Peanut butter fluff is a delicious blend of cream cheese, creamy peanut butter, marshmallow creme, and whipped topping. It comes together fast and is the perfect peanut butter flavored treat for parties!
    Peanut Butter Fluff
    Peanut butter fluff in a large white bowl.
    Oreo Dip
    Oreo Dip: This dip is so quick and easy to make! All you need are 10 minutes and five simple ingredients to whip up this creamy, fluffy Oreo dip that's sure to be a crowd pleaser.
    Oreo Dip Recipe
    A bowl of Oreo dip with an Oreo in it and crumbled Oreos on top.
    Blue Cheese Dip
    Blue Cheese Dip: Made of simple ingredients like sour cream, mayo, green onions, spices, lemon juice, and of course, blue cheese crumbles. This no bake recipe is delicious to serve with fresh vegetables, your favorite crackers, or even as a thick blue cheese dressing on top of a side salad.
    Blue Cheese Dip Recipe
    Blue cheese dip in small white bowl, with hand holding chip.
    Spicy Crackers Recipe
    Spicy Crackers Recipe: Seasoned crackers that are the perfect party snack. Sometimes called "firecrackers" or ranch crackers, this no bake recipe has tons of flavor.
    Spicy Ranch Crackers
    Spicy ranch crackers in white bowl.
    Lemon Puppy Chow
    This recipe is a delicious twist on classic Muddy Buddies. The lemon flavors shine through so wonderfully and this recipe is refreshing on a hot day!
    Lemon Puppy Chow
    Lemon Puppy Chow in white bowl.
    Honey Lime Fruit Salad
    Honey Lime Fruit Salad: A refreshing fresh fruit salad that's always a hit! Serve this fruit salad as a healthy dessert or as a sweet side dish for any occasion!
    Honey Lime Fruit Salad
    Honey Lime Fruit Salad
    Walking Strawberry Cheesecake
    Walking Strawberry Cheesecake: This scrumptious creation combines the best of both worlds: the rich, creamy goodness of cheesecake and the refreshing, juicy sweetness of strawberries. 
    Walking Cheesecake
    Walking cheesecake dessert in baking dish.
    Booty Dip Recipe
    Booty Dip: This recipe is made with Cream cheese, brown sugar, marshmallow fluff, vanilla, whipped cream and chocolate chips come together to create a fluffy, dreamy dip you won't be able to stop eating. 
    Booty Dip
    A bowl of booty dip surrounded by crackers and with two graham crackers in the dip.
    Mixed Berry Trifle
    Mixed Berry Mini Trifles: This trifle is an easy no bake dessert that's pretty, too! Cubes of cake, berries, and whipped cream are all you need to make these delicious mixed berry trifles! 
    Mixed Berry Trifle
    A mixed berry mini trifle.
    Peanut Butter Yogurt Dip
    Peanut Butter Yogurt Dip: A sweet dessert dip made with peanut butter, Greek yogurt, honey and cinnamon that is perfect for dipping fresh fruit, graham crackers or pretzels.
    Peanut Butter Yogurt Dip
    Close up of Peanut Butter Yogurt Dip in a bowl
    Instant Pot Hard Boiled Eggs
    Instant Pot Hard Boiled Eggs: So quick, easy and it made the shells peel off so easily, with the 5, 5 & 5 method!
    Hard Boiled Eggs for Snacking
    sliced hard boiled eggs on plate
    How to Make a Peanut Butter and Jelly Sandwich
    How to Make a Peanut Butter and Jelly Sandwich: Did you know that there's a certain way to make a pb&j even better? It's true. Keep reading!
    Peanut Butter and Jelly
    Close up of peanut butter and jelly sandwich
    The BEST Rice Krispie Treats
    This rice krispie treats recipe is made with milk, making the marshmallows more creamy and the treats gooey and soft!
    The BEST Rice Krispy Treats
    Rice krispie treats on wooden board.
    Lucky Charms Treats Recipe
    Lucky Charms Treats: Delicious cereal bars made with a favorite cereal, that are made in the microwave and ready in about 10 minutes!
    Lucky Charms Treats
    Lucky Charms Treats stacked on top of one another, sitting on white counter.
    Banana Pudding Dip
    Banana Pudding Dip: An easy creamy dip that can be served with vanilla wafers, graham crackers, and fresh fruit as a no bake dessert recipe that's a sweet treat everyone will love!
    Banana Pudding Dip
    banana pudding dip on serving tray with crackers and fresh fruit
    Fruit Board and Dip
    Fruit Board: A great way to serve your favorite fruits at your next party! Make the fruit platter as shown or use your favorite fruits and crackers.
    How to Make a Fruit Board
    fruit board with crackers and dip
    Fruit Dip with Marshmallow Fluff
    Fruit Dip with Marshmallow Fluff: An easy fruit dip recipe that's perfect for fruit platters for dipping your favorite fruit or even graham crackers in!
    Fruit Dip with Marshmallow Fluff
    Fruit dip with marshmallow fluff in a white bowl
    Nuts and Bolts Recipe
    Nuts and Bolts Recipe: Or sometimes called "Texas Trash" or simply a homemade chex mix recipe, this seasoned snack is perfect for the holidays or to eat all year long!
    Nuts and Bolts Recipe
    Nuts and Bolts mix in wooden bowl
    Pinwheel Sandwiches
    These pinwheel sandwiches use simple ingredients and they're easy to make with your favorite deli meat! Perfect appetizer or even a lunch idea.
    Turkey Pinwheels
    Close-up of pinwheel sandwiches stacked on top of one another.
    Turkey Sliders
    Turkey sliders are great for a warm lunch option or party appetizer. The sweet flavors of the Hawaiian rolls combined with the salty flavors of cheese and turkey create the perfect combination.
    Turkey Sliders
    Turkey slider sitting on top of other turkey sliders with cheese.
    The BEST Guacamole
    How to Make Guacamole: Easy Recipe + The BEST! – This authentic homemade guacamole tops all guacamole recipes, using everyday ingredients to make a dip everyone will love!
    The BEST Guacamole Recipe
    The best guacamole in a small bowl with fresh cilantro on top.
    Zesty Italian Pasta Salad
    Zesty Italian Pasta Salad: This super easy recipe is made using any type of pasta you prefer, a few other simple ingredients, and Zesty Italian dressing!
    Italian Pasta Salad Recipe
    ingredients in bowl for zesty Italian pasta salad
    Harvest Chicken Salad
    Harvest Chicken Salad has grapes, apples, celery, and pecans, has so many flavors of fall but it's cool enough for an easy summer meal as well.
    Chicken Salad Sliders
    Chicken salad with grapes and apples, sitting on bread.
    Italian Cucumber Salad
    Italian cucumber salad uses simple ingredients, such as Italian dressing, onions, cherry tomatoes and a few seasonings to make this a summer side dish to keep on hand!
    Italian Cucumber Salad
    Italian cucumber salad with onions, tomatoes, Italian dressing and seasonings.
    Chicken Chipotle Melts
    Chicken Chipotle Melts are a Taco Bell copycat recipe that only uses 4 ingredients and they are ready in about 20 minutes.
    Chicken Chipotle Melts
    Hand holding a chipotle chicken melt over a pan of others.

    Ready-to-Go Foods to Pack for the Beach

    If you’re looking for snack ideas that you can pick up from the store and go, here are my favorites:

    • Fruits - fruits can serve a double purpose to satisfy both hydration and hunger. My top picks are grapes, cut up watermelon or other melon, and berries.
    • Cheese - Individual cheese snacks (like string cheese, cheese sticks, or BabyBel cheese wheels) are a great thing to bring. Pair it with your fruit or eat it them on their own!
    • Veggies - Baby carrots and other low carb veggies slice well, pack easily and are great for dipping. Think celery, sliced bell peppers and sliced cucumbers.
    • Hummus & Crackers - Sometimes you can find the hummus and cracker dip packages at the store, and these are easy to take with you!

    Drink Ideas for the Beach

    • Bottled Water - An obvious one, but plenty of water is important when sitting in the sun all day!
    • Lemonade - Homemade lemonade is one of the most refreshing things to drink on the beach. Pro tip - freeze some in advance so it stays cold much longer.
    • Cocktails: Summer cocktails are also a good choice!

    Miscellaneous Items to Pack

    Plastic Forks - One time I packed a salad for a beach day and completely forgot a fork. Spectators got a kick out of watching me try to eat it with my hands (dressing and all!) but it's best to pack extra silverware.
    Paper Towels – Pro tip: pack them in a plastic bag so they don’t get all sandy.
    Ice and/or Ice packs – To keep everything cold in your cooler!
    Extra plastic baggies – You never realize how handy extras are until you need to put leftovers away!

    What else do you think are beach-food essentials? What else would you add to your healthy beach packing list?

    Have fun on your day at the beach! (And maybe take me with you?)

    Strawberry Scone Recipe

    January 20, 2024

    Bisquick strawberry scone on white plate.

    Scones sometimes get a bad rap for being dry, dense, and plain. But add fresh berries and a quick glaze, and your family will go nuts for these Bisquick Strawberry Scones.

    In only half an hour, these strawberry scones will be ready for a delicious breakfast or even fancy brunch, especially for a bridal shower or Mother’s Day.

    Bisquick strawberry scone sitting on white plate.

    I love scones. They just feel a bit fancy, especially when served on a small plate next to a mug of piping-hot coffee. They are a great option to keep in your recipe box because they come together quickly, unlike yeast bread options.

    If you’re all about convenience, add these scones to a brunch spread that includes mini cheater cinnamon rolls with hash brown patties in the air fryer. Want a tart-sweet scone? Cranberry Orange is the perfect pairing.

    [feast_advanced_jump_to]

    Why You’ll Love This Recipe

    • Kitchen shortcuts: Bisquick isn’t only for biscuits! It’s the perfect scone starter as well.
    • Bright and cheery: Using soda gives these berry scones a citrus boost.
    • Ready in only 30 minutes: Unlike bread that needs time to rise, scones are a quick biscuit-like baked good that’s ready in no time.

    Ingredients Needed

    I’ve highlighted a couple of ingredients below with some relevant notes. Aside from this, the ingredients needed are pretty basic.

    Labeled ingredients for Bisquick strawberry scones.
    • Bisquick – This is a great kitchen shortcut because it contains your flour, fat, and leavener all in one!
    • Butter – I normally use unsalted when baking, but salted works too.
    • Soda – Any lemon-lime soda works here, just make sure it is regular and not diet as this is the sugar in the recipe. (It’s not the first time I’ve used soda in a recipe like this. This 7up pound cake uses… you guessed it… 7up!)
    • Heavy cream – The thick liquid is necessary here to achieve the perfect dough.
    • Strawberries – Dice up fresh strawberries in even pieces so that your scones have berries throughout. Love strawberry flavor? These strawberry brownies (although made with a cake mix) are full of strawberry flavor!

    Substitutions

    • Berries – strawberries not in season? Use any fresh berry you’d like. If your blackberries are exceptionally large, slice in half before using. Do not use frozen fruit as it will add too much liquid.

    Variations

    • Swap the glaze – Add a touch of orange or lemon extract to the powdered sugar and then go slow on the milk. This will add a bit of extra flavor.

    How to Make Bisquick Berry Scones

    Do you stash butter in your freezer like I do? You’re in luck – you can use your butter straight from frozen!

    Line a sheet pan with parchment paper to ensure the scones don’t stick as well as don’t spread out of shape.

    *Be sure to see the recipe card below for the full ingredients list & instructions!*

    Collage showing steps 1-4 of how to make Bisquick strawberry scones.

    STEP 1. Grate butter. Grate the butter into the biscuit mix in a bowl (Image 1). Gently toss to coat.

    Tip: You can even use your butter straight from the freezer! Keeping it cold is key here, and it also grates easier when frozen. So refrigerated or frozen, just make sure not to melt the butter with excessive handling.

    Glaze ingredients for strawberry scones.

    STEP 2. Mix. Add remaining ingredients and stir to combine (Image 2). Do not over mix or your scones will be tough!

    Spoon drizzling glaze on strawberry scones.

    STEP 3. Shape. Gently pat the dough into a flat disc, about 2 inches thick (Image 3).

    STEP 4. Bake. Cut the disc into scones, then bake until golden (Image 4).

    Bisquick strawberry scones sitting on white plate, surrounded by whole strawberries.

    STEP 5. Glaze. If desired, make a simple icing of powdered sugar and milk and drizzle over the top of warm scones.

    Recipe Pro Tips

    • Allow to rest after baking. Let the scones rest for just a few minutes before adding glaze. This way they are still served warm, but the icing won’t melt right off.
    • Correct temperature. While it’s ok if your heavy cream is closer to room temp, the butter absolutely must be cold.
    • Different flavor. If it’s fall season, don’t sleep on the idea of making these pecan pie scones from one of my blogging friends too!
    Close up of strawberry scones, sitting on white plate.

    Recipe FAQs

    What is the secret to making good scones?

    A good scone is moist and flakey, and nothing boring or bland! The key is to use COLD butter and not over-mix or over-bake. Cold butter won’t melt until it hits the heat of the oven, which ensures flakey layers. If your butter is too warm or overworked, it will melt into the dough and your scones will be dense.

    Can I freeze scones?

    I don’t recommend freezing the raw dough here, as the berries will give off excess liquid when thawed, before baking. This makes a not-so-pretty presentation and may ruin the texture. You can wrap baked scones and freeze in an airtight bag.

    Do I need to use heavy cream?

    One of the keys to the best scone texture is a thick, rich liquid. So you can use cultured buttermilk or sour cream in place of heavy cream, but don’t go any lower fat than that. Using reduced-fat milk may make the scones tough and dense.

    What to Serve with Strawberry Scones

    I always feel better serving a somewhat dessert-like treat next to protein such as scrambled eggs. For meat lovers, throw bacon in the air fryer or sausage patties in the oven! Add more cut fruit on the side and it’s a complete meal.

    Storage

    Scones are best when warm and fresh, but you can enjoy the next day. Lightly toast in a toaster oven to revive them a bit, then top with butter. If you know you won’t finish them all at once, skip the glaze on the leftovers, otherwise, it will melt off when reheating.

    More Baking Recipes You’ll Love

    • A basket of homemade biscuits lined with a tea towel.
      Easy Homemade Buttermilk Biscuits
    • Close up of pumpkin streusel muffins stacked on top of one another
      Pumpkin Streusel Muffins
    • Bronuts, stacked on top of one another with sprinkles on top.
      Bronuts
    • Breakfast cookies sitting on wire cooling rack.
      Breakfast Cookies

    Did you make this? I’d be so grateful if you left a “star” rating below to let me know what you thought! Then, the next time you need a quick and easy recipe, come back to Fantabulosity to browse all of my easy recipes!

    Recipe

    Bisquick strawberry scone on white plate.
    Print Pin
    Be the first to rate!

    Bisquick Strawberry Scones

    Scones sometimes get a bad rep for being dry, dense, and plain. But add fresh berries and a quick glaze, and your family will go nuts for these Bisquick Strawberry Scones!
    Course Breakfast, Snack
    Cuisine American
    Prep Time 10 minutes minutes
    Cook Time 25 minutes minutes
    Total Time 35 minutes minutes
    Servings 8 scones
    Calories 355kcal
    Author Jessica Burgess

    Ingredients

    • 3 cups Bisquick
    • ¼ cup cold butter
    • ⅔ cup heavy cream
    • ⅔ cup lemon-lime soda such as Sprite or Starry
    • 1 cup chopped strawberries

    Drizzle

    • ½ cup powdered sugar
    • 1 tablespoon milk

    Instructions

    • Preheat the oven to 350°F.
    • Line a baking sheet with parchment paper
    • Add Bisquick to a large bowl and grate the cold butter in. Give it a light stir so the butter is evenly distributed throughout and coated in the Bisquick.
    • Stir in heavy cream, Sprite and chopped strawberries.
    • Do not over mix. If you feel the mixture is too wet from the juice of the fruit you can add more Bisquick until it comes together
    • Lightly dust the countertop with some more Bisquick and empty the bowl out onto it.
    • Fold the mixture with your hands into a flat disc about 2" thick.
    • Cut it into 8 even triangles.
    • Place scones on the lined baking sheet and set on the middle rack of the preheated oven.
    • Bake for 30-35 minutes or until golden brown.

    Drizzle

    • Mix the powdered sugar and milk together and drizzle over the scones.

    Notes

    • You can use any fruit you’d like!
    • I don’t recommend freezing the raw dough, but you can easily wrap and freeze baked scones.

    Nutrition

    Serving: 1scone | Calories: 355kcal | Carbohydrates: 40g | Protein: 4g | Fat: 20g | Saturated Fat: 10g | Polyunsaturated Fat: 1g | Monounsaturated Fat: 7g | Trans Fat: 0.2g | Cholesterol: 39mg | Sodium: 628mg | Potassium: 125mg | Fiber: 1g | Sugar: 16g | Vitamin A: 476IU | Vitamin C: 11mg | Calcium: 101mg | Iron: 1mg

    Summer Drink Recipes

    January 19, 2024

    Multiple images of summertime drinks in a collage.

    Summer is here and that means it is time to get outside and have a good time, and have some of the best summer drink recipes. If you are planning a pool party, or maybe even a BBQ, you are going to want to save this collection of 35 Summer Drink Recipes to inspire the menu at your party, or next to your summer dinner recipe.

    This collection has cocktails that are cold, refreshing and perfect for sipping with your friends. Don’t forget to make these pretty ice cubes to go along with the drinks too and get some fun party favor ideas if hosting a party!

    summer drinks

    Save this post to your cocktails board so you can find these recipes easily.

    From a lemon elderflower gin cocktail that is light and lovely, to a fresh raspberry margarita, this list has something for every occasion. I am certain you will find a few to try out this summer to beat the heat.

    Lemon Gin Elderflower Cocktails by Masala Herb

    These cocktails are gorgeous, light and so refreshing for a summer day. These are perfect for a garden party, or just to sip with someone special.

    Watermelon Strawberry Basil Cocktail by  A Worthey Read

    Mix up the best flavors of summer into one visually appealing and super refreshing cocktail. This is light, tasty and easy to mix.

    Watermelon Wine Slushies  by Boulder Locavore

    These chilly watermelon slushies are made with wine to give them a delightful boozy kick for adults. These are just the thing to make to beat the summer heat.

    Blackberry Mojitos by The Healthy Epicurean

    Mix blackberries, mint and rum and you have the coolest refreshment to share this summer. Use fresh picked berries and mint for the best flavor.

    Rhubarb Cocktails by Pinch and Swirl

    This light pink drink is a little tart, slightly sweet and has the perfect kick of rum to round things out. Make this for a sippable summer drink.

    Pomegranate Fizz by India Phile

    Pomegranate juice and gin come together to make an unforgettable cocktail. This recipe isn't too complicated to make at home for your home happy hour.

    Frozen Mezcal Margaritas by Kelly Stilwell

    This frozen margarita is made with mezcal for a really great smoky flavor. This is one drink to make when the temperatures start to soar.

    Paloma Cocktails by The Suburban Soapbox

    Give your happy hour a bright and vibrant flavor by mixing up a batch of these grapefruit palomas. They are made with mezcal for a smoky and tart cocktail that is perfect for summer.

    Watermelon Vodka Slushies by Cup of Zest

    Grab a few summer staple ingredients to make this silky smooth slushie. It is a great after dinner drink option that is cool and refreshing.

    Blackberry Bramble by Sweet Tea and Thyme

    Sweet, tart and gorgeous are the best ways to describe this easy to make cocktail. It captures the essence of sun ripened berries and tart lemon perfectly for a summer refreshment.

    Spicy Skinny Margaritas by Ugly Duckling Bakery

    These margaritas are made with spicy chili infused tequila and lime for a really flavorful cocktail that is lighter but so flavorful for summer.

    Cucumber Jalapeno Margarita by Happy Hour Hacks

    Adding some veggies to your summer cocktails make for a vibrant and delicious addition to happy hour. This recipe is both cool and refreshing and a little spicy to make things interesting.

    Passion Fruit Martinis by xoxo Bella

    This margarita recipe perfectly captures summer goodness in a glass! It is bright, sunny and so fruity for an after dinner drink.

    Blueberry Sriracha Margaritas by Quiche My Grits

    Bring big, bold flavors to your summer drinks with this easy cocktail. It is pretty, spicy and sweet for a total summer treat.

    Frozen Gin and Tonic by Little Sugar Snap Peas

    Get your classic gin and tonic fix in an icy cool form to beat the summer heat. This recipe is easy and so refreshing with the addition of raspberries.

    Guava Mimosas  by Fresh Coast Eats

    Give your tastebuds a tropical vacation with this cocktail hour upgrade. Guava and bubbly wine is sure to be a 2 ingredient favorite.

    Gin Basil Smash by Encore More

    Make this easy gin smash with fresh basil for a flavorful, savory cocktail that goes great with a summer meal.

    St Germain Elderflower Spritz by Burrata and Bubbles

    This light and lovely cocktail makes use of  French elderflower liqueur and sparkling wine for a bubbly drink that really  goes well on a hot day.

    Mermaid Water by Easy Party Cocktails 

    If you are having a pool party you are going to want to make a batch of this mermaid water! This light blue green cocktail is a fruity rum punch that is guaranteed to make a splash with your guests.

    Blood Orange Mojitos by Best Served Vegan

    This is going to be your favorite mojito recipe ever! Blood oranges offer the perfect citrus pop that makes these summer cocktails so easy to sip.

    Tinto De Verano by Dollop of Dough

    Add lemon lime soda to red wine to make this fizzy and sippable summer drink that is popular in Barcelona. 

    Lavender Lemonade Cocktails by A Grill For All Seasons

    Adding a sprig of lavender to this lemon cocktail is the perfect flavor enhancement and garnish! This pretty drink makes a crowd pleasing option for a summer gathering.

    Grapefruit Basil Greyhound by Swift Fit

    Basil and grapefruit are perfect partners for a refreshing cocktail that is delicious and different. Add vodka and fresh herbs for such a fancy feeling at home drink.

    Limoncello Spritz by Maple and Mango

    Make this spritz recipe with limoncello and prosecco for a fast and fruity cocktail that serves well with brunch or dinner.

    Frozen Peach Cocktails by Spend with Pennies

    If you love peaches, then this icy cold cocktail is the thing to make! It is made with champagne to make a party worthy drink that will impress your guests.

    Pina Colada Mules by Cupcakes and Kale Chips

    This cocktail brings two classics into one cup! You are going to love the tropical vibes of this cool mule.

    Pink Sangria with Rose Wine by Barley and Sage

    Sangria is always a good idea for sharing cocktails with friends. This recipe is a pretty pink color as it uses rose wine, vodka and loads of juicy berries for a great girls night drink.

    Malibu Bay Breeze by Sugar and Soul

    Give your cocktail hour a boozy kick with this malibu rum drink that is fruity, refreshing and fun to serve to party guests. You will love how easy these are to make.

    Ombre Blueberry Cocktails  by Sinful Kitchen

    This cocktail is layered with blueberry, ginger ale and gin to bring the wow factor everytime. You will love the effect and the flavor on a hot day.

    Frose Cocktails by The Toasty Kitchen

    Frozen rose wine makes for such a lovely slushie to serve to your friends before a nice dinner on the deck.

    Fresh Raspberry Margaritas by Sprig and Spoon

    This margarita recipe is frosty and so fresh with raspberries, lime and tequila to make the ultimate way to cool off after a day in the sun.

    Jamaica Lime Margaritas by Sense and Edibility

    Give your cocktail hour big vacation vibes with this Jamaica lime margarita recipe. It is like a grown up version of agua fresca that I know you will love.

    Pink Starburst Shots by Britney Breaks Bread

    If you love those tasty little starburst candies, then you are going to want to save this fun shot recipe that has all of the essence of an iconic candy with a boozy kick for adults.

    Pineapple Coconut Mimosas by Regain Your Sparkle

    These mimosas have a delectable pineapple coconut flavor that makes them perfect for a summer brunch with your besties. This recipe is so easy that you can make a few rounds in no time.

    Lavender French 75 by Oh Sweet Culture Shock

    Summer is the perfect time to indulge in a light, floral cocktail like this take on the french 75. I know you will love this for an elegant option that you can make for your at home happy hours.

    Tips for making the best cocktails at home

    • Use fresh ingredients for the best results
    • Make sure to use a lot of ice to keep your drinks super cold and refreshing
    • Use high-quality spirits
    • Don't be afraid to mix things up and experiment to make something unique and delicious.

    More Drink Recipes

    If you love drink recipes, you can find all of my drink recipes in one spot!

    Slow Cooker London Broil and Gravy

    January 17, 2024

    Close up of slow cooker steak on a pile of mashed potatoes.

    You’re in for a treat with this Slow Cooker London Broil and Gravy recipe. Imagine a perfectly tender, juicy steak, all wonderfully slow-cooked to a melt-in-your-mouth consistency.

    This delicious slow cooker recipe harnesses the power of your Crock Pot, turning a simple London broil into a succulent, flavorful delight that’s infused with rich, savory gravy the whole family will love on busy weeknights.

    Close up of slow cooker steak on mashed potatoes, sitting in front of Crock Pot.

    And the best part? This beef dish, enhanced with a beefy onion soup mix, requires minimal prep and cooks away while you go about your day. Trust me, this is a must-try slow cooker recipe that’s sure to impress, so much like our crock pot pulled beef recipe, too.

    Want to try a few more slow cooker recipes? Try this hearty Sausage Casserole in the Slow Cooker as a great family evening meal. Or if you are having a Mexican-themed night, try these Crock Pot Chicken Enchiladas.

    [feast_advanced_jump_to]

    Why You’ll Love This Recipe

    • Uncomplicated Preparation: This Slow Cooker London Broil doesn’t require an intricate cooking process or tools. A basic slow cooker and a few simple steps are all you need to create this delicious masterpiece.
    • Customizable: The beauty of this great recipe is its flexibility. You can easily adjust the ratios for a bolder gravy flavor or even add in some of your favorite spices to make it uniquely yours.
    • Satisfying: Aside from being an absolute flavor bomb, this Slow Cooker Steak is also a protein-packed complete meal that will keep you satiated without feeling overly heavy.

    What is London Broil?

    London Broil is a term that’s often used to describe a lean cut of beef, perfect for slow cooking methods. Originally, it referred to flank steak, but over time, it has come to include cuts like top round and shoulder. 

    The term ‘London Broil’ also refers to a method of preparation and cooking, typically involving marinating the beef and then broiling or grilling it. In our Slow Cooker Steak recipe, we’re using the London Broil cut for its ideal balance of leanness and flavor, which marries perfectly with our rich, beefy onion gravy. Slow cooking this cut ensures a tender, flavorful steak that’s practically foolproof.

    Ingredients Needed

    I’ve highlighted a couple of ingredients below with some relevant notes. Aside from this, the ingredients needed are pretty basic.

    Ingredients for slow cooker steak sitting on counter.
    • London Broil – To get the most flavor out of your London Broil, try to marinate it for at least a few hours before slow cooking. This not only penetrates the meat with flavor but also tenderizes it, helping to achieve that desirable melt-in-your-mouth texture.
    • Brown Gravy Packet – Always whisk your gravy mix into cold water before adding it to the slow cooker. This prevents clumping, ensuring a smooth and velvety gravy that evenly coats your steak. I used brown gravy packets for this Salisbury steak recipe too!
    • Beefy Onion Soup Mix – Don’t be afraid to be generous with your soup mix. This is the secret ingredient that gives your steak its rich, beefy flavor. However, remember it can be salty, so taste your gravy before adding any extra salt.

    Substitutions

    Sometimes substitutions are necessary because of ingredients that are unavailable or needed for dietary restrictions. Here are some suggestions that can help:

    • London Broil – If you can't find London Broil, you can use other lean cuts of beef such as flank steak, top round steak, or roast. They might need a little more time in the slow cooker, but the end result will be just as delicious.
    • Brown Gravy Packet – If you don’t have a packet of brown gravy mix on hand, you can make your own. Combine 1 tablespoon of cornstarch, 1 tablespoon of beef bouillon, and ½ teaspoon of onion powder. This will give you a homemade mix that’ll work just as well.
    • Beefy Onion Soup Mix – If you’re out of this, try using a mix of 1 tablespoon of beef broth, 1 tablespoon of dried minced onion, ¼ teaspoon of onion powder, and a pinch of black pepper. This combination will give you a similar flavor profile to the beefy onion soup mix.

    Variations

    • Vegetable Lovers: Add in your favorite veggies during the last hour of cooking for a more balanced, wholesome meal. Carrots, potatoes, or bell peppers work exceptionally well with the savory gravy.
    • Spicy Kick: If you’re a fan of spice and want to kick things up a notch, try adding a dash of crushed red pepper flakes or a couple of dashes of hot sauce to the gravy.
    • Twist: For an aromatic lift, consider adding fresh herbs like rosemary or thyme into the slow cooker. They impart a wonderful fragrance and freshness that complements the richness of the delicious gravy.
    • Cheese It Up: For a dose of cheesy goodness, sprinkle some shredded cheddar or gouda over the steak during the last few minutes of cooking. Let it melt into a gooey, irresistible layer that’ll take the dish to a whole new level.

    How to Make Slow Cooker Steak

    This slow cooker steak is broken into  2 components:

    • Prepare the ingredients
    • Cook in the slow cooker

    *Be sure to see the recipe card below for the full ingredients list & instructions!*

    Two image collage showing London broil before trimming the fat off and after.

    STEP 1: Prepare the meat. Slice the London Broil to your preferred thickness, removing any excess fat. Place steak pieces in bottom of Crock Pot.

    Steps of 4 images showing how to make slow cooker steak.

    STEP 2: Add Beef Onion Soup Mix. Sprinkle onion soup mix seasoning on top of steak pieces.

    STEP 3: Add brown gravy mix. Next, sprinkle on brown gravy mix. 

    STEP 4: Pour water. Pour water on to the steak and seasonings and stir to combine.

    STEP 5: Cook for 4.5 hours. Set your slow cooker to ‘low’, cover and let it work its magic for about 4.5 hours. 

    Cooked steak slices in slow cooker.

    STEP 6: Check your steak. It should be tender and richly flavored. 

    STEP 7: Serve the meal. Serve your slow cooker London broil steak over a bed of mashed potatoes for a hearty, satisfying meal any day of the week. Enjoy!

    Recipe Pro Tips

    • Slice Before Cooking: Cutting your London broil into slices before cooking can lead to faster and more even cooking. This also allows more flavor to penetrate the meat.
    • Eliminate Excess Fat: Trimming off the fat from the meat can prevent the gravy from becoming too greasy.
    • Cook from frozen: I’ve also cooked a 4 pound London broil from frozen in the slow cooker. (Not sliced.) This cooked on high for 6 hours and it turned out delicious as well.
    • Make it Your Own: Don’t be afraid to adjust the ratios or add in some of your favorite spices. This easy recipe is flexible and can be tailored to your preference.
    Cooked steak and gravy on wooden spoon.

    Recipe FAQs

    Can I use a different cut of meat for the Slow Cooker Steak?

    Yes, while London Broil is suggested for its leanness and flavor, you can use other beef cuts such as flank steak or top round roast. Adjust the cooking time as needed, depending on the thickness of the cut.

    What if I don’t have brown gravy mix or beefy onion soup mix?

    No problem! You can make your own substitutes at home with this gravy recipe. For brown gravy mix, combine 1 tablespoon of cornstarch, 1 tablespoon of beef bouillon, and ½ teaspoon of onion powder. For the beefy onion soup mix, combine 1 tablespoon of beef bouillon, 1 tablespoon of dried minced onion, ¼ teaspoon of onion powder, and a pinch of black pepper.

    Can I add vegetables to the Slow Cooker Steak?

    Absolutely! Adding your favorite vegetables can provide a wholesome balance to the meal. Simply add them during the last hour of cooking to prevent them from becoming too soft.

    How can I make my Slow Cooker Steak spicier?

    You can add a dash of crushed red pepper flakes or a couple of dashes of hot sauce to the gravy if you prefer a spicier steak.

    Can I add cheese to the Slow Cooker Steak?

    Yes! Sprinkling some shredded cheese over the steak in the last few minutes of cooking will melt into a gooey layer, adding a delightful cheesiness to the dish. Cheddar or gouda works well for this. 

    What to Serve with Slow Cooker Steak

    This Slow Cooker Steak can be a versatile centerpiece for numerous side dishes. Here are a few favorites:

    • Mashed Potatoes: These are a classic pairing, providing a creamy base for the flavorful steak and gravy. I even love making mashed potatoes in the Instant Pot.
    • Grilled Asparagus: Lightly seasoned and grilled, asparagus offers a crisp contrast to the tender steak. You can even make asparagus wrapped in bacon for extra flavor.
    • Glazed Carrots: Their sweet, buttery flavor complements the savory notes of the steak. I have candied carrots and air fryer carrots that are great side dishes.
    • Steamed Green Beans: A simple side like green beans add a bright pop of color to your plate. Cook green beans with bacon, sugar, onion and a few spices to make the best green beans.
    • Garlic Bread: Perfect for soaking up the rich gravy, this choice is sure to satisfy carb lovers. You can even cook garlic bread in the air fryer.
    • Caesar Salad: A fresh, crunchy Caesar salad can provide a refreshing contrast to the richness of the steak and gravy.
    • Rice or Pasta: White rice and egg noodles also work well the the savory sauce.
    Cooked steak and gravy on pile of mashed potatoes.

    Storage

    Storing the Leftovers: If you end up with leftover Slow Cooker Steak, store it in an airtight container in the refrigerator. It should keep well for up to 3 days. When ready to reheat, do so gently in a pot over low heat, stirring occasionally, or in a microwave-safe dish.

    Freezing this Dish: Yes, you can freeze Slow Cooker Steak! Make sure it’s completely cooled before transferring to freezer-safe bags or containers. Try to remove as much air as possible before sealing. This dish can be frozen for up to 3 months. When ready to consume, thaw overnight in the refrigerator and reheat gently.

    A bite of slow cooker steak and mashed potatoes on a fork.

    More Steak Recipes You’ll Love

    Once you make one steak recipe, you’ll definitely want to try more. For another slow cooker-style meal, you could make this Crock Pot Cube Steak. Or, if you would prefer to cook in the oven, learn How to Cook Steak in the Oven with these helpful tips and techniques.

    • Strawberry Pound Cake on cake stand.
      Strawberry Pound Cake with Strawberry Glaze Icing
    • A slice of strawberry cheesecake poke cake on a round plate.
      Strawberry Cheesecake Poke Cake
    • A slice of burnt sugar cake on a round, vintage plate.
      Burnt Sugar Cake
    • A slice of chocolate peanut butter dump cake on a round plate.
      Chocolate Peanut Butter Dump Cake

    Did you make this? I’d be so grateful if you left a “star” rating below to let me know what you thought! Then, the next time you need a quick and easy recipe, come back to Fantabulosity to browse all of my easy recipes!

    Recipe

    Close up of slow cooker steak on a pile of mashed potatoes.
    Print Pin
    5 from 5 votes

    Slow Cooker London Broil (With Video)

    This slow cooker London broil recipe is not only easy to make but it creates a tender steak recipe in the Crock Pot, with a gravy that's delicious served over mashed potatoes.
    Course Dinner
    Cuisine American
    Prep Time 10 minutes minutes
    Cook Time 4 hours hours 30 minutes minutes
    Total Time 4 hours hours 40 minutes minutes
    Servings 4
    Calories 322kcal
    Author Jessica Burgess

    Ingredients

    • 2 pounds london broil
    • 2 packets brown gravy 1.61 oz. each
    • 1 packet beefy onion soup mix 2.2 oz
    • 2.5 cups water

    Instructions

    • Prepare the meat. Slice the London Broil to your preferred thickness, removing any excess fat.
    • Place steak pieces in bottom of the slow cooker, trying to make sure the pieces don't overlap too much.
    • Next, add the beefy onion soup mix seasoning and brown gravy mix to the slow cooker, on top of the meat. Pour the water on top and stir to combine.
    • Cover and set your slow cooker to 'low' and let it work its magic for about 4.5 hours.
    • Check your steak. It should be tender and richly flavored and stir to combine.
    • Serve the meal. Serve your slow cooker steak over a bed of mashed potatoes for a hearty, satisfying meal any day of the week. Enjoy!

    Video

    Notes

    I used a 2lb London broil and I also cut off the fat. 
    However, I’ve also cooked a 4 lb. London broil from frozen in the slow cooker. (Not sliced.) This cooked on high for 6 hours and it turned out delicious as well.)

    Nutrition

    Serving: 1serving | Calories: 322kcal | Carbohydrates: 7g | Protein: 53g | Fat: 8g | Saturated Fat: 3g | Polyunsaturated Fat: 0.3g | Monounsaturated Fat: 3g | Cholesterol: 138mg | Sodium: 958mg | Potassium: 918mg | Fiber: 1g | Sugar: 0.5g | Vitamin A: 2IU | Vitamin C: 0.3mg | Calcium: 69mg | Iron: 5mg

    Fried Potatoes and Onions

    January 14, 2024

    Fried potatoes and onions in cast iron skillet.

    I cannot get enough breakfast food. There’s just something about a big platter filled with all my favorites. I find fried potatoes to be the perfect breakfast food and nothing is better than this fried potatoes and onions recipe, although they’re also delicious as a side dish for dinner!

    Cooked fried potatoes and onions in cast iron skillet.

    Do you love potatoes as much as I do? They are chewy and crispy all at once, and can really fill out a meal. They are the perfect vehicle for ketchup, cheese sauce, or this white gravy recipe.

    Whether you are a turkey bacon kinda person, or enjoy a classic sausage patty, they fit right next to the potatoes. Round things out with either scrambled eggs, fruit, and yogurt and you’ll be satisfied for hours. Prefer not to fry in oil? Try out breakfast potatoes in the air fryer!

    [feast_advanced_jump_to]

    Why You’ll Love This Recipe

    • Simple to make: This is mostly hands-off in order to achieve the perfect browning!
    • One-dish side: Make these in a single skillet while you have eggs going on the next burner.
    • Perfect for a crowd: As long as you have a large skillet, you can make as many potatoes as fit!

    Ingredients Needed

    Just a few key ingredients needed to make fried potatoes and onions:

    Labeled ingredients for fried potatoes and onions on marble counter.
    • Potatoes – Red is my favorite to use in this dish. We are going to peel and slice thinly. Don’t have red potatoes or don’t enjoy their flavor? You can use Russet but it’s best to soak the slices in warm water for 15 minutes or so. Then dry thoroughly before frying.
    • Onion – I think yellow onion is the mildest option, and adds just the right flavor without being overpowering. You can use white if desired.
    • Oil – Reach for canola or vegetable as good frying oils. These have high smoke points and won’t burn in the skillet.
    • Butter – I like salted here because it’s used as a finishing ingredient. Potatoes are also bland on their own, so the extra salt is perfect.
    • Seasoning – Salt is a given, and I love to utilize fresh garlic. If you like spice, then the red pepper flakes are great! You can always use black pepper instead.

    Equipment

    I love a cast iron skillet. Often, these don’t have a lid – so you will want to see if any of your other lids fit your cast iron skillet! It doesn’t have to be a perfect seal, but you don’t want it to fall inside. I don’t recommend nonstick as you simply can’t get an amazing crust on your potatoes.

    If you have a super sharp knife and really good skills, you can slice your potatoes. Otherwise, pick up a mandolin to get truly even slices.

    How to Make Fried Onions and Potatoes

    *Be sure to see the recipe card below for the full ingredients list & instructions!*

    Slice the potatoes while the onion cooks. You should have just enough time!

    Steps 1-4 of how to make fried potatoes and onions.

    STEP 1. Heat the oil. Heat a tablespoon of cooking oil in a cast iron skillet (Image 1). Add the onions in a single layer (Image 2).

    Tip: The potatoes need to be sliced to an even thickness for even cooking. You want them all to cook through at the same time so some aren’t burning. Use a mandolin for this step.

    STEP 2. Brown onions. Cook, stirring occasionally, until the onions are evenly browned (Image 3). Remove to a plate.

    STEP 3. Arrange potatoes. Add remaining oil and once hot, begin layer the potatoes evenly in the pan (Image 4).

    Steps 5-8 of how to make fried potatoes and onions.

    STEP 4. Add a lid. Cook potatoes undisturbed while covered to brown the first side (Image 5). Flip and cover again until cooked through.

    STEP 5. Combine. Return onions to the pan and add seasoning (Image 6). Add butter and garlic and stir to coat (Image 7).

    STEP 4. Garnish. Add green onion if desired and serve immediately (Image 8).

    Cooked fried potatoes and onions in cast iron skillet.

    Recipe Pro Tips

    • Peel your potatoes. I like to peel my potatoes because otherwise I find the peel comes off in a ring when cooking, which is sometimes a bit hard to eat and doesn’t look pretty.
    • Correct temperature. Keep an eye on the temperature so that you aren’t burning the potatoes. Browned is perfect, black is not!

    Recipe FAQs

    Is it best to boil potatoes before frying?

    That isn’t necessary! I find it tricky to know how long to boil them to help with cooking but not make them mushy and fall apart. If you are slicing them thin enough, they will cook through just fine in the skillet.

    Is it better to fry potatoes in butter or oil?

    I always use a mix. Oil has a higher smoke point so it is best for starting out the cooking process. I then use butter to finish frying, because it adds the most amazing flavor. And because we are just using it at the end, it doesn’t have a chance to burn.

    Should potatoes be soaked before pan frying?

    When I use red potatoes, I don’t take this extra step. However, if you are using a starchier potato such as russet, you will want to soak them first to remove excess starch. They key is to then dry them completely before frying.

    What to Serve with Pan Fried Potatoes and Onions

    These fried potatoes are an amazing upgrade to your breakfast or brunch spread. Get busy and get cooking! I’d recommend some Homemade Biscuits, White Gravy recipe, and this Homemade Country Fried Steak.

    Or if you’re making this slow cooker steak, it’s delicious to pair these together!

    Cooked potatoes and onions on white plate.

    Storage

    Store any leftovers in an airtight container in the fridge for 3-5 days. They will turn soggy when cold, but can be revived on the stovetop or in the air fryer!

    More Potato Recipes You’ll Love

    • Air fryer baby potatoes.
      Air Fryer Baby Potatoes
    • A bowl filled with a heaping serving of Amish Potato Salad.
      Amish Potato Salad
    • Sweet potatoes in the Instant Pot.
      Instant Pot Sweet Potatoes
    • Fiesta Ranch potato wedges on plate next to a small bowl of ranch dressing.
      Fiesta Ranch Baked Potato Wedges

    Did you make this? I’d be so grateful if you left a “star” rating below to let me know what you thought! Then, the next time you need a quick and easy recipe, come back to Fantabulosity to browse all of my easy recipes!

    Recipe

    Fried potatoes and onions in cast iron skillet.
    Print Pin
    5 from 6 votes

    Fried Potatoes and Onions

    These fried potatoes are an amazing, crispy addition to your breakfast table, especially combined with the tender onions in this easy recipe.
    Course Breakfast, Side Dish
    Cuisine American
    Prep Time 10 minutes minutes
    Cook Time 15 minutes minutes
    Total Time 25 minutes minutes
    Servings 4 servings
    Calories 239kcal
    Author Jessica Burgess

    Ingredients

    • 3 tablespoons cooking oil divided
    • ½ large yellow onion sliced
    • 3-4 red potatoes peeled and sliced into ¼-iInch thick slices
    • 1 teaspoon salt
    • ¼ teaspoon crushed red pepper flakes
    • 1 teaspoon fresh minced garlic
    • 1 tablespoon salted butter
    • Sliced green onions for garnish optional

    Instructions

    • Heat a skillet over medium high heat; add 1 tablespoon of oil to the hot skillet.
    • Add onions and cook for 4-6 minutes until browned.
    • Once browned, remove onions from the skillet and set aside.
    • Reduce heat to medium low and add the remaining oil to the pan. When the oil is hot, place the potatoes in a single layer in the skillet. Then keep layering the potatoes into the skillet until all the potatoes are used.
    • Cover with a lid and cook undisturbed for 1-2 minutes before flipping so they can brown on one side. Once browned, flip and cover again. Continue to do this until most of the potatoes are browned; about 10 minutes.
    • Ad the onions back into the skillet along with the salt and pepper flakes. Flip and stir to combine. Let it cook for an additional 2 minutes, without the lid.
    • Lastly, add the butter and garlic. Stir and flip to coat all the potatoes in butter as it melts and let the garlic brown and become fragrant. This should take about 1-2 minutes. Be careful not to burn the garlic.
    • Garnish with green onion if desired and serve immediately.

    Video

    Notes

    • It is important to get the potato slices as even as possible for even cooking. Using a mandolin slicer is best for this.
    • If making a double portion use a large skillet so that you will have more surface area for browning.
    • I like using red potatoes for this dish because they have less starch and fry easier. If using a starchier potato you can soak the sliced potatoes in water and then dry before cooking to remove some of the starch.
    • For a less spicy dish substitute the red pepper flakes for black pepper or omit pepper completely.

    Nutrition

    Serving: 1serving | Calories: 239kcal | Carbohydrates: 27g | Protein: 3g | Fat: 14g | Saturated Fat: 3g | Polyunsaturated Fat: 3g | Monounsaturated Fat: 7g | Trans Fat: 0.2g | Cholesterol: 8mg | Sodium: 636mg | Potassium: 761mg | Fiber: 3g | Sugar: 3g | Vitamin A: 136IU | Vitamin C: 15mg | Calcium: 23mg | Iron: 1mg
    • « Go to Previous Page
    • Page 1
    • Interim pages omitted …
    • Page 6
    • Page 7
    • Page 8
    • Page 9
    • Page 10
    • Interim pages omitted …
    • Page 25
    • Go to Next Page »

    Primary Sidebar

    Jessica Burgess of Fantabulosity, slicing an avocado.

    Hi, I'm Jessica! - Owner and Creator of the blog and brand, Fantabulosity.

    I’m here to help you make easy comfort food and nostalgic recipes, using simple ingredients, that everyone will love.

    More about me →

    Potluck Recipes

    • A slice of strawberry jello cake, topped with a strawberry slice, sitting on a round plate.
      Strawberry Jello Cake (Easy, Moist Strawberry Cake)
    • Crack green beans on wooden spoon.
      Crack Green Beans
    • Old fashioned potluck cake recipes collage.
      Old-Fashioned Cakes That Still Show Up at Every Potluck
    • Collage of potluck desserts.
      Easy Potluck Desserts (Simple Recipes That Always Get Asked For)
    • Cold Pasta Salad Recipes Collage.
      Cold Pasta Salad Recipes
    • Chicken Casserole recipes image collage.
      20 Chicken Casserole Recipes

    Popular Recipes

    • bread pudding in baking dish
      Bread Pudding Recipe: Easy Old Fashioned Recipe (With Video!)
    • Burger baked in the oven, steamed in aluminum foil, and placed on white plate.
      Burgers in the Oven
    • two tuna salad sandwiches stacked on top of each other
      The BEST Tuna Salad Recipe
    • Sliced banana bread on white platter
      Best Banana Bread
    • Strawberry brownies on white marble cutting board.
      Strawberry Brownies Recipe
    • Cheeseburger Sliders
      Cheeseburger Sliders with Hawaiian Rolls

    Footer

    ↑ back to top

    Featured In

    About

    • About Jessica
    • Contact
    • Collaborate
    • Dinner System

    Easy Recipes

    • All Recipes
    • Vintage Recipes
    • Dinner Recipes
    • Desserts

    How to Cook

    • Oven-Baked
    • Stove-Top
    • No Bake
    • Cooking Basics

    Privacy Policy |Accessibility Copyright © 2026 Fantabulosity | Terms & Conditions | FTC
    All recipes, photos, and content are copyrighted and may not be reproduced, republished, or distributed without written permission.

    Rate This Recipe

    Your vote:


    A rating is required
    A name is required
    An email is required