• Skip to primary navigation
  • Skip to main content
  • Skip to primary sidebar

Fantabulosity logo

  • All Recipes
  • Vintage Recipes
  • Holiday
  • Dinner Theme System
  • About
  • Navigation Menu: Social Icons

    • Facebook
    • Instagram
    • Pinterest
    • TikTok
    • YouTube
menu icon
go to homepage
  • Recipes
  • Desserts
  • Dinners
  • Gatherings
  • Holidays
  • About Jessica
    • Facebook
    • Instagram
    • Pinterest
    • TikTok
    • YouTube
  • search icon
    Homepage link
    • Recipes
    • Desserts
    • Dinners
    • Gatherings
    • Holidays
    • About Jessica
    • Facebook
    • Instagram
    • Pinterest
    • TikTok
    • YouTube
  • ×
    Home » Recipes

    Bacon and Sausage Quiche

    Bacon and Sausage Quiche

    August 20, 2023

    Slice of bacon and sausage quiche on spatula.

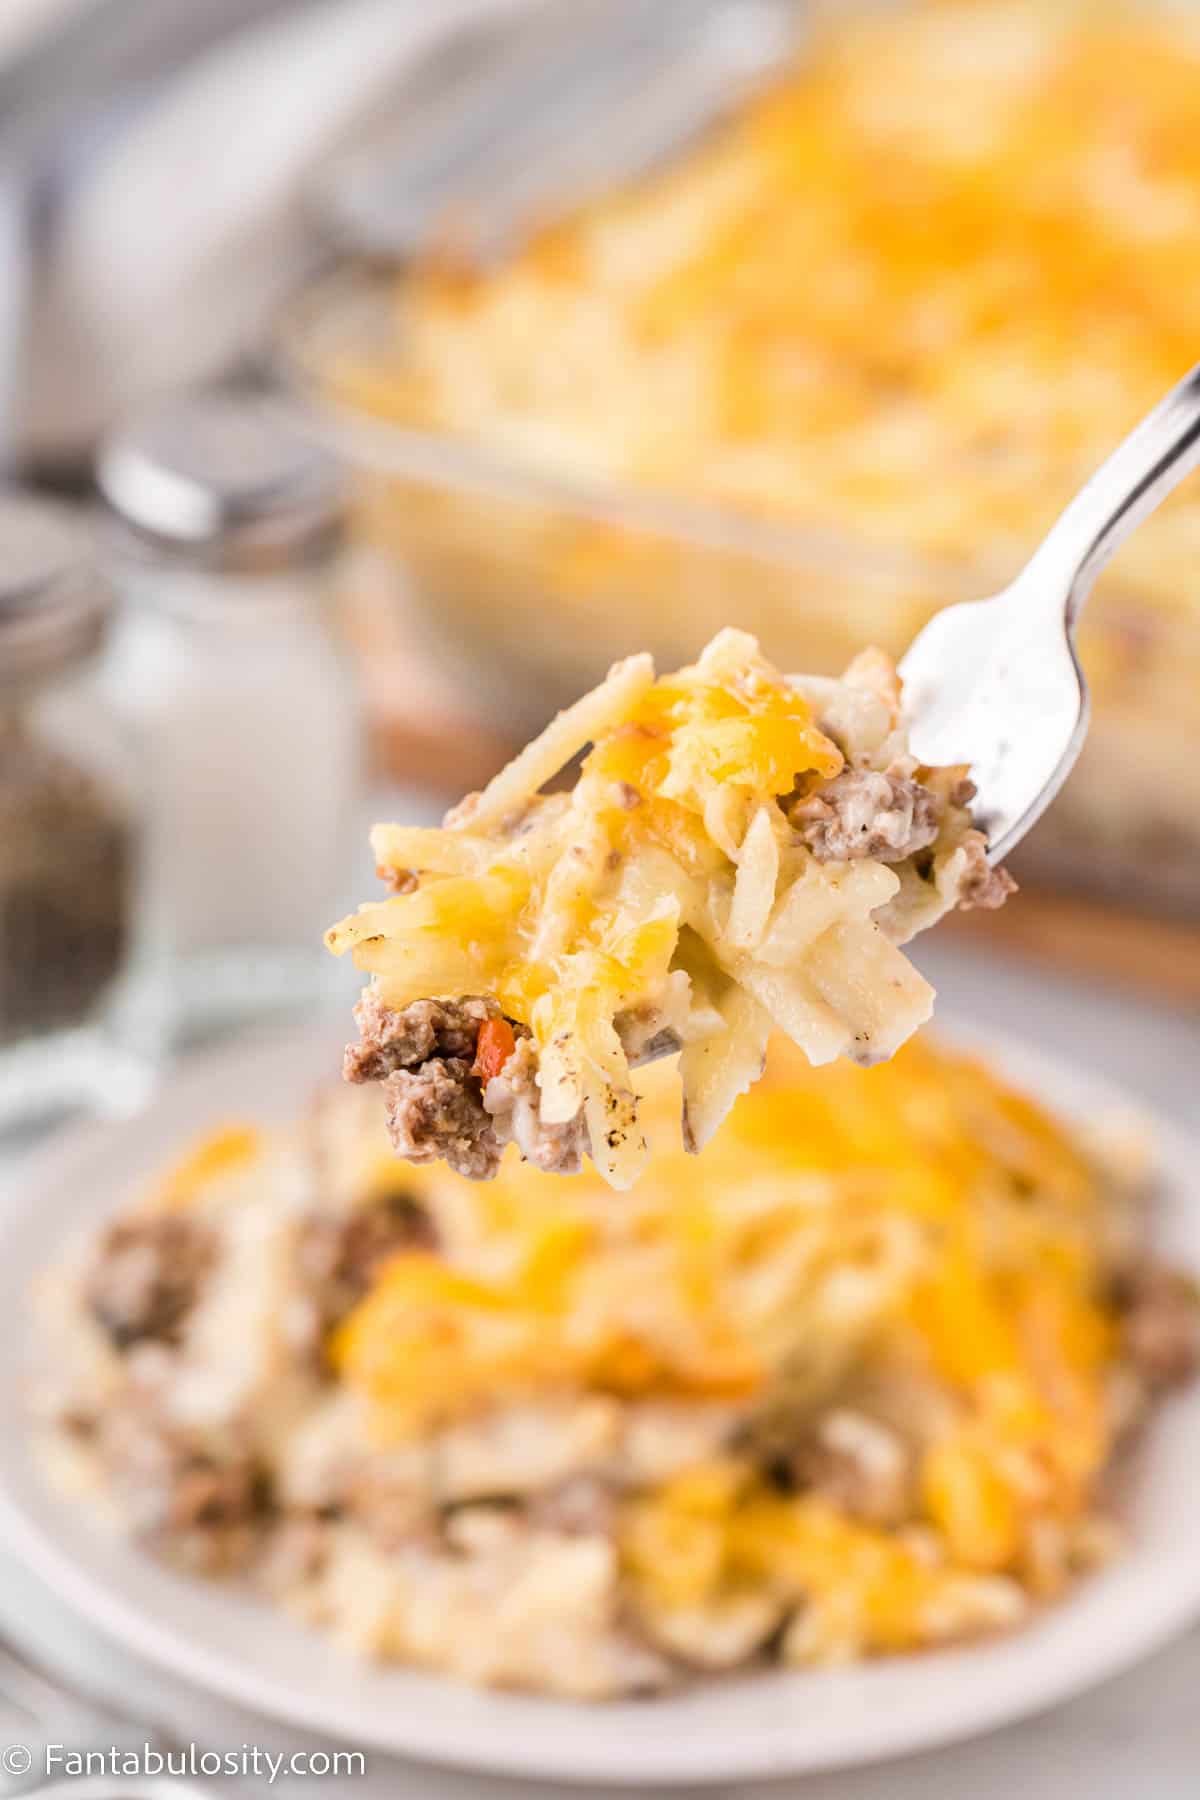
    This Bacon and Sausage Quiche is a simple crustless recipe that uses items like sausage, bacon, and other simple ingredients that you may already have on hand!

    Savory breakfast recipes are some of our favorites, and we think you’re also going to love these breakfast egg rolls if you love recipes like this quiche!

    Slice of bacon and sausage quiche on a spatula above the whole quiche.

    This quiche recipe brings a whole new meaning to eating your bacon and eggs in the morning for a hearty breakfast. It’s loaded with flavor and hearty enough with protein that will keep the kids full until lunchtime. Or, for an easy dinner idea, this quiche is meaty enough that it won’t even feel like a breakfast dish!

    [feast_advanced_jump_to]

    Why You’ll Love This Recipe

    • Enjoy any time of day: Whether you need a quiche recipe for brunch, weekend breakfast, or even a dinner idea… this recipe is perfect for ANY time of the day.
    • Crustless: Cutting out the crust, means that it’s fewer ingredients and fewer carbs.
    • Prep ahead of time: Although quick to whip up in the evening after work, feel free to shave off some time and prepare this in the morning, and bake it when you get home from work!
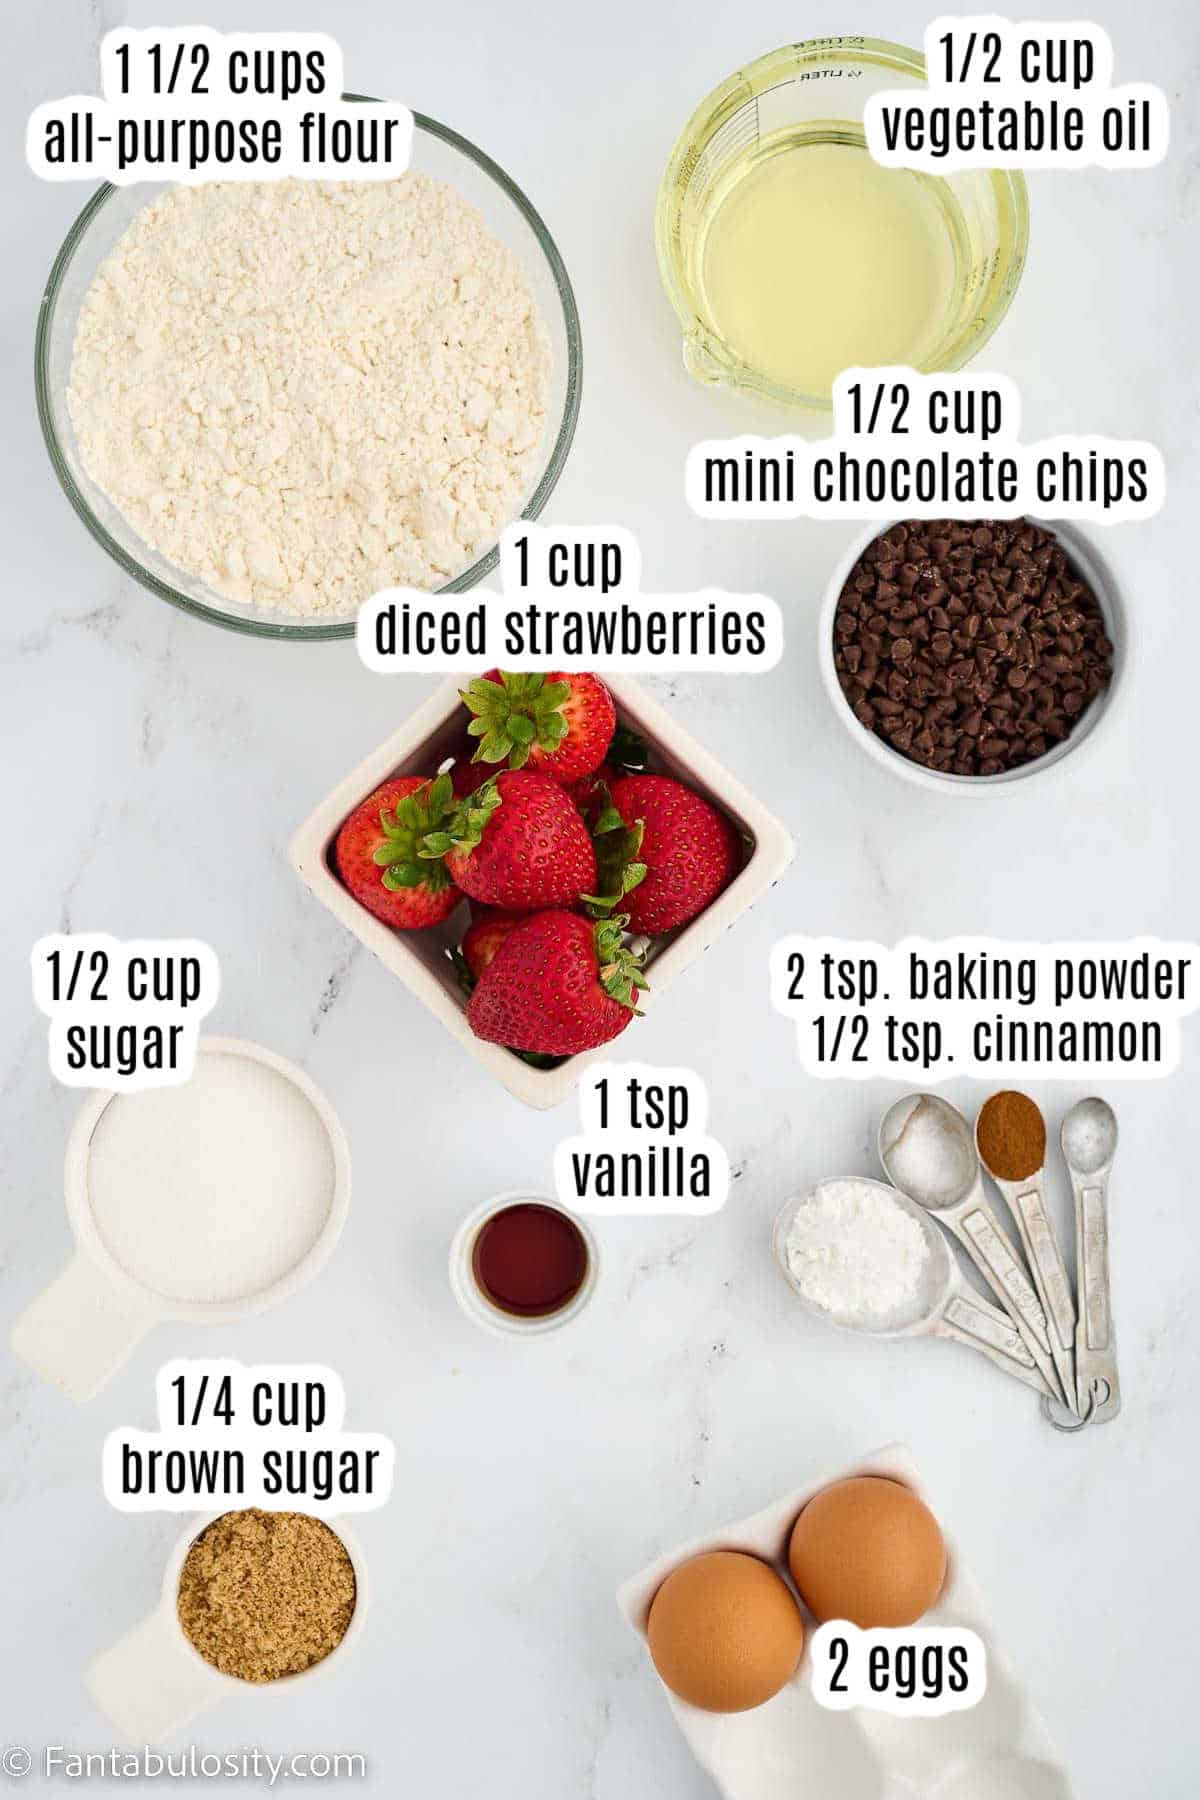
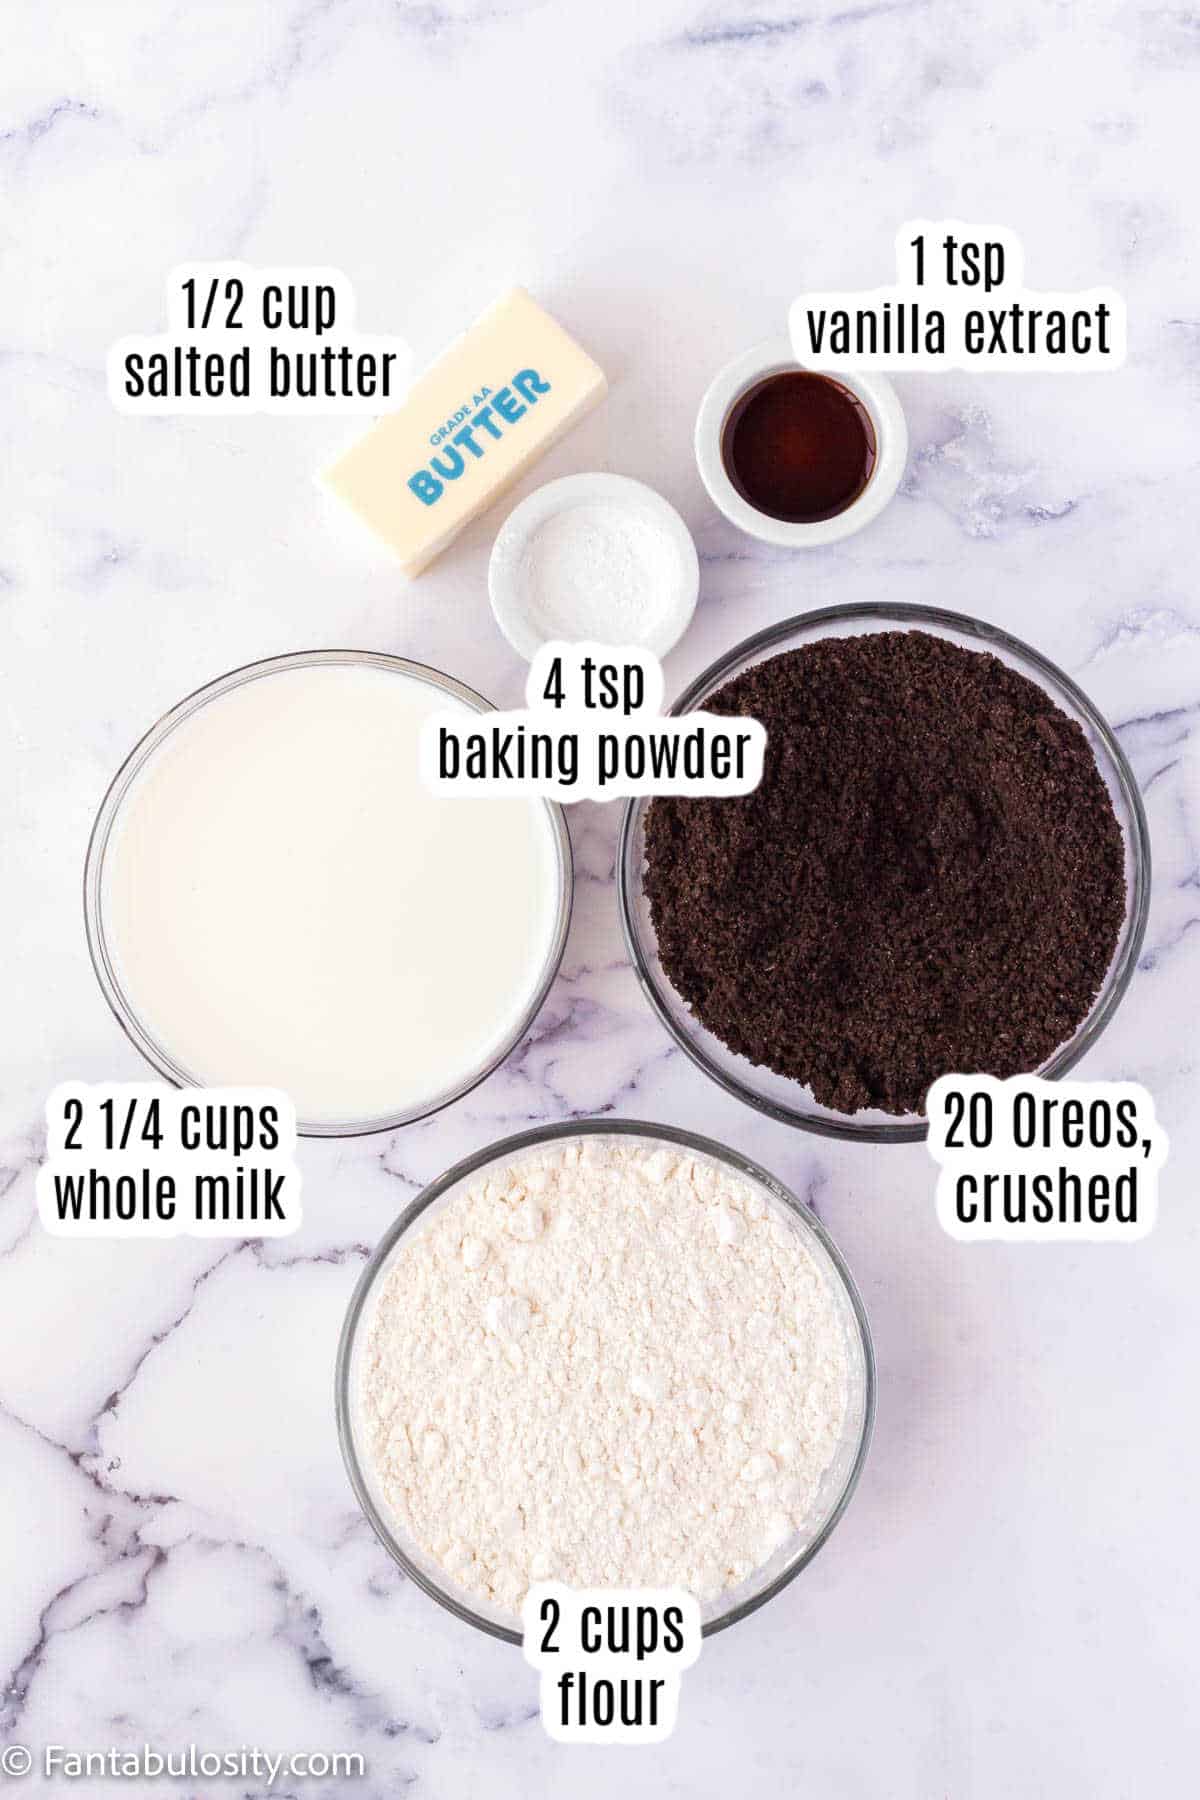
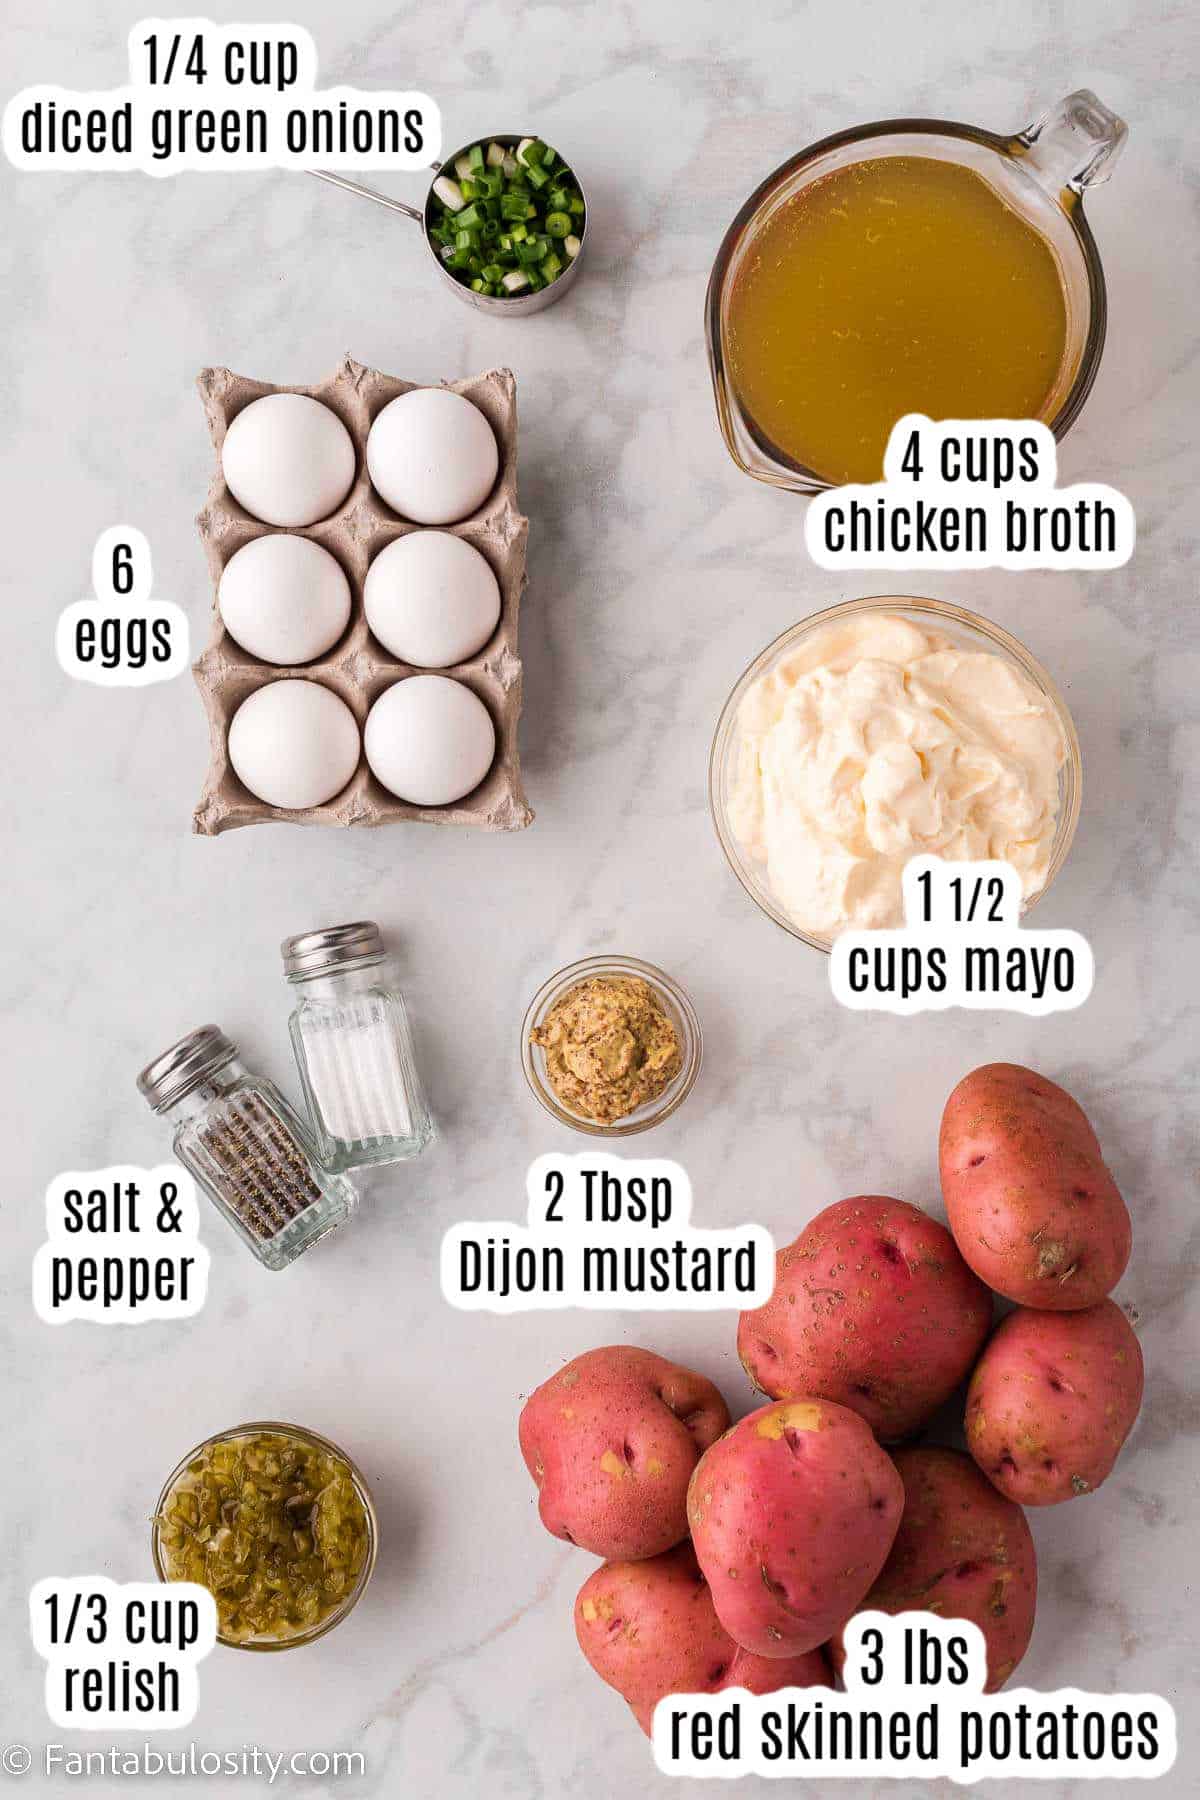
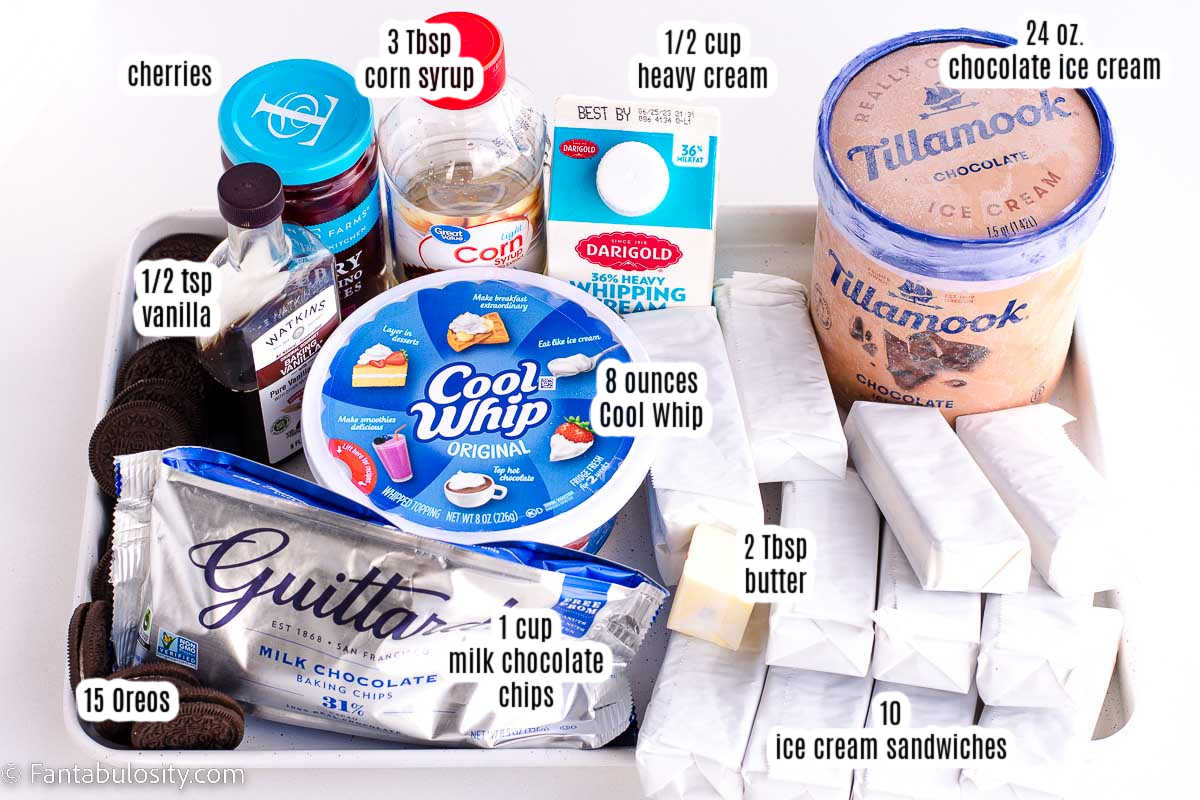
    Ingredients Needed

    I’ve highlighted a couple of ingredients below with some relevant notes. Aside from this, the ingredients needed are pretty basic.

    Labeled ingredients for bacon and sausage quiche.
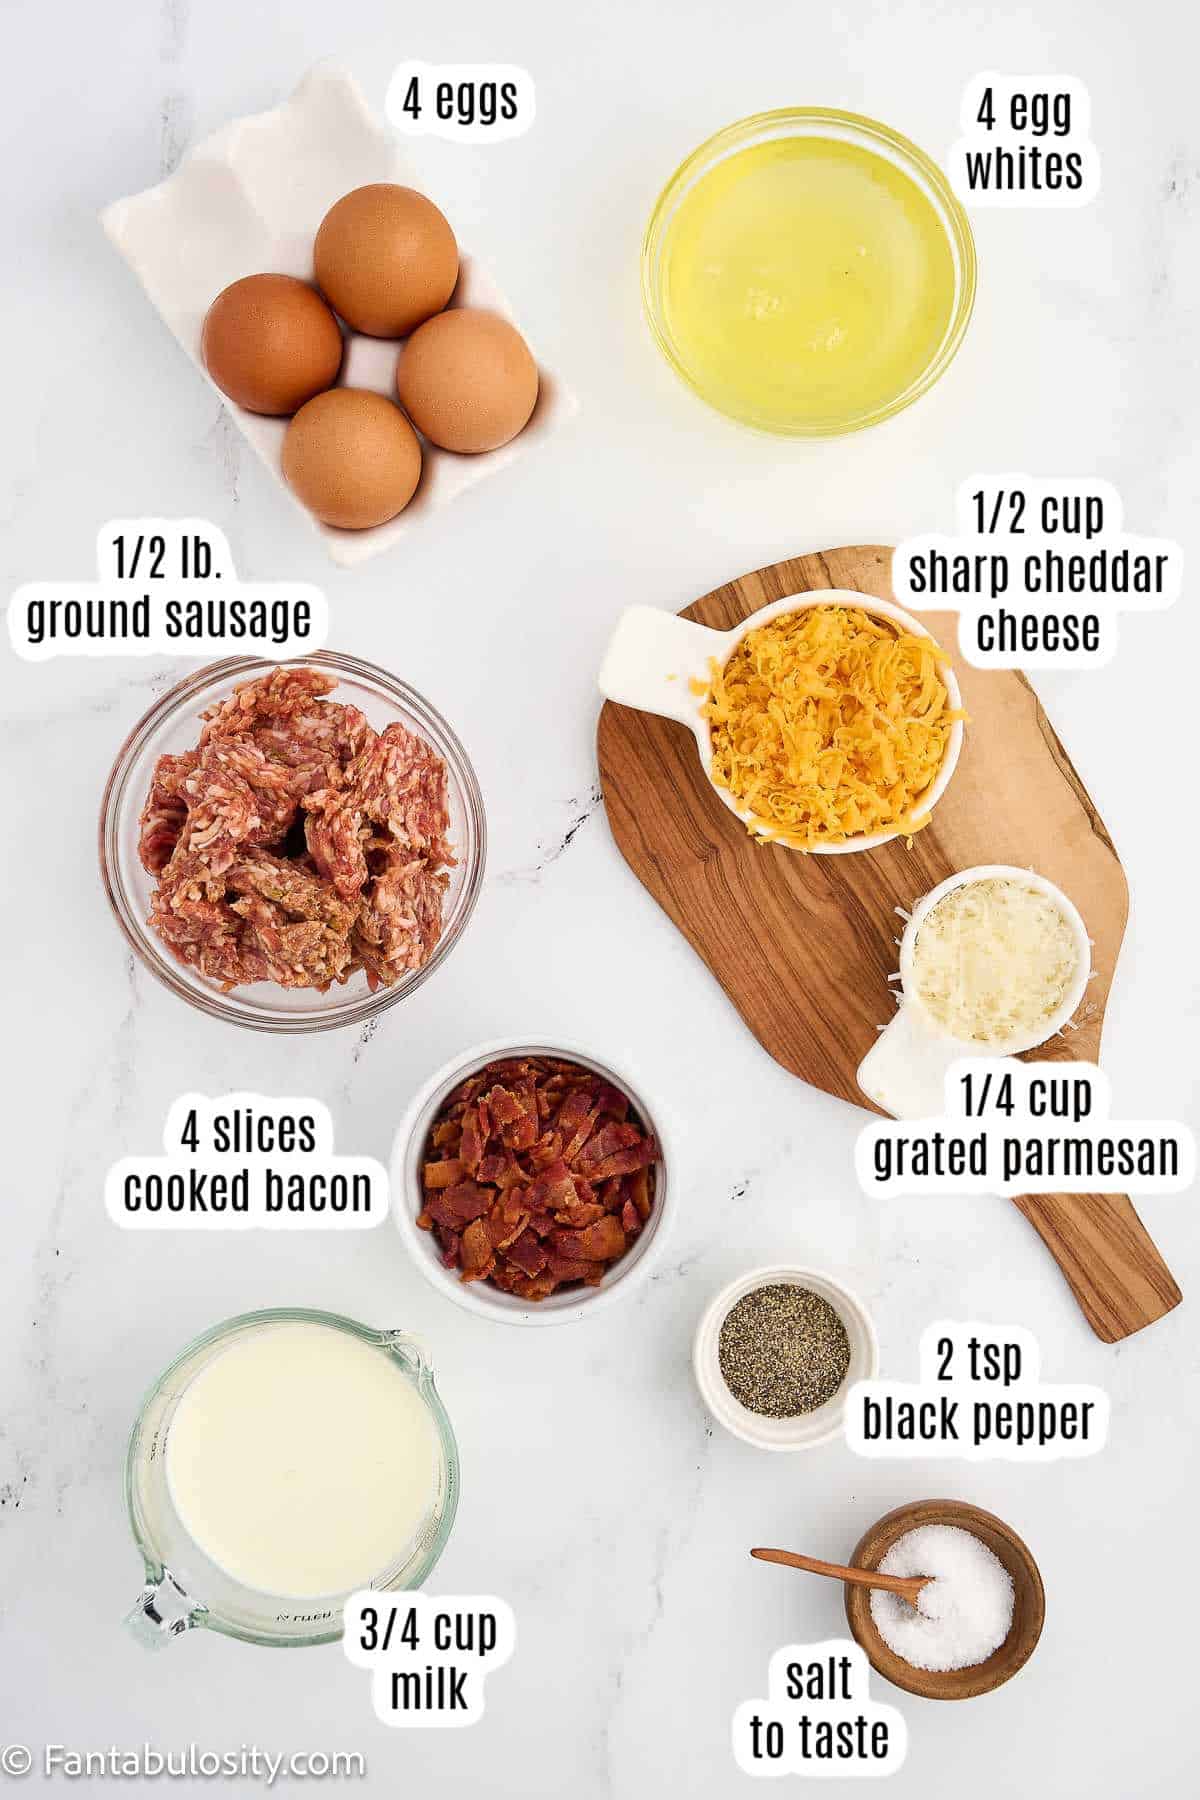
    • Cheddar cheese – When it comes to having shredded cheese in a recipe, you can buy pre-shredded in the store but when you shred your own, it doesn’t have the caking ingredient that prevents cheese from sticking together in the package, and that means your cheese won’t have the powdery texture. So if you’re able, it’s best to shred your own cheese.
    • Sausage – I use mild ground sausage but you can use hot and spicy if you prefer a “kick” to recipes like I like to use in this sausage and tortellini soup. Or you can also use baked sausage links if needed as a substitute in a pinch.
    • Milk – the type of milk used is up to you! Skim, 2%, whole, or even almond, soy, or coconut milk should work.
    • Salt – the amount of salt is up to you. Remember that bacon and sausage have a lot of salt already so you won’t want to overdo it, and you can always add salt but it’s harder to take it away.

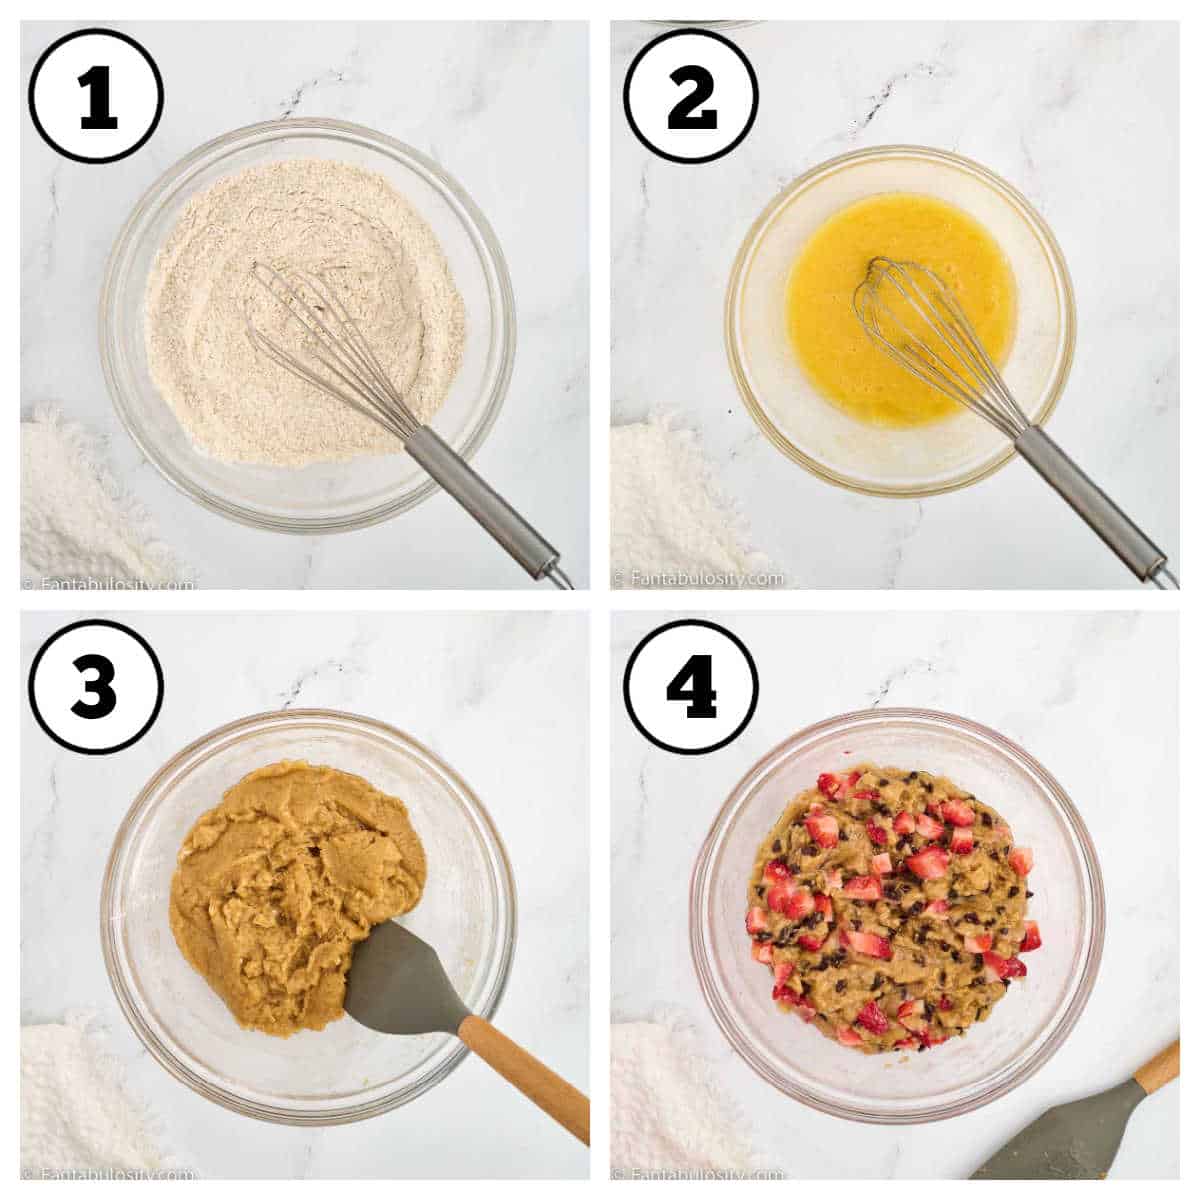
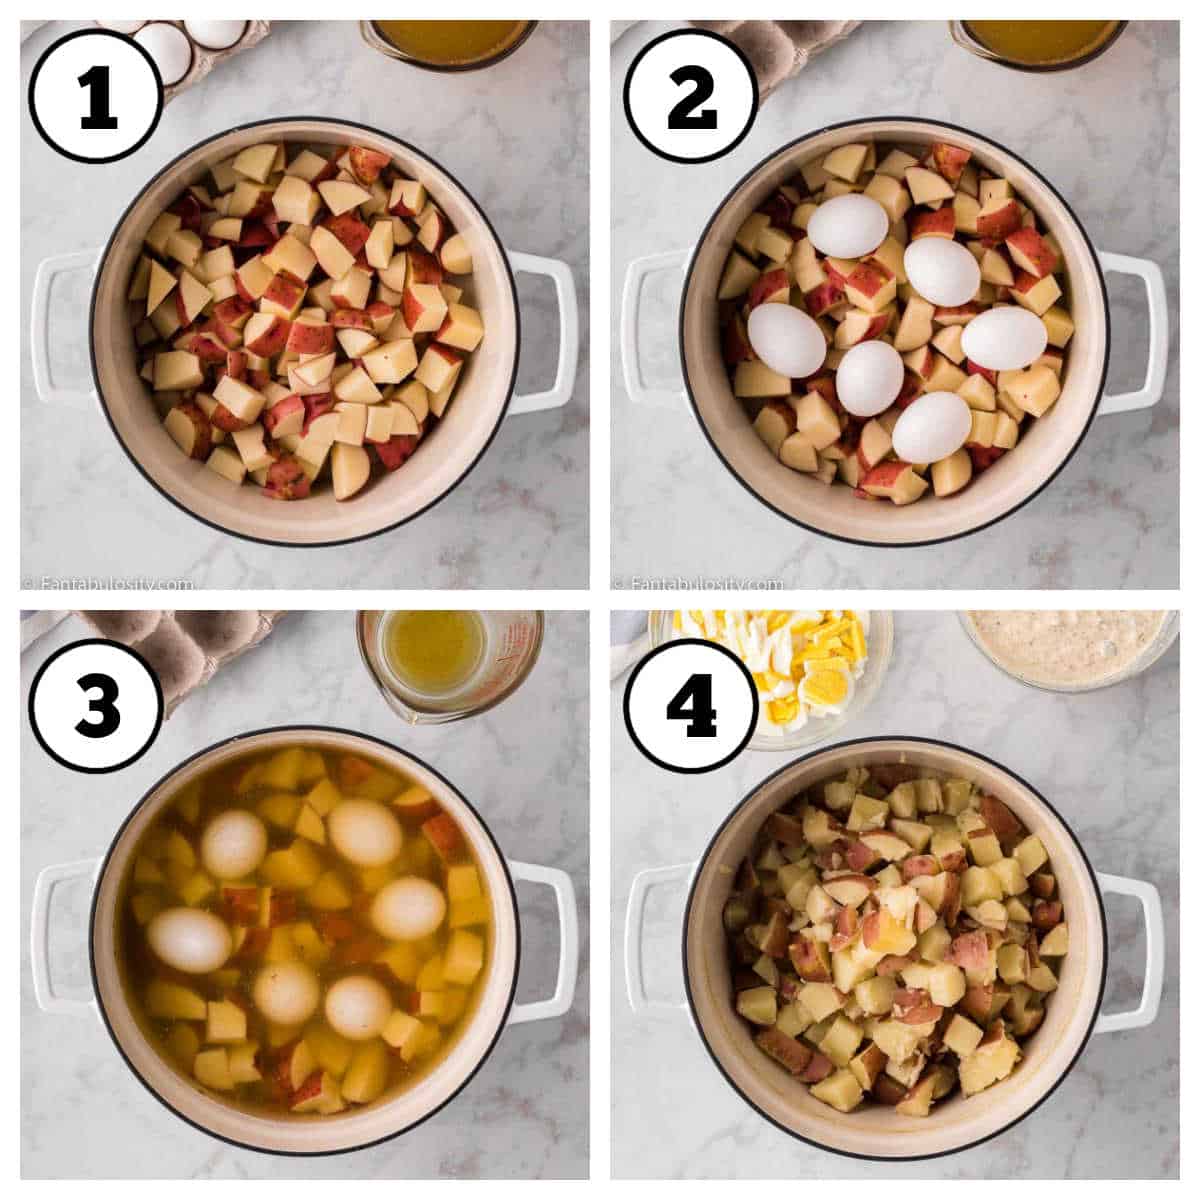
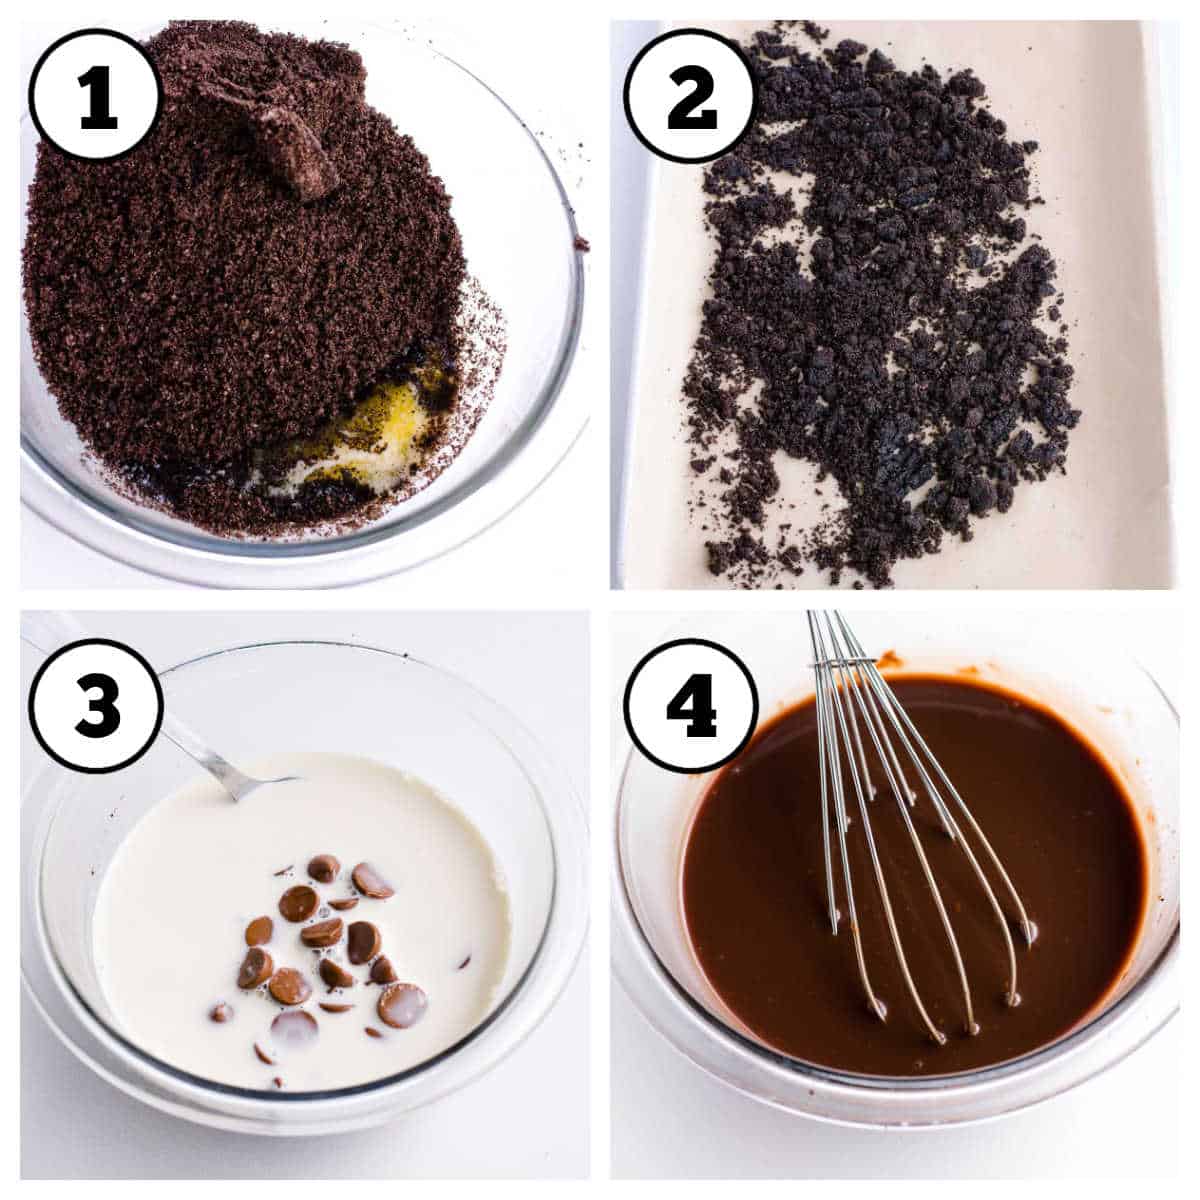
    How to Make This Bacon and Egg Quiche

    *Be sure to see the recipe card below for the full ingredients list & instructions!*

    Before Cooking: Preheat oven to 350 degrees Fahrenheit.

    Steps 1-4 of how to make bacon and sausage quiche.

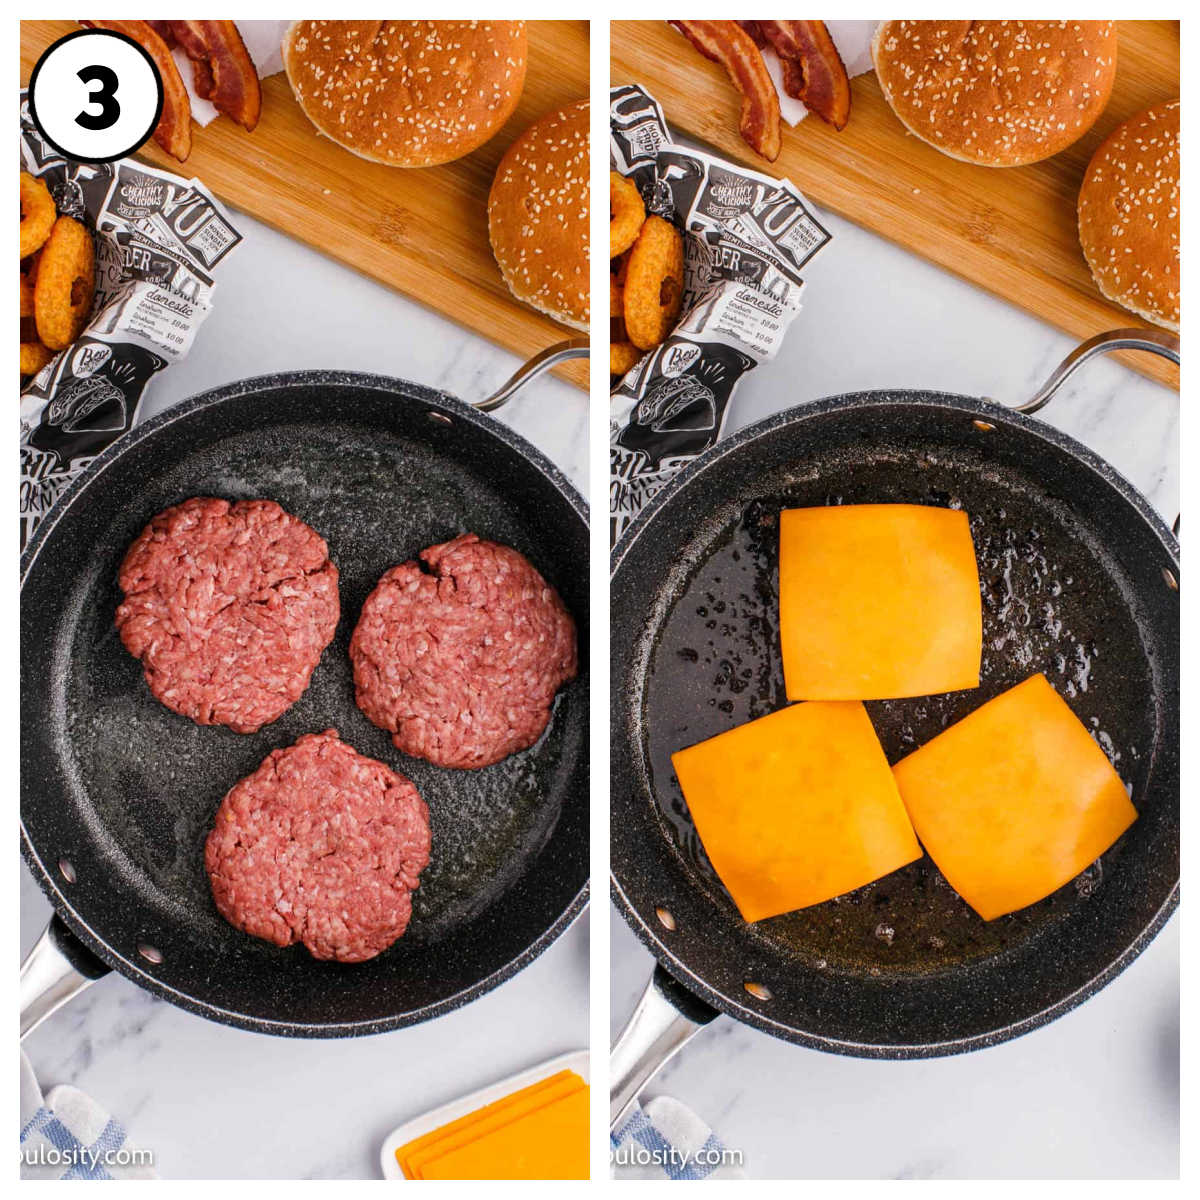
    STEP 1. Brown ground sausage, drain and set aside.

    STEP 2. In a mixing bowl, whisk eggs and egg whites. Add milk, salt, pepper, cheese, and cooked meats.

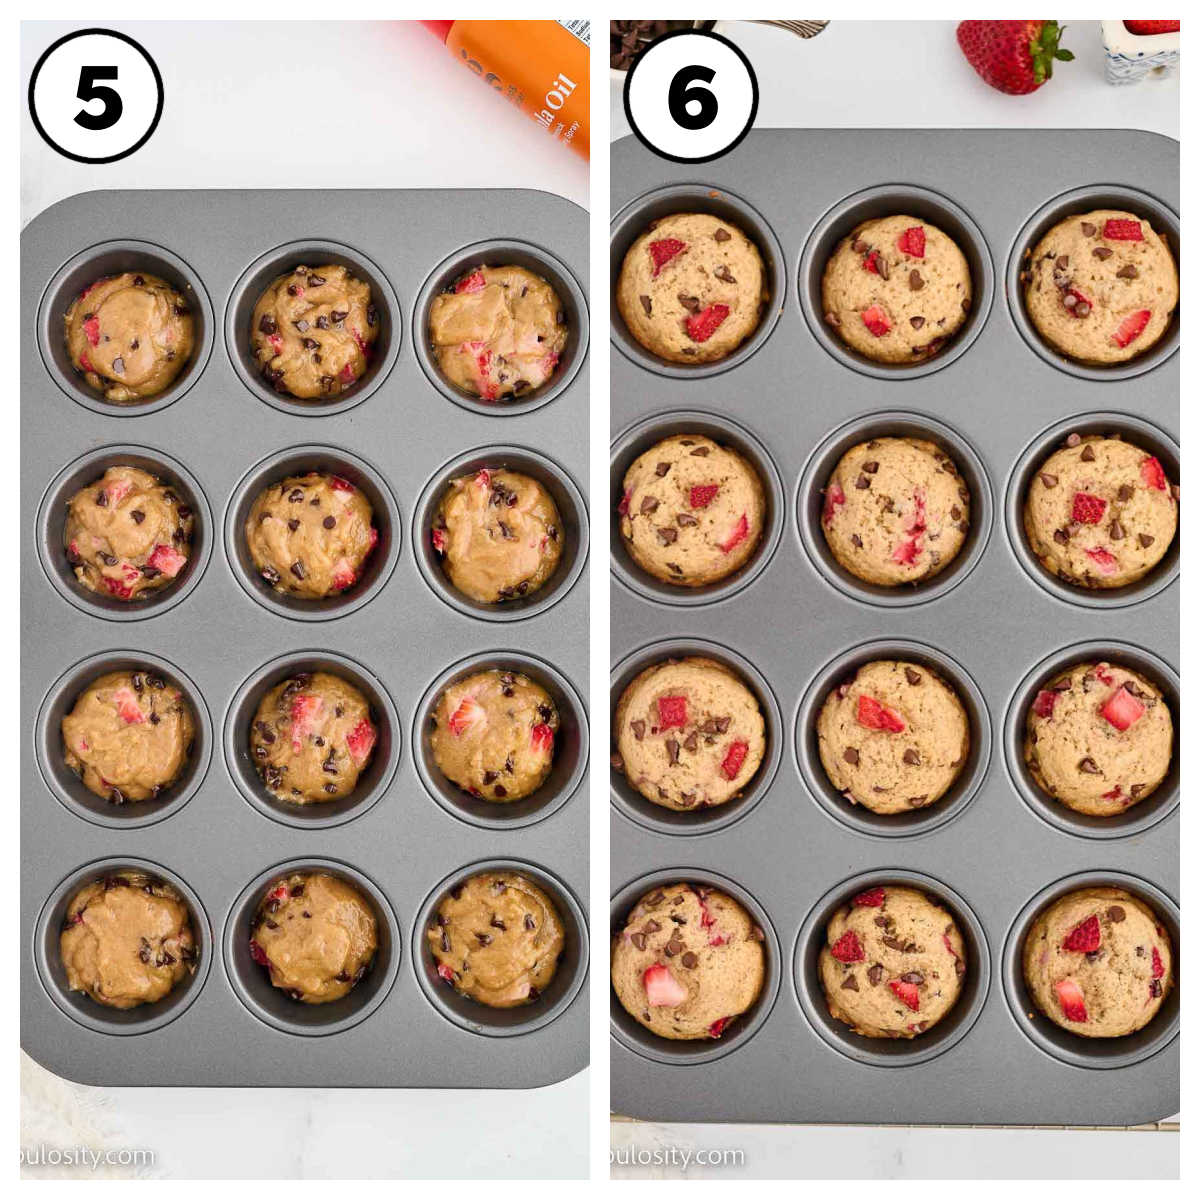
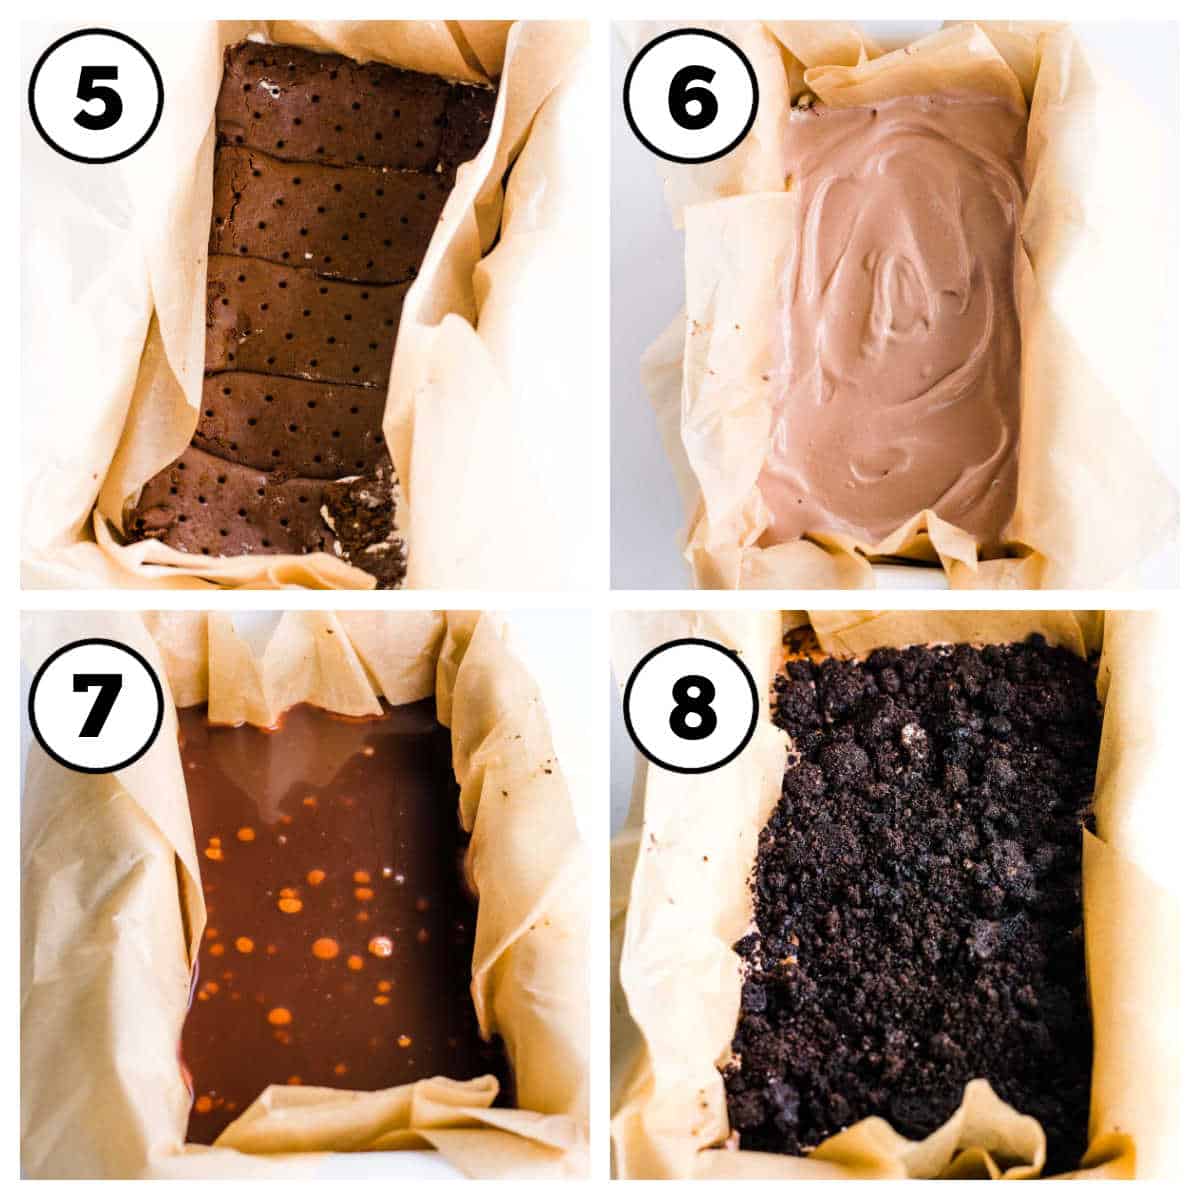
    STEP 3. Pour mixture into greased pie pan and bake uncovered for 40 minutes.

    STEP 4. Remove from oven, slice, and enjoy!

    Cooked bacon and sausage quiche in pie plate.

    Recipe Pro Tips

    • Add veggies. If you’re looking to add some vegetables to this quiche recipe, that’s perfectly ok! Adding chopped spinach, celery, or carrots to this recipe is a great idea for sneaking in some vegetables.
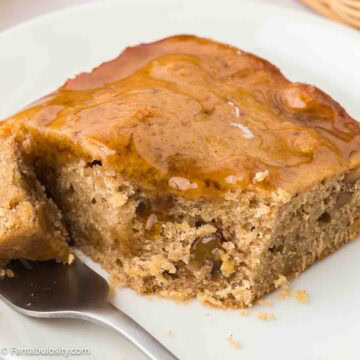
    • Toppings. If you’re looking for more things to garnish this quiche with, a dollop of sour cream, parsley, or even a drizzle of syrup can add more flair to this recipe.
    Bacon and sausage quiche sliced, and a close-up of the inside.

    What to Serve with Quiche

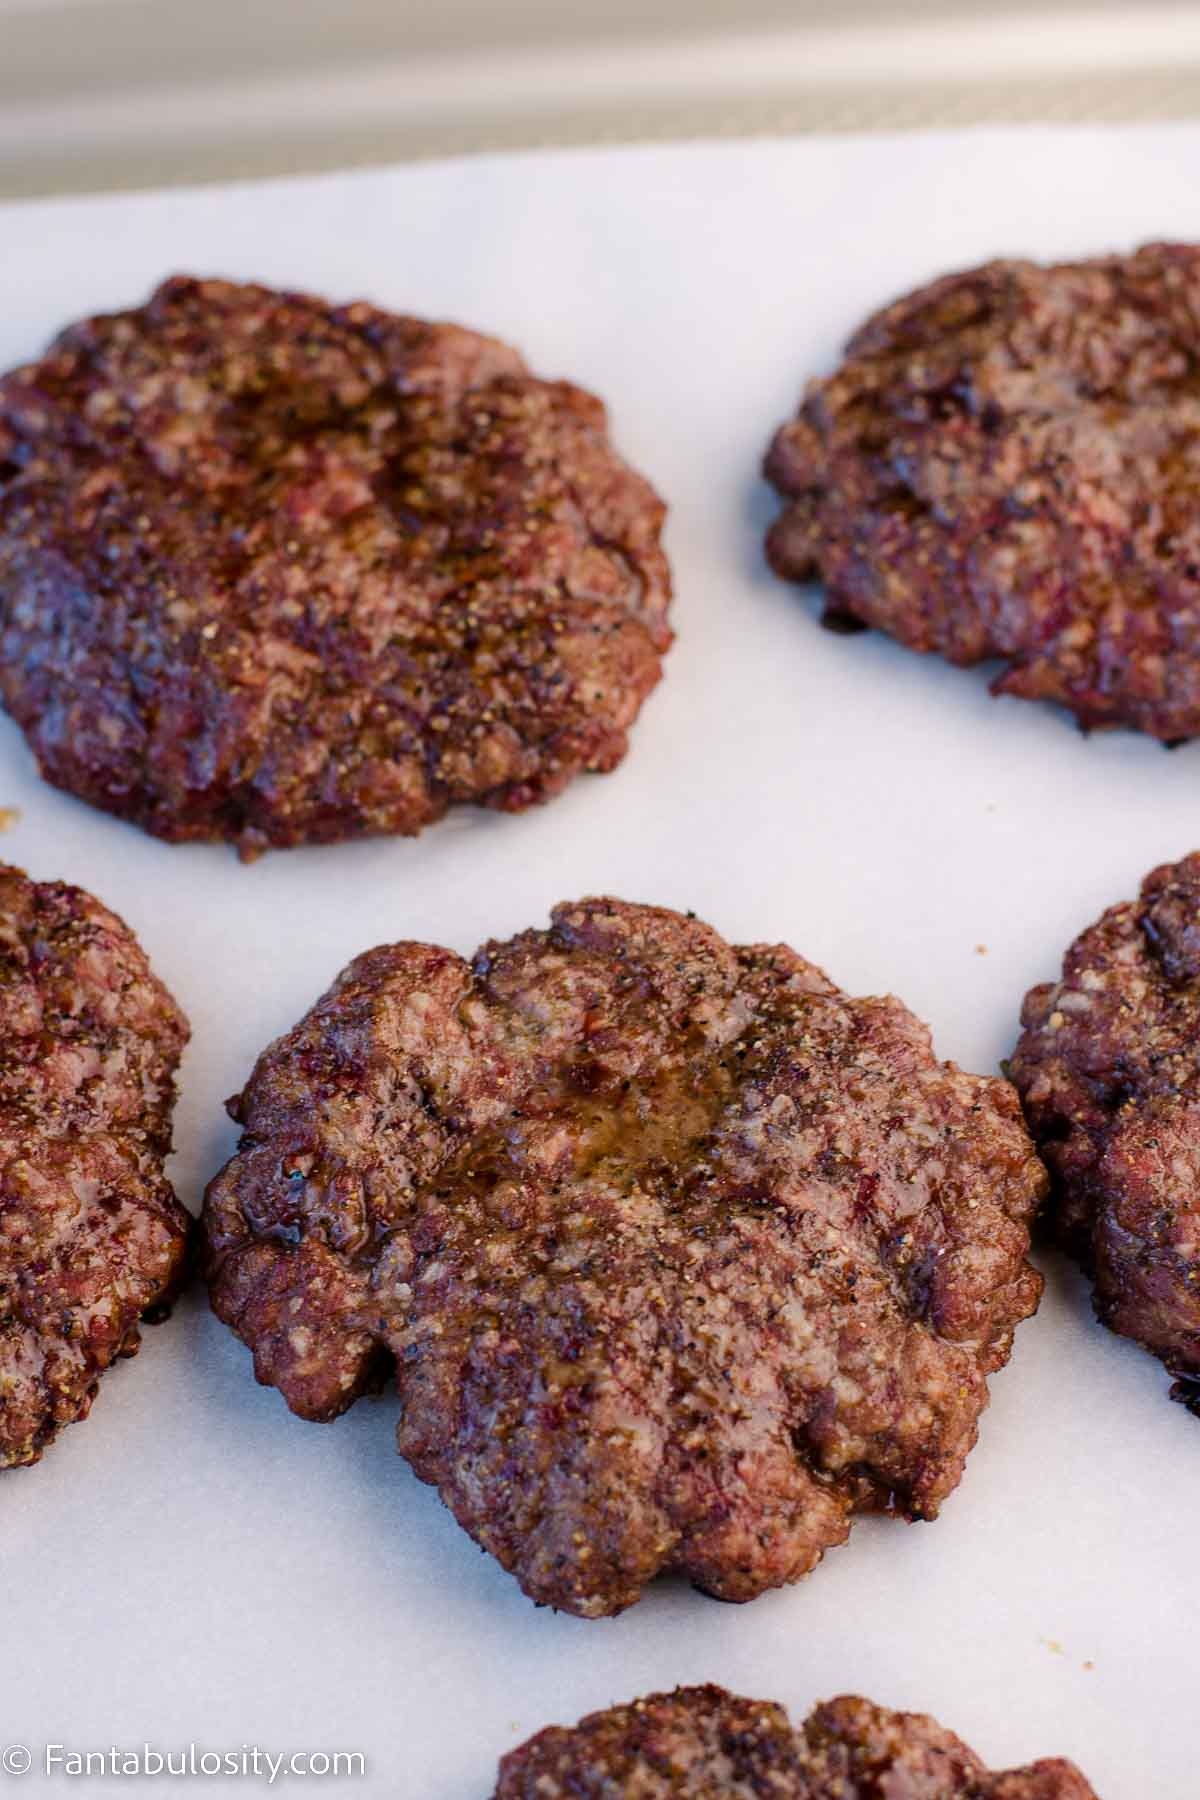
    If hosting a breakfast or brunch, serving different dishes with quiche may be a good idea, especially something simple like baked sausage patties. Or, if you’re simply wanting something else to serve with a delicious breakfast quiche at home, these recipes are delicious alongside this savory recipe:

    • Honey Lime Fruit Salad
      Honey Lime Fruit Salad
    • A breakfast waffle charcuterie board.
      Breakfast Waffle Charcuterie Board
    • Strawberry chocolate muffins on cooling rack.
      Strawberry Chocolate Muffins
    • A close up photo of a stack of cinnamon swirled pancake squares that were baked on a sheet pan
      Sheet Pan Pancakes

    Storage

    If you have leftover quiche, allow it to fully cool and then cover with plastic wrap, or place in an airtight container and in the refrigerator for 3-4 days.

    More Breakfast Recipes You’ll Love

    If you’re having this quiche for breakfast, then I think you’ll also love this easy breakfast casserole for another morning!

    • Bagel French Toast casserole in the crock pot.
      Crock Pot Bagel French Toast Casserole
    • Crock Pot rice pudding in small bowl.
      Crock Pot Rice Pudding
    • White gravy recipe on top of biscuits next to bacon on a vintage plate.
      White Gravy Recipe
    • A slice of Amish applesauce cake on plate with fork.
      Amish Applesauce Cake

    Did you make this? I’d be so grateful if you left a “star” rating below to let me know what you thought! Then, the next time you need a quick and easy recipe, come back to Fantabulosity to browse all of my easy recipes!

    Recipe

    Slice of bacon and sausage quiche on spatula.
    Print Pin
    4.15 from 7 votes

    Bacon and Sausage Quiche

    This bacon and sausage quiche is full of meaty and cheesy flavor. Easy to make, and hearty enough making it a filling breakfast or dinner recipe.
    Course Breakfast
    Cuisine French
    Prep Time 15 minutes minutes
    Cook Time 40 minutes minutes
    Total Time 55 minutes minutes
    Servings 6 servings
    Calories 262kcal
    Author Jessica Burgess

    Ingredients

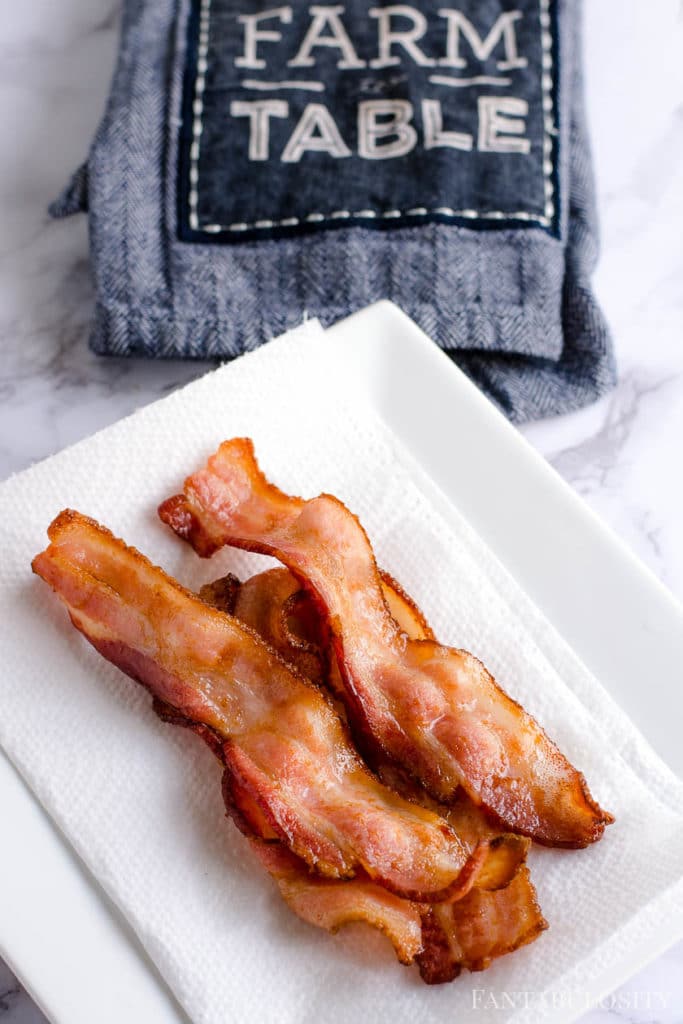
    • 4 slices cooked bacon crumbled
    • ½ pound sausage
    • 4 large eggs
    • 4 egg whites
    • ¾ cup milk
    • 2 teaspoon black pepper
    • ½ cup sharp cheddar cheese shredded
    • ¼ cup grated parmesan
    • salt to taste

    Optional Add-Ins:

    • onions diced
    • bell peppers diced
    • tomatoes diced
    • broccoli finely chopped
    • ham diced
    • spinach chopped

    Instructions

    • Preheat oven to 350 degrees Fahrenheit.
    • Brown ground sausage, drain and set aside.
    • In mixing bowl, whisk eggs and egg whites. Add milk, salt, pepper, cheeses and cooked meats.
    • Pour mixture into greased pie pan and bake uncovered for 40 minutes.

    Nutrition

    Serving: 1serving (⅙ recipe) | Calories: 262kcal | Carbohydrates: 2g | Protein: 14g | Fat: 21g | Saturated Fat: 7g | Cholesterol: 167mg | Sodium: 462mg | Potassium: 217mg | Sugar: 1g | Vitamin A: 295IU | Vitamin C: 0.2mg | Calcium: 106mg | Iron: 1.2mg

    Brownies with Cream Cheese Frosting

    August 19, 2023

    A brownie with cream cheese frosting, tipped on it's side, in the middle of other brownies.

    These Brownies with Cream Cheese Frosting are made using a chocolate fudge pudding mix, and a few other ingredients that come together and pair perfectly with the creamy cream cheese frosting!

    The brownie recipes you’ll find here are always easy, and this recipe is no exception. In a little over an hour, you’ll have a delicious dessert ready for you to enjoy.

    Sliced brownies with cream cheese frosting on counter.

    Ever since these strawberry brownies went viral online, I knew you loved brownies as much as I do. So since then, you’ve seen similar recipes like these chocolate peanut butter brownies, and these cornflake brownies appear here too, so I think you’re going to love them all just the same! Or if you love using cake mixes when making desserts, you’ll love these red velvet brownies too!

    Have an Instant Pot? You may also love these Instant Pot brownies too!

    [feast_advanced_jump_to]

    Why You’ll Love This Recipe

    • Chocolate + Cream Cheese: Flavor combinations can make or break a recipe. In this case, the cool and creamy, sweet cream cheese frosting, combined with the chocolate flavor is the perfect combination.
    • Pudding Brownies: Did you know that if you add pudding mix to brownies, it can make them more moist and even softer? It’s true. You’ll love the addition of the mix to these.
    • Potluck Recipe: This is the kind of dessert people expect to see at a potluck, and you'll find more potluck dessert ideas here.

    Ingredients Needed

    I’ve highlighted a couple of ingredients below with some relevant notes for this chocolatey brownie. Aside from this, the ingredients needed are pretty basic.

    Labeled ingredients for homemade brownies with cream cheese frosting.
    • Butter – The unsalted butter will be used for the brownies and the salted butter will be used in the cream cheese frosting.
    • Flour – All-purpose flour is recommended for these brownies.
    • Cream Cheese – Since this needs to be softened, go ahead and sit this out so it has time to soften when it comes time to use it for the frosting.
    • Chocolate Chips – Using milk chocolate chips instead of semi-sweet should be ok, however, it will alter the taste of the brownies slightly.

    How to Make Brownies with Cream Cheese

    These fudgy brownies are made from scratch, instead of using a box mix. However, this recipe is still very easy to make!

    This chocolate brownie and cream cheese frosting recipe is broken into 3 components:

    • make the brownies
    • allow brownies to cool
    • make and frost the brownies with frosting

    *Be sure to see the recipe card below for the full ingredients list & instructions!*

    How to Make Homemade Brownies

    BEGIN: Set the oven to 350° and prepare an 8 x 8 baking pan by lining with parchment paper and clipping the sides down to the pan.

    Steps 1-4 of how to make homemade brownies with cream cheese frosting.

    STEP 1. In a microwave-safe bowl, add half of the chocolate chips and the butter. Microwave for 30 seconds; if the chocolate is not completely melted, stir and microwave for another 15 seconds. Continue to do this until the chocolate is completely melted and well combined with the butter. 

    STEP 2. While the chocolate is cooling, mix sugars, vanilla, and eggs together in a large bowl for 3 to 5 minutes until smooth and not gritty. This will give you a fudgier consistency.

    STEP 3. Add the melted chocolate mixture to the egg mixture and whisk to combine. 

    STEP 4. Next add the flour, pudding mix, and salt.

    Steps 5-8 for making homemade brownies.

    STEP 5. Whisk until smooth; the batter will be thick. 

    STEP 6. Add in the chocolate chips, and mix in.

    STEP 7. Get the baking dish that was prepared earlier.

    STEP 8. Pour batter in to baking dish and spread batter to the edges until brownie batter is level. Bake for 30-35 minutes until a toothpick comes out mostly clean. The less time you bake the more fudgy the brownies will be.

    Completely cool brownies before frosting. 

    How to Make Cream Cheese Frosting

    Steps 9-12 for making cream cheese frosting to go on brownies.

    STEP 9. In a large mixing bowl add the butter and cream cheese and cream until light and fluffy and pale in color. 

    STEP 10. Add half of the powdered sugar to the cream cheese mixture and mix scraping the bowl as needed. 

    STEP 11. Add the remaining powdered sugar, vanilla, half and half, and salt.

    STEP 12. Mix until smooth. 

    Steps 13-15 how to frosting brownies with cream cheese frosting.

    STEP 13. Grab the fully-cooled brownies.

    STEP 14. Spread the perfect finishing touch (frosting) evenly over cooled brownies.

    Cut and serve the pan of brownies for a decadent dessert.

    Recipe Pro Tips

    • Allow to fully cool. Making sure that you allow the cake to completely cool before frosting is key or the frosting won’t turn out the way that it should.
    • Correct temperature. Butter, eggs, and cream are the key ingredients that should be at room temperature before making this recipe.
    Bite taken out of brownie with cream cheese frosting.

    Recipe FAQs

    What is brownie frosting made of?

    There are different types of frosting recipes that can work on brownies. Cream cheese frosting and buttercream frosting are the two most popular recipes.

    How do you store brownies with frosting?

    Depending on the type of frosting, some can be stored in the refrigerator or stored at room temperature. Brownies with cream cheese frosting should be refrigerated in an airtight container but they can sit out at room temperature for up to two hours.

    🍽 What to Serve with This Brownie Recipe

    Serving decadent brownies with a scoop of ice cream (a la mode) is common and serving your favorite flavor of ice cream with these cream cheese brownies would be a great idea.

    More Dessert Recipes You’ll Love

    If you love easy desserts like these fudgy chocolate brownies, then you’ll love all of our desserts. (Especially if you have an Instant Pot, try these brownies made in the Instant Pot.) Here are a few dessert recipes you don’t want to miss:

    • Cherry bread with cherry icing on wooden cutting board.
      Cherry Bread with Cherry Glaze
    • A collage of old-fashioned dessert recipes
      Old-Fashioned Desserts Everyone Knows and Loves
    • Blueberry dump cake, with serving spoon resting in pan.
      Blueberry Dump Cake (Easy, Buttery Dessert with Fresh Berries)
    • Cherry dump cake topped with homemade whipped cream, served in a dessert bowl.
      Cherry Dump Cake (Easy 3-Ingredient Dessert)

    Did you make this? I’d be so grateful if you left a “star” rating below to let me know what you thought! Then, the next time you need a quick and easy recipe, come back to Fantabulosity to browse all of my easy recipes!

    Recipe

    A brownie with cream cheese frosting, tipped on it's side, in the middle of other brownies.
    Print Pin
    5 from 4 votes

    Brownies with Cream Cheese Frosting

    Homemade brownies with cream cheese frosting, use a pudding mix to make them moist and soft! The cool cream cheese frosting combined with chocolate is the perfect pairing!
    Course Dessert
    Cuisine American
    Prep Time 15 minutes minutes
    Cook Time 30 minutes minutes
    Cooling Time 1 hour hour
    Total Time 1 hour hour 45 minutes minutes
    Servings 9 brownies
    Calories 577kcal
    Author Jessica Burgess

    Ingredients

    Brownies

    • ½ cup unsalted butter 1 stick
    • 6 ounces semi-sweet chocolate chips divided
    • ½ cup granulated sugar
    • ½ cup brown sugar
    • 3 eggs
    • 1 teaspoon vanilla extract
    • ½ cup all-purpose flour
    • 3.9 ounce box of chocolate fudge pudding mix mix only
    • ½ teaspoon salt

    Frosting

    • 4 ounces cream cheese softened
    • ¼ cup salted butter ½ stick
    • 2 cups powdered sugar
    • 1 teaspoon half and half
    • ¼ teaspoon vanilla
    • ⅛ teaspoon salt a pinch

    Instructions

    For Brownies

    • Set the oven to 350° and prepare an 8 x 8 pan by lining with parchment paper and clipping the sides down to the pan.
    • In a microwave safe bowl, add half of the chocolate chips and the butter. Microwave for 30 seconds; if the chocolate is not completely melted, stir and microwave for another 15 seconds. Continue to do this until the chocolate is completely melted and well combined with the butter.
    • While the chocolate is cooling, mix sugars, vanilla, and eggs together in a large bowl for 3 to 5 minutes until smooth and not gritty. This will give you a fudgier consistency.
    • Add the chocolate mixture to the egg mixture and whisk to combine. Next add the flour, pudding mix, and salt. Whisk until smooth; the batter will be thick. 
    • Pour into the prepared pan.
    • Bake for 30-35 minutes until a toothpick comes out mostly clean. The less time you bake the more fudgy the brownies will be.
    • Completely cool brownies before frosting. 

    For Frosting

    • In a large mixing bowl add the butter and cream cheese and cream until light and fluffy and pale in color. 
    • Add half of the powdered sugar to the bowl and mix scraping the bowl as needed. 
    • Add the remaining powdered sugar, vanilla, half and half, and salt. Mix until smooth. 
    • Spread frosting evenly over cooled brownies.
    • Cut and serve.

    Notes

    Storage: Brownies with cream cheese frosting should be refrigerated, although they can sit out at room temperature for up to two hours.

    Nutrition

    Serving: 1brownie | Calories: 577kcal | Carbohydrates: 77g | Protein: 5g | Fat: 29g | Saturated Fat: 17g | Polyunsaturated Fat: 1g | Monounsaturated Fat: 8g | Trans Fat: 1g | Cholesterol: 109mg | Sodium: 446mg | Potassium: 204mg | Fiber: 2g | Sugar: 65g | Vitamin A: 733IU | Vitamin C: 0.01mg | Calcium: 50mg | Iron: 2mg

    No Bake Biscoff Pie

    August 18, 2023

    No Bake Biscoff Pie on white plate.

    This Biscoff Pie recipe is a smooth and creamy, refrigerated pie that’s perfect for any time of year, especially during the summer months and during the holidays.

    Pie recipes are great for entertaining, making for a Sunday afternoon treat, or making for a potluck. When they are easy recipes like this no-bake dessert, it’s a great one to keep in your back pocket for any time that you need it.

    Slice of no bake Biscoff pie on white plate, sitting next to rest of pie.

    This peanut butter pie is a similar, creamy, no-bake pie recipe, that is easy to make, along with this turtle pie, which has delicious flavors of caramel, chocolate, and cheesecake. This butterscotch pie recipe is another no-bake recipe that’s easy to make, with simple ingredients and is a must-make.

    [feast_advanced_jump_to]

    Why You’ll Love This Recipe

    • No Bake Cookie Crust: If you know how delicious an Oreo crust is, then you can imagine how amazing a Biscoff pie crust is, with this Biscoff pie recipe! Then, if you have extra Biscoff cookies, make this Biscoff fudge recipe.
    • Make-ahead recipe: Since this pie recipe needs to chill, to thicken, it’s best to make this recipe ahead of time but that’s a great thing if you’re making it for an event, so it’s one less thing that you have to do. You can also make this no-bake pumpkin pie and allow it to set with this one.
    • Uses just a few ingredients: With only a few ingredients, it’s hard to believe that a pie can have tons of flavor but it does!
    • No Nuts: If you haven’t had Biscoff before, the Biscoff website states that its product does not include nuts. So if you love peanut butter pie but can’t have it, this is a great alternative.

    Ingredients Needed

    Labeled ingredients for no bake Biscoff pie.
    • Biscoff Crust – For full-on Biscoff flavor, you’ll want to use a Biscoff crust, although it’s not a must. If you don’t feel like making the crust, you can use an Oreo or graham cracker crust instead.
    • Biscoff Cookie Butter – You should be able to find this in the grocery store, next to the peanut butter.

    How to Make Biscoff Pie

    This pie recipe is broken into 3 components:

    • making the crust (unless you use a different, pre-made crust)
    • making the pie
    • allowing the pie to chill

    *Be sure to see the recipe card below for the full ingredients list & instructions!*

    Steps 1-4 of how to make Biscoff pie.

    STEPS 1 & 2. In an electric mixer or with a hand mixer, beat the softened cream cheese and the Biscoff butter until smooth and creamy - scraping the sides and bottom of the bowl occasionally.

    STEPS 3 & 4. Add the powdered sugar and beat until mixed together smoothly - again, scraping the sides and bottom of the bowl to make sure it is all incorporated.

    Steps 5-8 of how to make Biscoff pie.

    STEPS 5 & 6. Remove the bowl from the mixer and fold in the container of Cool Whip with a spatula.

    STEPS 7 & 8. Transfer pie filling into the pie cracker crust and smooth out the top.

    STEP 9. Cover the pie with plastic wrap, and chill in the refrigerator or freezer for 3 hours. Serve!

    Tip: You can make this the day before you need it as well. Sitting in the refrigerator overnight will allow the pie to thicken more and the flavors to combine more.

    If you put it in the freezer instead of the refrigerator, allow it to thaw for at least 10 minutes before trying to cut into it.

    Biscoff pie in white pie plate.

    Recipe Pro Tips

    • Top with your favorites. We chose to top this no-bake Biscoff pie with more crushed Biscoff cookies. However, you can do the same, or use crushed Oreos, drizzle caramel, drizzle chocolate, or add dollops of whipped cream.
    • Softened Cream Cheese. Don’t forget to soften your cream cheese before you start making the pie. How to soften quickly: pour hot water into a drinking glass and allow it to sit for a couple of minutes. Pour the water out, quickly place the cream cheese in the glass, and turn the glass upside down. All to sit until the cream cheese has softened.
    Slice of Biscoff pie on white plate, next to whole pie.

    What to Serve with Biscoff Pie

    Ice cream goes great with any pie; this recipe is no exception. But you can also top this pie with your favorite chopped candy bars, syrups, and much more!

    A fork holding a bite of Biscoff pie.

    Storage

    Make sure to store this pie in the refrigerator when not actively serving. It should keep in the refrigerator for 3-5 days.

    More Pie Recipes You’ll Love

    If you love pies as much as we do, you’ll also love these easy pie recipes:

    • A slice of caramel cream pie on a round plate, with a fork lying next to it.
      Caramel Cream Pie
    • A slice of chocolate chip cookie pie on a plate with a fork.
      Chocolate Chip Cookie Pie
    • A slice of apple butter pie topped with cinnamon whipped cream, sitting on a round plate.
      Apple Butter Pie
    • Slice of sweet potato pie recipe on spatula.
      Sweet Potato Pie Recipe

    Did you make this? I’d be so grateful if you left a “star” rating below to let me know what you thought! Then, the next time you need a quick and easy recipe, come back to Fantabulosity to browse all of my easy recipes!

    Recipe

    No Bake Biscoff Pie on white plate.
    Print Pin
    5 from 6 votes

    No Bake Biscoff Pie

    This no bake Biscoff pie is a creamy, chilled pie recipe that is quick to make and required refrigeration to thicken before serving. It's a pie that's a blend of delicous flavors that are delicious all year long.
    Course Dessert
    Cuisine American
    Prep Time 15 minutes minutes
    Chill Time 3 hours hours
    Total Time 3 hours hours 15 minutes minutes
    Servings 8 slices
    Calories 469kcal
    Author Jessica Burgess

    Ingredients

    • 1 Biscoff pie crust Biscoff pie crust recipe – or a 9-inch graham cracker crust
    • 8 ounces cream cheese
    • 1 cup Biscoff cookie butter
    • ¾ cup powdered sugar
    • 8 ounces Cool Whip

    Instructions

    • In an electric mixer or with a hand mixer, beat the softened cream cheese and the Biscoff butter until smooth and creamy - scraping the sides and bottom of the bowl occasionally.
    • Add the powdered sugar and beat until mixed together smoothly - again, scraping the sides and bottom of the bowl to make sure it is all incorporated.
    • Remove the bowl from the mixer and fold in the container of Cool Whip with a spatula.
    • Transfer pie filling into the pie cracker crust and smooth out the top.
    • Cover the pie with plastic wrap, and chill in the refrigerator or freezer for 3 hours.

    Notes

    Since a few hours are required to allow the pie to “set” before serving, this is a great “make-ahead” recipe that you can make the day before to allow the flavors to fully combine. 

    Nutrition

    Serving: 1slice | Calories: 469kcal | Carbohydrates: 49g | Protein: 6g | Fat: 28g | Saturated Fat: 11g | Polyunsaturated Fat: 1g | Monounsaturated Fat: 6g | Cholesterol: 33mg | Sodium: 210mg | Potassium: 92mg | Fiber: 1g | Sugar: 30g | Vitamin A: 431IU | Calcium: 64mg | Iron: 1mg

    Lazy Cake

    August 17, 2023

    Slice of lazy cake being held by spatula.

    Lazy Cake is an easy, chocolate, no bake recipe, that chills in the refrigerator, and that uses simple ingredients, that doesn’t require any baking.

    Cake recipes are some of our favorite dessert recipes, especially chocolate recipes like this one.

    Lazy cake on a spatula, up above the rest of the pieces.

    During the summer, it can be a great time to make easy no bake desserts. This ice cream sandwich cake and this Oreo dessert are two of our favorites to make without the oven.

    [feast_advanced_jump_to]

    Why You’ll Love This Recipe

    • It uses simple ingredients: Only common ingredients are used in this recipe! So you’ll more than likely have most, or all of these on hand.
    • Make-ahead recipe: It’s great when a recipe can be made ahead of time. Whether that’s for an event, so you can save your time later for last-minute needs, or just because you want to make it when you feel like it, rather than waiting until you have to make it.
    • Kid-Friendly: If your kiddos love chocolate desserts, then they will love all the chocolatey flavors in this recipe.

    Ingredients Needed

    As you can see below, the ingredients for this recipe are simple and you may even have everything on hand!

    Labeled ingredients for lazy cake.

    Substitutions

    If you find that you have to switch some ingredients out, here are some suggestions that may help:

    • Graham Crackers – if you’d rather use graham crackers instead of animal crackers, you absolutely can.
    • Chocolate Chips – we prefer using milk chocolate chips instead of semi-sweet but if you prefer dark chocolate flavors, you can use those instead.

    How to Make Lazy Cake

    The process for this lazy cake is simple, however there are a few steps to follow to make sure this is a success for you!

    This Lazy Cake recipe is broken into 3 components:

    • Mixing the cake batter
    • Chilling
    • Making ganache and chill again.

    *Be sure to see the recipe card below for the full ingredients list & instructions!*

    How to Make the Cake Batter

    Tip: Before beginning, line an 8-inch, square baking pan with parchment paper.

    Cut parchment paper a little bigger than pan, and cut a slit that's about 2-3 inches, in each corner, so it sits down in the baking pan easier.

    Place a piece of tape (or use clips) on each side of the baking pan to hold the parchment paper in place.

    Steps 1-4 of how to make lazy cake.

    STEP 1. Melt butter over low-medium heat, until melted.

    STEP 2. Add the cocoa and sugar, and then whisk together.

    STEP 3. Then add in the peanut butter. Whisk until blended.

    STEP 4. Next, add the milk, and cook over medium heat and let it come to a boil, whisking occasionally, and allowing it to cook for another 5 minutes, as long as the mixture as thickened.

    .

    Steps 5-8 of how to make lazy cake.

    STEP 5. Remove from heat, add in vanilla (and a pinch of salt if desired), and stir to combine.

    STEP 6 & 7. Crush the animal crackers to smaller pieces and then add them to the chocolate mixture and stir to combine.

    STEP 8. Pour mixture in to prepared baking dish. Refrigerate for one hour.

    How to Make the Ganache

    Steps 9-12 for making lazy cake.

    STEP 9. Place milk chocolate chips in glass bowl. Over low-medium heat, heat heavy cream in a sauce pan until it's gently boils.

    STEP 10. Pour hot heavy cream over chocolate chips and stir until combined.

    STEP 11. Remove cake from refrigerator.

    STEP 12. Pour ganache over cold lazy cake, sprinkle on more crushed animal crackers if desired, and place back in refrigerator for 2-3 hours or until it's hard enough to cut.

    Lazy cake on counter with parchment paper being pulled off of sides.

    Tip: When slicing the cake, wipe your knife between each slice for clean cuts.

    Lazy cake sliced in to 9 pieces.

    Recipe FAQs

    What is lazy cake make of?

    Lazy cake is made of cocoa, peanut butter, sugar, butter, animal cookies (or graham crackers), and few other staple ingredients.

    Where did lazy cake originated?

    It has been said that lazy cake is from the middle east and Europe. However it is becoming more common in other areas.

    What to Serve with Lazy Cake

    Lazy cake is delicious alone but you can serve other items with it, such as a delicious ice cream flavor, like vanilla bean or mint chocolate chip.

    Or, you may want to try drizzling a raspberry syrup on top for some extra pizzazz.

    Slice of lazy cake, sitting next to whole cake.

    Storage

    It’s best to store the lazy cake in the refrigerator when not actively serving. This helps keep it from getting too soft.

    Bite taken out of lazy cake.

    More Cake Recipes You’ll Love

    Love cake recipes like this one? Then you’ll love these other delicious cakes we have for you, especially this fun mini chocolate cake recipe, or this chocolate cake without eggs!!

    • A serving of 3-ingredient dump cake in a bowl with a dollop of homemade whipped cream.
      Dump Cake Recipe (Easy 3-Ingredient Dessert That Always Works)
    • Orange upside down cake sliced on spatula.
      Orange Upside Down Cake
    • A slice of peach cobbler cheesecake sitting on a plate next to a fork.
      Peach Cobbler Cheesecake (Easy Baked Recipe with Streusel Topping)
    • A slice of Westhaven cake on a round plate.
      Westhaven Cake

    Did you make this? I’d be so grateful if you left a “star” rating below to let me know what you thought! Then, the next time you need a quick and easy recipe, come back to Fantabulosity to browse all of my easy recipes!

    Recipe

    Slice of lazy cake being held by spatula.
    Print Pin
    5 from 1 vote

    Lazy Cake

    This is called a "lazy cake" because there's no baking required! Just a few simple ingredients, and a delicious, chocolate, sweet, cool, cake is ready to enjoy!
    Course Dessert
    Cuisine American
    Prep Time 15 minutes minutes
    Chill 3 hours hours
    Total Time 3 hours hours 15 minutes minutes
    Servings 9 squares
    Calories 616kcal
    Author Jessica Burgess

    Ingredients

    • ½ cup cocoa
    • 1 cup milk
    • 1 cup white granulated sugar
    • 1 cup butter 2 sticks
    • 1 Tablespoon vanilla
    • ⅓ cup peanut butter
    • 2 cups animal crackers or graham crackers (Plus a few extras for crushed garnish on top, if desired.)
    • pinch salt if desired, especially if used unsalted butter

    Chocolate Ganache

    • 1 cup milk chocolate chips
    • ½ cup heavy whipping cream

    Instructions

    • Line 8 inch square baking pan with parchment paper. Cut parchment paper a little bigger than pan, and cut a slit that's about 2-3 inches, in each corner, so it sits down in the baking pan easier. Place a piece of tape (or use clips) on each side of the baking pan to hold the parchment paper in place.
    • Melt butter over low-medium heat, until melted.
    • Add the cocoa and sugar, and then whisk together.
    • Then add in the peanut butter. Whisk until blended.
    • Next, add the milk, and cook over medium heat and let it come to a boil, whisking occasionally, and allowing it to cook for another 5 minutes, as long as the mixture as thickened.
    • Remove from heat, add in vanilla (and a pinch of salt if desired), and stir to combine.
    • Chop the animal crackers in to smaller pieces (not crush in to crumbs) and add them to the chocolate batter, and then stir to combine.
    • Pour mixture in to prepared baking dish. Refrigerate for one hour.

    Ganache

    • Place milk chocolate chips in glass bowl.
      Over low-medium heat, heat heavy cream in a sauce pan until it’s gently boils.
      Pour hot heavy cream over chocolate chips and stir until combined.
    • Pour ganache over cold lazy cake, sprinkle on more crushed animal crackers if desired, and place back in refrigerator for 2-3 hours or until it's hard enough to cut.

    Notes

    Make sure to store any leftover lazy cake in the refrigerator when not actively serving, or it can get too soft. It’s best served cold.

    Nutrition

    Serving: 1slice | Calories: 616kcal | Carbohydrates: 61g | Protein: 6g | Fat: 41g | Saturated Fat: 23g | Polyunsaturated Fat: 2g | Monounsaturated Fat: 10g | Trans Fat: 1g | Cholesterol: 72mg | Sodium: 350mg | Potassium: 299mg | Fiber: 3g | Sugar: 45g | Vitamin A: 869IU | Vitamin C: 0.1mg | Calcium: 94mg | Iron: 2mg

    French Bread Pizza

    August 16, 2023

    French bread pizza, sliced on wooden cutting board.

    Feel like trying something a little different from classic pizza? Then the French Bread Pizza might be perfect.

    This delightful dish is a perfect fusion of crispy French bread and gooey cheese, topped with a rich tomato sauce, and your favorite pizza toppings. It’s a simple easy meal, customizable, and deliciously satisfying for an easy dinner or easy lunch idea. 

    Two pieces of french bread pizza on baking sheet.

    Whether you’re a busy parent looking for a quick meal option or a pizza lover seeking a new twist on a classic favorite, this homemade French Bread Pizza recipe is your ticket to a delicious meal. Then, keep this bagel pizza and this Texas toast pizza in mind for the next pizza recipe you try!

    Or, you could have a go at Pizza Monkey Bread for a brilliant tear-and-share option with some pasta. And maybe you didn’t grow up making French bread pizza and are instead nostalgic for School Lunch Pizza?

    [feast_advanced_jump_to]

    Why You’ll Love This Recipe

    • Loads of variations: Just like with any pizza recipe, you can change the toppings to suit your tastes and everyone gets what they like.
    • Make-ahead recipe: Make the basics before you are ready to bake them and just put everything together for a quick lunch.
    • Ready in only 20 minutes: With a little prep and a short cooking time, this delicious recipe will be ready in less than 20 minutes. Perfect for a last-minute pizza night

    Ingredients Needed

    I’ve highlighted a couple of ingredients below with some relevant notes. Aside from this, the ingredients needed are pretty basic.

    Ingredients for french bread pizza.
    • Bread – French or Italian bread or baguette is the best option for this type of pizza bread as it is crispy on the outside and soft on the inside. Buy two so you can also make this cheesy pull-apart bread recipe too!
    • Cheese – You can’t make the best pizza without mozzarella and this French bread pizza is no different.
    • Sauce – Pizza sauce is the other must-have ingredient and also means the pizza bread is very easy to make. 

    Substitutions

    Sometimes substitutions are necessary because of ingredients that are unavailable or needed for dietary restrictions. Here are some suggestions that can help:

    • Bread: If you can’t find French bread or baguette, ciabatta is a great alternative due to its similar texture and chew. For a healthier twist, you can opt for whole-grain or multigrain bread.
    • Cheese: If mozzarella isn’t available or if you want to try something different, provolone or Monterey Jack cheese would make a good substitute. For a vegan option, use a plant-based cheese of your choice.
    • Sauce: In the absence of pizza sauce, marinara or a simple tomato sauce seasoned with Italian herbs would work just as well. For a change of pace, try using pesto or white garlic sauce as a base.

    Variations

    Don’t limit your creativity to what you’d usually find on a pizza. If you’re looking for a lighter, vegetarian version, consider swapping the meat for a colorful array of bell peppers, sweet corn, and caramelized onions. 

    Those who love seafood might want to top their pizza with anchovies, capers, and fresh arugula after baking. If you’re after a gourmet twist, a sprinkle of blue cheese, pear slices, and a drizzle of balsamic glaze would make a tantalizing combination. Remember, the sky’s the limit when you’re making your own pizza!

    How to Make French Bread Pizza

    This pizza bread is broken into 2 components:

    • Prepare the bread
    • Add the toppings and cook

    Some recipes tend to saute the green peppers first to make them a bit softer but we like them crunchy so I add them raw. The choice is up to you!

    *Be sure to see the recipe card below for the full ingredients list & instructions!*

    STEP 1: Mix the garlic butter. Combine melted butter with garlic powder.

    STEP 2: Cut the bread and coat it then cook. Slice the bread in half lengthwise, then generously coat it with garlic butter. Bake it at 450 degrees for 4 minutes until golden and fragrant. (Image 1&2)

    Steps 1-4 of image collage of making french bread pizza.

    STEP 3: Add the pizza sauce. Spread approximately 1 ½ cups of pizza/marinara sauce on top (or slightly less than a 14 ounce jar, saving the remainder for dipping). (Image 3)

    STEP 4: Add the cheese and toppings. Top it off with some delicious cheese and your favorite toppings for the perfect finishing touch. Toppings can include: pepperoni slices, fresh mozzarella, Italian sausage, and pre-shredded cheese. Top with parmesan cheese or red pepper flakes. (Image 4 & 5)

    French bread pizzas with toppings, ready for baking.

    STEP 5: Cook and serve. Preheat the oven to 450 degrees and bake for 6-7 minutes on a large baking sheet, or until the cheese has melted and turned a delicious golden brown. For an extra touch, consider broiling for a minute to enhance the flavors.

    Two different French bread pizzas on baking sheets.

    Recipe Pro Tips

    • Pre-toast the bread: Before adding the toppings, it’s a good idea to toast the bread a little first. This will help to keep it from getting too soggy from the sauce.
    • Customize your toppings: This is your pizza, so feel free to get creative with your toppings. Don’t feel like you need to stick to the traditional family’s favorite toppings. Think outside the box!
    • Use fresh ingredients: The fresher your ingredients, the better your French Bread Pizza will taste. Nothing beats the taste of fresh basil, tomatoes, or mozzarella cheese.
    • Watch the oven: The pizza can go from perfectly cooked to burned in a matter of minutes. Keep a close eye on it, especially in the final stages of baking.
    • Serve immediately: French Bread Pizza is best served immediately while the cheese is still hot and gooey. If you need to save some for later, it’s best reheated in an oven or toaster oven to keep the bread crispy.
    • Add a salad: Pair your pizza with a simple side salad for a complete meal. The crisp, fresh salad contrasts nicely with the rich, hearty pizza.
    Pepperoni French bread pizza slices.

    Recipe FAQs

    How do you keep French bread pizza from getting soggy?

    A couple of steps can help prevent your French Bread Pizza from turning soggy. First, ensure you pre-toast your bread before adding the sauce and toppings. This creates a barrier that keeps the sauce from seeping into the bread. Additionally, go easy on the sauce. Too much can make the bread soggy.

    Can I make French Bread Pizza ahead of time?

    Yes, you can assemble your French Bread Pizza ahead of time, but it’s recommended to add the toppings and bake just before you’re ready to serve. This will ensure the french bread loaf
     remains crisp and the toppings fresh.

    How can I make a vegan French Bread Pizza?

    Substitute mozzarella with plant-based cheese and ensure your bread and sauce are vegan-friendly. You can top your pizza with a variety of vegetables, and for extra protein, add some plant-based meat substitutes.

    How do you make homemade pizza sauce?

    Creating homemade pizza sauce is straightforward and allows you to control the flavor profile to suit your tastes. Start with a can of crushed tomatoes. Sauté minced garlic in olive oil
     until fragrant, then add the tomatoes. Season with salt, pepper, oregano, and a pinch of sugar to balance the acidity. Let it simmer on low heat for 15-20 minutes to meld the flavors. Cool it before use on your French Bread Pizza. If you prefer a smoother sauce, you can blend it until it reaches your desired consistency.

    Sliced French bread pizza slices on wooden cutting board with meat and vegetable toppings.

    What to Serve with French Bread Pizza

    French Bread Pizza pairs wonderfully with a wide variety of sides. Consider serving it with a crisp Caesar salad, tangy coleslaw, or a fresh Greek salad. Steamed vegetables or roasted Brussels Sprouts can also add a nutritious touch to your meal. For a more indulgent side, try some garlic knots, focaccia bread, or cheese-stuffed breadsticks. 

    And of course, don’t forget a cold drink like iced tea, soda, or a glass of your favorite wine. Remember, the best accompaniment to any meal is the company of loved ones, so gather around the table and enjoy!

    Mixture of different types of French bread pizza on wooden pizza cutting board.

    Storage

    Storing leftover French Bread Pizza is simple and can extend your enjoyment of this delicious meal. Allow the pizza to cool completely, then place it in an airtight container. Store it in the refrigerator for up to 3-4 days. 

    You can also freeze the leftover pizza for longer storage – just be sure to wrap it tightly in plastic wrap or place it in a freezer bag before freezing to preserve its quality. To reheat, thaw in the refrigerator if frozen, then warm in a preheated oven until heated through, which will help maintain the crispness of the bread.

    Slice of French bread pizza dipping in to small bowl of marinara sauce.

    More Recipes You’ll Love

    Once you make French Bread Pizza, you’ll get the urge to try more French-inspired recipes, I just know it! Here are a few suggestions to help you out.

    • French Dip Sandwiches on a white plate with potato wedges and sauce
      Instant Pot French Dip
    • Slice of French toast casserole on white plate with blueberries and strawberries.
      French Toast Casserole
    • french onion beef casserole scooped up out of white dish
      French Onion Beef Casserole
    • French Toast Sticks
      EASY Cinnamon French Toast Sticks

    Did you make this? I’d be so grateful if you left a “star” rating below to let me know what you thought! Then, the next time you need a quick and easy recipe, come back to Fantabulosity to browse all of my easy recipes!

    Recipe

    French bread pizza, sliced on wooden cutting board.
    Print Pin
    5 from 6 votes

    French Bread Pizza

    Using French bread to make the pizza crust, with these steps will ensure you have a delicious, crispy crust that you can customize with your favorite toppings.
    Course Appetizer, Dinner, Lunch, Main Course, Side Dish
    Cuisine American, Italian
    Prep Time 10 minutes minutes
    Cook Time 10 minutes minutes
    Total Time 20 minutes minutes
    Servings 14 pieces
    Calories 210kcal
    Author Jessica Burgess

    Ingredients

    • 4 Tablespoons butter
    • 1 teaspoon garlic powder
    • 1 loaf french bread
    • 14 ounces pizza sauce You more than likely won't use all of this but you can use the extra sauce for dipping.
    • 4 cups shredded mozzarella

    Toppings Used in This Recipe – Amounts Vary Based on Preference

    • pepperoni cut in to fourths to make triangles
    • canadian bacon cut in to small triangles
    • "meat lovers" cooked bacon and sausage crumbles found in the frozen section (warmed in microwave before adding to pizza)
    • black olives sliced
    • green pepper
    • Italian dressing seasoning packet optional for pizza topping flavor

    Instructions

    • Melt butter and garlic powder together in the microwave.
    • Cut bread in half, lengthwise and brush on melted garlic butter on to each slice of bread. (You may not use all of this and you can set aside any remaining to use later.)
    • Bake at 450 for 4 minutes. This is key to keeping the bread toasty instead of getting soggy.
    • Top baked bread with about 1 ½ cups of pizza sauce – dividing the sauce between the two. (This will more than likely be little less than a 14 ounce jar of pasta sauce, and you can save the rest for dipping.)
    • Top each piece of sauced bread with 2 cups of cheese and favorite toppings.
      (We did one half of bread with cheese and pepperoni and the other half with the remaining topping ingredients listed above.)
    • Bake at 450 for 6-7 minutes or until cheese has melted and is a nice golden brown. TIP: For a golden brown cheese, you may want to turn the oven to "broil" and watch carefully as it can turn golden brown, quickly!
    • If desired, sprinkle on a little of the Italian dressing seasoning packet for added flavor.
    • Slice french bread in to 1-2 inch pieces.
    • Warm and use any leftover pizza sauce as marinara sauce for dipping the slices.

    Nutrition

    Serving: 3pieces | Calories: 210kcal | Carbohydrates: 17g | Protein: 11g | Fat: 11g | Saturated Fat: 6g | Polyunsaturated Fat: 1g | Monounsaturated Fat: 3g | Trans Fat: 0.1g | Cholesterol: 34mg | Sodium: 533mg | Potassium: 145mg | Fiber: 1g | Sugar: 3g | Vitamin A: 439IU | Vitamin C: 2mg | Calcium: 182mg | Iron: 2mg

    Chicken Caprese Sandwich

    August 15, 2023

    Chicken Caprese Sandwich on white plate.

    This recipe for a Chicken Caprese Sandwich is made of deliciously seasoned chicken breast, fresh tomatoes, Ciabatta rolls, balsamic reduction, fresh basil leaves, and slices of fresh mozzarella cheese. It’s a sandwich recipe that’s perfect for the summer months and you can get the ingredients at almost any grocery store.

    Chicken Caprese Sandwich on white plate, with balsamic dripping on to plate.

    A delicious, traditional Caprese salad is perfect during the summer and is made up of mozzarella, tomatoes, and fresh basil. It’s a cool dish that has a ton of flavor, even with a few ingredients.

    So with my love of Caprese salads, I loved the idea of turning it in to a sandwich with this chicken sandwich recipe. Now if you’re not a fan of chicken, you’ll also love this Caprese wrap that doesn’t use any meat.

    [feast_advanced_jump_to]

    Why You’ll Love This Recipe

    • It uses simple ingredients: Although a Caprese sandwich sounds fancy, you can usually find the ingredients at most grocery stores.
    • Fancy and Simple: Planning on making a lunch or dinner to impress? This sandwich is perfect for that but it’s also simple enough to make for a quick lunch just for you!
    • Ready in only 20 minutes: Talk about a quick and easy dinner idea! This recipe, from start to finish, takes less than 30 minutes.

    Ingredients Needed

    I’ve highlighted a couple of ingredients below for this caprese sandwich recipe with some relevant notes. Aside from this, the ingredients needed are pretty basic.

    Labeled ingredients on white counter for caprese sandwich.
    • Mozzarella – You can find the fresh mozzarella in the shape of a ball, and you’ll want to slice that in to thick slices for your caprese sandwich.
    • Chicken – Make sure to choose boneless, skinless, chicken breasts for this recipe. We use these in our chicken club sandwich as well and we feel it’s the best cut of meat for a juicy, tender sandwich.
    • Pesto Sauce – You can make homemade pesto sauce recipe but we prefer using store-bought pesto.

    Substitutions

    Sometimes substitutions are necessary because of ingredients that are unavailable or needed for dietary restrictions. Here are some suggestions that can help:

    • Bread – Ciabatta bread is best for this sandwich but that doesn’t mean it’s the only kind you can use. If you choose use different types of slices of bread, it’s best to make sure that you choose a thicker bread.
    • Basil – if you can’t find fresh basil, it’s ok to use dried but it won’t be nearly as good as fresh!
    • Skipping the Balsamic – I’m not a fan of balsamic vinegar. So I skip this when I make a sandwich for myself. However, I know how popular it is for caprese recipes, and all of my friends and family love it, so I figured you would too. However, if you don’t like it as much, you can easily skip that part.

    How to Make This Caprese Chicken Sandwich

    With this type of sandwich, it’s best to assemble it right before enjoying it. However, you can make the chicken ahead of time, so it’s quick to assemble when the time comes to eat.

    *Be sure to see the recipe card below for the full ingredients list & instructions!*

    Steps 1-4 of how to make caprese chicken sandwiches.

    STEP 1. Season the chicken. Sprinkle the chicken breasts with salt, pepper, and garlic powder. (The amounts can vary based on taste preference.)

    STEP 2. Oil. Heat cooking oil over medium-high heat.

    STEP 3. Raw chicken. Place seasoned chicken into the pan.

    STEP 4. Cook chicken. Brown chicken on each side, flipping once, until chicken is cooked through; about 4-5 min on each side until golden brown, and/or until the internal temperature is checked with a meat thermometer and it has reached 165 degrees F.

    Cooked chicken covered in pesto sauce, in white bowl.

    Coat in Pesto. Place the cooked chicken in a bowl and toss with the pesto sauce.

    Image collage of steps 5-8 of how to make chicken caprese sandwich.

    STEP 5. Add chicken. Place pesto-covered chicken, on to a bottom piece of Ciabatta bun.

    STEP 6. Mozzarella. Next, add on mozzarella slices on top of chicken.

    STEP 7. Balsamic and Basil. Layer on balsamic and basil, on top of mozzarella.

    STEP 8. Tomato. Lastly, adding juicy tomatoes on top and add top bun.

    Close up of caprese chicken sandwich.

    Recipe Pro Tips

    • Leftover chicken. This is a fantastic way to use leftover chicken too!
    • Tomato Slices. Using fresh garden tomatoes for this recipe are superb. However, I know not everyone has a garden. This is a great reason to stock up on tomatoes at the farmer’s market, or at least during peak season at the grocery store. However, do not refrigerate your tomatoes. This causes them to lose flavor.

    Recipe FAQs

    What is a Caprese sandwich made of?

    All Caprese sandwiches should have mozzarella, fresh basil, and tomato. Adding a protein or a drizzle of balsamic is common too.

    What goes well with Caprese sandwich?

    A pasta salad recipe pairs perfectly with a Caprese sandwich, as well as carrot sticks and jalapeno ranch dip or even a honey lime fruit salad.

    Are Caprese sandwiches healthy?

    When compared to sandwiches such as a fried chicken sandwich, yes, they can be considered healthy. However if “healthy” looks like “low-carb” to you, then using ciabatta bread for this sandwich would not be a good choice.

    Chicken caprese sandwich sliced in half.

    Storage

    If there are leftovers from this sandwich, it’s best to store the toppings separately in the refrigerator, in an airtight container, and then assemble before serving, so the bread does not get soggy and so you can reheat the chicken when ready to enjoy.

    More Sandwich Recipes You’ll Love

    If you love sandwich recipes, then you’ll love these other recipes:

    • Curry chicken salad with grapes in a white bowl.
      Curry Chicken Salad
    • Chicken salad with grapes and apples, sitting on bread.
      Harvest Chicken Salad
    • Crack Chicken Sandwich on wooden cutting board.
      Crack Chicken Sandwiches
    • egg salad on croissant
      The BEST Egg Salad Recipe

    Did you make this? I’d be so grateful if you left a “star” rating below to let me know what you thought! Then, the next time you need a quick and easy recipe, come back to Fantabulosity to browse all of my easy recipes!

    Recipe

    Chicken Caprese Sandwich on white plate.
    Print Pin
    5 from 1 vote

    Chicken Caprese Sandwich

    Chicken Caprese Sandwich: Fresh mozzarella, basil, tomatoes, and bread make up this delicious grilled cheese recipe. This Italian take on the American classic is so delicious and an easy lunch recipe.
    Course Main Course
    Cuisine American, Italian
    Prep Time 10 minutes minutes
    Cook Time 10 minutes minutes
    Total Time 20 minutes minutes
    Servings 4 sandwiches
    Calories 568kcal
    Author Jessica Burgess

    Ingredients

    • 1 pound Boneless Skinless Chicken Breast 
    • 2 Tablespoon cooking oil
    • pinch salt -/+ based on taste preference
    • pinch black pepper -/+ based on taste preference
    • ½ teaspoon garlic pepper Or -/+ based on preference.
    • 4 Tablespoons pesto sauce
    • 4 Ciabatta buns
    • 8 slices fresh Mozzarella
    • fresh basil leaves
    • 2 Tablespoons Balsamic reduction
    • 1 large fresh tomato

    Instructions

    • Sprinkle salt, pepper, and garlic on each side of the chicken breast.
    • Heat cooking oil over medium high heat.
    • Place seasoned chicken into the pan. Brown chicken on each side, flipping once, until chicken is cooked through; about 4-5 min on each side.
    • Place the cooked chicken in a bowl and toss with the pesto sauce.

    Assemble the Sandwich

    • Add the chicken breast to the bun. Then put the fresh mozzarella on top of the chicken. Sprinkle the mozzarella with salt and pepper to help balance the sweet from the balsamic. 
    • Then add as much basil and balsamic as you would like.
    • Lastly add the tomato slice and sprinkle with salt and pepper if desired. 

    Nutrition

    Serving: 1sandwich | Calories: 568kcal | Carbohydrates: 34g | Protein: 43g | Fat: 29g | Saturated Fat: 10g | Polyunsaturated Fat: 3g | Monounsaturated Fat: 9g | Trans Fat: 0.04g | Cholesterol: 119mg | Sodium: 904mg | Potassium: 570mg | Fiber: 1g | Sugar: 4g | Vitamin A: 1099IU | Vitamin C: 8mg | Calcium: 321mg | Iron: 1mg

    30 Ground Beef Dinner Ideas

    August 15, 2023

    Ground Beef Dinner Ideas in an image collage.

    Ground beef is one of the unsung heroes of a family dinner recipe. It is easy to get, easy to cook, and with just a few ingredients you can turn it into something completely delicious. If you have some ground beef in the freezer, you are on your way to making an amazing meal with this collection of 30 Ground Beef Dinner Ideas.

    Ground beef is economical for the budget-minded cook. It is versatile; there are so many dishes you can make with it!

    From the easiest cheeseburger sliders to comforting hamburger hash brown casseroles; ground beef is a great source of protein, and it makes delicious meals that everyone will enjoy. You might want to save these recipes to your Pinterest easy dinner board.

    Beef and cheese burrito

    Beef Burritos

    This recipe makes super cheesy beef burritos with plenty of salsa in the fold. Your family will love this for a fast and filling ground beef meal. Serve with rice or Mexican street corn.

    Air fryer burgers

    Air Fryer Burgers

    Bring big burger flavor to the table without firing up the grill. This recipe makes for a fast family meal with ground beef that you can make on a busy weeknight, or anytime the craving for a good burger hits.

    burger sliders

    Cheeseburger Sliders

    It’s no secret that we love hamburger recipes around here. But when you season the Hawaiian buns that go with them, it takes sliders to a whole new level.

    french onion beef casserole scooped up out of white dish

    French Onion Beef Casserole

    This casserole is loaded with great flavors. Adding French onion and ground beef to a casserole is an easy recipe for a hearty family meal. Serve with bread and a veggie for an easy dinner with ground beef.

    Side view of blue cheese burger on pretzel bun, with lettuce leaf, sitting next to french fries.

    Blue Cheese Burgers with Pretzel Buns

    Upgrade burger night with tangy blue cheese! This recipe tastes like it came from a trendy burger joint.

    Syrup dripping down top of waffle burger

    Waffle Burger

    Everyone can make a burger out of some ground beef, right? Add some flair and make a burger that uses waffles instead of buns!

    Spoonful of beef stroganoff

    Easy Beef Stroganoff Recipe

    Bring comfort food to the dinner table with this easy dish. Noodles, ground beef, and a tasty gravy make this meal filling and delicious!

    A fork holding a bite of fried spaghetti, over a plate of it, next to a piece of garlic toast.

    Fried Spaghetti

    Although fried spaghetti uses leftover spaghetti, this recipe is so delicious that you may want to make a batch of spaghetti just so you can fry it!

    Fork holding a bite of hamburger hashbrown casserole.

    Hamburger Hash Brown Casserole

    Grab some frozen beef and a bag of hash browns to make this really simple casserole to make this easy and hearty dinner. Serve with a simple salad like this old-fashioned pea salad.

    Electric skillet burgers on a bun with lettuce and cheese and waffle fries.

    Electric Skillet Hamburgers

    This recipe takes the mess out of frying burgers indoors thanks to the lid on your electric skillet. Make these burgers unique every time you serve them by mixing up the toppings.

    Taco pasta ready to eat, in skillet with a wooden spoon.

    Taco Pasta

    Taco night has never been more delicious! All the flavors of tacos, in skillet form.

    One serving of cowboy stew in white bowl, sitting on wooden pot holder.

    Cowboy Stew

    Three kinds of meat; bacon, hamburger, and kielbasa make this stew hearty. It has plenty of veggies to make it wholesome too for a fantastic dinner everyone will love.

    Oven baked hamburgers with cheese and sesame seed bun

    How to Cook Burgers in the Oven

    Did you know that you can make the best burgers in the oven? This easy recipe turns out perfectly every time for a satisfyingly simple meal idea.

    Biscuit and cheeseburger casserole on spatula

    Cheeseburger Casserole

    Taking everyone’s favorite cheeseburger recipe and turning it in to a casserole. This recipe uses simple ingredients and is so full of flavor that kids and adults love.

    Swedish meatballs and sauce top cooked egg noodles on a white plate

    Easy Swedish Meatballs

    Skip a trip to Ikea; this recipe makes the best Swedish meatballs. Serve these over egg noodles or mashed potatoes for a really creamy dinner that pairs well with crusty bread and a veggie for a wholesome and easy meal idea with ground beef.

    smoked ground beef burgers on a seeded bun with tomato and pickle. Served with fries

    Smoked Burgers

    Pop some ground beef patties on the smoker for an hour and you are going to have the best burger night ever. Smoky meat is always delicious paired with a classic side like Amish Potato Salad.

    Chili in small white bowl.

    Simple Chili Recipe

    It’s hard to believe that this chili recipe uses just a few simple ingredients and that it’s so good! But it is! This chili base allows each person to add ingredients and their favorite toppings to make it the best!

    Tortilla chip scooping Velveeta Rotel dip out of bowl.

    Rotel Dip

    Cheese, ground beef, and Rotel tomatoes come together easily to make a tasty dip. Chances are, you might want to make a meal out of this; it is that good!

    burgers moved away from direct flame

    How to Grill Frozen Burgers

    If you forgot to defrost meat for dinner tonight, no worries. These burgers are frozen at the start but are perfect by the time they are finished.

    Lasagna soup in small white bowl, with a dollop of ricotta cheese on top.

    Easy Lasagna Soup

    Italian night just got a lot easier, and it’s in soup form! This lasagna soup is easy to make and is wonderful on a cold winter night.

    Two bowls of goulash sit alongside a crock pot full of the same rich, hearty soup brimming with beef, vegetables and noodles

    Crock Pot Goulash

    Grab some simple ingredients like veggies, noodles, and ground beef to make this easy and delicious Goulash that cooks while you are at work for a warm welcome when you get home.

    Burger with nacho cheese, onion and pickle on bun

    Stove Top Burgers

    Get a great ground beef meal ready without firing up the grill. This recipe makes it so easy to fry the perfect juicy burger on your stovetop.

    Instant pot chili mac recipe

    Instant Pot Chili Mac

    Let your instant pot make short work of dinner tonight. This recipe has noodles, beef, and kidney beans for a really delicious and nutritious family dinner idea that is ready in just a few moments.

    A Juicy Lucy burger on a plate cut in half to reveal the cheese inside.

    Juicy Lucy Burgers

    Cheeseburgers are always a good idea for a ground beef dinner. This recipe tucks melty cheese inside the patty for a burger that is bursting with cheesy flavors!

    Instant pot cheeseburger macaroni. Noodles with ground beef

    Cheeseburger Macaroni

    This easy instant pot recipe tastes even better than the iconic box mix. Pop some wholesome, simple ingredients like cheese, ground beef, and noodles for a fast and filling family-friendly meal.

    Frito Chili Pie Recipe

    Frito Chili Pie

    If you love Chili, you’re going to love having it in chili pie form. This is a thicker recipe, that pours on top of Fritos and then topped with your favorite toppings.

    Sloppy joey sliders with cheese

    Sloppy Joe Sliders

    Sloppy joe sliders are an easy dinner idea that can also serve as an appetizer for a party at dinnertime. The cheese and buttery seasoned bun make these sliders a must for dinner!

    Taco Soup

    Bring the bold flavors of tacos to an easy-to-make taco soup. This recipe uses simple pantry staples to make a hearty soup that has a great flavor and can feed a crowd.

    Donut Burger with Cheese and Bacon

    Buttery Glazed Donut Burgers

    This recipe is epic. Bring decadent glazed donuts to burger night for an incredibly indulgent meal that beats any drive-thru offering!

    Hot taco dip being lifted out of baking dish with a chip.

    Hot Taco Dip

    This dip has all of the flavors of tacos in a cheesy dip. It is so hearty and delicious that you can pair some chips with this and have a very yummy meal the family will love on those nights you just want something easy.


    Which of these easy ground beef dinner ideas would your family like? If you try any of these recipes I hope you will come back and leave a comment to let me know what you thought!

    Indoor Picnic Food Ideas

    August 14, 2023

    Images in collage for indoor picnic food ideas.

    Are you looking for a way to surprise someone with a special afternoon but you aren’t sure what to do?

    How about having an indoor picnic? On a wet day, this is a perfect way to make a meal special for kids or adults.

    This is also a budget-friendly date idea that is sure to impress your spouse on a date night at home. I have gathered some of my favorite indoor picnic food ideas to share with you and make sure to also see the list of picnic food ideas for couples and these ideas for a picnic set up.

    Collage of indoor picnic food ideas.

    From the best tuna salad ever to an easy layered taco dip that pairs perfectly with tortilla chips. I know you are going to find a few recipes to try out for your own indoor picnic, or even ways to make food look fun.

    You might want to pin these ideas to your Pinterest picnic board.

    Italian sliders with meat, cheese and peppers

    Italian Sliders on Hawaiian Rolls

    These little sliders have so much flavor thanks to the mixture of meat and cheese with banana peppers! Make these for the perfect portion of finger food to share over lunch or dinner.

    Reuben dip in white pie dish, and a spoon scooping out a serving.

    Reuben Dip

    If you like a good Reuben sandwich, then you are going to love this dip! Serve it with crusty rye bread for the perfect indoor picnic food.

    Chicken caprese sandwich sliced in half.

    Caprese Chicken Sandwich

    This Caprese chicken sandwich makes for perfect picnic food. This sandwich is really great when served with a bowl of soup, or a glass of wine.

    ham and cheese on a bun with pasta in a bowl

    Hot and Ham Cheese Sandwiches

    You can’t go wrong with a classic like hot ham and cheese! This recipe is easy and makes for perfect indoor picnic food, paired with chips or a side salad.

    Peanut Butter and Jelly

    An indoor picnic doesn’t have to be fancy; a classic like pb&j and good conversation is all you need to make a great combo.

    fried peanut butter and jelly sandwich on a white plate

    Fried Peanut Butter and Jelly Sandwiches

    Peanut butter and jelly sandwiches are always a good idea. This recipe warms them up with buttery toasted bread for the unique and yummy picnic option.

    Chicken grilled cheese

    Chicken Grilled Cheese

    Melty cheese and chicken are perfect partners for an easy lunch to share. Add your favorite cheeses to make this sandwich deliciously different.

    shrimp Macaroni salad in a bowl

    Shrimp Macaroni Salad

    Bring your macaroni salad up a step by adding shrimp. This is such a delicious option for creamy and filling picnic food.

    Tuna salad sandwiches stacked up on a white plate

    Tuna Salad Sandwiches

    After one bite, you are going to agree these are the best tuna salad sandwiches ever. This classic picnic food always hits the spot while being budget-friendly.

    Chopped Italian salad in a bowl

    Italian Chopped Salad

    Pasta, lettuce, and all the fixings like bacon and blue cheese come together to make the best salad. I know you will love the honey mustard dressing as much as I do.

    Taco Dip in a white casserole dish

    Taco Layer Dip

    Who could resist this tasty taco dip? Offer it with tortilla chips for an easy indoor picnic offering that everyone will love.

    Air fryer pigs in a blanket

    Air Fryer Pigs in a Blanket

    Wrap little sausages in dough and pop them in the air fryer for classic finger food. Serve these with some smoked queso or some pretzel cheese dip.

    M&M candy coated peanut butter cream cheese ball with pretzels

    Chocolate Chip Cheese Ball

    Cream cheese, peanut butter and M&M’s come together to make the best dessert cheese ball for your indoor picnic. I know you are going to love this recipe.

    bacon ranch pasta in gray bowl

    Bacon Ranch Pasta Salad

    This creamy pasta is perfect for a picnic! With all the flavors of cheese, bacon, and creaminess, it’s hard to beat!

    Bruschetta Recipe

    The BEST Bruschetta

    A classy appetizer or the perfect nibble for an indoor picnic? We’re going to go with BOTH! This bruschetta is not only easy to make but the fresh flavors are incredible.

    Fried Bologna and Egg Sandwich, cut in half, sitting on white plate

    Fried Bologna and Egg Sandwich

    It’s a Southern classic but also a great idea for a picnic. Eggs aren’t just for breakfast anymore either. This warm bologna and egg sandwich is a great sandwich idea for your picnic.

    Honey lime fruit salad in white bowl.

    Honey Lime Fruit Salad

    Fresh fruit is not only a great idea for a picnic but the honey and lime flavors in this fruit salad take a common dish to the next level.

    no bake oreo dip in white bowl with dippers around

    Oreo Dip

    What about dessert? This no-bake Oreo dip makes the dessert portion of your picnic something to remember! Dip fruit or your favorite cookies into this smooth and creamy dip.

    shortcake characuterie with berries, cookies and whipped cream on a board

    Shortcake Charcuterie by Sugar and Soul

    This shortcake board is the perfect dessert for your indoor picnic. Add assorted berries and plenty of cookies for an experience.

    Old fashioned ham salad sandwiches on wooden cutting board.

    Ham Salad

    A cool sandwich on a hot summer day hits the spot. But even if the picnic is inside, a cool sandwich may just be what you need to round out the meal.


    Which of these recipes would you like to serve at your indoor picnic? Leave a comment and let me know if you have any suggestions for the perfect picnic food.

    Tips for an Indoor Picnic:

    If you’re hosting an indoor picnic, here are some tips to help make it a success!

    • Offer a variety of food and drinks. These ice cubes with fruit and herbs is a beautiful way to make drinks fun too! Variety is always nice so think something salty, something crunchy, a sweet, something to snack on in between courses.
    • Set the mood with music, lighting, and activities.
    • Wear comfortable clothes and offer comfortable seating.
    • Don’t forget to relax and have fun.

    Love These Recipe Collections?

    Here are more collections we’ve created for you so you can browse and find some of the best recipes:

    • Church supper recipes collage.
      Church Supper Recipes
    • A basket full of baseball snack ideas.
      Baseball Snack Ideas for Kids (Easy + Team Snack Ideas Moms Love)
    • Old fashioned potluck cake recipes collage.
      Old-Fashioned Cakes That Still Show Up at Every Potluck
    • Old-Fashioned Dinner Recipes collage.
      19 Old-Fashioned Dinner Recipes (Classic Comfort Food Favorites)

    Spicy Crackers Recipe

    August 13, 2023

    Spicy ranch crackers in white bowl.

    Spicy Crackers Recipe: Seasoning saltine crackers with spices that are full of flavor, is so easy and they’re the perfect snack recipe for the holidays or just to snack on during game night!

    Seasoned, spicy, saltine crackers in white bowl.

    My aunt introduced me to this recipe years ago, and it’s still one of my favorite snacks and I can’t resist them when they’re on the counter.

    These spicy saltine crackers are not only easy but they are ready to eat in about an hour.

    [feast_advanced_jump_to]

    Why You’ll Love This Recipe

    • It uses a few ingredients: With only 5 ingredients, this recipe uses items that you may even have on hand.
    • Make-ahead recipe: Did you know that you can make this recipe in advance if you want to? It’s true! Make them in advance so it’s one less thing you have to do when entertaining.
    • No Bake Recipe – no oven required, and it’s a simple mix-and-dry recipe!

    Ingredients Needed

    I’ve highlighted a couple of ingredients below with some relevant notes. Aside from this, the ingredients needed are pretty basic.

    Labeled ingredients for spicy ranch crackers.
    • Oil – We use canola oil for this recipe but don’t go out and buy it just because we say so. If you have others on hand, it’s ok to use them too. See the substitutions section below for tips.
    • Garlic Pepper – You should be able to find garlic pepper in the spice aisle, and we love to use Lawry’s but any brand will do.
    • Ranch Seasoning – if you plan to make these a lot, you can usually find the bulk ranch dressing seasoning in the plastic jars in the store. Otherwise, the small individual packets will do.

    Substitutions

    Sometimes substitutions are necessary because of ingredients that are unavailable or needed for dietary restrictions. Here are some suggestions that can help:

    • Oil – if you have vegetable oil on hand, this can be used instead of canola oil. You can also try olive oil but we’ve found that it can give the crackers more of a bitter taste if you don’t use a higher quality olive oil.
    • Crackers – These can be made with Oyster crackers or saltines! But I prefer the saltines for easier grab-and-go snaking.

    How to Make Spicy Crackers

    This seasoned crackers recipe is broken into 2 components:

    • Seasoning the crackers
    • Allowing the crackers to dry

    *Be sure to see the recipe card below for the full ingredients list & instructions!*

    Place crackers in a large bowl or container. One that’s large enough for gently stirring to mix the oil/seasonings.

    Steps for how to make spicy ranch crackers.

    Step 1. In a separate bowl, add in oil, ranch seasoning, garlic pepper & red pepper.

    Step 2. With a spoon, mix oil and seasonings until evenly combined.

    Step 3. Pour mixture over crackers and toss every 15 minutes until crackers are coated well.

    Step 4. Spread crackers out on wax paper and let dry for an hour.

    Store in an airtight container.

    Allowing spicy ranch crackers to dry on counter.

    Storage

    Once these crackers have air-dried, it’s best to store these crackers in an airtight container for 4-5 days.

    Spicy ranch crackers close-up.

    Food Gift Wrapping Idea

    Around the holidays, giving food gifts is such a great idea. These spicy crackers are the perfect food gift idea! Simply store them in an airtight container, or a little box, and tie a ribbon around it.

    Spicy ranch crackers in box for gift.

    More Snack Recipes You’ll Love

    Whether you need snacks for a party or just for munching on during the holidays, you’ll love these other snack recipes:

    • Pumpkin cheese ball on plate surrounded by crackers.
      Pumpkin Cheese Ball
    • Pumpkin fluff in Pyrex serving bowl, with Reddi Wip and pumpkin pie spice on top.
      Pumpkin Fluff
    • Cheese dip in sauce pan, with soft pretzels surrounding it.
      Pretzel Cheese Dip
    • 4th of July cupcakes.
      4th of July Cupcakes – Red, White, and Blue Layers

    Did you make this? I’d be so grateful if you left a “star” rating below to let me know what you thought! Then, the next time you need a quick and easy recipe, come back to Fantabulosity to browse all of my easy recipes!

    Recipe

    Spicy ranch crackers in white bowl.
    Print Pin
    4.17 from 53 votes

    Spicy Crackers Recipe

    Spicy Crackers Recipe: Seasoned crackers that are the perfect party snack. Sometimes called "firecrackers" or ranch crackers, this no bake recipe has tons of flavor.
    Course Snack
    Cuisine American
    Prep Time 10 minutes minutes
    Resting Time 1 hour hour
    Total Time 10 minutes minutes
    Servings 29 servings
    Calories 70kcal
    Author Jessica Burgess

    Ingredients

    • 16 ounces saltine crackers
    • 1 ½ cup canola oil
    • 1 ounce package ranch dressing seasoning
    • 3 Tablespoons garlic pepper
    • 1 Tablespoons red pepper flakes

    Instructions

    • Place crackers in a large bowl or container.
    • In a separate bowl, mix oil, ranch seasoning, garlic pepper & red pepper.
    • Pour mixture over crackers and toss every 15 minutes until crackers are coated well.
    • Spread crackers out on wax paper and let dry for an hour.
    • Store in an air tight container.

    Nutrition

    Serving: 5crackers | Calories: 70kcal | Carbohydrates: 3g | Fat: 4g | Sodium: 778mg | Potassium: 13mg | Vitamin A: 80IU | Calcium: 2mg | Iron: 0.3mg

    20 Favorite Hamburger Recipes

    August 13, 2023

    Image collage of hamburger recipes.

    With so many tasty ways to make hamburgers, you are sure to agree they are one of the most versatile dinner options for families.

    Hamburgers can be served with a variety of toppings, so you can customize them to your liking, (like we did with our burger bar) so they are always a great option for picky eaters! I have made them in so many ways over the years. You can find my favorites recipes below!

    A collage of pictures of hamburgers with a text overlay.

    Don't forget to save this collection to your easy dinner board.  Make a batch of this red-skin potato salad, or these sweet potato fries for a great side to go with your burgers.

    If you've ever wondered what the different types of hamburgers are or the best way to cook them, here's a quick breakdown before we get into the recipes.

    What Are the Most Popular Types of Hamburgers?

    Hamburgers can be made in so many different ways, but a few classic styles show up again and again. Whether you like something simple or a little more loaded, these are some of the most popular types of burgers you'll see.

    • Classic Cheeseburger: A traditional beef patty topped with melted cheese, lettuce, tomato, onion, and your favorite condiments. Simple, reliable, and always a hit.
    • Smashburger: A thinner patty that's pressed onto a hot surface to create crispy, caramelized edges with a juicy center.
    • BBQ Burger: Topped with barbecue sauce, cheese, and often bacon or crispy onions for a smoky, savory flavor.
    • Stuffed Burger (Juicy Lucy): A burger with cheese or fillings inside the patty, creating a melted center when cooked.
    • Oklahoma Onion Burger: Thinly sliced onions are smashed right into the patty as it cooks, giving it a rich, caramelized flavor.

    No matter which style you prefer, they all start with a good burger base and can be customized with your favorite toppings.

    How to Cook Hamburgers (Best Methods)

    There's more than one way to cook a great hamburger, and each method gives you a slightly different result depending on what you're going for.

    • Grilling: Great for summer cookouts, grilling gives burgers that classic smoky flavor and charred edges.
    • Stovetop (Skillet): One of the easiest methods, especially for smashburgers. Cooking in a skillet helps create a nice crust while keeping the inside juicy.
    • Oven-Baked: A simple, hands-off option when you're cooking for a crowd. This method works well for evenly cooked burgers without needing to flip constantly.

    Each method works well, so it really comes down to what you have available and the texture you prefer.

    Tips for Making the Best Hamburgers

    A few simple tips can make a big difference when it comes to flavor and texture.

    • Use the right fat ratio: Ground beef with an 80/20 fat ratio gives you juicy, flavorful burgers without drying out.
    • Don't overwork the meat: Gently form the patties to keep them tender. Overmixing can make burgers dense.
    • Make a small dent in the center: Pressing a slight indentation in the middle helps burgers cook evenly and prevents them from puffing up.
    • Season simply: Salt and pepper go a long way, but you can always add your favorite seasonings for extra flavor.
    • Let them rest: Giving burgers a minute or two after cooking helps keep the juices inside.

    Donut Burgers

    This idea brings dessert to the dinner table in a big, bold way! Tuck a juicy cheeseburger in between glazed donuts for a deliciously different way to have dinner at home.

    A pastry brush brushing melted butter on top of the biscuits after the cheeseburger casserole has been cooked.

    Cheeseburger Casserole

    Skip the buns but deliver cheeseburger flavor with this easy casserole that can feed a hungry crowd. The biscuit topping offers a delicious twist on a classic.

    Electric Skillet Burgers

    Pull out the electric skillet and avoid that pesky stove top splatter. This recipe turns out to be a really good cheeseburger that is juicy and flavorful.

    Venison burger on white plate, sitting next to french fries.

    Venison Burgers

    Combine deer with sausage and what you get is one amazing burger. Fry them, grill them or even bake them for a really great take on an all-American burger!

    blue cheese burgers on pretzel bun

    Blue Cheese Burgers

    The easy addition of blue cheese elevates this recipe immediately. You are going to love the way this flavor pops with every bite.

    burger sliders

    Easy Cheeseburger Sliders

    While these sliders might be smaller in size, they absolutely have a whole lot of big flavors tucked into each bite. Your family will love this recipe paired with eggplant fries.

    Air Fryer Turkey Burgers with crispy jalapenos

    Baked Turkey Burgers

    Make burger night super juicy and healthy by using your air fryer and ground turkey. This easy weeknight recipe will be a hit with the whole family.

    A Juicy Lucy burger on a plate cut in half to reveal the cheese inside.

    Juicy Lucy Burgers

    These burgers are the best! Skip the cheese topping and opt for a cheese stuffing to make these juicy burgers with beef, chicken or even turkey.

    cooked burger patties on the grill

    Grilled Frozen Burgers

    No need to thaw your meat ahead of time. Master the art of grilling perfect burgers straight from the freezer every time, just in time for the summer bbq season.

    Crispy Chicken Zinger Burgers

    These chicken burgers taste even better than what you can get at KFC because they are homemade. It is spicy, crispy and so satisfying! Skip the drive thru and make these anytime you like!

    cowboy burger on bun

    Cowboy Burgers

    Pile this burger high with bbq sauce and onion rings and take a big bite for a beefy burger that is so delicious! This recipe is better than any drive-thru offering.

    Oven Baked Cheeseburgers

    This recipe has gone viral for a good reason; it makes the best burgers! Click over to find out the trick that makes these burgers melt in your mouth.

    Smoked Burgers

    Give these easy burgers the best flavor by smoking them! These are great for a weeknight dinner, or as the star of any backyard bbq!

    Cheeseburgers in the air fryer

    Air Fryer Burgers

    Make your burgers in the air fryer for a fuss-free way to get the best flavor! You will love that you can skip the grill and still get great taste.

    Cheeseburger on bun with red onions, pickle

    Stove Top Burgers

    Grab some salt and pepper, ground beef patties and your favorite skillet to make these really good burgers! Use your favorite toppings to make each burger as unique as the person eating it.

    Close up of cheeseburger sub, sitting on white plate.

    Cheeseburger Subs

    Why not have your favorite burgers in sub form? This idea is so fun and mixes things up from your typical hamburger recipe.

    Spicy Mala Chicken Burgers by Sift and Simmer

    Who says burgers have to be made of beef? This recipe makes for spicy chicken burgers that are simply irresistible with a delectable crunchy exterior!

    Guber Burger by Food Meanderings

    This sounds like a wacky burger; it has peanut butter in it! But, this protein packed meal tastes amazing. I know you will enjoy the creamy texture peanut butter adds.

    duck burgers with cherry ketchup

    Duck Burgers with Cherry Ketchup by Ugly Duckling Bakery

    Make burger night delightfully different by making duck burgers! This recipe also has a really wonderful cherry ketchup recipe included so you can go all the way for the best flavor.

    chicken Parmesan burgers

    Chicken Parm Burgers by Spend With Pennies

    This recipe is as delicious as it is unique. It brings chicken parm flavor to a juicy burger form. Your family will love this take on two classics, mashed up into one.

    Which of these burger recipes would your family like the most? I hope you will leave a comment and let me know if you try any of the recipes in this collection.

    Common Questions:

    How can I jazz up a hamburger?

    Adding different toppings, uncommon seasonings, and thinking outside of the box for a bun, are great ways to jazz up hamburgers!

    What can you add to hamburger meat to make it taste better?

    Mixing in seasonings and fat content can make hamburger meat taste even better. Seasonings such as spices, condiments and even items such as butter or cooking oils.

    What keeps burgers juicy?

    The fat content can help burgers stay juicy. Whether or not you buy the ground beef with natural fat content or you add it. You can add fat content by adding items such as butter but you can also add different types of fatty meat, such as pork to help make the burger juicier.

    Topping Ideas for Burgers

    Options are endless for topping your burgers. Here are some of our favorite hamburger toppings:

    • ketchup
    • mustard
    • mayo
    • ranch dressing
    • bbq sauce
    • guacamole
    • lettuce
    • onions
    • tomatoes
    • pickles
    • bacon
    • cheeses
    • pineapple
    • fried onions
    • hot sauce
    • spice blends
    • fried egg
    • potato chips
    • jalapenos
    • mushrooms
    • taco sauce
    • pizza sauce

    Types of Cheese for Burgers

    Cheese on a burger can be as simple as using American cheese, or as fun as using something wild like, goat cheese! Here are types of cheese to consider for your next burger:

    • American
    • Swiss
    • pepper jack
    • Colby-jack
    • cheddar
    • Havarti
    • queso
    • gouda
    • goat
    • blue cheese

    Buns for Burgers

    Although using a bun for burgers is common, there are different types of buns that can be fun to use. Here are some common types, to some fun, experimental types:

    • hamburger bun
    • brioche
    • Hawaiian buns
    • sandwich thins
    • lettuce leaves
    • donuts
    • waffles
    • biscuit
    • pancakes

    How to Store Leftover Burgers

    If you have leftover hamburger patties, and are looking for ways to reheat them, here are different ways you can warm them up to enjoy again:

    • air fryer
    • oven
    • stove-top
    • grill
    • hibachi, flat-top grill
    • microwave

    Tips for the Best Burgers

    • Use high-quality ground beef. The quality of the ground beef will make a big difference in the taste of your burgers. Look for ground beef that is 80% lean or leaner. You’ll find more ground beef recipes for dinner if you have more on hand!
    • Don’t overwork the meat. When you are forming the patties, be gentle. Overworking the meat will make the burgers tough.
    • Season the meat well. Season the meat with salt, pepper, and your favorite seasonings.

    Side Dishes for Hamburgers

    There are so many side dish ideas to serve with your favorite cheeseburger. Some of our favorites are french fries, pasta salads, and even a green salad recipe.

    Love these Recipe Collections?

    If you love being able to find some of the best recipes that we’ve collected for you, then you’ll love these others:

    • A collage of side dishes for sliders.
      Best Sides for Sliders (Easy Recipes Your Family Will Love)
    • Collage of potluck desserts.
      Easy Potluck Desserts (Simple Recipes That Always Get Asked For)
    • Image collage of dump cake recipes.
      Best Dump Cake Recipes (Easy, Crowd-Pleasers)
    • Nine images showing beach snack ideas.
      Snacks for the Beach

    Butter Chicken Recipe

    August 12, 2023

    Butter Chicken next to white rice in large serving bowl.

    This Butter Chicken Recipe has so much flavor, and Indian recipes like this are meant to be shared. You’ll love this easy recipe because it’s one of the best weeknight dinners that still tastes delicious the next day. Plus, you can add some Side Dishes, and you’re set.

    Cooked butter chicken, next to white rice, in large serving bowl.

    Tender chicken recipes are always popular! Be sure to check out another Indian recipe, this Chilli Chicken.

    This Bacon Wrapped Chicken Thighs as well as my Chicken Street Tacos for more fun and simple chicken dinner recipes.

    [feast_advanced_jump_to]

    Why You’ll Love This Recipe

    • It tastes like authentic Indian cuisine: It’s so good you’ll be ready to make it a second time. 
    • Simple to make: You’ll love that you can whip this up your first time and have it taste perfect. 
    • It’s versatile: This is a simple recipe that can easily be turned into a vegetarian option by cutting out the protein and adding in vegetables instead. 

    Ingredients Needed

    I’ve highlighted a couple of ingredients below with some relevant notes. Aside from this, the ingredients needed are pretty basic.

    • Butter – We use unsalted for this recipe, but you can use salted if you prefer. Just remember that you may want to reduce the amount of salt the recipe calls for if using salted butter.
    • Cream – Double (heavy) cream is best. Make sure it’s at room temperature. If added in when cold, it will cause the caramel to split.
    • Skinless Chicken Thighs – This type of chicken is needed to keep it tender and juicy, however, chicken breast could be used as well.
    • Tomato Sauce – This is used to help add acidity to the dish. If you don’t have tomato sauce, a tad bit of tomato paste could be an option.
    • Basmati Rice – The texture of the rice pairs so well with the curry texture. If you don’t have Basmati, white rice or brown rice can be a good pairing, too.

    Substitutions

    Sometimes substitutions are necessary because of ingredients that are unavailable or needed for dietary restrictions. Here are some suggestions that can help:

    • White Onion – Sweet onions or scallions can be an option, too. Scallions would be a great topping for this simple dish.
    • Chicken Breasts – Any cut of chicken will work for this dish as long as there is no added skin or bones.
    • Naan Bread – While this is optional to add, it’s a fun dipper to this dish. If you don’t have Naan bread, any type of bread will work.

    Variations

    If you love recipes but like to change them up, this Creamy Butter Chicken Recipe is very forgiving.

    • Main Ingredient – Even though chicken is the star of the recipe, you can easily make it without the chicken added. Using vegetables like broccoli, zucchini, onions, and cauliflower are great options for making a simple and healthy dish with wonderful curry flavors.

    Equipment

    • Large saucepan
    • Measuring tools
    • Mixing tools
    • Cutting board
    • Knife

    How to Make Butter Chicken Recipe Without Garam Masala

    This easy recipe has easy-to-follow steps. Just be sure to gather all the needed ingredients before starting.

    *Be sure to see the recipe card below for the full ingredients list & instructions!*

    You’ll start the basis of the recipe by adding butter to a pan over medium heat on the stove.

    Steps 1-4 for how to make butter chicken.

    STEP 1. Cook the onion. Add the diced onion and garlic to the pot and saute for 3-5 minutes. (Image 1).

    STEP 2. Add the spices. Add the cumin, ground coriander, ground ginger, allspice, turmeric, and sea salt and stir to combine.  (Image 2)

    STEP 3: Add the chicken. Put the diced chicken into the pan and cook until the chicken is browned. (Image 3)

    STEP 4: Stir. Make sure that the chicken is stirred in with the rest of the ingredients. (Image 4)

    Steps 5-8 for how to make butter chicken recipe.

    STEP 5: Add the tomato sauce. Pour in the tomato sauce with the cooked chicken and other ingredients. (Image 5)

    STEP 6: Simmer. Reduce the cooking heat to low and cover. (Image 6)

    STEP 7: Add the cream. Once the simmering time has passed, pour in the cream. (Image 7)

    STEP 8: Add butter. Add the rest of the butter and garnish. (Image 8)

    Tip: Make sure that the chicken is cooked all the way. You can use a meat thermometer to test some of the chicken pieces before stirring into the rest of the ingredients. Fully cooked chicken should have an internal temperature of at least 165 degrees.

    Cooked butter chicken in skillet.

    Once you serve this in a bowl, add some homemade naan bread as the perfect pairing. You can also pair it with cauliflower rice as well. This is a great way to add more veggies to the dish.

    Close up of butter chicken in skillet, with serving spoon dipped in.

    Recipe Pro Tips

    • Allow to fully cool. The flavor of this dish does intensify as it cools. If you can let it cool down slightly, the outcome is incredible.
    • Add some spice. You can take this best butter chicken recipe and crank up the heat. Add some red chili powder, and enjoy.
    Hand dipping naan bread in to butter chicken.

    Recipe FAQs

    What is the difference between chicken makhani and butter chicken?

    While both are popular Indian food items at Indian restaurants, there is no difference between the two. Butter chicken is made with a makhani sauce and may be called by either name. Both are considered authentic Indian butter chicken recipes and can be called by either name. 

    How is butter chicken traditionally eaten?

    This is one of the most popular curries to be eaten with Naan bread or rice. People will also add extra sauce and top with fresh cilantro for a truly delicious flavor. A lot of butter chicken recipes are served with bite-sized pieces of Naan bread for dipping. 

    Why is my butter chicken bland?

    You just need to add a teaspoon of salt or other species if you feel like this recipe is bland. You’ll find that a lot of butter chicken recipes need to be altered a bit to find the perfect flavor. This is why recipe testing of the sauce recipe is so important to do! You want to end up with a 5 star rating flavor once you make it. 

    What is butter chicken sauce made of?

    The great thing about making this simple chicken recipe is that the ingredients aren’t hard to find at all. You more than likely have most of them already in your fridge and pantry. See the recipe card below for the full list of needed ingredients.

    What’s the difference between tikka masala and butter chicken?

    The biggest difference between the two is the flavor. Butter chicken has a creamier taste and texture while Tikka Masala has a bit of spice to it.

    What gives butter chicken its color?

    The added spices like turmeric are what help to give this delicious dish its golden coloring.

    Why is it called butter chicken?

    When made, there is not only butter added as an ingredient but butter is also added as another garnish, too. More butter, please!

    What to Serve with Creamy Butter Chicken

    This butter chicken recipe ingredients go well with Easy Italian White Bread as well as Naan bread. You can also serve this simple dish with The BEST Side Salad Recipe as well.

    Storage

    You can store any leftovers in an airtight container for up to 3 days in the fridge.

    If you decide that you need to store it longer than that, simply freeze it for up to 2 months.

    When you’re ready to reheat and eat, thaw it overnight in the fridge and reheat in a saucepan over low heat. Stirring occasionally until it’s heated all the way.

    More Simple Recipes You’ll Love

    • Close up of cooked salmon patties on a plate, with fresh parsley sprinkled on top.
      Old-Fashioned Salmon Patties Recipe
    • A sliced, boneless pork chop that was baked in the oven, sitting on a plate.
      How to Cook Pork Chops in the Oven (Bone-In & Boneless Guide)
    • A wooden spoon dishing out a serving of meatball casserole in a 9x13 baking dish.
      Meatball Casserole
    • bratwursts on bun with toppings
      How to Cook Brats in the Oven

    Did you make this? I’d be so grateful if you left a “star” rating below to let me know what you thought! Then, the next time you need a quick and easy recipe, come back to Fantabulosity to browse all of my easy recipes!

    Recipe

    Butter Chicken next to white rice in large serving bowl.
    Print Pin
    5 from 2 votes

    Butter Chicken Recipe

    This Butter Chicken Recipe is a fast and simple dish. Perfect for a quick weeknight dinner, loaded with authentic Indian flavor.
    Course Main Course
    Cuisine Indian
    Prep Time 5 minutes minutes
    Cook Time 29 minutes minutes
    Total Time 34 minutes minutes
    Servings 6 servings
    Calories 428kcal
    Author Jessica Burgess

    Ingredients

    • 4 tablespoons butter salted
    • 1 white onion medium and chopped
    • 1½ tablespoons minced garlic
    • 2 tablespoons cumin
    • 1 tablespoon ground coriander
    • 2 teaspoons ground ginger
    • 2 teaspoons allspice
    • 1½ teaspoons turmeric
    • 1 teaspoon sea salt
    • 1 package chicken thighs boneless and skinless, about 2 pounds, cut into 1-inch pieces
    • 1 can tomato sauce 15 ounces
    • ¾ cup heavy cream
    • fresh cilantro chopped, optional
    • basmati rice steamed, optional
    • naan bread optional

    Instructions

    • Melt 3 tablespoons butter in a saucepan over medium heat.
    • Add the chopped onion into the pan and saute for 3-5 minutes. The onion should be transulcent.
    • Add the minced garlic and stir. Cook for 1 minute.
    • Add the the cumin, ground coriander, ground ginger, allspice, turmeric and sea salt and stir to combine. 
    • Cook everything for about 30 seconds.
    • Add in the diced chicken and stir. Cook for 2-4 minutes and make sure that it's fully coated with the spices. The chicken should be browned on all four sides from the heat and cooking.
    • Add the tomato sauce. Stir, and then simmer.
    • Put the heat on low, add a lid and simmer for about 12 minutes., or until the chicken reaches an internal temperature of 165 degrees.
    • Stir in the heavy cream and let simmer for 5-7 minutes.
    • Stir in 1 tablespoon of butter.
    • Garnish with the optional items. Serve and enjoy.

    Notes

    NOTE: Make sure that the chicken is cooked all the way. You can use a meat thermometer to test some of the chicken pieces before stirring into the rest of the ingredients. Fully cooked chicken should have an internal temperature of at least 165 degrees.

    Nutrition

    Serving: 1g | Calories: 428kcal | Carbohydrates: 12g | Protein: 19g | Fat: 35g | Saturated Fat: 16g | Polyunsaturated Fat: 4g | Monounsaturated Fat: 12g | Trans Fat: 0.4g | Cholesterol: 146mg | Sodium: 1071mg | Potassium: 670mg | Fiber: 3g | Sugar: 6g | Vitamin A: 1265IU | Vitamin C: 11mg | Calcium: 84mg | Iron: 4mg

    Fish Sliders

    August 11, 2023

    Fish sliders on white plate.

    Get ready to dive into the fantastic world of flavors with our delightful Filet-o-Fish Sliders. These simple sandwiches pack a punch of taste, combining tender, flaky fish with a tangy, homemade sauce and Hawaiian buns.

    Fish sliders on cookie sheet, ready to eat.

    Perfect for a family gathering or as a quick weeknight dinner, these sliders will be an instant hit with both kids and adults alike for a lunch idea or even an easy dinner idea. So, let’s get started and whip up these flavor-packed bites that will leave your taste buds asking for more.

    Love the idea of a seafood slider but not looking for a “fried fish” recipe? These salmon sliders give you the seafood vibe but may be a healthier option.

    If you want to go for more recipes using those tasty Hawaiian sliders, you’ll love our most popular slider recipe, these cheeseburger sliders, or even these delicious roast beef sliders!

    Or, why not try Hawaiian Roll Breakfast Sliders for breakfast? They are a great recipe for a boost to your breakfast menu. Or for a lunch option, try Italian Sliders with Hawaiian Rolls to fill everyone up.

    [feast_advanced_jump_to]

    Why You’ll Love This Recipe

    • It uses a few ingredients: With only 5 ingredients, this recipe uses items that you may even have on hand.
    • Easy to customize: You can swap out the ingredients easily to use what you have or what you prefer
    • Quick and simple: These sliders don’t take long to make so are ideal for evenings when time is short.

    Ingredients Needed

    I’ve highlighted a couple of ingredients below with some relevant notes. Aside from this, the ingredients needed are pretty basic.

    Labeled ingredients for fish sliders.
    • Buns – We used Hawaiian slider buns as there are 9 in the pack.
    • Fish fillets – I bought 8 fish fillets for the recipe but only ended up using 7 to fill the sandwiches.
    • Cheese – Any good American cheese will work nicely for this recipe.

    Substitutions

    Sometimes substitutions are necessary because of ingredients that are unavailable or needed for dietary restrictions. Here are some suggestions that can help:

    • Hawaiian slider buns: If you can’t find Hawaiian slider buns or prefer a different type, you can easily substitute them with any small-sized buns. If you’re watching your carbs, consider using whole wheat or multigrain slider buns. For an extra zing, pretzel buns can be an interesting choice.
    • American cheese: If American cheese isn’t your favorite or if you’re looking for a healthier option, try using a slice of sharp cheddar for a more robust flavor or a slice of provolone for a milder taste. For those who are lactose intolerant or vegan, there are many non-dairy cheeses available in the market that melt well and taste great.

    Variations

    If you want to add a unique twist to these Fish Sliders, here are a few suggestions that you might want to consider:

    • Go spicy: If you’re a fan of heat, consider adding a layer of spicy mayo or your favorite hot sauce to your sliders, like we use in our buffalo chicken sliders. You could also sprinkle some crushed red pepper flakes or cayenne pepper on the fish fillets before baking them.
    • Add some greens: For an added health kick, you can add a layer of fresh spinach, arugula, this KFC coleslaw recipe, or fresh lettuce to your sliders. This will not only add nutrition but also a nice crunch.
    • Try a different protein: If fish isn’t your favorite protein, you can easily substitute it with grilled chicken, turkey, or even a veggie patty for a vegetarian alternative.
    • Cheese variety: Experiment with different types of cheese. A smoked gouda or creamy brie can take your sliders to a whole new level of deliciousness.
    • Add pickles: For a tangy crunch, consider adding sliced pickles to your sliders. Dill or bread and butter pickles both work great.

    How to Make Fish Sliders

    *Be sure to see the recipe card below for the full ingredients list & instructions!*

    STEP 1: Cook the fish fillets. Preheat the oven to 425 degrees Fahrenheit, or as directed on the packaging of your frozen fish filets. Proceed to cook them according to the package instructions. (Image 1 and 2)

    Steps 1-2 baked fried fish on cookie sheet.

    STEP 2: Mix the butter. In the meantime, combine butter and ½ teaspoon of Old Bay seasoning in a separate bowl, then heat them together in the microwave for approximately 30 seconds until melted. (Image 4)

    Steps 3-6 for making sauce and bun glaze for fish sliders.

    STEP 3: Make the sauce (optional). Prepare the optional sauce by combining the ingredients together. (Image 5-6)

    STEP 4: Layer the cheese and butter. Begin by slicing the buns in half. Place a layer of cheese on the bottom buns and generously spread melted butter and seasonings on the top bun. (Image 7-9)

    Steps 7-10 of how to make fish sliders.

    STEP 5: Add extra butter (optional). If desired, you can utilize any remaining melted butter to brush the buns once they are out of the oven. (Image 8)

    STEP 6: Heat the sliders. Preheat the oven to 425 degrees and bake for 2-3 minutes, or until the cheese has melted to perfection (Image 10)

    STEP 7: Add a piece of fish and sauce then serve. Take out from the oven and place a portion of fried fish on each bun (you may need to cut some pieces in half to fit better). Drizzle with sauce, slice the buns into individual sliders, and savor the deliciousness. (Images 11-14)

    Steps 11-14 for making fish sliders.

    Recipe Pro Tips

    • Choosing the fish: Opt for a mild white fish like cod, haddock, or tilapia. These types are less “fishy” and work great for sliders.
    • Cooking the fish: Make sure not to overcook the fish. It should be flaky and moist, not dry.
    • Melting the cheese: Be watchful while melting the cheese in the oven. It should melt evenly and not burn.
    • Serving hot: Serve the Fish Sliders hot for the best taste. If you’re preparing them in advance, you can reheat them in the oven before serving.
    • Experiment with sauce: Don’t be afraid to play around with the sauce. You can add more or less of the ingredients to suit your personal preference.
    • Slider size: Ensure the fish fillets are the correct size for your slider buns, so they don’t overhang. If necessary, cut into smaller fish pieces or use larger buns.

    Recipe FAQs

    Can I use fresh fish instead of frozen?

    Absolutely! If you have access to fresh fish, feel free to use it in place of frozen. You’ll need to adjust the cooking times appropriately as fresh fish will typically cook faster than frozen.

    Can I use a different type of bread for the fish sliders? 

    Yes, you can. While brioche buns are a popular choice for sliders because of their sweetness and soft texture, you can use any type of small bun or roll. Whole wheat or gluten-free buns can be a healthier alternative.

    I don’t have Old Bay seasoning. What can I use instead?

    Old Bay is a blend of spices typically used in seafood dishes. If you don’t have it, you can make a similar blend with equal parts of paprika, dry mustard, and celery salt, with a pinch each of black pepper, red pepper flakes, ground nutmeg, and ground cloves.

    Can I make these sliders ahead of time?

    You can prepare individual items ahead of time, but they’re best assembled and served immediately to maintain the freshness of the fish and the crispness of the buns.

    What cheese is best for fish sliders?

    While American cheese is suggested in the recipe, feel free to experiment with your favorite kinds of cheese. Gouda, mozzarella, and Swiss are all delicious options.

    What to Serve with Fish Sliders

    Fish Sliders are a versatile dish that pairs well with a variety of sides. Here are some suggestions:

    • Crispy Sweet Potato Fries: A healthier alternative to traditional french fries, air fryer sweet potato fries are a delicious companion to fish sliders. Their sweet, earthy taste complements the savory flavors of the sliders perfectly.
    • Coleslaw: This classic side dish adds a refreshing crunch to your meal. You can stick with traditional coleslaw or experiment with variations like apple slaw, tangy red cabbage slaw, or a coleslaw mix.
    • Green Salad: A simple green salad with a light vinaigrette dressing can be a nice, light accompaniment to balance out the heartiness of the sliders.
    • Pickle Spears: The tangy flavor of pickles pairs well with the rich flavors of the fish and cheese. Plus, they add a nice crunch to your meal.
    • Pasta Salad: A chilled pasta salad, especially one with a tangy vinaigrette, can make a wonderful side for these hearty sliders.
    Hand holding fish slider with Old Bay sauce drizzled on top.

    Storage

    Storing leftover Fish Sliders is a breeze and can come in handy for quick meals throughout the week. Firstly, let the sliders cool down completely. Transfer them to an airtight container or wrap them individually in cling wrap or aluminum foil. Leftover Fish Sliders can be stored in the refrigerator for up to 3 days. 

    To reheat, preheat the oven to 350 degrees and bake for approximately 10 minutes, or until the sliders are warmed through and the cheese is melty. 

    It is not recommended to freeze them as the texture of the fish and buns can become soggy upon thawing.

    Fish sliders stacked on top of one another, sitting on white plate.

    More Fish Recipes You’ll Love

    Got a taste for fish and want to try more fish recipes for the whole family? You could start with another really simple one: Fish Finger Tacos, perfect for an evening meal. Or if you have an air fryer, try this simple Easy Air Fryer Tilapia Recipe for something a little different.

    • Lemon air fryer tilapia.
      Easy Air Fryer Tilapia Recipe
    • Panko Crusted Cod on spatula, above a plate of food.
      Panko Crusted Cod
    • Cilantro Avocado + Hummus Fish Tacos
      Fish Finger Tacos
    • air fryer salmon patties
      Air Fryer Salmon Patties

    Did you make this? I’d be so grateful if you left a “star” rating below to let me know what you thought! Then, the next time you need a quick and easy recipe, come back to Fantabulosity to browse all of my easy recipes!

    Recipe

    Fish sliders on white plate.
    Print Pin
    5 from 6 votes

    Fish Sliders

    These fish sliders are a party-food favorite or easy dinner recipe that the family will love. Use this homemade sauce and Hawaiian buns to pair with the fish for delicious flavor.
    Course Dinner
    Cuisine American
    Prep Time 5 minutes minutes
    Cook Time 25 minutes minutes
    Total Time 30 minutes minutes
    Servings 4
    Calories 158kcal
    Author Jessica Burgess

    Ingredients

    • 8 Hawaiian slider buns not the slider rolls
    • 8 frozen fish sandwich fillets
    • 9 slices Cheese – American
    • 2 tablespoons butter
    • ½ teaspoon Old Bay seasoning

    Optional Ingredients

    • 8 dabs hot sauce
    • 1 teaspoon Old Bay
    • 1 lemon juice
    • ¾ cup mayo

    Instructions

    • Preheat oven to 425 – or the directions on your frozen fish filets. Cook them accordingly.
    • Meanwhile, mix butter and ½ teaspoon Old Bay and melt together for about 30 seconds in microwave.
    • Slice buns in half, put cheese on bottom buns, and top the other with melted butter and seasonings.
    • Put in oven at 425°F for 2-3 minutes or until cheese is melted.

    Optional Sauce

    • Mix together hot sauce, Old Bay, lemon juice and mayo.
    • Optional, use any leftover melted butter to brush buns again after coming out of oven.
    • Remove from oven and top with fried fish (may have to cut some pieces of fish in half to fit the buns better), top with sauce, slice buns in to individual sliders, and enjoy.

    Video

    Notes

    Old Bay sauce – It can also be served on the side, or spread on half of the sliders if the sauce isn’t desired by everyone. 

    Nutrition

    Serving: 1slider | Calories: 158kcal | Carbohydrates: 2g | Protein: 8g | Fat: 13g | Saturated Fat: 8g | Polyunsaturated Fat: 1g | Monounsaturated Fat: 3g | Trans Fat: 0.5g | Cholesterol: 43mg | Sodium: 703mg | Potassium: 61mg | Sugar: 1g | Vitamin A: 397IU | Calcium: 439mg | Iron: 0.3mg

    Instant Pot Pork Butt

    August 10, 2023

    Cooked Instant Pot pork butt in white bowl, sitting next to barbecue sauce.

    Tender, shredded Instant Pot Pork Butt is the perfect meal for a party or for an easy dinner idea! Delicious eaten as is, or served on a bun for a pulled pork sandwich with a drizzle of bbq sauce and even topped with cole slaw if desired.

    Instant Pot recipes are one of our favorites here because of the ease and how tender meats turn out in this pressure cooker. Our Instant Pot roast is another recipe that you’ll want to keep on hand for go-to dinner, and then these Instant Pot brownies are something to try to conquer that sweet tooth.

    Cooked Instant Pot pork butt in white bowl.

    I love a good sandwich! Barbecue pork feels like you were cooking all day and is a lovely meal to share with friends. Sometimes you want a hot meal such as Hot Ham and Cheese Sandwiches but there’s also something truly refreshing about a cool Egg Salad Sandwich.

    Make this pulled pork for a fun summer gathering or even as a delicious meal in the wintertime. You can set the Instant Pot to cook while everyone enjoys company or takes a dip in the pool. Then simply shred and let everyone make their own custom sandwich, making BBQ pork sliders, or enjoy alone, or even topped on a baked potato!

    [feast_advanced_jump_to]

    Why You’ll Love This Recipe

    • Super tender meat: Combining this specific cut and cooking method will yield a tender meat that shreds easily and makes a delicious sandwich.
    • Make-ahead recipe: You can cook this up whenever you have time and freeze the meat ready to go! This makes for a quick and easy dinner.
    • Don’t heat up the house: The Instant Pot is perfect for making meals in summer so you don’t heat up the house with the oven.

    Ingredients Needed

    I’ve highlighted a couple of ingredients below with some relevant notes. Aside from this, the ingredients needed are pretty basic.

    Labeled ingredients for Instant Pot pulled pork.
    • Pork – Select a pork butt or shoulder for the best result. We’ll go into the differences in the FAQs below!
    • Seasonings – We are mixing up our own barbecue dry rub to layer on the flavor to our pork.
    • Apple Cider Vinegar – Adding an acid helps to break down the connective tissue in the meat as it cooks.
    • Liquid Smoke – If you haven’t used this, it’s the perfect secret ingredient to have in your kitchen. It adds a touch of color and a smokey flavor.

    Substitutions

    Sometimes substitutions are necessary because of ingredients that are unavailable or needed for dietary restrictions. Here are some suggestions that can help:

    • ACV – white vinegar doesn’t have the same tang, but it can be used in a pinch. You definitely don’t want to leave out the vinegar entirely as it helps break down the meat.
    • Sauce – while this is typically served with barbecue sauce, you can always skip it and let the pork shine by itself.

    Equipment

    A 6-quart Instant Pot or other electric pressure cooker is required to cook this tender pulled pork.

    How to Make Instant Pot Pulled Pork Butt

    The pork is easily prepared:

    • trim fat and bone and portion into chunks
    • rub on seasoning and sear
    • pressure cook in liquid

    *Be sure to see the recipe card below for the full ingredients list & instructions!*

    Prepare the roast to be ready to cook, then let the Instant Pot heat up while you mix the rub.

    Steps 1-4 of how to make Instant Pot pork butt.

    STEP 1. Prepare the pork. Remove any bone that is present, and trim up excess fat around the edges. Some cuts may have skin still which should also be removed (Image 1). Cut the roast into several large chunks (Image 2).

    STEP 2. Make the rub. Combine the seasonings and brown sugar into a rub, then rub it into all sides of the cut pork.

    Steps 3-6 to make pork butt in the Instant Pot.

    STEP 3. Heat the pot. Let the Instant Pot heat on sauté mode, then add the oil (Image 3). Brown the chunks of pork on all sides, working in batches (Image 4).

    STEP 4. Deglaze the pot. Remove the browned pork and add water. Be sure to carefully scrape up all of the browned bits on the bottom with a wooden spoon!

    Steps 7-10 on how to make pork butt in the Instant Pot.

    STEP 5. Whisk. Add the remaining ingredients to the Instant Pot and whisk to combine.

    STEP 6. Cook pork. Add the browned pork to the liquid and pressure cook.

    Tip: Ensure the pork is all in a single layer in the liquid. This will allow it to all cook evenly. It’s ok to squish it in!

    STEP 7. Shred the pork. Remove the cooked pork to a plate and shred with two forks to serve.

    Recipe Pro Tips

    • Deglaze the pot. Don’t miss this step! If you leave any browned bits on the bottom of the pot, you risk them burning. This causes an error and the pot won’t come to pressure and cook the pork.
    • Allow a natural pressure release. One of the most important steps with the Instant Pot is to let meat have a natural release. This allows the juices to settle instead of pulling them all out by performing a quick release immediately when cooking is complete.
    Shredded pork butt that was cooked in the Instant Pot, sitting on white platter.

    Recipe FAQs

    What cut of pork should I use?

    Stick with pork shoulder or pork butt. Contrary to the name, the pork “butt” comes from the same area of the animal as the shoulder! The butt is often fattier and sometimes comes with the skin attached. The shoulder will generally have a bone left in and is a leaner cut. Both work well here and both will need to be trimmed of excess fat before cooking. Remove any bone and skin as well.

    Is it necessary to sear pork before cooking?

    The answers are often mixed on this. Searing locks in the juices – but because we are using the Instant Pot, this also locks in juice compared to roasting in the oven. However, it does add a lot of flavor to the pork and the cooking liquid, so it is a must in my book.

    How long does it take to cook pork in the Instant Pot?

    You read the recipe right – we did 80 minutes! While certainly not “instant” it a hands-off way to create tender pork for sandwiches. This is also why we cut the pork into chunks. While more surface area seared equals more flavor, it also helps the meat to cook evenly and perfectly. It would take even longer if left whole!

    Why isn’t my Instant Pot pork tender?

    Usually the culprit is releasing the pressure too quickly! The pressure is all nicely contained from cooking the meat, and if we release it as soon as the cooking time is up, it can pull the juices from the meat. By allowing 20 minutes or so for the pressure to come down on its own, we are ensuring the juices have settled and will remain in the meat.

    What to Serve with Instant Pot Pulled Pork

    I love to serve this on a bun (on large buns or sliders) but it is also great just piled on a plate.

    You can also serve your favorite coleslaw right on top or on the side, and pickles are the perfect companion! Love a gravy on your shredded pork? This pork gravy recipe is a hit on a lot of pork recipes!

    I also love this honey lime fruit salad as a refreshing palate cleanser or a red potato salad for the perfect pairing.

    Instant Pot pork butt, shredded, on white plate.

    Storage

    Allow any leftover pork to come to room temperature, then store in the fridge in an airtight container for up to 4 days. You can also freeze in a container or bag for up to 6 months. I recommend storing the meat as-is and adding sauce once reheated.

    Reheat in a slow cooker with some broth or water, or you can easily reheat on the stovetop.

    Shredded pork butt on bun, with coleslaw on top, and sitting on a white plate.

    More BBQ Pork Recipes You’ll Love

    • Baked BBQ Pork Chops in the Oven
    • Baked BBQ Pork Steaks on white plate
      Pork Steaks in the Oven
    • Slow Cooker Pulled Pork shredded with bbq sauce
      Cherry Coca-Cola Slow Cooker Pulled Pork
    • BBQ Pork Steaks
      BBQ Pork Steaks in the Slow Cooker

    Did you make this? I’d be so grateful if you left a “star” rating below to let me know what you thought! Then, the next time you need a quick and easy recipe, come back to Fantabulosity to browse all of my easy recipes!

    Recipe

    Cooked Instant Pot pork butt in white bowl, sitting next to barbecue sauce.
    Print Pin
    5 from 7 votes

    Instant Pot Pork Butt

    This Instant Pot Pork Butt (or pork shoulder) is so easy to make, that's great alone or served on a bun as a bbq pork sandwich.
    Course Dinner
    Cuisine American
    Prep Time 35 minutes minutes
    Cook Time 1 hour hour 20 minutes minutes
    Total Time 1 hour hour 55 minutes minutes
    Servings 8 servings
    Calories 284kcal
    Author Jessica Burgess

    Ingredients

    • 3-4 pounds pork butt or pork shoulder
    • 3 tablespoons brown sugar Divided
    • 2 teaspoons paprika
    • 1 teaspoon mustard powder
    • ½ teaspoon chili powder
    • ½ teaspoon cumin
    • ½ teaspoon salt
    • ¼ teaspoon black pepper
    • 2 tablespoon cooking oil
    • ¾ cup water
    • ½ cup apple cider vinegar
    • 3 tablespoons tomato paste
    • ¼ teaspoon liquid smoke

    Optional Serving Ideas

    • Barbecue sauce
    • Hamburger buns or slider buns
    • Coleslaw
    • Pickles

    Instructions

    • Cut pork into 3-4 chunks, removing bone and excess fat.
    • Set the Instant Pot to sauté mode. While warming up, mix all of the dry spices with 1 tablespoon of the brown sugar.
    • Rub the sugar and spice mixture onto the chunks of pork.
    • When the Instant Pot reads HOT add the oil. Tilt the pot back and forth to evenly coat the bottom. Then place the seasoned meat chunks into the instant pot. Be sure to get an even layer of meat; you may need to work in batches.
    • Brown the meat on each side for 3-4 minutes. When all sides are brown remove the meat from the pot.
    • Add the water to the pot to deglaze. Use a flat spoon to scrape the bits off of the bottom.
    • Once the pot is deglazed, whisk in the vinegar, tomato paste, liquid smoke, and the rest of the brown sugar.
    • Place all of the browned meat back into the pot in an even layer. You may need to wiggle and squish them a bit to do this.
    • Pressure cook on high for 60 minutes and allow a natural release for 20 minutes.
    • At the end of 20 minutes release any remaining pressure. Remove the pork from the pot. Place onto a plate and shred with two forks.
    • Optional: you can use the juices left in the pot as a sauce, but depending on the cut of meat it may be very greasy.
    • Serve the shredded pork with your favorite sides and barbecue sauce, or with all of your favorites on a bun.

    Notes

    • For a nice kick you can add ¼ teaspoon of cayenne pepper to the seasoning rub.
    • This reheats great and can be made the day before.
    • Reheating in a slow cooker is best (so that it doesn’t dry out as easily) but it can also be reheated in the microwave or in a skillet. Be sure to save any juices from cooking to reheat the meat with if they aren’t too greasy.
    • Refrigerate in an airtight container for up to 4 days or freeze for up to 6 months.

    Nutrition

    Calories: 284kcal | Carbohydrates: 6g | Protein: 32g | Fat: 13g | Saturated Fat: 4g | Polyunsaturated Fat: 2g | Monounsaturated Fat: 7g | Trans Fat: 0.1g | Cholesterol: 102mg | Sodium: 309mg | Potassium: 673mg | Fiber: 1g | Sugar: 5g | Vitamin A: 377IU | Vitamin C: 1mg | Calcium: 35mg | Iron: 3mg

    Slow Cooker Shredded Beef Tacos

    August 9, 2023

    Shredded beef tacos that were cooked in slow cooker, sitting on white plate.

    These Slow Cooker Shredded Beef Tacos will be a big hit for your family or the next friendly gathering. With the perfect amount of seasoning and all your favorite toppings, tacos on your Tuesday will be next level, especially since it’s one of our easy slow cooker recipes!

    Shredded beef tacos folded up in line with toppings.

    Beef is the essential taco filling in my book. You can also serve up some quick Chicken Street Tacos to cover all the bases! Does your family get tired of the “same old” week after week? I also love to mix things up and turn tacos into a fun pasta dish, making this Dorito Taco Salad, or switching to a warming Taco Soup when the weather turns chilly.

    [feast_advanced_jump_to]

    Why You’ll Love This Recipe

    • Custom spice level: Grab a packet of seasoning at the store, or mix up your own and vary the spiciness.
    • Hands off: The perfect pulled beef tacos need to cook all day to achieve the tenderness we are looking for, meaning it’s only about 15 minutes to assemble and later shred!
    • The perfect leftovers: Especially for a smaller family, this recipe makes enough for leftovers. Cook once, eat twice! We love making slow cooker pulled beef too for tacos!

    Ingredients Needed

    I’ve highlighted a couple of ingredients below with some relevant notes. Aside from this, the ingredients needed are pretty basic.

    Labeled ingredients for shredded beef tacos.
    • Chuck roast – I think this is the best cut of meat for pulled beef tacos because it is affordable, and it has just the right amount of marbling that lends itself well to slow cooking.
    • Flour tortillas – I used soft taco shells but you can always add crunch by picking up hard taco shells instead.
    • Taco seasoning – make it easy and use a packet, or stir up your own special seasoning.
    • Beef broth – We are using just enough, combined with tomato sauce, to make a taco that won’t be sad and dry.
    • Toppings – Go wild here! I suggest tomato, avocado, and sour cream. Add cheese if you like!

    Substitutions

    Sometimes substitutions are necessary because of ingredients that are unavailable or needed for dietary restrictions. Here are some suggestions that can help:

    • Taco seasoning – see the notes in the recipe card to whip up your own “packet.” I’ve also easily used Chicken Taco Seasoning on beef.
    • Broth – you can use homemade or store-bought. I even like to keep a jar of “broth base” in the fridge as it keeps longer than broth. Just dissolve into water per the directions before using. Beef stock and broth are also interchangeable.

    Equipment

    Get out your slow cooker! Just about every kitchen has one (or more!) and it’s the perfect way to achieve tender taco meat. A 6-8 quart size is best here, and will accommodate double the meat if you want to go that route. If you’re using the slow cooker function on your Instant Pot, then you’ll also want to keep this pulled pork recipe in the Instant Pot in mind, for a future dinner idea.

    How to Make Slow Cooker Beef Tacos

    I love these for busy days, especially if everyone is outside the house with work or errands. Take just a few minutes to add everything to the crockpot in the morning, and another few minutes to shred just before serving!

    *Be sure to see the recipe card below for the full ingredients list & instructions!*

    Steps 1-4 of how to make shredded beef tacos.

    STEP 1. Prepare the Sauce. Combine the broth, tomato sauce, and garlic in the slower cooker.

    STEP 2. Add the roast. Settle the roast into the liquid. Cover and cook on low.

    STEP 3. Shred the beef. Use two forks to pull the beef into shreds.

    Tip: The cooking liquid should give your shredded beef just the right texture, but feel free to splash in more water or broth if desired.

    STEP 4. Season and serve. Stir the taco seasoning into the shredded beef. Add to taco shells and top as you like.

    Slow cooker beef taco on tortilla with toppings.
    Cooked taco flavored beef lifting out of slow cooker with tongs.

    Recipe Pro Tips

    • Make your own taco seasoning. This way you know exactly what you are adding to your meal. You can also easily keep things gluten-free if needed, and then you can use it for other recipes like this walking taco casserole.
    • Double it up. Doubling this recipe means you can stash half of the meat away in the freezer for a busy night!
    • Toppings are key. Red onions are classic, but you can use any variety. Use avocado or swap to guacamole.
    Pulled beef taco on tortilla with toppings.

    Recipe FAQs

    Why do I need to use a chuck roast?

    I find this cut of beef to be the perfect marriage of affordability and shredability. It’s a lean enough cut so you won’t have floating fat on top of your dish, but there is just the right amount of marbling to tenderize the meat. This is cut that definitely benefits from slow cooking – it will shred incredibly easily after the low and slow cook time.

    What type of broth is best?

    Grabbing a carton of broth is fine here! But if you do make your own, that definitely adds a lot of flavor. Bouillon cubes or a paste/base also work. Just rehydrate per the instructions on the product before adding to the slow cooker.

    Can I make pulled beef tacos ahead?

    You can absolutely make this taco filling ahead of time! It’s perfect for parties. Double the recipe for a larger crowd. It’s key to cool the meat completely before packing up to freeze. You can freeze in bags or containers and then easily reheat before serving. Just save the topping prep until you are ready to serve!

    What to Serve with Beef Tacos

    Skip plain diced tomato and whip up some fresh homemade Pico de Gallo for topping! Add chips and some Smoked Queso for the ultimate side dish. And since you’ve already got the chips ready, you may as well add Elote Dip.

    Storage

    Double this shredded beef taco recipe if you'd like! It makes for great leftovers if stored properly. Allow the beef to cool completely before sealing it in an airtight container. You can keep it in the fridge for up to 3 days. Store any prepped toppings in separate airtight containers in the refrigerator. 

    I like to freeze flat in a gallon Ziploc bag! This allows you to easily break it up from frozen to help in reheating.

    To reheat, spread the shredded beef out over a baking sheet lined with aluminum foil. Pop it in the oven at 350 degrees F for about 10 minutes or until heated through. This will give you some great browned bits. Alternatively, transfer the beef to a microwave-safe bowl and microwave in 30-second intervals (stirring between each) until heated through.  

    Once you have reheated your beef, assemble the tacos as you normally would. 

    More Taco Recipes You’ll Love

    • taco layer dip recipe
      Easy Taco Layer Dip Recipe
    • Crispy chicken tacos baked on baking sheet.
      Crispy Chicken Tacos
    • Chicken Street Tacos on white plate.
      Chicken Street Tacos
    • Fried tacos on wooden cutting board.
      Fried Tacos

    Did you make this? I’d be so grateful if you left a “star” rating below to let me know what you thought! Then, the next time you need a quick and easy recipe, come back to Fantabulosity to browse all of my easy recipes!

    Recipe

    Shredded beef tacos that were cooked in slow cooker, sitting on white plate.
    Print Pin
    5 from 5 votes

    Shredded Beef Tacos

    Nothing is easier than setting the crockpot out in the morning and coming back to dinner, done! Top these tacos with your favorite toppings, as that's KEY to making the best shredded beef tacos!
    Course Dinner
    Cuisine Mexican
    Prep Time 15 minutes minutes
    Cook Time 8 hours hours
    Total Time 8 hours hours 15 minutes minutes
    Servings 8 servings
    Calories 680kcal
    Author Jessica Burgess

    Equipment

    • 1 slow cooker 6-8 quart size

    Ingredients

    • 4 pounds chuck roast
    • ½ cup beef broth
    • 1 tablespoon minced garlic
    • ¼ cup tomato sauce
    • 1 package taco seasoning see notes to make your own!
    • 8 soft tortilla shells

    Toppings

    • 1 tablespoon lime juice
    • ¼ cup fresh cilantro chopped
    • ½ cup sour cream
    • 2 avocados sliced
    • 1 tomato diced
    • ½ red onion diced

    Instructions

    • Add the beef broth, tomato sauce, and garlic to the base of a 6-8 quart slow cooker and stir to combine. Set the beef roast on top of the liquid.
    • Put the lid on the slow cooker and cook on low for 8-10 hours.
    • Use 2 forks to shred the beef in the slow cooker.
    • Mix together the taco seasoning and shredded beef. Stir well; the juices from slow cooking the beef will mix with the taco seasoning. You can add extra water if needed.
    • Divide the shredded beef evenly between 8 taco shells and top with sour cream, cilantro, lime juice, avocado, tomato, and onion.

    Notes

    Not a store-bought taco seasoning person? No problem! Making your own is quite simple. Just whisk together the following ingredients:
    • 2 teaspoons smoked paprika
    • 1 ½ teaspoons cumin
    • ½ teaspoon cayenne
    • 1 tablespoon chili powder
    • 1 teaspoon pepper
    • 2 teaspoons onion powder
    • 1 ½ teaspoons oregano
    • ½ teaspoons red pepper flakes
    Use homemade taco seasoning in this recipe just as you would a store-bought version. If you are sensitive to spice, feel free to cut back a bit on the paprika and/or cayenne.

    Nutrition

    Serving: 1taco | Calories: 680kcal | Carbohydrates: 33g | Protein: 49g | Fat: 40g | Saturated Fat: 15g | Polyunsaturated Fat: 4g | Monounsaturated Fat: 20g | Trans Fat: 2g | Cholesterol: 165mg | Sodium: 984mg | Potassium: 1160mg | Fiber: 6g | Sugar: 4g | Vitamin A: 799IU | Vitamin C: 11mg | Calcium: 135mg | Iron: 7mg

    Pretzel Dip with Cream Cheese

    July 25, 2023

    Ranch beer dip in tan bowl, next to pretzels and crackers.

    Ready to try making your own Pretzel Beer Dip with Cream Cheese, a concoction guaranteed to elevate your snack game to unprecedented heights?

    Pretzel dip with cream cheese in gray bowl, next to prezels and crackers.

    This creamy, tangy, and slightly boozy dip pairs perfectly with soft pretzels (or any snack of your choice) and is bound to be the star of your next get-together as an appetizer or even as a snack recipe! Its unique blend of flavors, combined with its easy preparation, make it a recipe you’ll come back to time and time again. Prepare to be amazed as we journey into the mouthwatering world of this wonderful pretzel dip.

    Looking for more appetizers for your party? Why not try Chicken Bacon Ranch Crescent Bites for a simple savory option?

    [feast_advanced_jump_to]

    Why You’ll Love This Recipe

    • It uses a few simple ingredients: With only 5 ingredients, this recipe uses items that you may even have on hand.
    • Easy to make more: If you are making this for a party or BBQ, it is easy to just make a bigger batch.
    • No bake recipe: This dip is ready in less than 15 minutes and there’s no need to heat up the oven for it as it is a no-bake pretzel cheese dip.

    Ingredients Needed

    I’ve highlighted a couple of ingredients with some relevant notes. Aside from this, the ingredients needed are pretty basic.

    • Cream cheese – We used plain cream cheese for this recipe as any flavors would change how the dip tasted.
    • Beer – I opted for Heineken, but it tends to be on the lighter side. For a more robust beer flavor, I recommend substituting it with a highly hopped IPA beer.
    • Cheese – I used a sharp cheddar for the recipe as it has plenty of taste.
    Labeled ingredients for beer ranch dip.

    Substitutions

    Sometimes substitutions are necessary because of ingredients that are unavailable or needed for dietary restrictions. Here are some suggestions that can help:

    • Cream Cheese: You can substitute plain cream cheese with a dairy-free cream cheese option or Greek yogurt if you’re looking for a healthier option.
    • Beer: Non-alcoholic beer can be used as a substitute for regular beer if you’re aiming for a non-alcoholic version of this dip. Alternatively, for a gluten-free option, a gluten-free beer could be used.
    • Cheese: If you want a different flavor profile, try substituting sharp cheddar with a smoky Gouda or spicy Pepper Jack. For a vegan option, there are numerous vegan cheeses available in the market that could work as a substitute.

    Variations

    • Flavor Boost: For a tangier version of this easy dip, you can add a teaspoon of Dijon mustard. If you’re a fan of heat, consider adding some chopped jalapenos or a dash of hot sauce.
    • Beer Alternatives: Instead of traditional beer, consider using a dark stout for a deeper, richer flavor. A crisp cider could also be used for a sweet and refreshing twist.
    • Toppings: Sprinkle some chopped fresh herbs like chives or parsley on top for added color and freshness. For a crunch, top with crispy bacon bits or toasted breadcrumbs.

    How to Make Pretzel Beer Cheese Dip

    This dip is broken into two components:

    • Mix the ingredients
    • Add toppings and chill

    *Be sure to see the recipe card below for the full ingredients list & instructions!*

    STEP 1: Mix the ingredients. Combine the softened cream cheese, beer, and ranch dressing mix in a large bowl. Use a hand mixer to thoroughly blend the ingredients together. (Image 1).

    STEP 2: Add the cheese. Gently incorporate the cheese using a rubber spatula, ensuring thorough mixing. (Image 2).

    Two image collage of how to make beer ranch cheese dip.

    STEP 3: Add the topping. Transfer the dip into a bowl and garnish it with freshly chopped scallions.

    Green onions on top of beer cheese ranch dip.

    STEP 4: Chill then serve. Enjoy this delectable treat served with pretzels or robust crackers, served slightly chilled for the perfect pairing.

    Scoop of beer ranch dip on white plate next to beer bottle and pretzels.

    Recipe Pro Tips

    • Cream Cheese: For a smoother dip, ensure your cold cream cheese is sat at room temperature before you begin. This will make it easier to blend with the other ingredients.
    • Beer: The choice of beer can greatly influence the taste of your dip. Feel free to play around with different types until you find your preference.
    • Cheese: Grating your own cheese instead of buying pre-grated will result in a smooth, creamy dip.
    • Mixing: Avoid over-mixing once you add the cheese. Over-mixing could result in a less creamy and more gritty texture to your dip.
    • Serving: This dip is best served at room temperature or slightly chilled. If refrigerated, take it out a few minutes before serving.

    Recipe FAQs

    Can I use non-alcoholic beer?

    Yes, you can use non-alcoholic beer. It will give you the same bubbly texture and similar flavor, making it a great option for those who prefer to avoid alcohol.

    What can I serve this dip with?

    This delicious dip pairs wonderfully with pretzels, robust crackers, or any of your favorite sturdy chips. For a lighter option, try serving it with crisp, fresh veggies like bell pepper strips or carrot sticks.

    Can this dip be made ahead of time?

    Absolutely! This dip can be made a day or two before you plan to serve it. Just store it in an airtight container in the refrigerator. When you’re ready to serve, let it sit at room temperature for about 15 minutes to soften, then give it a good stir.

    Can I use a different type of cheese?

    Yes, feel free to experiment with different cheeses to find your preferred flavor profile. Just keep in mind that softer cheeses will melt better and result in a smoother dip.

    Is this dip gluten-free?

    As long as you use a gluten-free beer and ensure your other ingredients are gluten-free, this dip should be safe for most people with gluten intolerance. However, if you’re serving guests with severe allergies or celiac disease, always double check the labels of all your ingredients to ensure they haven’t been processed in a facility that also processes gluten-containing products.

    What to Serve with Beer Cheese Dip

    This Beer Cheese Dip is a versatile appetizer that goes well with a variety of items. The robust, cheesy flavor perfectly complements the saltiness of soft pretzels, soft pretzel bites, or hearty rye crackers. It’s also delightful with an array of fresh vegetables, like celery sticks, cherry tomatoes, or broccoli florets for a healthier option. 

    For a satisfying savory twist, try it with smoked sausage slices or grilled chicken skewers. Alternatively, toasted artisanal bread slices or homemade pita chips deliver a delightful crunch. No matter your preference, this dip is sure to be the star of the show at any gathering.

    Storage

    You can make a large batch or Store leftover Pretzel Beer Dip with Cream Cheese easily. Just place it in an airtight container and store it in the refrigerator. The dip should stay fresh for up to 3-4 days. 

    To serve the chilled dip, just allow it to sit at room temperature for about 15 minutes for the flavors to meld and the dip to soften a bit, stirring well before serving. Although this dip is best enjoyed fresh, it still retains much of its deliciousness even after being stored!

    More Snack Recipes You’ll Love

    Don’t just stick to the one dip – try these great recipes as well! You can make a Jalapeno Artichoke Dip for a spicy option. Or if you want a warm dip option, make this Hot Taco Dip and go as spicy as you like!  Both are great for dipping savory pretzels!

    This Pretzel Beer Cream Cheese Dip is one of our favorite dips.  This perfect recipe is the perfect appetizer for movie nights, family reunions, and game day snacking.  You will be sure to get a five-star rating!

    • Strawberry cake mix cookies on white plate.
      Strawberry Cake Mix Cookies
    • A mixed berry mini trifle.
      Mixed Berry Mini Trifles
    • Cake mix peanut butter cookies stacked.
      Cake Mix Peanut Butter Cookies
    • A bowl of booty dip surrounded by crackers and with two graham crackers in the dip.
      Booty Dip

    Did you make this? I’d be so grateful if you left a “star” rating below to let me know what you thought! Then, the next time you need a quick and easy recipe, come back to Fantabulosity to browse all of my easy recipes!

    Recipe

    Ranch beer dip in tan bowl, next to pretzels and crackers.
    Print Pin
    5 from 1 vote

    Pretzel Dip with Cream Cheese

    This creamy, tangy, and slightly boozy dip pairs perfectly with soft pretzels (or any snack of your choice) and is bound to be the star of your next get-together.  
    Course Snack
    Cuisine American
    Prep Time 5 minutes minutes
    Total Time 5 minutes minutes
    Servings 12
    Calories 212kcal
    Author Jessica Burgess

    Ingredients

    • 16 ounces cream cheese softened
    • ⅓ cup beer
    • 1 envelope ranch dressing mix
    • 2 cups shredded cheddar cheese
    • Fresh chopped scallions for topping

    Instructions

    • In a large bowl, mix the softened cream cheese, beer, and ranch dressing mix together with a hand mixer.
    • Fold in the cheese with a rubber spatula. Mix well.
    • Pour the dip into a bowl and top with freshly chopped scallions.
    • Serve slightly chilled with pretzels or sturdy crackers.

    Tips

    • I used Heineken, but it is very light. If you want a deeper beer flavor, use a very hoppy IPA beer instead.

    Nutrition

    Serving: 1serving | Calories: 212kcal | Carbohydrates: 3g | Protein: 7g | Fat: 19g | Saturated Fat: 11g | Polyunsaturated Fat: 1g | Monounsaturated Fat: 5g | Cholesterol: 57mg | Sodium: 242mg | Potassium: 66mg | Sugar: 1g | Vitamin A: 696IU | Calcium: 170mg | Iron: 0.1mg

    Strawberry Crunch Cake

    July 18, 2023

    Slice of strawberry cake on white plate with fresh strawberries on top.

    This Strawberry Crunch Cake is a semi-homemade delicious treat! Made with a boxed strawberry cake mix and topped with a buttercream frosting and a strawberry crunch top, similar to the topping on our strawberry crunch cheesecake!

    Slice of strawberry crunch cake on white plate, with fresh strawberries on top.

    This truly fun cake recipe adds cookies to the frosting! It may sound strange to have crumbs in your frosting (something you usually avoid!) but it gives this strawberry crunch cake recipe just the right sort of texture. In the past, we’ve combined cookies in other baked goods like these Circus Animal Cookie Donuts but when it comes to a cake recipe, it really makes it super fun.

    [feast_advanced_jump_to]

    Why You’ll Love This Recipe

    • It uses a few ingredients: The bright color is perfect for parties.
    • Semi-homemade: What could be easier than combining various boxes and ingredients with homemade frosting? Talk about the icing on the cake!
    • Showstopper: Between the texture, flavor, and fun decoration, everyone will be oohing and aahing when you bring dessert out.

    Ingredients Needed

    I’ve highlighted a couple of ingredients below with some relevant notes. Aside from this, the ingredients needed are pretty basic.

    Labeled ingredients for strawberry crunch cake.
    • Cake mix – Strawberry is the star here. Prepare per the box instructions if the amounts of water, oil, and eggs are different than in this recipe card. I also use a strawberry cake mix in this strawberry cake mix cookies recipe!
    • Freeze-dried strawberries – This is the perfect secret ingredient. It adds flavor and color without excessive sugar. We are also using it for texture!
    • Butter – I use unsalted. If you only have salted, then don’t add extra salt to the frosting.
    • Powdered sugar – Makes the perfect fluffy buttercream.
    • Shortbread cookies – What? Cookies in our frosting? You bet! It wouldn’t be a “crunch cake” without them!

    Substitutions

    Sometimes substitutions are necessary because of ingredients that are unavailable or needed for dietary restrictions. Here are some suggestions that can help:

    • Frosting – I strongly recommend making your own buttercream here. If you want to cheat though, you can usually whip canned frosting with some powdered sugar in your mixer to come close to the same texture.
    • Butter – as in most of my recipes, the choice to use salted vs. unsalted is up to you. I know sometimes stores only have one kind on sale! Just keep in mind that you won’t want to add extra salt if your butter already has it.
    • Cookies – think Lorna Doones or Chessmen here. If you can’t find those then graham crackers will also work well. I haven’t tried it, and it may add a bit more sweetness than other options, but even golden Oreo cookies would be tasty!

    Variations

    • Fruity fun – freeze-dried apples are also a common item you can find in the store. I think it would be great to try a spice cake and apples as a new variation of crunch cake!

    How to Make Strawberry Crunch Cake

    *Be sure to see the recipe card below for the full ingredients list & instructions!*

    Steps 1-4 of how to make strawberry crunch cake.

    STEP 1. Pulse the strawberries. Give half the strawberries a pulse in the food processor. Don’t completely obliterate them!

    STEP 2. Prepare the cake. Prepare the cake as directed on the box, then stir in the chopped strawberries.

    Steps 5-8 of how to make strawberry crunch cake.

    STEP 3. Bake the cake. Bake in a prepared pan as directed and let the cake cool completely.

    STEP 4. Prepare to crunch. Process the cookies and remaining strawberries.

    Tip: If you do not have a food processor to process the shortbread cookies and freeze-dried strawberries, adding them to a large zip bag (like a freezer ziplock bag) and using a rolling pin to process them into a textured crumb will also work. Either way, your strawberry crumble will be perfect.

    Baked strawberry cake in white cake pan.
    Steps 9-12 for how to make strawberry crunch cake.

    STEP 5. Make frosting. Whip the butter then add vanilla. Slowly add powdered sugar and beat to desired texture.

    Recipe Pro Tips

    • Allow to fully cool. Making sure that you allow the cake to completely cool before frosting is key or the frosting won’t turn out the way that it should.
    • Use baking spray. Not familiar with baking spray? This special can combines the flour with oil instead of just oil. This helps the cake release cleanly from the pan. No spray? Line the bottom only of the pan with a piece of parchment paper.
    Steps 13-15 for how to make strawberry crunch cake.

    STEP 6. Frost cake. Ensure the cake is completely cool, then spread the frosting evenly over the top.

    STEP 7. Add crunch. Sprinkle the prepared crunchy topping over the entire cake.

    Slice of strawberry crunch cake on white plate.

    Recipe FAQs

    I don’t normally have avocado oil. What can I use?

    Avocado is a great choice because it has a neutral flavor. Other great options are canola or vegetable oils. In comparison, stay away from olive oil, for example, which can add a strong flavor to the cake.

    What is strawberry crunch cake?

    Think of this cake as emulating the flavors of those yummy strawberry shortcake crunch ice cream bars, just with cake instead of ice cream! That’s why we’ve “coated” the top of the cake with crushed cookies and strawberries.

    What’s the best way to top the cake with strawberries?

    If you want to add fresh strawberries to the top of your cake, do that just before serving. It will add a bright pop of color and some different texture. However, they will let juice run into the cake which could potentially water down the frosting if you do them too early. So it’s best to slice the cake and add strawberries to each serving.

    Slice of cake on white plate with bite taken out with fork.

    Storage

    Did you know that buttercream doesn’t have to be refrigerated? This cake will last outside the fridge for about 3 days, as long as your kitchen isn’t too hot. But you can always keep in the fridge to extend the cake as well as keep that cool and creamy frosting just right.

    More Strawberry Recipes You’ll Love

    • Strawberry brownies on white marble cutting board.
      Strawberry Brownies Recipe
    • Strawberry Crumble Recipe
      Strawberry Crumble
    • Strawberry cheesecake cookies stacked on top of one another.
      Strawberry Cheesecake Cookies
    • Slice of strawberry cream cheese icebox cake on white plate, next to fork.
      Strawberry Cream Cheese Icebox Cake

    Did you make this? I’d be so grateful if you left a “star” rating below to let me know what you thought! Then, the next time you need a quick and easy recipe, come back to Fantabulosity to browse all of my easy recipes!

    Recipe

    Slice of strawberry cake on white plate with fresh strawberries on top.
    Print Pin
    5 from 4 votes

    Strawberry Crunch Cake

    This strawberry crunch cake is a semi-homemade delicious treat! Made with a boxed strawberry cake mix and topped with a buttercream frosting and a strawberry crunch top!
    Course Dessert
    Cuisine American
    Prep Time 13 minutes minutes
    Cook Time 34 minutes minutes
    Chill Time 2 hours hours
    Total Time 2 hours hours 47 minutes minutes
    Servings 12 servings
    Calories 459kcal
    Author Jessica Burgess

    Ingredients

    • 1 box strawberry cake mix 15.25 ounces
    • 3 large eggs*
    • ½ cup avocado oil* or any neutral oil
    • 1 cup water*

    Frosting Ingredients

    • ½ cup unsalted butter
    • ¼ teaspoon salt
    • 1 tablespoon vanilla extract
    • 1 bag freeze-dried strawberries; divided 1 ounce
    • 3 cups powdered sugar
    • 5 shortbread cookies about 5 ounces total
    • 1-2 tablespoons milk

    Instructions

    • Preheat oven to 350.
    • Add half of the bag of freeze-dried strawberries to the bowl of your food processor. Pulse 10 times to break up the strawberries. **If you do not have a food processor, you can add the strawberries to a zip bag and crush them using a rolling pin or a glass by rolling over the strawberries with gentle pressure. Set aside.
    • Grease a 13×9 baking pan using baking spray or butter and flour for dusting. You can also line the bottom of your 13×9 pan with a piece of parchment paper.
    • Prepare the cake mix according to package directions for oil, water, and eggs. Stir to combine.
    • Once the ingredients are fully mixed together, add in the crushed half of the strawberries. Using a spatula, fold them in so they are incorporated throughout.
    • Pour the prepared batter into the greased 13×9 baking pan.
    • Bake your cake at 350 degrees F (177 degrees C) for 34-38 minutes or until a toothpick comes out clean in the center.
    • Once baked, place the pan on a cooling rack and allow the cake to cool completely for about 2 hours.
    • Add the remaining freeze-dried strawberries to your food processor and add the shortbread cookies. Pulse 8-10 times or until the mixture resembles crumbs. Set aside. **Do not over-process this mixture, you want the mixture to be crunchy.

    Frosting

    • In the bowl of your electric mixer add the butter. Using a whisk attachment, beat the butter until softened. About 1 minute (if the butter is not at room temperature).
    • Add the salt and vanilla extract and mix until incorporated.
    • Slowly add in the powdered sugar about ½ cup at a time. Beat on medium-low speed, scraping down the sides making sure to incorporate the butter and sugar. Then increase the speed to medium until all of the powdered sugar has been incorporated. Add 1-2 tablespoons of milk if the frosting becomes too thick.
    • Once the cake has completely cooled, top the cake with the frosting and smooth it out so it's even over the whole cake.
    • Gently sprinkle the prepared strawberry crumb mixture over the top of the frosted cake, making sure to evenly coat the top of the cake. Slice the cake and enjoy!

    Video

    Notes

    • *Use the water, oil, and egg measurements from your cake mix box.
    • If you do not have a food processor to process the shortbread cookies and freeze-dried strawberries, adding them to a large zip bag (like a freezer ziplock bag) and using a rolling pin to process them into a textured crumb will also work.

    Nutrition

    Calories: 459kcal | Carbohydrates: 62g | Protein: 3g | Fat: 22g | Saturated Fat: 8g | Polyunsaturated Fat: 2g | Monounsaturated Fat: 9g | Trans Fat: 0.3g | Cholesterol: 67mg | Sodium: 327mg | Potassium: 28mg | Fiber: 0.1g | Sugar: 48g | Vitamin A: 309IU | Vitamin C: 1mg | Calcium: 79mg | Iron: 1mg

    Lemon Poke Cake

    July 17, 2023

    Slice of lemon poke cake on white plate, with lemon wedge on top.

    This Lemon Poke Cake is an absolute stunner. Just 4 ingredients (plus cake mix ingredients) and dessert will bring the perfect presentation to the table. Served chilled, this cake is super refreshing on a warm summer day.

    If you're looking for more desserts that work well for sharing, you'll find my favorite potluck desserts here.

    Slice of lemon poke cake on white plate.

    It goes to the top of the list when it comes to our easy cake recipes, and dare I say… easy dessert recipes!

    I love when recipes are so easy to make! These are quick pantry ingredients you probably always have on hand. You do need a few hours’ warning to make this, but it’s so delicious it will be worth the wait.

    If summer is already fading, try your hand at a Pumpkin Poke Cake or this tropical-flavored Coconut Poke Cake!

    [feast_advanced_jump_to]

    Why You’ll Love This Recipe

    • It uses a few ingredients: With only 4 ingredients (plus the ingredients for your cake mix), this recipe couldn’t get any easier!
    • Make-ahead recipe: This keeps for 3 days in the fridge, so it’s perfect for making at least the day before serving.
    • Easy to customize: Pick your flavor of cake and pudding for the ultimate custom dessert.

    Ingredients Needed

    I’ve highlighted a couple of ingredients below with some relevant notes. Aside from this, some simple ingredients are all you need.

    Labeled ingredients for lemon poke cake on white counter.
    • Cake mix – Brand doesn’t matter, just pick the one you like the flavor of and generally use.
    • Pudding – Lemon lovers unite! I chose lemon pudding to match the lemon cake. Make sure and grab “instant” and also NOT sugar-free.
    • Milk – Low-fat is fine here, whatever you normally keep in the fridge.
    • Cool whip – I go full-fat here because this is a treat!

    Nope, no real lemon is used in this recipe but if you have real lemons to use, these lemon blondies are what you should try instead.

    Substitutions

    Sometimes substitutions are necessary because of ingredients that are unavailable or needed for dietary restrictions. Here are some suggestions that can help:

    • Pudding – if you happen to grab the “cook and serve” version, that’s fine! Just prepare it according to the box and NOT with the milk in the recipe card.
    • Jello – have jello on hand and no pudding? Save a trip to the store – poke cake is often made with jello so just use that instead! Prepare as the box states and pour over the cake (no milk).

    Variations

    Not a lemon fan? No worries! This poke cake works no matter what you love!

    • Flavor – think of this as a framework rather than a must-follow-instructions sort of recipe. You can select whatever cake flavor you want and then add a pudding that matches or complements.
    • Color – got a special occasion? Think about selecting a flavor that adds to the party decor. Strawberry cake with vanilla pudding for a baby shower, school colors, or the guest of honor’s favorite color.

    How to Make Pudding Poke Cake

    There are just 3 easy steps to get this cake on the table:

    • bake the cake
    • pour on the pudding
    • chill, top, and serve

    Make the cake the night before a party or gathering, or even first thing in the morning for a dinner party.

    *Be sure to see the recipe card below for the full ingredients list & instructions!*

    Steps 1-4 on how to make lemon poke cake.

    STEP 1. Bake the cake. Prepare the cake according to the box directions and let cool completely.

    STEP 2. Poke the cake. Use the handle of a wooden spoon to make evenly spaced holes across the entire cake.

    Tip: You want to use something about ¼" in diameter to poke the holes in the cake to ensure the holes are large enough to create pockets of pudding. I find thin-handled wooden spoons are perfect for this. 

    STEP 3. Mix the pudding. Whisk by hand until the pudding just begins to thicken.

    Steps 5-8 on how to make lemon poke cake.

    STEP 4. Spread on the pudding. Evenly spread the pudding over the cake, taking time to push pudding into each hole.

    STEP 5. Chill. Let the cake chill for at least two hours before proceeding and serving.

    STEP 6. Top and serve. Spread whipped topping over the entire cake and then top with slices of lemon or zest for an extra special presentation.

    Lemon poke cake in cake pan with lemon slices on top.

    Recipe Pro Tips

    • Allow to fully cool. Make sure your cake is totally cool so the pudding doesn’t melt.
    • Whipped cream. Not a fan of cool whip? You can definitely make homemade whipped cream from heavy cream to top the cake. Because it doesn’t have stabilizers, you won’t want to do this step until just before serving.
    Slice of lemon poke cake on white plate, with lemon slice on top.

    Recipe FAQs

    What is a poke cake?

    Seems like a silly question, right? But it’s simply due to poking literal holes in the cake. This is necessary because while cakes with a simple syrup or milk poured over don’t need holes, a thicker ingredient like jello or pudding must have somewhere to go! These are also known as “poke and pour” cakes since you are pouring the the fun ingredient on after poking holes.

    What goes in a poke cake?

    While we used pudding here, poke cake can be made with jello, kool aid, sweetened condensed milk, caramel…the list goes on! But essentially just bake a cake and poke holes once cooled. Add a fun filling and topping and that’s it! All pantry ingredients are used so you can make a poke cake on a whim.

    How far ahead can I make a poke cake?

    No one likes dry cake, and that’s the benefit of adding a filling via poking. I recommend making this cake the day ahead or the morning of a dinner party, giving it just enough time to chill. You can keep this for up to 3 days, but I find you risk the cake starting to fall apart due to moisture as it reaches the end of those 3 days.

    What to Serve with Lemon Poke Cake

    This cake is great for a crowd, so you shouldn’t need much else on the side! You can always serve up fresh berries to be enjoyed next to or on top of the cake. This would be a perfect dessert to bring outside after everyone finishes up their Aloha Burgers.

    Fork holding a bite of lemon poke cake, above slice of cake.

    Storage

    Store leftover cake in the fridge for up to 3 days. Just remember that this cake can get fairly wet from the filling, so the sooner you eat it up the better! Also, if using homemade whipped cream rather than whipped topping, you risk the topping “breaking down” the longer it sits.

    More Lemon Recipes You’ll Love

    • Lemon Puppy Chow in white bowl.
      Lemon Puppy Chow
    • Lemon Brownies Recipe with cake mix
      Lemon Cake Mix Brownies
    • lemon bundt cake on wood stand
      Creamy Lemon Pound Cake (Bundt Cake)
    • Slice of lemon meringue pie on small plate, with slice of lemon laying beside it.
      Lemon Meringue Pie

    Did you make this? I’d be so grateful if you left a “star” rating below to let me know what you thought! Then, the next time you need a quick and easy recipe, come back to Fantabulosity to browse all of my easy recipes!

    Recipe

    Slice of lemon poke cake on white plate, with lemon wedge on top.
    Print Pin
    5 from 1 vote

    Lemon Poke Cake

    This Lemon Poke Cake will give you a cold blast of summer in a super easy dessert. The pudding mix makes this so moist and delicous.
    Course Dessert
    Cuisine American
    Prep Time 10 minutes minutes
    Cook Time 25 minutes minutes
    Chill Time 2 hours hours
    Total Time 2 hours hours 35 minutes minutes
    Servings 12 servings
    Calories 317kcal
    Author Jessica Burgess

    Ingredients

    • 1 box lemon cake mix 15.25 ounces
    • Ingredients to prepare cake mix per instructions oil, eggs, etc.
    • 2 boxes instant lemon pudding mix 3.4 ounces each
    • 3 ½ cups cold milk
    • 1 tub Cool Whip, thawed 8 ounces

    Instructions

    • Prepare cake mix according to the package directions and bake in a 9×13 pan. Leave cake to cool completely.
    • Poke holes over the cake every 1-1 ½ inches using the handle of a wooden spoon.
    • Whisk the lemon pudding mix and milk by hand in a large bowl until it just begins to thicken, about 2 minutes.
    • Carefully pour the pudding over the cake. Use an offset spatula to spread it into an even layer, making sure to press the pudding down into the holes.
    • Set the cake in the refrigerator to chill for at least two hours to allow the pudding the set.
    • When ready to serve, spread the Cool Whip over the top of the cake. Garnish with lemon slices for the perfect presentation.

    Video

    Notes

    • Store leftovers in the refrigerator for up to three days.
    • If you love lemon, fold one tablespoon of lemon zest into the cake batter or pudding for extra tang.
    • Be sure to use instant pudding mix and not the cook-and-serve kind. If you have the cook-and-serve kind, prepare according to the box and not the milk in the ingredients list here.
    • You want to use something about ¼" in diameter to poke the holes in the cake to ensure the holes are large enough to create pockets of pudding. I find thin-handled wooden spoons are perfect for this.
    • The lemon pudding can be substituted with lemon jello, although I like the added creaminess the pudding adds to the cake.
    • Use two cups of homemade whipped cream instead of whipped topping if desired.

    Nutrition

    Calories: 317kcal | Carbohydrates: 58g | Protein: 6g | Fat: 7g | Saturated Fat: 5g | Polyunsaturated Fat: 0.4g | Monounsaturated Fat: 1g | Trans Fat: 0.1g | Cholesterol: 50mg | Sodium: 451mg | Potassium: 162mg | Fiber: 1g | Sugar: 27g | Vitamin A: 189IU | Calcium: 199mg | Iron: 1mg

    20 Unique Charcuterie Boards

    July 9, 2023

    Unique charcuterie board ideas in an image collage.

    Charcuterie boards are my favorite party food option. They are so beautifully arranged, and typically feature a variety of different meats (and fun salami roses), cheeses, fruits, nuts, and other accompaniments.

    They allow you and your guests to sample a bit of everything and find new favorite combinations. You can also make them based on your budget, using a variety of produce, deli meats, and pieces of cheese.

    Unique charcuterie board ideas collage.

    If you are looking for ideas to make your own charcuterie boards at home, then you are going to love this collection of 20 Unique Charcuterie Boards.

    With ideas like skinny boards with low-calorie foods, to taco boards with all of the fixings, I know you will find a few ideas to make in your home kitchen.

    Pair a  favorite drink recipe with one of these unique charcuterie boards. 

    waffles and fruits on a board

    Waffle Charcuterie by Fantabulosity

    This waffle board is perfect for breakfast or brunch. Add lots of fresh fruits and a variety of waffles so everyone can have their breakfast just how they like it.

    skinny charcuterie board

    Skinny Charcuterie by Make It Skinny

    This spread of snacks is low calorie for a healthy option that looks elegant and still tastes great. Use fresh fruits, small chunks of cheese and low carb crackers to offer a variety that everyone can enjoy.

    breakfast board with eggs, waffles, fruit

    Breakfast Charcuterie Board  by Feast and Fam

    Make a healthy breakfast board for a leisurely weekend breakfast, or as a show stopping brunch! With so many fresh ingredients like eggs, waffles, berries and meat, this has something for everyone!

    Italian meats, cheese, vegetables

    Italian Charcuterie Board by Little Farro Kitchen

    This charcuterie board has imported cheeses, deli meats, tasty olives and a sweet bite with honeycomb! This fancy little feast is perfect for a dinner party with friends.

    fresh fruits on a charcuterie board

    Fruit Charcuterie Board by Blackberry Babe

    Offer your guests all of the summer fruits with a creamy dip that they are going to love. This colorful option is healthy, delicious and easy to assemble.

    Mediterranean flavors in a charcuterie board

    Mediterranean Snack Board by Food Wine and Love

    Pair your cocktail hour with a variety of tasty vegan snacks. This board is easy to assemble but has an assortment of ingredients for endless combinations of flavors.

    Taco meats, cheese and shells with fresh veggies

    Taco Charcuterie Platter by The Soccer Mom

    Make a charcuterie platter that brings loads of taco flavor to your next gathering. Add fresh veggies, meat and cheeses for a build your own taco night that everyone will love.

    Jars of charcuterie ingredients

    Jarcuterie by Inspired by Charm

    This idea makes for individual charcuteries that your guests can grab and carry around to snack on as they mingle. You are going to love how easy these are to assemble.

    Burrata charcuterie board

    Burrata Board by Princess Pinky Girl

    If you like burrata cheese, then you are going to love this board! It has  a perfect balance of sweet, savory and salty options for dipping! Peaches, berries, meats and snap peas are so good with burrata cheese.

    charcuterie cones with fresh fruits and veggies

    Charcuterie Cones by A Grateful Meal

    These yummy charcuterie cones are perfect for a party. They have a great portion of snackable ingredients in an easy to assemble paper cone.

    red white and blue snacks arranged on a charcuterie board

    Red, White and Blue Charcuterie Board by Plant Based on a Budget

    This charcuterie board is so festive for the summer holidays. It is made with vegan options for an inclusive and fun snack to share.

    Mezza platter

    Mezze Platter by My Chefs Apron

    This platter of Mediterranean flavors makes perfect party food. With fresh veggies, tasty dips, and cheese, you are going to love the flavorful combinations you can create.

    Beer Cheese Fondue Board by Barley and Sage

    Add a cheesy twist to your next charcuterie night with this beer cheese fondue recipe. It pairs perfectly with anything you want to dip into it! Veggies, meat, pretzels, or bread taste amazing in this.

    summer cheese board with burrata, peaches

    Summer Cheese Platter by Life As a Strawberry

    This board is packed with delicious cheeses and fresh veggies. Add an assortment of breads and fruits to make a grazing board that everyone will love.

    Bagel board with fruit, eggs and meat

    Bagel Charcuterie Board by Whole Lot of Yum

    If you like bagels, you are going to love this board! With cream cheese, fruits, veggies, meats and all of the toppings you can make your dream bagel for an awesome breakfast, brunch or lunch.

    red and blue berries with white cheese and crackers

    Patriotic Charcuterie Board by Healthy Family Project

    This board is packed with red, white and blue ingredients for a summer snack board that is healthy and wholesome.

    Breakfast summer cheese board

    Summer Charcuterie Platter by Britney Breaks Bread

    This is one epic board for a summer party. It has perfect boiled eggs, fresh fruits, and flaky croissants for a summer spread that has something healthy for everyone.

    Bloody mary charcuterie board with olives, celery

    Bloody Mary Charcuterie Board by Amanda's Cookin'

    This is the brunch board to offer if you are serving bloody marys for brunch! It has all of the toppings that you could dream of in a fancy bloody mary.

    Italian meats and cheeses on charcuterie board

    Italian Charcuterie  by Tulips and Twill

    This spread is loaded with Italian meats and cheese. Sprinkle in plenty of olives, dates and crackers, and you have a crowd pleasing snack to share.

    Charduderie board with meaty offerings

    Charduderie by Cuss Kitchen

    This spread isn't elegant, but it has so many tasty finger food snacks! Make this for a game day party, or for a family BBQ to offer something for everyone.

    Quick Tips for Making a Charcuterie Board:

    • Use a variety of ingredients. Look to add color and texture to your board by selecting produce in various colors.
    • Arrange your ingredients in a visually appealing manner. Use shapes, layering heights, and serving tools to make your presentation stand out.

    Find more entertaining ideas here:

    You must use the category name, not a URL, in the category field.

    The BEST No Bake Cookies Recipe

    July 9, 2023

    No bake cookies on aluminum foil.

    The BEST No Bake Cookies Recipe with Chocolate, Oatmeal, and Peanut Butter: The classic recipe that uses milk, butter, sugar, cocoa, peanut butter, and oats! Plus, the pro-tips that will help you make sure they turn out every time!

    This is one of those desserts that fits right in at a gathering. You can find more potluck desserts here.

    No bake cookies on aluminum foil.
    • Chocolate no bake cookies?
    • Chocolate peanut butter no bake cookies?
    • No bake chocolate oatmeal cookies?
    • No bake oatmeal cookies?

    I’m not sure what you may call them… because I’ve heard them called all SORTS of different names, but we talk about them so much that we’ve just shortened it to “no bakes” around here.

    If you love easy cookies, you’ll also love these Monster cookies , these Peanut Butter Chocolate Chip Cookies, the No Bake S’mores Cheesecake Recipe, our Gluten Free, Oatmeal Breakfast Cookies, and these Chocolate and Peanut Butter Energy Bites – No Bake!

    Peanut butter and chocolate also pair well in a Lazy Cake – no bake is the ultimate in “lazy cooking.”

    Why You’ll Love this Recipe

    I’ve hesitated sharing this recipe for no bake cookies, because I felt like EVERYONE must already have a recipe and know what no bake cookies are. Right?! Wrong.

    Or at least they’ve been made by others but so many have had trouble with other recipes hardening and turning out. But this recipe never fails me, and you’ll see why in the PRO TIPS below!

    How to Make No Bake Cookies

    They’re really easy, and the PERFECT recipe for someone just starting out in the kitchen. (I actually think this was the very first cookie recipe I tackled as a little girl too! It’s kind of neat actually to be sharing this with you today since I had NO idea back then that this blogging “thing” would even exist, where I share my favorite recipes.)

    Using everyday ingredients, that you probably already have on hand, you’ll cook them on the stovetop and they’ll air-dry on the counter. No baking required!

    The full, printable recipe card is at the bottom of this post.

    Step 1: Butter, Sugar, Milk, Cocoa

    Combine the following ingredients in a saucepan on the stovetop. (Not turning the burner on just yet.)

    Vanilla Extract: I don’t like adding vanilla extract to no bakes but if you prefer it, you can add 1 teaspoon of vanilla extract at the same time you add the milk.

    TIP: This is a GREAT time to place a piece of aluminum foil out on the countertop, so it is ready for you when the cookies are ready to scoop out.

    • Butter – You’ll be using a stick of butter, which is a half of a cup. Don’t worry about it being softened, cold right out of the refrigerator will work just fine. I also prefer to use salted butter, but unsalted works just fine too! I’ve also used margarine and it works as well.
    • Sugar – 2 cups of white granulated sugar
    • Milk – I usually use 2%, but have used whole and skim before as well, so using whatever you have on hand should work just fine! New tip: I’ve been out of milk before and have used caramel-flavored almond milk coffee creamer, and it worked too! Plus, it added a touch of caramel flavor it was delicious!
    • Cocoa – 4 tablespoons of unsweetened cocoa
    Stick of butter in white saucepan.
    1 stick of butter
    Sugar and butter in white saucepan.
    2 cups of sugar
    Milk added to sugar and butter in white saucepan
    ½ cup of milk
    Cocoa powder added to white sauce pan with other ingredients.
    4 Tablespoons of Cocoa

    Step 2: Mix & Boil

    Turn the burner on to medium-high heat, and begin stirring so the butter will melt.

    Step 3: Boil for 1 Minute

    Once the butter has melted, stop stirring to allow the mixture to come to a boil.

    PRO TIP: Once all of the chocolate mixture starts boiling, (not just a bubble here and there — wait until it all starts boiling, and if the boiling starts in the middle, wait until it reaches the sides) begin timing the boil, stir slowly and constantly, and let it boil for 1 minute.

    Remove from heat.

    Ingredients melting in white saucepan.
    Melt & Boil

    Step 4: Add in Peanut Butter

    Once the saucepan has been moved away from the heat, add, and stir in the peanut butter until completely mixed in.

    PRO TIP: The brand of peanut butter matters! I used generic peanut butter for years but using creamy, Jif or Skippy, are now my favorites to use and it makes such a difference!

    ⅓ cup peanut butter in chocolate mixture in saucepan.
    ⅓ cup peanut butter

    Step 5: Add the Oats

    Pour in 3 cups of oats and stir until combined.

    Tip: I’ve found “quick oats” are better than old-fashioned oats for no bake cookies but old-fashioned oats will work.

    3 cups of oats added to saucepan.
    3 cups oats

    Step 6: Quickly Spoon Out Cookies

    This is where you’ll want to be quick and spoon out cookies with a tablespoon, on to a sheet of aluminum foil.

    Oats mixed in to the chocolate mixture in saucepan.
    Mix in oats

    Leaving them in the hot pan will allow the cookies to continue to cook and harden, resulting in a very crumbly cookie.

    Cookies spooned out on to aluminum foil to set.
    Spoon on to foil

    Step 7: Rest for 20 minutes

    Let the cookies rest for at least 20 minutes to harden.

    To see if the cookies have set, you should be able to pick up the cookies with your hand.

    Hardened cookies ready for eating.

    Storage

    Once hardened and cooled, store in an air-tight container and enjoy within a couple of days as they can tend to dry out.

    Classic no bake cookies - oatmeal chocolate peanut butter recipe

    More Cookie Recipes

    If you’ve fallen in love with these no bake cookies, then I know you’re also going to love this 3-ingredient peanut butter fudge, this chocolate peanut butter bars too and these chewy oatmeal raisin cookies! They’re also a favorite in our house! Or, give these cake mix peanut butter cookies a whirl, too!

    Recipe

    No bake cookies on aluminum foil.
    Print Pin
    4.75 from 36 votes

    The BEST No Bake Cookies

    No Bake Cookies Recipe with Chocolate Oatmeal and Peanut Butter: The classic recipe that uses milk, butter, sugar, cocoa, peanut butter and oats!
    Course Dessert
    Cuisine American
    Prep Time 5 minutes minutes
    Cook Time 1 minute minute
    Resting Time 20 minutes minutes
    Total Time 26 minutes minutes
    Servings 16 cookies
    Calories 245kcal
    Author Jessica Burgess

    Ingredients

    • ½ cup salted butter 1 stick
    • 2 cups white granulated sugar
    • ½ cup milk 2%, whole or skim
    • 4 Tablespoons cocoa
    • ⅓ cup peanut butter Creamy is my favorite and JIF or Skippy are preferred over generic. It makes a difference!
    • 3 cups oats quick or old-fashioned
    • 1 teaspoon vanilla extract optional

    Instructions

    • Place a piece of aluminum foil, approximately a foot long, out on the counter. You'll be scooping out the cookies on to this to let dry once they're finished cooking.
    • In a large sauce pan place ½ cup salted butter, 2 cups white granulated sugar½ cup milkand 4 Tablespoons cocoaand turn burner on to medium-high heat.
      Some prefer adding vanilla extract to this recipe, however I don't like them with vanilla. If would like vanilla, add 1 teaspoon of vanilla extract at the same time as the milk.
    • Stirring to combine, cook until butter has melted.
    • Next, and PRO TIP: Once all of the chocolate mixture starts boiling, (not just a bubble here and there — wait until it all starts boiling) begin timing the boil, stir slowly and constantly, and let it boil for 1 minute.
    • After one minute of boiling, remove from heat
    • Mix in ⅓ cup peanut butter and stir until combined
    • Add in 3 cups oats and stir until evenly mixed
    • QUICKLY, using a spoon, scoop out a tablespoon of cookie mixture on to your prepared aluminum foil, making approximately 16-20 cookies.
    • Let cookies sit for about 20 minutes or until the cookies have hardened and you can pick them up off of the aluminum foil.

    Video

    Notes

    TIP: Spread out a piece of aluminum foil on to the counter before you start making the cookies so it will be ready and you can quickly spoon out the cookies.

    Nutrition

    Serving: 1cookie | Calories: 245kcal | Carbohydrates: 37g | Protein: 4g | Fat: 10g | Saturated Fat: 5g | Cholesterol: 16mg | Sodium: 80mg | Potassium: 121mg | Fiber: 2g | Sugar: 26g | Vitamin A: 190IU | Calcium: 22mg | Iron: 1mg

    Walking Strawberry Cheesecake

    June 29, 2023

    Walking cheesecake dessert in baking dish.

    Indulge in the delightful fusion of a classic dessert with a fruity twist – presenting our Walking Strawberry Cheesecake! This scrumptious creation combines the best of both worlds: the rich, creamy goodness of cheesecake and the refreshing, juicy sweetness of strawberries. They’re the perfect easy dessert for hosting a party or even just as an after-school snack idea!

    Walking dessert in dish, with plastic spoon sticking out of Teddy Graham bag.

    Perfect for any occasion, this simple dessert will have your taste buds dancing in delight, leaving you craving for more. So, if you’re ready to make desserts super simple, keep on reading as we unveil the magic behind this fantastic recipe. 

    If you have strawberries left after this recipe, why not try these Cheesecake Stuffed Strawberries or Strawberry Cheesecake Bites that are almost too cute to eat! Or, for those hot summer days, make a Strawberry Cream Cheese Ice Box Cake or this no-bake Strawberry Heaven.

    [feast_advanced_jump_to]

    Why You’ll Love This Recipe

    • It uses a few ingredients: With only 5 ingredients, this recipe uses items that you may even have on hand.
    • Eat on the go: Once you’ve mixed the pudding mix, there’s nothing more needed than a spoon for each portion.
    • Ready in only 15 minutes: Want a super quick and easy idea? This recipe, from start to finish, only takes 15 minutes.

    What is Walking Cheesecake?

    Walking desserts, such as this fun cheesecake, are portable twists on the classic cheesecake dessert that allows you to enjoy its deliciousness on-the-go! It involves adding instant pudding mix, usually cheesecake flavored, to a bag of crushed graham crackers, along with fresh strawberries or your favorite fruit. 

    This delightful concoction creates a mess-free, handheld treat that can be easily enjoyed as you walk, at picnics, or during any outdoor event. Say goodbye to the hassle of plates and relish in the convenience and scrumptiousness of walking cheesecake – a dessert that’s perfect for those with a sweet tooth or who crave sweet indulgence anytime, anywhere!

    Ingredients Needed

    I’ve highlighted a couple of ingredients below with some relevant notes. Aside from this, the ingredients needed are pretty basic.

    Labeled ingredients for walking cheesecakes.
    • Cheesecake mix – To keep everything simple, use an instant cheesecake mix to create this simple dessert.
    • Teddy Grahams – Make sure you get the individual serving bags of Teddy Grahams for this recipe.
    • Strawberries – Fresh strawberries are best for this recipe, slice them up and mix them with the cool whip.

    Substitutions

    Sometimes substitutions are necessary because of ingredients that are unavailable or needed for dietary restrictions. Here are some suggestions that can help:

    • Cheesecake Mix: Instead of instant cheesecake mix, you can use instant vanilla or white chocolate pudding mix for a similar creamy texture and sweetness.
    • Cool Whip: To replace Cool Whip, you can opt for homemade whipped cream (made by whipping heavy cream with sugar and vanilla extract) or use a dairy-free whipped topping, such as coconut whipped cream, for a vegan alternative.
    • Strawberries: Fresh strawberries can be replaced with other fruits like blueberries, raspberries, blackberries, or diced peaches for a different fruit pairing. 

    Variations

    There are numerous variations you can try to give your Walking Cheesecake a unique twist. Here are some ideas to inspire your creativity:

    • Chocolate Lovers: Use chocolate-flavored instant pudding mix and add chocolate chips or chocolate shavings to the mixture. You can also use crushed Oreos or chocolate graham crackers instead of regular graham crackers.
    • Tropical Delight: Use a combination of diced mango, pineapple, and kiwi as your fruit mix, and consider using coconut-flavored instant pudding or adding shredded coconut for an extra tropical touch.
    • Banana Cream: Use banana-flavored instant pudding and add sliced bananas to the mix. You can also drizzle caramel sauce over the top for an added indulgence.
    • Caramel Apple: Add diced apples and a drizzle of caramel sauce to the vanilla pudding mix. You could also sprinkle cinnamon or apple pie spice over the top for a warm, comforting flavor.
    • Lemon Blueberry: Combine lemon-flavored instant pudding with fresh blueberries, and consider adding a bit of lemon zest for an extra burst of citrus flavor.
    • Peanut Butter & Chocolate: Use chocolate-flavored instant pudding and mix in peanut butter chips or swirl in some creamy peanut butter for a delicious, nutty twist.
    • Cherry Almond: Combine vanilla instant pudding with cherry pie filling and sprinkle chopped almonds over the top for a delightful cherry almond flavor combination.

    Remember, there’s no limit to the creative combinations you can come up with the easy dessert! Mix and match flavors, fruits, and toppings to create your own unique Walking Cheesecake that suits your taste buds.

    How to Make Walking Strawberry Cheesecake

    This strawberry cheesecake is broken into 2 components:

    • Make the cheesecake
    • Assemble the dessert

    *Be sure to see the recipe card below for the full ingredients list & instructions!*

    STEP 1: Mix the cheesecake. In a medium mixing bowl, combine the pudding mix with milk. Stir the mixture for two minutes, then let it sit for three minutes to set up completely. (Image 1-2)

    STEP 2: Prepare the crackers: To easily access the teddy grahams inside, cut open the top of the bags and fold over the edges. 

    Steps 1-4 of how to make walking cheesecakes.

    STEP 3: Add the pudding. Fill each bag with pudding using a spoon. (Image 3).

    STEP 4: Add the strawberries and cool whip. Place the strawberries in the bags and add a generous dollop of cool whip on top. (Image 4).

    Walking cheesecake with Cool Whip and strawberries on top.

    Recipe Pro Tips

    • Prep in advance: To save time, prepare the instant pudding and crush the graham crackers ahead of time. Store them separately in air-tight containers until you’re ready to assemble your Walking Cheesecake.
    • Choose ripe fruits: For the best flavor and texture, use ripe, juicy fruits in your Walking Cheesecake. Wash and dry them thoroughly before dicing or slicing to ensure they don’t make the mixture soggy.
    • Customize portions: Create individual servings of Walking Cheesecake by using small zip-top bags or reusable containers. This makes it easy for everyone to enjoy their own personalized dessert on-the-go.
    • Chill before serving: For an even more refreshing treat, chill your Walking Cheesecake in the refrigerator for at least 30 minutes before serving. This will help the flavors meld together and create a firmer, creamier texture.
    Walking strawberry cheesecake in Teddy Grahams bags.

    Recipe FAQs

    Can I make my own pudding from scratch instead of using instant pudding mix?

    Yes, you can definitely make your own pudding from scratch for your Walking Cheesecake. Homemade pudding will provide a richer, creamier texture and allows you to control the ingredients. Just be sure to let it cool and thicken before assembling your dessert.

    Is it possible to make a vegan or dairy-free version of Walking Cheesecake?

    Absolutely! To make a vegan or dairy-free version, use a dairy-free instant pudding mix or a homemade dairy-free pudding recipe. Replace Cool Whip with a dairy-free whipped topping like coconut whipped cream, and use dairy-free graham crackers or cookies for the base.

    Can I freeze Walking Cheesecake for later consumption?

    While it’s possible to freeze Walking Cheesecake, the texture may change once thawed, especially if it contains fruits. If you do decide to freeze it, store individual portions in airtight containers or freezer-safe zip-top bags. When ready to consume, let the portions thaw in the refrigerator for several hours or overnight. Keep in mind that the texture might be slightly different, but it should still taste delicious.

    How can I make a gluten-free Walking Cheesecake?

    To make a gluten-free Walking Cheesecake, simply replace regular graham crackers with gluten-free graham crackers or another type of gluten-free cookie. Also, make sure to check the labels on your instant pudding mix and whipped topping to ensure they are gluten-free as well.

    Can I use frozen fruit instead of fresh fruit for my Walking Cheesecake?

    It’s best to use fresh fruit for your Walking Cheesecake because frozen fruit can release excess moisture when thawed, making the dessert soggy. However, if you only have access to frozen fruit, make sure to thaw it completely, drain any excess liquid, and pat the fruit dry with a paper towel before adding it to your dessert.

    Assembled walking strawberry cheesecakes in dish.

    Storage

    To store leftover pudding portions, follow these simple steps:

    1. Choose the right container: Transfer the leftover pudding into an airtight container or individual serving bowls with lids. Glass or plastic containers with tight-fitting lids work well in preventing air exposure, which can cause the pudding to form a skin or become dry.
    2. Cover the surface: If you’re using a container without a lid or want extra protection against skin formation, press a piece of plastic wrap directly onto the surface of the pudding. This will create a barrier that prevents air from coming into contact with the pudding.
    3. Refrigerate: Place the covered container or bowl in the refrigerator. It’s best to store pudding in the coldest part of the fridge, away from the door where temperatures tend to fluctuate.
    4. Consume within a few days: Leftover pudding is best enjoyed within 3-4 days of preparation. Before eating, check for any signs of spoilage, such as off smells, mold, or changes in texture.

    Remember that instant puddings tend to set more firmly over time, so the texture might be slightly different when consuming leftovers. If you notice the pudding has become too thick, you can gently fold in a small amount of milk or whipped cream to loosen it before serving.

    More Cheesecake Style Recipes You’ll Love

    If you are looking for a more traditional cheesecake recipe, try this Strawberry Crunch Cheesecake instead. Or if you want something more citrus based, try this Orange Fluff Salad that’s perfect for a party. You could also use any leftover berries for a Mixed Berry Mini Trifle as well. Or, you’ll love these cake favorites:

    • A slice of shoofly cake sitting on round plate.
      Shoofly Cake
    • A slice of coconut poke cake on a spatula.
      Coconut Poke Cake Recipe
    • A slice of strawberry heaven cake dessert on a plate.
      Strawberry Heaven
    • Strawberry Pound Cake on cake stand.
      Strawberry Pound Cake with Strawberry Glaze Icing

    Did you make this? I’d be so grateful if you left a “star” rating below to let me know what you thought! Then, the next time you need a quick and easy recipe, come back to Fantabulosity to browse all of my easy recipes!

    Recipe

    Walking cheesecake dessert in baking dish.
    Print Pin
    5 from 1 vote

    Walking Strawberry Cheesecake

    Walking Strawberry Cheesecake: This scrumptious creation combines the best of both worlds: the rich, creamy goodness of cheesecake and the refreshing, juicy sweetness of strawberries. 
    Course Dessert
    Cuisine American
    Prep Time 15 minutes minutes
    Total Time 15 minutes minutes
    Servings 8 bags
    Calories 1787kcal
    Author Jessica Burgess

    Ingredients

    • 5.1 ounce box cheesecake pudding mix
    • 2 cups milk
    • 8 packages single serving Teddy Grahams
    • 1 cup strawberries diced
    • 1 cup cool whip

    Instructions

    • In a medium mixing bowl, combine the pudding mix and milk. Stir the mixture for two minutes and allow it to sit for three minutes to set up completely.
    • Cut open the tops of the bags of teddy grahams and flip over the edges of the bag.
    • Spoon the pudding into each bag.
    • Add the strawberries to the bags and top with a dollop of cool whip.

    Notes

    TIP: Chill before serving: For an even more refreshing treat, chill your Walking Cheesecake in the refrigerator for at least 30 minutes before serving. This will help the flavors meld together and create a firmer, creamier texture.

    Nutrition

    Serving: 1bag | Calories: 1787kcal | Carbohydrates: 318g | Protein: 31g | Fat: 43g | Saturated Fat: 8g | Polyunsaturated Fat: 2g | Monounsaturated Fat: 15g | Cholesterol: 9mg | Sodium: 2721mg | Potassium: 851mg | Fiber: 14g | Sugar: 99g | Vitamin A: 117IU | Vitamin C: 11mg | Calcium: 410mg | Iron: 17mg

    Aloha Burgers

    June 27, 2023

    Aloha burger on white plate.

    This Aloha Burger recipe is filled with all the best parts of summer. Crispy bacon, sweet sauce, juicy pineapple, and melted cheese all combine on a perfectly grilled burger to make your backyard the gathering place!

    Ever since our baked burgers have gone viral, and have become a reader favorite, we’ve started sharing more and more burger recipes with you and it has been so fun to share the different variations!

    Aloha burger on white plate.

    Do you love grilling as much as I do?? When it’s summer, I just can’t wait to get outside. Plus I know in a lot of households, the main cook isn’t always the grill person in the family! So it can mean a bit of a break as well. And if you don’t have room on the grill next to these burgers, did you know you can make corn on the cob in the Instant Pot? It is really tasty!

    You also can’t go wrong with a classic Red-Skinned Potato Salad!

    [feast_advanced_jump_to]

    Why You’ll Love These Aloha Burgers

    • It uses pantry ingredients: You likely have everything on hand already, even though it seems like a long list!
    • Feed a group: As written, you can make 6 or 8 burgers. Perfect for short notice extra guests. You can also very easily double this one or even make sliders.
    • Ready in under 30 minutes: Talk about a quick and easy dinner idea! You can whip these up in no time flat.

    Ingredients Needed

    It might seem like a lot of ingredients for aloha burgers but they are all items that you have in the pantry, especially for grilling season.

    Labeled ingredients for Aloha burgers.
    • Ground beef – I like an 80/20 mix but you can mix and match your fat levels or even use some ground turkey as well! That’s the best part about forming your own burgers. See more of our ground beef dinner ideas!
    • Pineapple – Fresh or canned both work well. If using fresh, you’ll need to buy juice separately. Also keep in mind that sometimes fresh pineapple bothers some people’s mouths! When canned, the enzyme that causes that is deactivated by heat.
    • Bacon – Thick, thin, peppery or mapley! Whatever your favorite is will go well here. And since it’s cooked ahead, it’s easy to make BLTs one night and save some bacon for these burgers.
    • Teriyaki sauce – This helps add some sweetness inside our burgers and I love using this teriyaki recipe without ginger.
    • BBQ sauce – I love to add this on top of the finished burger to hold the bacon on! Pick a sweet or spicy.
    • Havarti – The strong flavor here helps the cheese get noticed.

    Substitutions

    Sometimes substitutions are necessary because of ingredients that are unavailable or needed for dietary restrictions. Here are some suggestions that can help:

    • Cheese – not a fan of havarti? Provolone or Swiss also work well here.
    • Meat – you can use ground chicken or turkey for some of the beef to reduce the fat content. There are so many flavors at play here that it’s a great recipe for poultry.

    Equipment

    I love the taste of grilled burgers, but you can absolutely make burgers on the stove on a grill pan if rain has brought the party inside.

    Nothing beats an instant-read thermometer. This is truly the only way to tell when a burger has reached your desired finished temp. Never cut a burger open to check the color – it will lose all the juices plus won’t sit nicely on the bun anymore.

    Where Did Hawaiian Burgers Originate?

    Unlike many foods that are named from a cuisine, but really didn’t come from there (hello, French fries!) pineapple really is a big part of Hawaiian culture. The pineapple stands for hospitality so it only makes sense to pop it on top of a grilled burger you make for friends.

    How to Make BBQ Bacon Burgers

    Cook your bacon ahead of time, whether that’s the day before or even right on the grill before the burgers. Cooking it on the grill means no messy stovetop! Set out all your toppings so they are ready to go and then mix everything up and grill. Super quick and easy!

    *Be sure to see the recipe card below for the full ingredients list & instructions!*

    Steps 1-3 for making Aloha burgers.

    STEP 1. In a large bowl add the ground beef through pineapple juice. Gently mix together until just combined.

    STEP 2. Divide the ground beef mixture into 6 equal parts for ⅓ pound burgers or 8 equal parts for ¼ pound burgers.

    Tip: To get your burgers all the same size, use a kitchen scale to weigh each one. A third pound burger will be 5.3 ounces, a quarter pound will be 4 ounces.

    STEP 3. Gently roll each portion into a ball, then gently flatten into a circle. I make a fairly larger indentation in the center of each patty to keep them from puffing up too much as they cook.

    Steps 4 through 5 for how to make aloha burgers.

    STEP 4. Heat the grill to 400°. Grill the onion and pineapple slices first to get a great char, and then let rest on a plate or over indirect heat.

    STEP 5. Cook the burgers with the lid closed, flipping once. Place a slice of cheese on each burger and cook for 1 more minute.

    Tip: Use an instant read thermometer to check the temperature like this Instant Read Thermometer.

    STEP 6. Let the burgers rest on a plate, covered, for 5 minutes. You don’t want to lose any juices!

    STEP 7. Place each burger on a bun spread with mayo, top with a grilled pineapple slice, grilled onion slice, bacon, teriyaki sauce, barbecue sauce, lettuce, and any other toppings you desire.

    Building an aloha burger with all of the toppings on a white plate and white counter.

    Recipe Pro Tips

    • Do not overmix the beef. Working the mixture too much will result in tough meat. Your hands work great for mixing and distributing. You can also use a stand mixer on the lowest setting to combine the ingredients.
    • It's common to use your thumb to make the indent in the patty. I recommend making the indentation a bit wider than that. A couple inches should do.
    • Get the grill HOT! The key to your burgers not sticking is a hot grill. 
    • Don't press your burgers down on the grill, this will dry them out.
    Red onion, teriyaki sauce, bacon, lettuce and cheese on burger.

    Recipe FAQs

    How long do I cook burgers on the grill?

    These are the recommended cooking times for burgers:
    Rare = 145° 2-2 ½ minutes per side
    Med. rare = 160° 3-minutes per side
    Well = 170° 3 ½-4 minutes per side

    Should I put breadcrumbs or egg in my burger mixture?

    It’s a matter of preference. Breadcrumbs can help bind the meat and give the burger a slightly firmer texture. Adding an egg can do the same thing along with adding moisture to the burger. Experiment and see what works best for you.

    How do I keep my burgers from falling apart on the grill?

    Be gentle when forming the patties, and make sure they’re not overworked. Avoid packing the meat too tightly.

    Can I grill frozen burgers?

    Yes, you can grill frozen burgers, but it will take longer to cook them. Use a lower heat setting to prevent the outside from burning while the inside thaws and cooks.

    What to Serve with Aloha Burgers

    I love a good, sturdy burger, and those with smaller appetites may be happy with just this massive pineapple burger on their plates. You can definitely serve up cocktails for a crowd while the burgers cook, and I highly recommend some Elote Dip recipe with chips.

    Close up of aloha burger with all of the toppings.

    Storage

    If you have any leftover burgers, keep the patties in the fridge for a couple days. Give them a quick reheat in a small skillet before assembling a burger.

    More Burger Recipes You’ll Love

    • Waffle Burger on white plate with small bowl of syrup
      Waffle Burger
    • Crispy Chicken Burger
      Crispy Chicken Burger (KFC Zinger Burger)
    • Donut Burger - Luther Burger
      Donut Burger
    • A juicy Lucy burger cut in half so we can see the cheese inside and stacked one half on top of the other.
      Juicy Lucy Burgers

    Did you make this? I’d be so grateful if you left a “star” rating below to let me know what you thought! Then, the next time you need a quick and easy recipe, come back to Fantabulosity to browse all of my easy recipes!

    Love that sweet and salty combo? You’ll also love those flavors in this restaurant-style teriyaki chicken.

    Recipe

    Aloha burger on white plate.
    Print Pin
    5 from 4 votes

    Aloha Burgers

    A juicy burger patty with a teriyaki glaze and pineapple ring takes your favorite burger to a whole new level!
    Course Dinner
    Cuisine American
    Prep Time 15 minutes minutes
    Cook Time 7 minutes minutes
    Total Time 22 minutes minutes
    Servings 6 burgers
    Calories 995kcal
    Author Jessica Burgess

    Equipment

    • Grill or grill pan
    • Long handled spatula
    • Stand mixer (optional for mixing meat)

    Ingredients

    • 2 pounds ground beef
    • 1 teaspoon salt
    • ½ teaspoon pepper
    • 1 teaspoon garlic powder
    • ½ teaspoon onion powder
    • 1 teaspoon ground ginger
    • 2 tablespoons low sodium soy sauce
    • 2 tablespoons pineapple juice
    • 1 large red onion sliced into 6 slices
    • 6 pineapple slices fresh or canned
    • 6 slices cooked bacon
    • 6 slices havarti cheese
    • Green leaf lettuce
    • 6 soft hamburger buns such as brioche or Hawaiian
    • ¼ cup mayo
    • ½ cup teriyaki sauce homemade teriyaki recipe or store bought
    • ½ cup honey or brown sugar barbecue sauce
    • Optional toppings: tomato, bell pepper, pickles

    Instructions

    • In a large bowl add the ground beef, salt, pepper, garlic powder, onion powder, ginger, soy sauce and pineapple juice. Gently mix together until well combined.
    • Divide the ground beef mixture into 6 equal parts for ⅓ pound burgers or 8 equal parts for ¼ pound burgers.
    • Gently roll each portion into a ball, then flatten it between your hands, gently shaping into a circle. Indent the center of the patty. This helps prevent it from puffing up too much in the center while cooking.
    • Heat the grill to 400°. Place the onion slices and pineapple slices on the grill grates. Cook for about 3 minutes to char them and get some good grill marks. Remove to a plate or to indirect heat on your grill.
    • Place the patties on the grill, and close the lid. For medium burgers, cook for 3 minutes, then flip the burgers, close the lid and cook for an additional 2 minutes. Place a slice of cheese on each burger and cook for 1 more minute. (see FAQ's for additional cooking times)
    • Remove the burgers from the grill. Tent them with foil and let them rest for a good 5 minutes. This allows the juices to redistribute into the meat.
    • Build your burger. Place each burger on a bun spread with mayo, top with a grilled pineapple slice, grilled onion slice, bacon, teriyaki sauce, barbecue sauce, lettuce, and any other toppings you desire.

    Notes

    • 80/20 ground beef is best for a juicy burger. You can use a leaner beef if desired; but watch the cooking time so it doesn't dry out.
    • Use store bought pineapple juice, or use the juice from a can of pineapple.
    • I prefer fresh pineapple, for the best flavor but canned works.
    • If you like a kick, add red pepper flakes to the ground beef, or use a spicy barbecue sauce.

    Nutrition

    Serving: 1burger | Calories: 995kcal | Carbohydrates: 65g | Protein: 50g | Fat: 59g | Saturated Fat: 27g | Polyunsaturated Fat: 6g | Monounsaturated Fat: 15g | Trans Fat: 2g | Cholesterol: 283mg | Sodium: 2635mg | Potassium: 753mg | Fiber: 1g | Sugar: 21g | Vitamin A: 1034IU | Vitamin C: 8mg | Calcium: 274mg | Iron: 5mg

    The Greatest Cowboy Burgers

    June 26, 2023

    cowboy burger on bun

    Cowboy Burgers: When you think cowboy food, you think bbq and bacon and hearty food, and these cowboy burgers are no exception! Juicy beef patties are topped with cheese, bbq sauce, bacon, and onions rings to create a burger fit for a cowboy.

    Are cowboy burgers good you ask? Let me tell you, these are high on our list of favorite burgers! They’re right up there with our viral hamburgers in the oven recipe (and that’s saying something) and our blue cheese stuffed burger recipe.

    A cowboy burger in the foreground with two cowboy burgers in the background.

    ❤️ Why You’ll Love This Recipe

    These are incredible burgers! Juicy burger patties are topped with barbecue sauce, cheddar cheese, crispy bacon, and crispy onion rings on top of that, and all sandwiched between soft hamburger buns. Pair them with these bbq baked beans with ground beef and talk about a hearty meal, that any cowboy would love!

    [feast_advanced_jump_to]

    🧾 Ingredients

    The ingredients for this cowboy burger recipe are pretty simple, but they come together to create some of the best burgers you’ll ever make.

    The ingredients for cowboy burgers laid out with labels on the image.
    • 1 ½ – 2 tablespoons unsalted butter
    • 1 pound medium ground beef (or try ground venison for deer burgers!)
    • 1 teaspoon sea salt
    • 3 slices cheddar cheese 
    • 3 sesame buns
    • ½ cup barbecue sauce or more
    • 6 slices bacon, cooked and cut in half
    • 6 onion rings, cooked

    See the printable recipe card farther down in this blog post for exact quantities and step-by-step instructions.

    🤠 How to Make Cowboy Burgers

    1. Make 3 equal hamburger patties out of the ground beef and place back in the fridge to get cold (about 20 minutes).
    Three beef burger patties on a plate.
    1. Take out and sprinkle burger patties with about 1 teaspoon salt. 
    Three burger patties on a plate with salt sprinkled on them.
    Step 3 of how to make cowboy burgers.
    1. Heat up a skillet or deep sided pan, on medium heat and cook hamburger patties 6 minutes per side or to your preferred doneness (ensure you are cooking up to at least 160F, adhering to health and safety guidelines), then top with cheese and allow it to slightly melt. 
    Step 4 of building a cowboy burger with different toppings.
    1. Layer your burger:
      Bottom bun
      BBQ sauce
      Hamburger patty with cheese
      Bacon slices
      Onion rings
      Top bun (with more BBQ sauce if desired)
    A hamburger bun with a burger patty and cheese on it, topped with bacon, two onion rings, and another burger bun.

    📖 Substitutions & Variations

    If you need to make some changes to this cowboy burger recipe, we’ve got you covered. Here are our suggestions…

    • Bun – use gluten free buns instead of sesame buns to make this gluten free (be sure to double check your bbq sauce too if you are making this gluten free – often sauces can contain gluten)
    • Vegetarian – the beef patty can be replaced with a plant-based patty and the bacon can be omitted or replaced with vegan bacon to make this vegetarian
    • Want to get creative? Try adding some of the burger toppings listed below!
    Cowboy burger cut in half

    🥬 What Toppings Do You Put on a Burger?

    This cowboy burger is delicious with cheese, bacon, bbq sauce, and onion rings but you can definitely mix and match with your favorite burger toppings to create one that’s perfect for you.

    A few toppings we like on our burgers include:

    • sliced tomatoes
    • caramelized onions
    • lettuce
    • fried egg (don’t knock it until you’ve tried it, it’s pretty great)
    • pickles
    • pineapple rings (like on our Aloha Burger!)
    • sauerkraut
    • mushrooms (cooked or raw, both are great)
    Close up of cowboy burger

    ❄️ Storage

    Once you put these bbq cowboy burgers all together, they wouldn’t store very well (the buns would become soggy from the bbq sauce). If you do need to make them ahead, store all of the ingredients separately and combine them when you are ready to eat them. They will stay good in the fridge for 2-3 days in airtight containers (although your onion rings will get a bit soggy if you store them).

    You could make the burger patties ahead of time and freeze them. When cooking from frozen, make sure the internal temperature gets to at least 165° F.

    💡 Expert Tips and FAQs

    What is a cowboy burger made of?

    A cowboy burger typically a beef patty topped with cheese, and then bbq sauce, bacon, and onion rings added on top.

    Why is it called a hamburger if there’s no ham in it?

    Whenever we make hamburgers, we think about this one (and it’s a good question, if you ask me). The reason we call them hamburgers is because they originated in Hamburg, Germany (just like frankfurters originated in Frankfurt, Germany)!

    Did you make this? I’d be so grateful if you left a “star” rating below to let me know what you thought! Then, the next time you need a quick and easy recipe, come back to Fantabulosity to browse all of my easy recipes!

    🍔 Related Recipes

    If you enjoyed this cowboy burger, you’re definitely going to want to try our cheeseburger sliders recipe, Juicy Lucy burgers, and our donut burgers! No boring burgers here – these are both super fun and delicious takes on the classic cheeseburger, just like the cowboy burger. Or, mix things up a bit and give these cheeseburger subs a try for a fun twist!

    Recipe

    cowboy burger on bun
    Print Pin
    5 from 4 votes

    The Greatest Cowboy Burgers

    Cowboy Burgers: When you think cowboy food, you think bbq and bacon and hearty food, and these cowboy burgers are no exception! Juicy beef patties are topped with cheese, bbq sauce, bacon, and onion rings to create a burger fit for a cowboy. 
    Course Main Course
    Cuisine American
    Prep Time 20 minutes minutes
    Cook Time 12 minutes minutes
    Total Time 32 minutes minutes
    Servings 3 servings
    Calories 962kcal
    Author Jessica Burgess

    Ingredients

    • 1 ½ – 2 tablespoons unsalted butter
    • 1 pound medium ground beef
    • 1 teaspoon sea salt
    • 3 slices cheddar cheese
    • 3 sesame buns
    • ½ cup barbecue sauce or more
    • 6 slices bacon cooked and cut in half
    • 6 onion rings cooked

    Instructions

    • Make 3 equal hamburger patties out of the ground beef and place back in the fridge to get cold (about 20 minutes).
    • Take out and sprinkle burger patties with about 1 teaspoon salt. 
    • Heat up a skillet or deep sided pan, on medium heat and cook hamburger patties 6 minutes per side or to your preferred doneness (ensure you are cooking up to at least 160F, adhering to health and safety guidelines), then top with cheese and allow it to slightly melt. 
    • Layer your burger:
      Bottom bun
      BBQ sauce
      Hamburger patty with cheese
      Bacon slices
      Onion rings
      Top bun (with more BBQ sauce if desired)

    Notes

    How to Store Leftover Burgers
    Once you put these bbq cowboy burgers all together, they wouldn’t store very well (the buns would become soggy from the bbq sauce). If you do need to make them ahead, store all of the ingredients separately and combine them when you are ready to eat them. They will stay good in the fridge for 2-3 days in airtight containers (although your onion rings will get a bit soggy if you store them).
    You could make the burger patties ahead of time and freeze them. When cooking from frozen, make sure the internal temperature gets to at least 165° F.

    Nutrition

    Serving: 1serving | Calories: 962kcal | Carbohydrates: 43g | Protein: 41g | Fat: 69g | Saturated Fat: 29g | Polyunsaturated Fat: 5g | Monounsaturated Fat: 26g | Trans Fat: 2g | Cholesterol: 189mg | Sodium: 1985mg | Potassium: 741mg | Fiber: 2g | Sugar: 20g | Vitamin A: 941IU | Vitamin C: 5mg | Calcium: 248mg | Iron: 5mg

    Red, White and Blue Dip

    June 21, 2023

    Red white and blue dip in small white bowl, with graham cracker dipped in.

    This Red, White, and Blue Dip is a delicious, patriotic, and oh-so-easy recipe that’ll have everyone raving for the 4th of July! I have a no-bake dessert for you that’s perfect for those upcoming summer holiday gatherings!

    This festive dip is not only bursting with color but also packed with flavor and simple to make, especially for a patriotic holiday such as the Fourth of July. Trust me; you’ll want to whip this up in no time. 

    Red white and blue dip in white bowl, with snack cakes on top.

    Want to go further with your red, white, and blue theme for an Independence Day party, Memorial Day, or to celebrate other patriotic holidays? You could also make an American Flag Fruit Pizza that the kids will love. 4th of July Cupcakes are also simple and eye-catching, while you could also make some 4th of July Rice Krispie Treats as well.

    [feast_advanced_jump_to]

    ❤️ Why You’ll Love This Recipe

    • It uses a few ingredients: There are just four main ingredients in this cake batter dip, along with some color-themed sprinkles to finish it.
    • Easy to make more: This delicious dessert dip serves about 16, but you can easily double it to make more for a larger gathering.
    • No bake dessert: Making this dip is done with no need to turn the oven on or use a pan, so it is quick and simple.

    🧾 Ingredients Needed

    I’ve highlighted a couple of ingredients with some relevant notes. Aside from this, the ingredients needed are pretty basic.

    Labeled ingredients for red white and blue dip on white counter.
    • Cream cheese – A plain cream cheese is best for the dip, and let it come up to room temperature before making the recipe so it mixes easily.
    • Cream – Heavy cream is best. This adds richness to the dip that’s ideal.
    • Cake mixture – You’ll need 4 twin packages of red, white, and blue snack cakes to make the dip.

    📖 Substitutions

    Sometimes substitutions are necessary because of ingredients that are unavailable or needed for dietary restrictions. Here are some suggestions that can help:

    • Cream Cheese: You can swap cream cheese with Greek yogurt or dairy-free alternatives like cashew-based cream cheese, almond milk-based cream cheese, or even coconut cream (chilled and whipped) for a vegan-friendly option.
    • Heavy Cream: If you’re looking for a lighter alternative, try using half-and-half or whole milk. For a dairy-free version, opt for full-fat coconut milk, almond milk, or any other non-dairy milk of your choice.
    • Vanilla Extract: In case you run out of vanilla extract or want to try something different, you can use almond extract, maple syrup, or even honey to add a hint of sweetness and aroma to the dip.
    • Red, White, and Blue Snack Cakes: Feel free to get creative here! Replace the snack cakes with an assortment of fresh fruits like strawberries, raspberries, blueberries, and banana slices to amp up the nutrition. Or, try using red, white, and blue-colored cookies, pretzels, or rice cakes for a fun and crunchy twist.

    📖 Variations

    There’s always room for creativity when it comes to recipes. Here are some exciting variations you can try for the Red, White, and Blue Dip to keep things fresh and fun:

    • Fruity Twist: Add a burst of fruity flavor by mixing in your favorite fruit preserves or fruit curd (like raspberry, strawberry, or blueberry) into the dip. You can also fold in some finely chopped fresh fruits for added texture.
    • Chocolate Lovers’ Delight: Mix in some melted chocolate or cocoa powder for a rich, chocolaty version of the dip. You can even use white chocolate for a delicious contrast with the red and blue elements.
    • Tropical Paradise: Give your dip a tropical twist by adding crushed pineapple, shredded coconut, or a splash of coconut extract. Pair this variation with fresh tropical fruits for dipping.
    • Cheesecake Inspired: Transform your simple recipe into a no-bake cheesecake delight by adding a bit of lemon juice and zest for that tangy cheesecake flavor. You can serve it over a crushed graham cracker or cookie crust for an extra indulgent treat. Or make it into something like a cheesecake yogurt dip by adding some Greek yogurt along with the cake mix.
    • S’mores Fun: Fold in mini marshmallows and chocolate chips into the dip, and serve with graham crackers for a fun s’mores-inspired version everyone will adore.

    Feel free to mix and match these ideas or create your own unique spin on the Red, White, and Blue Dip. The sky’s the limit when it comes to creating a memorable treat for your family and friends.

    👩🏻‍🍳 How to Make Red, White and Blue Dip

    This Red, White and blue dip is broken into 2 components:

    • Make the dip
    • Add the snack cakes and decorate

    *Be sure to see the recipe card below for the full ingredients list & instructions!*

    STEP 1: Combine the cream cheese and cream. Take a medium-sized mixing bowl and combine the package of cream cheese with heavy whipping cream. (Image 1).

    STEP 2: Mix in vanilla extract. Combine with a hand mixer until smooth, then add a teaspoon of vanilla extract. (Image 2).

    STEP 3: Add the cake bars. Lightly mix 4 packages of snack cakes into the cream cheese mixture by breaking them up. (Image 3).

    Steps 1-3 of how to make red white and blue dip.

    STEP 4: Decorate and serve. Transfer to a serving bowl and decorate with a snack cake, if preferred, and red and blue sprinkles.

    Red, white and blue dip, in a small white bowl, with snack cakes on top.

    You can enjoy this with graham crackers, cookies, pretzels, or vanilla wafers. You will also love serving this 4th of July Puppy Chow next to this fun, festive dip!

    💭 Recipe Pro Tips

    • Chill the ingredients: Make sure your cream cheese or alternative base is chilled before mixing. This will help achieve a smooth and creamy texture without any lumps.
    • Room temperature ingredients: If using cream cheese, allow it to soften at room temperature for about 30 minutes before mixing. This will make it easier to blend with other ingredients for a smoother dip.
    • Gentle folding: When adding colorful elements (like fruit or food coloring), gently fold them into the dip to maintain their vibrant colors and avoid overmixing.

    📋 Recipe FAQs

    Can I make this dip ahead of time?

    Absolutely! You can prepare the dip a day in advance and store it in the refrigerator, covered with plastic wrap. This will save you time and allow the flavors to meld together even more.

    Can I make this recipe dairy-free?

    Yes! You can substitute the cream cheese and heavy cream with dairy-free alternatives like cashew-based cream cheese, coconut cream, or almond milk. Just be sure to choose a thick and creamy non-dairy substitute to maintain the desired texture.

    What fruits can I use for the red and blue colors?

    If you want to use fruit instead of cake bars, there are plenty of options. For the red color, you can use fruits like cherries, pomegranate seeds, or red apple slices. For the blue color, blackberries or purple grapes are great alternatives. You can even get blue strawberries or use fresh blueberries.

    Can I make this dip healthier?

    Definitely! You can switch to a healthier base like Greek yogurt, use a natural sweetener like honey or maple syrup, and serve the dip with fresh fruits and whole-grain crackers for a nutritious twist.

    Can I add nuts or seeds to the dip for added crunch?

    Yes, feel free to fold in chopped nuts (such as almonds, pecans, or walnuts) or seeds (like chia seeds or flaxseeds) for added texture and a nutritional boost.

    I hope these FAQs help you create the perfect Red, White, and Blue Dip for your family and friends. If you have any more questions, feel free to ask! Enjoy! 🎉🥣

    🍽 What to Serve with Red, White and Blue Dip

    There are plenty of delicious options to serve with the Red, White, and Blue Dip that cater to different tastes and preferences. Here are some ideas for dippers to accompany your festive dip:

    • Fresh fruits: Strawberries, raspberries, blueberries, apple slices, banana slices, pineapple chunks, or any other fruits you enjoy. The natural sweetness of fruits pairs well with the creamy dip.
    • Cookies: Graham crackers, vanilla wafers, shortbread cookies, or any other type of cookie that complements the flavors of the dip.
    • Pretzels: Regular or gluten-free pretzels add a salty crunch that contrasts nicely with the sweet and creamy dip.
    • Marshmallows: Regular or mini marshmallows offer a delightful, fluffy texture and a touch of extra sweetness.
    • Rice cakes: Plain or flavored rice cakes can provide a lighter, crunchy option for dipping.
    • Crackers: Whole-grain crackers, buttery crackers, or even flavored crackers (like cinnamon or chocolate) can be a tasty choice for scooping up the dip.
    • Crostini or baguette slices: Lightly toasted crostini or baguette slices give a more substantial dipping option with a delightful crunch.
    • Waffle or pancake pieces: For a fun breakfast or brunch twist, serve the dip with small pieces of waffles or pancakes.

    ❄️ Storage

    To store leftover Red, White, and Blue Dip, simply follow these steps:

    1. Refrigerate: Place the dip in an airtight container or cover the bowl with plastic wrap to prevent it from drying out or absorbing any unwanted odors.
    2. Store: Keep the dip in the refrigerator for up to 3 days. The cool temperature will help maintain its freshness and flavor.

    As for freezing the dip, it is possible but not highly recommended. The texture may change slightly upon thawing, which could affect the overall consistency and appearance of the dip. Cream cheese-based dips, in particular, can become a bit grainy or watery after freezing and thawing.

    🥣 More Dip Recipes You’ll Love

    Want to make more homemade dips for upcoming special occasions? You could try savory options like the Pretzel Cheese Dip to go alongside your dessert dips. Or something a little healthier with this Artichoke Jalapeno Dip recipe contrasts nicely with sweet dips. You can even go for a warm dip such as this Hot Taco Dip for cooler days.

    🍰 More Dessert Recipes

    Or, if you’re looking for more easy dessert recipes, you’ll love these top favorites:

    • bread pudding in baking dish
      Bread Pudding Recipe: Easy Old Fashioned Recipe (With Video!)
    • slice of peach cobbler on white plate
      Easy Peach Cobbler with Canned Peaches
    • Sliced banana bread on white platter
      Best Banana Bread
    • Vanilla Mug cake recipe on spoon
      The BEST Vanilla Mug Cake Recipe

    Did you make this? I’d be so grateful if you left a “star” rating below to let me know what you thought! Then, the next time you need a quick and easy recipe, come back to Fantabulosity to browse all of my easy recipes!

    Recipe

    Red white and blue dip in small white bowl, with graham cracker dipped in.
    Print Pin
    5 from 1 vote

    Red White and Blue Dip

    Introducing the Red, White, and Blue Dip - a delicious, patriotic, and oh-so-easy recipe that'll have everyone raving!
    Course Dessert
    Cuisine American
    Prep Time 5 minutes minutes
    Total Time 5 minutes minutes
    Servings 16 servings
    Calories 61kcal
    Author Jessica Burgess

    Ingredients

    • 8 ounces cream cheese (1 packet) softened
    • 2 Tablespoons heavy whipping cream can use milk or half and half if needed
    • 1 teaspoon vanilla extract
    • 4 twin packages red, white and blue snack cakes or similar, white cakes
    • red and blue sprinkles optional

    Instructions

    • In a medium sized mixing bowl, add a package of cream cheese and heavy whipping cream.
    • Add in a teaspoon of vanilla extract and combine with a hand mixer until smooth.
    • Break up 4 packages of snack cakes and lightly mix them into the cream cheese mixture.
    • Pour into a serving bowl and garnish with one snack cake, if desired, and red and blue sprinkles.
    • Serve with graham crackers, cookies, pretzels, or vanilla wafers.

    Nutrition

    Serving: 1serving | Calories: 61kcal | Carbohydrates: 2g | Protein: 1g | Fat: 6g | Saturated Fat: 3g | Polyunsaturated Fat: 0.2g | Monounsaturated Fat: 1g | Cholesterol: 17mg | Sodium: 48mg | Potassium: 21mg | Fiber: 0.003g | Sugar: 1g | Vitamin A: 219IU | Vitamin C: 0.01mg | Calcium: 15mg | Iron: 0.03mg

    Strawberry Chocolate Muffins

    June 18, 2023

    Strawberry chocolate muffins on cooling rack.

    These strawberry chocolate muffins are an easy muffin recipe that gives you that bakery-style flavor you love!

    Homemade muffins hit the spot especially when they’re made with fresh strawberries! These make such a great quick and easy snack, breakfast, dessert, or whip up a batch for the farmers market!

    Strawberry chocolate muffins on cooling rack, with one in the middle, split in half.
    [feast_advanced_jump_to]

    ❤️ Why You’ll Love These Strawberry Chocolate Muffins

    • It’s simple. This recipe will produce a fluffy muffin with just basic ingredients! There’s no sour cream, greek yogurt, or special ingredients in this recipe. Just kitchen staples… making this one of my favorite muffin recipes!
    • It’s quick! In under 30 minutes, you can make a batch of these fluffy strawberry muffins. Since you can quickly make this recipe, it makes it the perfect last-minute dessert to have with a cup of iced coffee.
    • It uses fresh fruit. Is there anything better than freshly chopped juicy strawberries in baked goods?? Especially when they’re paired with mini chocolate chips!? There’s no better combo in my opinion and they remind me so much of bakery muffins!
    • Chocolate fan. If you’re a chocolate chip fan, and love a good chocolate chip cookie recipe, then why wouldn’t you love these muffins too!?

    ? What Makes Muffins Light and Fluffy?

    There are a few key things you can do to achieve light and fluffy muffins. The first is make sure your eggs and oil are at room temperature before combining with the other ingredients. When at room temperature, it allows the batter to trap air and expand while baking.

    In addition to that, baking powder allows baked goods rise in the oven. When your muffins expand and rise in the oven, they come out light and fluffy!

    🧾 Ingredients Needed:

    Labeled ingredients on white countertop for strawberry chocolate chip muffins.
    • 1 ½ Cups All-Purpose Flour
    • ½ Cup Granulated Sugar
    • ¼ Cup Brown Sugar
    • 2 Teaspoons Baking Powder
    • ½ Teaspoon Ground Cinnamon
    • 2 Large Eggs
    • ½ Cup Vegetable Oil
    • 1 teaspoon Vanilla Extract
    • 1 Cup Chopped Strawberries
    • ½ Cup Mini Chocolate Chips

    👩🏻‍🍳 How to Make Strawberry Chocolate Muffins

    Steps 1-4 for making strawberry chocolate chip muffins.
    1. Preheat oven to 350 degrees Fahrenheit and prepare a muffin tin with cooking spray. 
    2. In a large mixing bowl, mix flour, sugar, baking powder, and cinnamon.
    3. In a separate bowl whisk eggs, vegetable oil, and vanilla extract. 
    4. Combine wet ingredients with dry ingredients and mix well and fold in diced strawberries and chocolate chips.
    Steps 5-6 for making strawberry chocolate chip muffins.
    1. Divide batter evenly in a muffin tin (or muffin cups) to make 12 muffins.
    2. Bake for 15-20 minutes or until a toothpick inserted into the middle comes out clean.
    3. Allow cooling slightly before removing from muffin tin and if desired, place on a wire rack to cool. Enjoy!

    💡 Expert Tips and FAQs

    How do I store leftover strawberry chocolate chip muffins?

    You can store leftover muffins in an airtight container, or a container tightly covered with plastic wrap, at room temperature for up to 4 days. I find they stay best if you line the bottom of your airtight container with paper towels and then place the muffins on top. 

    What is the secret to making moist muffins?

    There are a couple of secrets to making extra moist muffins. Adding oil into the batter is guaranteed to make moist muffins but you also want to make sure you are not over-mixing your muffin batter or over-baking your muffins.

    Can I use dark chocolate chips?

    Yes! You can substitute milk chocolate chips for dark chocolate chips. Dark chocolate chips are not as sweet so it will tweak the flavor a bit but it’s all about preference.

    Strawberry chocolate muffin on cooling rack.

    🍓 More Fresh Fruit Ideas

    If you want to add more than just fresh strawberries, you can add cherries, blueberries, and/or raspberries to this recipe. If you do choose to add extra fruit, make sure it’s chopped and then fold it in with the chocolate chips. This is a great way to use up any fruit that may be aging quickly!

    🥛 What to Serve With These Muffins

    A sweet treat pairs so well with a crispy piece of bacon in the mornings! I love making bacon in the air fryer because it’s quick and the clean-up is easy! If bacon isn’t your thing, you can pair the fluffy muffins with a sausage breakfast casserole!

    Strawberry chocolate chip muffins on white plate, surrounded by strawberries.

    🥣 Related Recipes

    If you’re a strawberry lover you have to check out these strawberry cheesecake cookies! They are to-die-for and a crowd favorite at parties. As I said before, nothing beats a sweet treat for breakfast! My boys love my easy peach turnovers and my easy blueberry turnovers in the morning! Or, check out these other favorite bakery and bread recipes:

    • Strawberry Bread loaf with Strawberry Icing, dripping down the side.
      Strawberry Bread with Strawberry Icing
    • Sliced lemon blueberry bread with lemon glaze.
      Lemon Blueberry Bread
    • Stack of homemade hush puppies on white plate, with one split open to show the inside.
      Hush Puppies
    • Sweet cornbread muffins stacked on a plate.
      Sweet Cornbread Recipe

    Recipe

    Strawberry chocolate muffins on cooling rack.
    Print Pin
    5 from 9 votes

    Strawberry Chocolate Muffins

    These strawberry chocolate chip muffins are a great way to start your day! There's nothing better than a light and fluffy baked treat in the morning.
    Course Breakfast, Dessert, Snack
    Cuisine American
    Prep Time 10 minutes minutes
    Cook Time 15 minutes minutes
    Total Time 25 minutes minutes
    Servings 12 muffins
    Calories 239kcal
    Author Jessica Burgess

    Ingredients

    • 1 ½ cups all-purpose flour
    • ½ cup granulated sugar
    • ¼ cup brown sugar
    • 2 teaspoon baking powder
    • ½ teaspoon ground cinnamon
    • 2 large eggs
    • ½ cup vegetable oil
    • 1 teaspoon vanilla extract
    • 1 cup diced strawberries
    • ½ cup mini chocolate chips

    Instructions

    • Preheat oven to 350 degrees Fahrenheit and prepare a muffin tin with cooking spray. 
    • In a large bowl, mix flour, sugar, baking powder, and cinnamon.
    • In a small bowl whisk eggs, vegetable oil, and vanilla extract. 
    • Combine wet ingredients with dry ingredients and mix well. 
    • Fold in diced strawberries and chocolate chips.
    • Divide batter evenly in a muffin tin to make 12 muffins. 
    • Bake for 15-20 minutes or until a toothpick inserted into the middle comes out clean. 
    • Allow cooling slightly before removing from muffin tin. Enjoy!

    Notes

    What’s the secret to making muffins moist?
    There are a couple of secrets to making extra moist muffins. Adding oil into the batter is guaranteed to make moist muffins but you also want to make sure you are not over-mixing your muffin batter or over-baking your muffins.

    Nutrition

    Calories: 239kcal | Carbohydrates: 31g | Protein: 3g | Fat: 12g | Saturated Fat: 9g | Trans Fat: 1g | Cholesterol: 28mg | Sodium: 18mg | Potassium: 120mg | Fiber: 1g | Sugar: 18g | Vitamin A: 58IU | Vitamin C: 7mg | Calcium: 51mg | Iron: 1mg

    4th of July Puppy Chow

    June 11, 2023

    4th of July Puppy Chow in white bowl, next to American Flag.

    This 4th of July Puppy Chow is not only easy to make but is so fun to celebrate the Fourth of July with, as a quick no-bake dessert idea or even as a snack recipe to munch on during the day and evening, while waiting for fireworks!

    Fourth of July Muddy Buddies in white bowl, next to small American flag.

    With the Fourth of July being right in the middle of summer, keeping things easy and cool, is key! This no-bake recipe only takes about 30 minutes (20 minutes of it being inactive time) to make and it can sit out all day too! So no need to worry about refrigerating this, although you will want to keep it out of super hot spaces, as the chocolate could melt.

    This recipe is definitely a beginner skill level and easier to make than say, our 4th of July cupcakes or Red, White, and Blue Star Rice Krispy Treats but they’re so cute!

    [feast_advanced_jump_to]

    ❤️ Why You’ll Love This Recipe

    • 5 simple ingredients: With only 5 ingredients, this recipe uses items that you may even have on hand, or can easily grab at almost any grocery store. Since it’s so easy, you may want to go ahead and make this Fourth of July Dip too!
    • Make-ahead recipe: Did you know that you can make this recipe in advance if you want to? It’s true. Simply make it, allow it to cool and rest, and then store until ready to enjoy.
    • Ready in only 30 minutes: Talk about a quick and easy recipe! This recipe, from start to finish, only takes half an hour!

    🧾 Ingredients Needed

    I’ve highlighted a couple of ingredients below with some relevant notes in case you find them helpful.

    Labeled ingredients for red white and blue puppy chow, on white counter.
    • Cereal – We use the Rice Chex but you can also use Corn Chex (or a generic version).
    • Chocolate Chips – Using white chocolate, helps keep the puppy chow, a brighter white color.
    • Powdered Sugar – This recipe calls for 2 cups but you can always use more if you want to sprinkle the top of the puppy chow while drying, so it really gets that “white” color, so it doesn’t melt in.

    📖 Substitutions

    Sometimes substitutions are necessary because of ingredients that are unavailable or needed for dietary restrictions. Here are some suggestions that can help:

    • Chocolate Chips – even though we used white chocolate chips, you can use milk chocolate or even semi-sweet.
    • Peanut Butter – creamy peanut butter is preferred for this recipe but if you love that crunch, you can also use crunchy peanut butter.

    👩🏻‍🍳 How to Make 4th of July Puppy Chow

    Begin by grabbing a large cookie sheet, and then cover it with parchment paper, and set it aside, so it’s ready whenever you need to pour your melted chocolate puppy chow on top of it.

    This is also a great time to separate the blue and red M&M’s from the other colors if you haven’t done so already. This is a job that my kids love doing, so it’s a great activity to keep the kids busy for a bit.

    *Be sure to see the recipe card below for the full ingredients list & instructions!*

    Steps 1-4 of how to make white chocolate muddy buddies.

    STEP 1. Chocolate and Peanut Butter. In a microwave safe bowl, one that’s large enough to fit 6 cups of cereal in a later step, pour in the 1 cup of chocolate chips and the 1 cup of peanut butter (Image 1).

    STEP 2. Melt. Place bowl in microwave, and cook for 30 seconds, and stir. Cook for another 30 seconds, and stir. If the chocolate has not melted yet, keep cooking in 30-second intervals, stirring after each time, until melted. Do NOT overcook or chocolate will burn and not melt well (Image 2).

    STEP 3. Add cereal. Next, pour in the 6 cups of cereal in to the melted chocolate mixture and stir gently, without breaking the cereal, to fully coat the cereal (Image 3).

    STEP 4. Add powdered sugar. Next, pour 2 cups of powdered sugar over the cereal mixture and gently stir again, making sure not to break the small pieces of cereal (Image 4).

    Tip: Instead of stirring the cereal mixture, you can also place it in a large paper bag, and shake the chocolate cereal mixture with powdered sugar.

    Steps 5-6 4th of July puppy chow.

    STEP 5. Spread on the sheet. Pour the cereal mixture on top of the parchment paper-covered baking sheet, and gently spread it out to allow it to cool and dry completely (Image 5). You may also want to sprinkle extra powdered sugar on top at this step, but it’s not required.

    STEP 6. Add candies. When the cereal mixture has cooled and dried, this is a great time to add the 1 cup of red and blue M&M’s. Stir and serve or store for later (Image 6).

    4th of July Puppy Chow in white bowl, next to American Flag.

    💭 Recipe Pro Tips

    • Change for the seasons. You can make this without the candies, any time of year, or add seasonal candies or sprinkles to fit the holiday that you’re celebrating.
    • Allow to cool. Make sure you allow the puppy chow to cool before storing or the condensation could make the puppy chow soggy.

    📋 Recipe FAQs

    Can I make 4th of July recipes for Memorial Day too?

    Absolutely. The red, white, and blue colors like in this puppy chow recipe is not only great for the 4th of July but it’s great for Memorial Day too!

    How do you store puppy chow?

    With this being chocolate-based, and with the chocolate candies, it’s best that this doesn’t sit in a hot, sunny location or it could all melt. However, it doesn’t have to be refrigerated and can sit out on the counter if stored in an airtight container for 4-5 days.

    Where do you find red and blue M&Ms?

    We just picked out the red and blue candies, out of the regular package, and saved the rest for later.

    ⭐️ More Puppy Chow Recipes You’ll Love

    Love puppy chow? We do too. Here you’ll find a few other puppy chow favorites and snacks here on the blog:

    • Lemon Puppy Chow in white bowl.
      Lemon Puppy Chow
    • How fun would this be to create for even a small gathering at home!? Simple Tips for Creating a Holiday Dessert Bar
      Butterfinger Puppy Chow
    • Hot chocolate muddy buddies in white bowl
      Hot Chocolate Muddy Buddies Recipe
    • Leprechaun Bait in round bowl, sitting on yellow napkin.
      Leprechaun Bait

    Did you make this? I’d be so grateful if you left a “star” rating below to let me know what you thought! Then, the next time you need a quick and easy recipe, come back to Fantabulosity to browse all of my easy recipes!

    Recipe

    4th of July Puppy Chow in white bowl, next to American Flag.
    Print Pin
    5 from 1 vote

    4th of July Puppy Chow

    This red, white and blue puppy chow is the perfect no-bake 4th of July dessert. It uses simple ingredients, and it's ready in about 30 minutes.
    Course Dessert, Snack
    Cuisine American
    Prep Time 10 minutes minutes
    Drying Time 20 minutes minutes
    Total Time 30 minutes minutes
    Servings 15 servings
    Calories 270kcal
    Author Jessica Burgess

    Ingredients

    • 6 cups square rice cereal
    • 1 cup white chocolate chips
    • 1 cup creamy peanut butter
    • 2 cups powdered sugar
    • 1 cup red and white chocolate candies We picked out the red and blue m&ms.

    Instructions

    • Chocolate and Peanut Butter. In a microwave safe bowl, one that's large enough to fit 6 cups of cereal in a later step, pour in the 1 cup of chocolate chips and the 1 cup of peanut butter.
    • Melt. Place bowl in microwave, and cook for 30 seconds, and stir. Cook for another 30 seconds, and stir. If the chocolate has not melted yet, keep cooking in 30-second intervals, stirring after each time, until melted. Do NOT overcook or chocolate will burn and not melt well.
    • Add cereal. Next, pour in the 6 cups of cereal in to the melted chocolate mixture and stir gently, without breaking the cereal, to fully coat the cereal.
    • Add powdered sugar. Next, pour 2 cups of powdered sugar over the cereal mixture and gently stir again, making sure not to break the small pieces of cereal.
    • Spread on the sheet. Pour the cereal mixture on top of the parchment paper-covered baking sheet, and gently spread it out to allow it to cool and dry completely. (You may also want to sprinkle extra powdered sugar on top at this step, but it's not required.)
    • Add candies. When the cereal mixture has cooled and dried, this is a great time to add the 1 cup of red and blue M&M's. Stir and serve or store for later.

    Nutrition

    Serving: 1serving | Calories: 270kcal | Carbohydrates: 36g | Protein: 5g | Fat: 13g | Saturated Fat: 4g | Polyunsaturated Fat: 2g | Monounsaturated Fat: 6g | Cholesterol: 3mg | Sodium: 172mg | Potassium: 152mg | Fiber: 1g | Sugar: 25g | Vitamin A: 204IU | Vitamin C: 2mg | Calcium: 72mg | Iron: 4mg

    Bronuts

    June 10, 2023

    Bronuts, stacked on top of one another with sprinkles on top.

    These Bronuts are made from brownie batter from scratch and turned in to donuts. They’re the ultimate chocolatey, thick, fudgy stick-to-the-roof-of-your-mouth kind of sweet treat. Brownie recipes have just gotten an upgrade.

    Bronuts with sprinkles dropping down on top.

    Brownie donuts are all the rage. They aren’t just “chocolate donuts,” no way! Think of the richest brownies you’ve had (like these brownies with cream cheese frosting) that aren’t at all cake-like. That’s these times three. Deep, dark brownie doughnuts filled with chocolate chips and topped with chocolate glaze – yum!

    Speaking of brownies, you don’t have to worry about messing with a mold if you don’t want to – just grab a Cast Iron Skillet and pour that batter in.

    [feast_advanced_jump_to]

    Why You’ll Love This Recipe

    • Best for chocaholics: Grab your favorite bittersweet bar and creamy milk chocolate chips for the best contrast.
    • Make-ahead recipe: Did you know these brownie donuts taste even better the next day? So they’re a breakfast recipe that you can make the night before and then simply wake up and enjoy.
    • Fun party options: Select sprinkles that fit your holiday to create a beautiful dessert spread, and they’re perfect for all of your parties.

    Ingredients Needed

    I’ve highlighted a couple of ingredients below with some relevant notes. Aside from this, the ingredients needed are pretty basic.

    Labeled ingredients for bronuts.
    • Butter – We use unsalted for this recipe but you can use salted if you prefer. Just remember that you may want to reduce the amount of salt the recipe calls for if using salted butter.
    • Bittersweet Chocolate – Select your favorite high-quality brand of bittersweet chocolate as the perfect base for these brownie donuts.
    • Chocolate Chips – I love to use milk or semisweet as a contrast to the deep, dark batter.
    • Eggs – You might be shocked to see we need four eggs. But that’s the secret to fudgy brownies: a high ratio of eggs to flour and cocoa.
    • Sugar – Combining both brown and white sugars is what gives a really deep flavor experience.

    Substitutions

    Sometimes substitutions are necessary because of ingredients that are unavailable or needed for dietary restrictions. Here are some suggestions that can help:

    • Chocolate chips – got a favorite milk chocolate bar? Go ahead and chop it up instead of already-formed chips
    • Butter – salted or unsalted are both fine. I know some bakers swear by only using unsalted, but if your store only had salted on sale, it’s totally fine.

    Variations

    OK, I know not everyone loves chocolate as much as I do. You can absolutely cut back on the chocolate!

    • Frosting – skip the cocoa powder in the frosting ingredients and use only powdered sugar to make a sweet vanilla frosting.
    • Sprinkles – use mini chocolate chips in place of sprinkles, pick different colored jimmies, or even leave them off completely.
    • Chocolate Chips – try white chocolate for a fun contrast when the doughnuts are bit into.

    Equipment

    A donut pan is something not everyone has – but it sure does make it easy! This is a two-pack and the recipe does make at least 12 donuts, but you definitely don’t need to buy two. If you have just one pan that makes 6 donuts, the batter is fine resting while the first pan cooks and cools.

    How to Make Bronuts

    These Brownie Donuts are made in 2 quick parts:

    • mix batter and bake
    • ice and sprinkle

    I recommend baking all the donuts first, whether that’s in one or two rounds in the oven, then let them all cool completely before icing. Much like baking a cake, the donuts need to be cool so the icing doesn’t melt right off.

    *Be sure to see the recipe card below for the full ingredients list & instructions!*

    Preheat the oven and get out a saucepan.

    Steps 1-4 on how to make bronuts.

    STEP 1. Melt the butter. Add bittersweet chocolate and butter to the saucepan and get things going! (Images 1 and 2).

    STEP 2. Beat the eggs. Whisk the eggs and sugars together in a bowl (Image 3). It should froth and increase in volume (Image 4).

    Steps 5-8 on how to make brownie donuts.

    STEP 3. Add the melted butter and chocolate to the egg mixture and fold together (Image 5) then stir in the vanilla and oil (Image 6).

    Tip: Do NOT overmix! Stirring too much will activate the gluten in the flour and make your brownie donuts more cake-like. Fold in the flour until you no longer see any streaks of flour. Likewise, only just fold the chocolate chips to incorporate.

    STEP 4. Add flour, cocoa, and salt (Image 7). Stir just until all streaks of white are gone (Image 8).

    Steps 9-11 on how to make bronuts.

    STEP 5. Gently mix in chocolate chips (Image 9).

    STEP 6. Spray the mold with cooking spray and use a piping bag to fill the molds (Images 10 and 11). Bake until a toothpick tester is still slightly wet.

    Tip: Don’t overbake – just like a pan of brownies, these will likely still seem underbaked when you remove them from the oven. That is key to keep the fudgy interior. Your cake tester will still have some wet batter on it and that’s ok!

    Steps 12-15 on how to make bronuts.

    STEP 7. Once the donuts are cool, add icing ingredients to a bowl (Image 12) then whisk until smooth (Image 13).

    STEP 8. Have cooled donuts ready on a cooling rack (Image 14), and carefully dip the top of each donut into the bowl of icing (Image 15).

    Hand holding brownie donut, with chocolate glaze on top.

    Tip: If adding sprinkles, be sure and do that before the icing has fully set so they are glued on.

    Bronuts on cooling rack with sprinkles on top.

    Recipe Pro Tips

    • High quality ingredients. Since these are so chocolatey, you definitely want to start with the best chocolate you can. Pick something you’d enjoy eating on its own.
    • Correct technique. Don't be tempted to overmix the brownie batter, we want these brownies to taste thick and fudgy but not cakey.
    Chocolate bronuts on white counter.

    Recipe FAQs

    What is a bronut?

    This may be a new word to you, but a bronut is a combination of a brownie and a donut. The best, super fudgy brownie batter baked into the shape of a donut! This is a similar concept to cronuts – croissant donuts!

    How do I make a donut mold?

    Not sure you want to invest in a donut pan? You can make your own donut mold but it can be a bit finicky. Start with a square of foil and gather the center up to make a “point” for the hole in a donut and then gather up the edges to make walls. You can either shape it by hand or wrap it around a biscuit cutter to get the right shape (but don’t bake your cutter!).

    Is it better to bake or fry doughnuts?

    Cake donuts are usually baked, just like cake. The raising agents (egg here, or baking powder/soda in other baked goods) have a chemical reaction in the oven to gain the right texture. On the other hand, yeast donuts will be fried to get the quick raising action of super fluffy bread dough!

    How should I store bronuts?

    Bronuts should be stored in an airtight container at room temperature where they will keep for at least 4 days. The flavor is even better the next day!

    What to Serve with Bronuts

    This bronut recipe goes well with fruit if you want to feel virtuous and sneak them for breakfast. As a dessert recipe, they obviously stand alone but you could go all out and whip up some Cookies and Cream Milkshakes to make it a real party!

    Stack of bronuts with bite taken out of top one.

    More Donut Recipes You’ll Love

    • Donut Burger - Luther Burger
      Donut Burger
    • Three red velvet donuts stacked on top of each other.
      Red Velvet Donuts
    • Circus Animal Cookie Donuts
      Circus Animal Cookie Donuts
    • Donut bread pudding in baking dish, next to donuts.
      Donut Bread Pudding

    Did you make this? I’d be so grateful if you left a “star” rating below to let me know what you thought! Then, the next time you need a quick and easy recipe, come back to Fantabulosity to browse all of my easy recipes!

    Recipe

    Bronuts, stacked on top of one another with sprinkles on top.
    Print Pin
    5 from 4 votes

    Bronuts

    Bronuts are triple chocolate donuts made from brownie batter and are the ultimate chocolatey, thick, fudgy stick-to-the-roof-of-your-mouth sweet treat. They're so delicious and they are easy to make too!
    Course Breakfast, Dessert
    Cuisine American
    Prep Time 20 minutes minutes
    Cook Time 15 minutes minutes
    Total Time 35 minutes minutes
    Servings 12 bronuts
    Calories 456kcal
    Author Jessica Burgess

    Equipment

    • Piping Bags
    • donut pans
    • Cooking Spray

    Ingredients

    • 8 ounces bittersweet chocolate, finely chopped or 1 cup bittersweet chocolate chips
    • ¾ cup unsalted butter cut into small pieces
    • 4 eggs
    • ¾ cup light brown soft sugar
    • ½ cup granulated white sugar
    • 1 teaspoon vegetable oil
    • 1 teaspoon vanilla extract
    • ¾ cup all purpose flour
    • ½ cup cocoa powder
    • ½ teaspoon salt
    • ½ cup semi sweet or milk chocolate chips

    For topping

    • 1 cup powdered sugar
    • 6 tablespoons cocoa powder
    • ½ teaspoon vanilla
    • 6 tablespoons whole milk
    • 2 tablespoons sprinkles

    Instructions

    • Preheat the oven to 350 °F.
    • Put the chopped chocolate and butter into a saucepan set over a low heat. Heat until fully melted then set aside.
    • In a large mixing bowl, add the eggs brown sugar and white sugar. Beat for a couple of minutes until the mixture looks thick and frothy and has increased in volume by about half.
    • Pour the melted chocolate mixture into the beaten egg mixture. Use a spatula or wooden spoon to fold the ingredients together until it's a uniform color.
    • Add the vegetable oil and vanilla extract and briefly mix until combined.
    • Tip in the flour, cocoa powder and salt.
    • Fold the ingredients very gently. Stop mixing when you can no longer see white streaks of flour.
    • Tip in the chocolate chips and mix gently to combine.
    • Put the donut moulds onto a baking sheet and spray them with cake release.
    • Transfer the brownie batter to a piping bag. Snip the end off with a pair of scissors then pipe the brownie batter into the molds until they are almost full. You might have some brownie batter left over (see notes).
    • Put the baking sheet into the oven and bake for 15 minutes.
    • Remove from the oven and leave the moulds to cool to room temperature on a cooling rack.
    • Once cool, pop the Brownie Donuts out of the molds.
    • To make the glaze, put the powdered sugar and cocoa powder into a mixing bowl and use a handheld whisk to combine.
    • Add the vanilla extract and 6 tablespoons of milk and mix thoroughly.
    • Check the consistency – you may need to add additional milk by the tablespoon to thin it out.
    • It should look the consistency of thick melted chocolate.
    • Dip the donuts into the glaze giving them a little shake as you pull them out of the bowl. If desired, add sprinkles right away before the glaze sets.

    Notes

    • As this recipe is completely chocolate centric we recommend only using the highest quality chocolate you can afford. It will make the world of difference to the overall brownie flavor. Use high quality bittersweet baking chips OR 2 4 ounce bars of bittersweet chocolate – the good stuff!
    • Don't be tempted to overmix the brownie batter, we want these brownies to taste thick and fudgy but not cakey.
    • If you have any batter left over after filling the molds just leave it in the piping bag and wait until the other brownie donuts are done cooking and the moulds have cooled. It will be fine in the bag while you wait.
    • Likewise, don't over bake them. The brownies will bake up quicker in the donut molds than if you used a pan. 15 minutes should be plenty. You can check for doneness with a toothpick which should come out with some wet crumbs stuck to it.
    • As the Brownie Donuts cool they will continue to set and will become more fudgy with time.

    Nutrition

    Serving: 1bronut | Calories: 456kcal | Carbohydrates: 60g | Protein: 6g | Fat: 23g | Saturated Fat: 16g | Polyunsaturated Fat: 1g | Monounsaturated Fat: 4g | Trans Fat: 0.5g | Cholesterol: 86mg | Sodium: 148mg | Potassium: 303mg | Fiber: 3g | Sugar: 46g | Vitamin A: 448IU | Vitamin C: 0.1mg | Calcium: 106mg | Iron: 2mg

    Crab Cake Sandwich

    June 7, 2023

    Crab cake sandwich on white plate.

    This crab cake sandwich recipe combines the irresistible flavors of tender, flaky crab meat with a crispy golden crust, all nestled between two soft buns. Sandwich recipes are an easy dinner idea or even lunch recipe and this crab cake sandwich makes any meal, less boring!

    Crab cake sandwich on white plate.

    Whether you’re a seasoned home cook or just starting out in the kitchen, this Crab Cake Sandwich is sure to impress your taste buds and leave you craving more. So, let’s dive into the fantastic world of this incredible dish that’s bound to become a new favorite in your house! This is also a fancier, warm version of a crab sandwich but if you’re looking for a cold, lunch-style sandwich, this crab salad sandwich is perfect!

    Still have some crab left after the recipe, or do you just want to try more dishes with crab (even imitation crab)? You could make a delicious Crab Pasta Bake for the family or try a Crab Salad. Or share your new favorite ingredient and make an Easy Crab Bisque instead.

    [feast_advanced_jump_to]

    Why You’ll Love This Recipe

    • It is easy to personalize: You can change the seasoning and vegetables added to the crab cakes to make it just how you like it
    • Easy to increase the portions: Need more than 4-6 servings? Then you can easily create more crab cakes to feed a bigger group.
    • Ready in only 50 minutes: There’s only a short prep period and a little cooking time, with most of the recipe time for chilling, so you can do something else in the middle!

    Ingredients Needed

    I’ve highlighted a couple of ingredients with some relevant notes. Aside from this, the ingredients needed are pretty basic.

    Ingredients for crab cake sandwiches.
    • Crab meat – You’ll need about a pound of crab meat for this recipe. If you use canned Lump Crab meat, make sure to drain it well, as too much liquid makes the crab cakes fall apart.
    • Crackers – Saltine crackers are perfect to add extra crunch to this recipe, finely crush them before adding them to the mix.
    • Seasonings – We used my favorite Tony’s Chacheries for the Cajun seasoning, along with ground mustard and some dried basil.

    Substitutions

    Sometimes substitutions are necessary because of ingredients that are unavailable or needed for dietary restrictions. Here are some suggestions that can help:

    • Saltine crackers: You can replace saltine crackers with other types of crackers like Ritz or whole wheat crackers. Alternatively, you can use breadcrumbs (either plain or seasoned) or panko crumbs for a similar texture.
    • Cajun seasoning: You can create your own blend by combining common spices like paprika, garlic powder, onion powder, cayenne pepper, black pepper, dried thyme, and dried oregano. Adjust the ratios according to your taste preferences. If you prefer a milder flavor, you can use Old Bay seasoning or Creole seasoning instead.
    • Ground mustard: Dijon mustard or yellow mustard can be used as a substitute for ground mustard. You can also use dry mustard powder or a pinch of turmeric for color and a slight mustard flavor.
    • Green onions: Chopped chives, shallots, or red onions can be used as a substitute for green onions. They will provide a slightly different flavor but still add a nice touch to your crab cakes.
    • Pimento peppers: You can replace pimento peppers with diced red bell peppers or roasted red peppers for a similar taste and texture. If you’d like a spicier kick, try using diced jalapeño peppers or banana peppers.

    Feel free to mix and match these substitutions to suit your taste buds and make the perfect crab cakes for you and your loved ones!

    Variations

    Crab cake sandwiches are versatile and can be customized to suit different taste preferences. Here are some delicious variations you can try:

    • Sauces: Swap out the remoulade sauce for other sauces like homemade tartar sauce, garlic aioli sauce, chipotle mayo, sriracha mayo, or hot sauce for a spicy kick.
    • Bread: Experiment with different types of bread, such as ciabatta, sourdough, or even a pretzel bun, to change up the texture and flavor of your sandwich.
    • Cheese: Add a slice of your favorite cheese, such as cheddar, Swiss, pepper jack, or provolone, for a gooey, melty twist.
    • Toppings: Enhance your crab cake sandwich with additional toppings like lettuce, tomato, avocado, this KFC coleslaw recipe, pickles, caramelized onions, or bacon for extra flavor and texture.
    • Seasoning: Incorporate unique seasonings into your crab cake mixture, such as curry powder, za’atar, or Italian seasoning, to create a different flavor profile.
    • Seafood mix: Combine crab meat with other seafood, like shrimp or scallops, for a more complex and luxurious taste.
    • Gluten-free: Make your crab cakes gluten-free by using gluten-free breadcrumbs with the traditional recipe or add some crushed gluten-free crackers instead of regular saltine crackers.
    • Vegetarian option: Replace crab meat with a mixture of mashed chickpeas or hearts of palm and add extra seasonings to mimic the taste and texture of crab cakes.

    With these variations, you can create a crab cake sandwich that caters to your taste buds and dietary preferences while still enjoying the essence of this delicious dish.

    How to Make Crab Cake Sandwiches

    This Crab Cake Sandwich recipe is broken into 2 components:

    • Mix the ingredients
    • Cook the crab cakes and serve

    *Be sure to see the recipe card below for the full ingredients list & instructions!*

    Steps 1-4 of crab cake sandwiches.

    STEP 1:  Mix the crab cake ingredients. Set aside the crab, crushed crackers, Cajun seasoning, basil, and mustard powder in a medium-sized mixing bowl and gently stir them together. (Image 1).

    STEP 2: Mix the wet ingredients. Beat the egg in a small bowl and then mix in green onion, pimentos, lemon juice, and lemon zest. (Image 2).

    STEP 3:  Make the crab cakes. Carefully mix the egg mixture with the crab mixture and shape it into burgers, approximately 4 ounces each if making 4. Put the patties on a pan lined with parchment paper or wax paper. (Image 3-5).

    STEP 4: Refrigerate the cakes. Chill the cakes in the refrigerator for 30 minutes to 1 hour before baking.

    Steps 5-8 crab cake sandwiches.

    STEP 5: Heat the pan. Wait to take the cakes out of the refrigerator until after the large skillet has been heated to medium heat with olive oil added to it. Then, place the crab cakes in the hot and ready pan.

    STEP 6: Cook the crab cakes. To cook the cakes, heat them on each side for 3 to 4 minutes until they turn golden brown. Afterward, take them out of the pan and transfer them onto a baking sheet with paper towels. (Image 6-8).

    STEP 7:  Create the sandwiches. To prepare the sandwich, simply put all the ingredients together and add your preferred Remoulade sauce on top in soft brioche buns.

    Spooning remoulade sauce on top of crab cake for sandwich.

    Recipe Pro Tips

    • Drain crab meat: Make sure to thoroughly drain the crab meat before mixing it with other ingredients. Excess moisture can make your crab cakes too wet and difficult to hold together.
    • Chill the mixture: Refrigerate the crab cake mixture for at least 30 minutes before forming patties. This allows the flavors to meld together and makes the patties easier to handle.
    • Forming patties: When shaping the crab cakes, avoid over-packing or compressing the mixture too much. Gently form the patties, which will result in a lighter, more tender texture.
    • Size consistency: Make sure your crab cakes are of uniform size and thickness to ensure even cooking.
    • Coat evenly: For a crisp, golden crust, coat the crab cakes evenly with breadcrumbs or panko crumbs before frying.
    • Hot oil: Ensure the oil is hot (around 350°F or 175°C) before adding the crab cakes. This will help them cook evenly and develop a crispy exterior.
    • Avoid overcrowding: Cook the crab cakes in batches if necessary, to prevent overcrowding the pan. Overcrowding can lower the oil temperature and lead to uneven cooking.
    • Gentle flipping: Be gentle when flipping the crab cakes to prevent breaking. Use a wide spatula and turn them only once during the cooking process.
    • Drain excess oil: Place cooked crab cakes on a paper towel-lined plate to absorb any excess oil before assembling your sandwich.
    Bite taken out of crab cake sandwich.

    Recipe FAQs

    Can I use canned crab meat for this recipe?

    Yes, you can use canned crab meat as long as you thoroughly drain it to remove excess liquid. Fresh or frozen crab meat can also be used if you prefer.

    Can I bake the crab cakes instead of frying them?

    Absolutely! To bake the crab cakes, preheat your oven to 400°F (200°C), place the patties on a parchment-lined baking sheet, and bake for about 15-20 minutes or until golden brown, flipping them halfway through.

    What type of crab meat is best for crab cakes?

    Lump or jumbo lump crab meat works best for crab cakes, as they provide a nice texture and flavor. However, you can also use claw meat or a combination of different types of crab meat.

    What to Serve with Crab Cake Sandwiches

    A variety of side dishes can complement Crab Cake Sandwiches, adding balance and flavor to your meal. Here are some delicious options to consider:

    1. Coleslaw: A classic pairing with seafood, coleslaw adds a refreshing crunch and tanginess to your meal.
    2. Roasted vegetables: Roasted or grilled veggies like roasted broccoli, asparagus, zucchini, bell peppers, or green beans provide a healthy and tasty accompaniment.
    3. Sweet potato fries: Baked or air-fried sweet potato fries add a touch of sweetness and a different texture to the meal.
    4. Green salad: A simple mixed green salad or this summer side salad with a light vinaigrette dressing can help balance out the richness of the crab cakes.
    5. Potato salad: A creamy potato salad or a German-style warm potato salad can be a satisfying addition to your crab cake sandwich experience.
    6. Corn on the cob: Grilled or boiled corn on the cob (or even Instant Pot corn on the cob), seasoned with butter and spices, complements the flavors of the crab cakes nicely.
    7. Cucumber salad: A light and tangy cucumber salad with red onions and dill, or creamy cucumber salad, can provide a refreshing contrast to crab cakes.
    8. Crispy chips: Serve your sandwiches with a side of kettle-cooked potato chips or even some homemade tortilla chips for an extra crunch.
    9. Pasta salad: A cold pasta salad with fresh vegetables, olives, and feta cheese can make for a delightful side dish.
    10. Rice or quinoa: Seasoned rice, pilaf, or quinoa can serve as a delicious and filling accompaniment to your crab cake sandwiches.

    Feel free to mix and match these side dishes based on your preferences and the occasion, creating the perfect meal to enjoy alongside your mouth-watering Crab Cake Sandwiches.

    Storage

    Store leftover cooked crab cakes in an airtight container in the refrigerator for up to 3 days. To reheat, place them in a preheated oven at 350°F (175°C) for about 10 minutes or until heated through.

    You can freeze uncooked or cooked crab cakes. Wrap each patty individually in plastic wrap and place them in a freezer-safe container or zip-top bag. They can be stored in the freezer for up to 3 months. Thaw in the refrigerator overnight before cooking or reheating.

    More Seafood Recipes You’ll Love

    The great thing about seafood recipes, is that they can be so versatile for so many recipes. Whether it’s a mussels recipe for an appetizer, a main dish recipe or even a side dish. Here are some of our favorite seafood recipes…

    • Crab salad in serving bowl.
      The BEST Crab Salad Recipe (Easy, Classic Recipe)
    • Quick Crab Bisque! Holy Moly this is good! https://fantabulosity.com
      Easy Crab Bisque
    • Crab pasta bake being lifted out of baking dish with tongs.
      Crab Pasta Bake
    • fried shrimp on plate next to sauce
      The BEST Fried Shrimp

    Did you make this? I’d be so grateful if you left a “star” rating below to let me know what you thought! Then, the next time you need a quick and easy recipe, come back to Fantabulosity to browse all of my easy recipes!

    Recipe

    Crab cake sandwich on white plate.
    Print Pin
    5 from 4 votes

    Crab Cake Sandwich

    This crab cake sandwich recipe is easy to make and is delicious with your favorite toppings like a remoulade sauce, and soft buns!
    Course Dinner, Lunch
    Cuisine American
    Prep Time 10 minutes minutes
    Cook Time 8 minutes minutes
    Chill Time 30 minutes minutes
    Total Time 48 minutes minutes
    Servings 4 sandwiches
    Calories 1149kcal
    Author Jessica Burgess

    Ingredients

    • 1 pound Lump Crab Meat
    • 16 Saltine Crackers Finely Crushed
    • 2 Teaspoons Cajun Seasoning
    • 1 Teaspoon Ground Mustard
    • 1 Teaspoon Dried Basil
    • 2 Eggs Lightly Beaten
    • 4 Tablespoons Mayonnaise
    • 2 Tablespoons Green Onion Sliced
    • 2 Tablespoons Pimento Peppers Drained
    • 1 Lemon Juice and Zest
    • Brioche Buns Toasted with Butter
    • Lettuce
    • Tomato
    • Remoulade Sauce if desired

    Instructions

    • Mix: In a medium-sized mixing bowl, gently stir crab, crushed crackers, Cajun seasoning, basil, and mustard powder together; set aside.
    • Egg mixture: In a small bowl, gently beat the egg. Then add green onion, pimentos, lemon juice, and lemon zest, then mix.
    • Combine: Gently combine the egg mixture with the crab mixture. Form into burger-size cakes. About 4 ounces each if making 4. Place patties on a parchment paper or wax paper lined pan.
    • Refrigerate cakes for 30 min to 1 hour before cooking.
    • Prep Oil: Add oil to a nonstick pan over medium heat; do not remove cakes from the refrigerator until the pan is hot and ready to cook.
    • Fry: Cook the cakes on each side for 3 to 4 minutes until golden brown. When done, remove them from the pan and place them on a baking sheet lined with paper towels.
    • Build: Assemble the sandwich and top with your favorite Remoulade sauce.

    Notes

    Type of Crab: You can use canned crab meat as long as you thoroughly drain it to remove excess liquid. Fresh or frozen crab meat can also be used if you prefer.
    To Store Leftover Crab Cakes: Store leftover cooked crab cakes in an airtight container in the refrigerator for up to 3 days. To reheat, place them in a preheated oven at 350°F (175°C) for about 10 minutes or until heated through.

    Nutrition

    Serving: 1sandwich | Calories: 1149kcal | Carbohydrates: 52g | Protein: 102g | Fat: 58g | Saturated Fat: 11g | Polyunsaturated Fat: 30g | Monounsaturated Fat: 14g | Trans Fat: 0.3g | Cholesterol: 541mg | Sodium: 4792mg | Potassium: 1503mg | Fiber: 7g | Sugar: 6g | Vitamin A: 3567IU | Vitamin C: 123mg | Calcium: 346mg | Iron: 10mg

    Cold Pasta Salad Recipes

    June 3, 2023

    Cold Pasta Salad Recipes Collage.

    Salad recipes are our FAVORITE around here, so this roundup of cold pasta salad recipes fits right in! 

    Whether you need cold pasta salad recipes for a potluck, spring dinner ideas, for a fun picnic food idea, or just looking for a side dish that doesn't require turning on the oven, here are some of the BEST pasta salad recipes to choose from!

    “Pin” your favorites to your favorite board on Pinterest so you have them when you need them!

    Post originally published in January 2019, updated in June 2023.

    Cold pasta salad recipes collage.

    Pasta Salad Recipes

    During the warmer months, the last thing you want to do is turn on your oven to make lunch or dinner.

    With these cold pasta salad recipes, use a little heat once, and enjoy it for days without turning on the oven!

    Here you'll find some that make the perfect dinner or even a side dish to bring to a party!

    Bacon Ranch Pasta Salad

    This 6 ingredient bacon ranch pasta salad is so simple and delicious. Perfect for potlucks, barbecues or a weeknight side dish.

    A bowl of chicken macaroni salad in a large serving bowl.

    Chicken Macaroni Salad

    An easy recipe using pasta, mayo, mustard, seasoned salt, pepper, celery, onion, and chicken to create a side dish favorite!

    Chicken Caesar Pasta Salad Recipe in a bowl with a cloth

    Chicken Caesar Pasta Salad

    It may sound odd to put pasta in a lettuce salad but talk about DELICIOUS! You will have a hard time going back to a regular Caesar salad after this one!

    
Bowls of zesty pasta salad with tomatoes and banana peppers.

    Zesty Italian Pasta Salad

    This super easy recipe is made using any type of pasta you prefer, a few other simple ingredients, and Zesty Italian dressing!

    
A large white bowl filled with shrimp pasta salad.

    Shrimp Macaroni Salad

    The flavors in this shrimp macaroni salad are absolutely amazing and it only uses simple ingredients that you may even already have on hand!

    A large white bowl filled with tuna pasta salad.

    Tuna Pasta Salad

    With easy ingredients and most of them being items that you can keep on hand, and even in the pantry… this recipe is a perfect last-minute option!

    Thai Salad Recipe with Noodles and Cabbage

    Thai Salad Recipe with Noodles and Cabbage is the perfect way to enjoy all those Thai flavors. Super simple to make and packed full of flavor and texture.

    BBQ Pasta Salad with Tuna

    This BBQ Pasta Salad with Tuna from My Crazy Good Life is way more exciting than your traditional pasta salad recipe, but with all the flavors of a backyard barbecue.

    Creamy Summer Pasta Salad

    With this Creamy Summer Pasta Salad from Fun Food Frolic, you can enjoy all the flavors of summer in one simple meal.

    Dressing tossed with cowboy pasta salad in glass bowl.
    Cowboy Pasta Salad

    Cowboy Pasta Salad

    It’s hearty, cheesy and full of flavor. It’s a potluck recipe that everyone asks for the recipe.

    Peach Pasta Salad

    This unique Chicken and Peach Pasta Salad from A Magical Mess is bursting with flavor and is the perfect dish to change things up without heating up your home.

    Sriracha Shrimp Pasta Salad

    This Sriracha Shrimp Pasta Salad from Accidental Happy Baker is so easy to make ahead and is both spicy and fresh!

    Primavera Pasta Salad

    This quick and easy Primavera Pasta Salad from It Bakes Me Happy is perfect for busy nights, and a break from the traditional pasta salad recipes.

    Asparagus Tortellini Pasta Salad

    This Asparagus Tortellini Pasta Salad from Who Needs a Cape brings summertime to the table in a unique and veggie filled way!

    Broccoli pasta salad in bowl.

    Broccoli Seafood Salad

    This quick and easy Broccoli Seafood Pasta Salad from Confessions of an Overworked Mom, is so simple to make and perfect for busy days.

    Olive pasta salad in bowl.

    Tri Colored Pasta Salad

    This Tricolor Pasta Salad from Courtney's Sweets is so easy to make and perfect for picnics or barbecues.

    Broccoli Lemon Pasta Salad

    This delicious mayo-free Broccoli Lemon Pasta Salad from Home Cooking Memories is perfect for picky eaters who don't like mayo.

    Tortellini Caprese Salad

    This delicious Tortellini Caprese Salad Who Needs a Cape has some of the best flavors of summer all in one pasta salad.

    A bowl of roasted veggie pasta salad.

    Roasted Veggie Pasta Salad

    Zucchini, tomatoes, sweet onions and peppers make this filling pasta salad super healthy and easy to make on a busy night.

    Vegan Macaroni Salad

    This summertime Vegan Macaroni Salad Vegan Huggs is the perfect way to feed those on a special diet, and still enjoy the deliciousness of pasta salad.

    More Easy Side Dish Recipes?

    You’ll only find delicious and easy recipes here, so get your “pinning” on and fill your Pinterest boards with our recipes for easy meal planning!

    Cornbread Salad Recipe

    More Recipe Collections

    If you love our collections, don’t miss these top favorites:

    • Multiple images of summertime drinks in a collage.
      Summer Drink Recipes
    • Ground Beef Dinner Ideas in an image collage.
      30 Ground Beef Dinner Ideas
    • Images in collage for indoor picnic food ideas.
      Indoor Picnic Food Ideas
    • Image collage of hamburger recipes.
      20 Favorite Hamburger Recipes

    Tired of Searching for Recipes?

    Well if you’re here for the first time, then you’ll want to get your hands on my NEW cookbook, Fabulously Fast Dinners. 

    Aren’t you tired of spending hours thinking about what the main dish to make for your family, and then realizing you STILL need a side dish to go with it?

    I’ve done all of this for you! An easy and fast main dish recipe, paired with a side dish recipe and even alternative suggestions for sides and desserts along the way!

    Dinnertime just got fabulous, and FAST!

    Oreo Pancakes

    June 2, 2023

    Stacked Oreo pancakes on white plate, topped with whipped cream.

    My Oreo Pancakes are the ultimate breakfast indulgence that you won’t be able to resist. Imagine starting your day with the irresistible combination of fluffy pancakes and your favorite cookie – Oreos!

    Stacked Oreo pancakes on white plate, with Oreo leaning up against stack.

    By blending together the classic flavors of Oreos with simple pancake ingredients, we’ve created a delightful and easy-to-make breakfast recipe that’s perfect for weekend mornings or special occasions.

    If you find you have some Oreos left when you’ve made these fluffy Oreo pancakes, why not try making Oreo Cupcakes? Or you could try making a dessert pizza with this Oreo Pizza recipe. Maybe you can keep it simple and make Oreo Mousse or this No Bake Oreo Dessert that works for any occasion.

    [feast_advanced_jump_to]

    Why You’ll Love This Recipe

    • It uses a few ingredients: With only 6 ingredients, this recipe uses items that you may even have on hand.
    • Great for breakfast or dessert: These pancakes work for a sweet breakfast or as a tasty dessert.
    • Ready in only 20 minutes: Talk about a quick and easy pancake recipe! This recipe, from start to finish, only takes 20 minutes to cook.

    Ingredients Needed

    I’ve highlighted a couple of ingredients below with some relevant notes. Aside from this, the ingredients needed are pretty basic.

    Labeled ingredients on marble counter for Oreo pancakes.
    • Flour – Use a simple white flour for this recipe to get the best results.
    • Baking powder – Make sure you add this so that your pancakes are light and fluffy.
    • Vanilla extract – Add just a little vanilla extract to balance out the chocolate flavor of the Oreos.

    Substitutions

    Sometimes substitutions are necessary because of ingredients that are unavailable or needed for dietary restrictions. Here are some suggestions that can help:

    • Vanilla Extract: If you don’t have any vanilla extract in your pantry, you can use almond extract or maple syrup for a slightly different, but still delicious, flavor profile. Alternatively, try adding a pinch of cinnamon or nutmeg to bring warmth and depth to your pancakes.
    • Oreos: Can’t find Oreo cookies or want to try something new? Swap them out for any chocolate sandwich cookie or even crumbled chocolate chip cookies. You could also experiment with flavored Oreos, such as Golden Oreos or Mint Oreos, to put a unique spin on your pancakes.
    • Salted Butter: If you only have unsalted butter, simply add a pinch of salt to your pancake batter to achieve the same balanced taste. You could also use coconut oil or margarine as a dairy-free alternative.
    • Whole Milk: There are plenty of options if you need to replace whole milk. Try using 2% milk, almond milk, or soy milk for a lighter texture. For an ultra-rich and creamy pancake, opt for half-and-half or a mixture of milk and heavy cream.

    Variations

    • Red Velvet Oreo Pancakes: Add a touch of romance to your pancakes by turning them into Red Velvet Oreo Pancakes. Simply mix in 2 tablespoons of unsweetened cocoa powder and a few drops of red food coloring to your pancake batter. This vibrant twist on the classic Oreo Pancake is perfect for special occasions, like Valentine’s Day or anniversaries, and is sure to leave everyone swooning.
    • Oreo Pancakes with Peanut Butter Swirl: If you’re a fan of the heavenly combination of chocolate and peanut butter, this variation is for you! Before cooking each pancake, swirl in a spoonful of melted peanut butter on top of the batter in the pan, creating a marbled effect. The result? A mouthwatering fusion of flavors that will have you reaching for seconds (or thirds!).
    • S’mores Oreo Pancakes: Bring the taste of the great outdoors to your breakfast table with S’mores Oreo Pancakes. To create this campfire-inspired treat, sprinkle a handful of mini marshmallows and crushed graham crackers over the pancake batter just before flipping. Finish off with a drizzle of chocolate syrup, and you’ll have a stack of pancakes that transports you straight to a cozy bonfire under the stars.

    How to Make Oreo Pancakes

    *Be sure to see the recipe card below for the full ingredients list & instructions!*

    Steps 1-4 collage for making Oreo pancakes.

    STEP 1: Mix the dry ingredients: In a medium-sized bowl, mix the flour, crushed Oreos, and baking soda. (Image 1).

    Tip: If you can, leave the batter for 5-10 minutes before you start cooking.

    STEP 2: Add in the wet ingredients: Stir the milk, vanilla extract, and melted butter into the pancake batter until there are no lumps of dry ingredients left. (Image 2-3).

    Stacked Oreo pancakes on white plate.

    STEP 3: Cook the pancakes: To cook pancakes, first melt a small amount of butter in a skillet over medium-high heat. Next, pour approximately ⅓ cup of batter onto the skillet and cook each side for approximately 2 minutes. (Image 4).

    STEP 4: Make the batch: Proceed with this step until you have utilized the entire batter. Afterward, serve and enjoy your pancakes while they are warm!

    Stacked Oreo pancakes with whipped cream and an Oreo cookie leaning next to them.

    Recipe Pro Tips

    • Gently fold in crushed Oreos: To ensure your pancakes have just the right amount of Oreo goodness in each bite, gently fold crushed Oreos into the batter instead of vigorously mixing them. This will help maintain the fluffy texture of your pancakes while evenly distributing the cookie pieces.
    • Preheat your pan and adjust heat as needed: Start by preheating your pan over medium heat and use a small amount of oil or butter to lightly grease the surface. If you notice that your pancakes are browning too quickly, simply lower the heat to prevent burning. Finding the perfect temperature is key to achieving golden-brown, perfectly cooked Oreo Pancakes.
    • Rest the pancake batter: Let your pancake batter rest for about 5-10 minutes before cooking if you can. This allows the flour to fully hydrate and the baking soda to start reacting, resulting in tender, fluffy pancakes that are sure to impress.

    Recipe FAQs

    Can I make the Oreo Pancakes ahead of time and reheat them later?

    Yes, you can! Simply cook your pancakes as usual, then allow them to cool completely. Once cooled, store them in an airtight container or wrap them in plastic wrap. When you’re ready to enjoy, reheat them in the microwave, toaster oven, or on a skillet over low heat until warmed through.

    What is the secret to perfect pancakes?

    The secret to perfect pancakes lies in a few key factors: using the right batter consistency, preheating your pan to the ideal temperature, and flipping the pancakes at the right time. For batter consistency, aim for a thick but pourable texture; if it’s too thin, add a bit more flour, and if it’s too thick, add a splash of milk. Preheat your pan over medium heat and adjust as needed to prevent burning. Finally, flip your pancakes when the edges are set and bubbles appear on the surface.

    Can I use a different type of cookie instead of Oreos for this recipe?

    Absolutely! Feel free to experiment with different types of cookies to create your own unique pancake flavors. Chocolate chip cookies, sandwich cookies, or even gingersnaps could all make delicious alternatives. Just remember to crush the cookies into small pieces for even distribution in the batter.

    Is it possible to make these Oreo Pancakes gluten-free or dairy-free?

    Yes, you can easily adapt this recipe for dietary preferences. For a gluten-free version, use a gluten-free all-purpose flour blend and gluten-free cookies. To make dairy-free Oreo Pancakes, replace the milk with a dairy-free alternative like almond or soy milk, and use a dairy-free butter substitute or coconut oil in place of the butter.

    Oreo pancakes, stacked on white plate with whipped cream.

    What to Serve with Oreo Pancakes

    When it comes to serving your scrumptious Oreo Pancakes, the possibilities are as endless as your imagination! To elevate your pancake experience and make every bite even more delectable, consider these tantalizing toppings and accompaniments:

    • Whipped Cream: A generous dollop of whipped cream adds a cloud-like, velvety texture that perfectly complements the rich Oreo flavors. You can use store-bought whipped cream or whip up your own at home for an extra touch of freshness.
    • Chocolate Syrup Drizzle: For the ultimate chocolate lover’s dream, drizzle your Oreo Pancakes with a silky ribbon of fudge chocolate sauce. This delightful addition will create a beautiful presentation and enhance the overall chocolatey goodness.
    • Fresh Fruit: The easiest way to balance out the indulgence of your pancakes by adding some fresh fruit to your plate. Sliced strawberries, bananas, or a handful of vibrant berries will not only add a pop of color but also provide a refreshing contrast to the richness of the Oreos.
    • Powdered Sugar Dusting: For a touch of elegance and a hint of extra sweetness, lightly dust your Oreo Pancakes with powdered sugar. This simple yet sophisticated finishing touch will make your breakfast feel like a gourmet treat.

    Storage

    For short-term storage (up to 2 days), place the stacked pancakes in an airtight container or a resealable ziploc bag, and store them in the refrigerator.

    For longer storage (up to 2 months), tightly wrap the stack of pancakes in plastic wrap or aluminum foil, then place them in a resealable freezer-safe plastic bag. Be sure to squeeze out any excess air and seal the bag tightly before storing it in the freezer.

    When you’re ready to savor your leftover Oreo Pancakes, reheat them in the microwave, toaster oven, or on a skillet over low heat until warmed through. If reheating from frozen, let the pancakes thaw at room temperature for about 10 minutes before reheating to ensure even warming.

    More Pancake Recipes You’ll Love

    Want to experiment more with pancakes? Then here are some ideas to try. First, you can try these Amazing Fluffy Pancakes which are a great way to have simple regular pancakes for any occasion. Then try a simple classic such as Easy Blueberry Pancakes that you can make for breakfast or dessert. Finally, you can try something a little different such as these Pumpkin White Chocolate Pancakes for a seasonal treat.

    • A close up photo of a stack of cinnamon swirled pancake squares that were baked on a sheet pan
      Sheet Pan Pancakes
    • Pancake Toppings Ideas
      95+ Pancake Toppings Ideas
    • Almond milk pancakes with syrup and blueberries on them.
      Almond Milk Pancakes
    • lucky charms pancakes
      Lucky Charms Pancakes

    Did you make this? I’d be so grateful if you left a “star” rating below to let me know what you thought! Then, the next time you need a quick and easy recipe, come back to Fantabulosity to browse all of my easy recipes!

    Recipe

    Stacked Oreo pancakes on white plate, topped with whipped cream.
    Print Pin
    5 from 1 vote

    Oreo Pancakes

    These Oreo pancakes are a sweet treat for breakfast and brunch or just for a fun midnight snack!
    Course Breakfast, Dessert
    Cuisine American
    Prep Time 10 minutes minutes
    Cook Time 20 minutes minutes
    Total Time 30 minutes minutes
    Servings 12 pancakes
    Calories 266kcal
    Author Jessica Burgess

    Ingredients

    • 2 cups white flour
    • 20 Oreos crushed
    • 4 teaspoons baking powder
    • 2 ¼ cups whole milk
    • 1 teaspoon vanilla extract
    • ½ cup salted butter melted

    Instructions

    • Batter ingredients: Combine the flour, crushed Oreos, and baking soda in a medium sized bowl.
    • Mix: Whisk in the milk, vanilla extract, and melted butter until no clumps of dry ingredients remain in the pancake batter.
    • Cook: Heat a small amount of butter in a skillet on medium high heat. Pour about ⅓ cup of batter onto the skillet and cook both sides for about 2 minutes.
    • Repeat: Continue this process until you have used all of the batter. Serve!

    Notes

    • You can store these pancakes in the fridge for about 5 days. Alternatively, you can freeze these pancakes for up to 3 months. Simply reheat the pancakes in the microwave when you are ready to eat them.
    • These pancakes are great served by themselves or with whipped cream and a drizzle of chocolate syrup.
    • Because you leave the creamy Oreo filling in the recipe, there is no need to add extra sugar to the pancake batter.

    Nutrition

    Serving: 1pancake | Calories: 266kcal | Carbohydrates: 33g | Protein: 5g | Fat: 13g | Saturated Fat: 7g | Polyunsaturated Fat: 1g | Monounsaturated Fat: 4g | Trans Fat: 0.3g | Cholesterol: 26mg | Sodium: 157mg | Potassium: 275mg | Fiber: 1g | Sugar: 10g | Vitamin A: 311IU | Calcium: 124mg | Iron: 3mg

    Oreo Brookies

    June 1, 2023

    Oreo Brookies

    Oreo Brookies: This tasty treat combines chocolate chip cookies, a fudgy brownie, and Oreo cookies! These cookie-brownie hybrids are a dessert lover’s dream!

    The moment I fell in love with Oreo Rice Crispy Treats and Oreo Dip, I know more Oreo recipes had to be here for you. Combine that with the love of brownies and cookies… oh my gosh, get ready!

    Originally published in January 2022, updated in June 2023.

    Oreo Brookies stacked on top of one another.

    Why You’ll Love This Oreo Brookie Recipe

    I love fusion recipes. If you can take one thing I love and somehow combine it with something else I love, you win! Like our Oreo Pancakes and Bronuts… this recipe combines the best cookie with the best breakfast item. (In our opinion!)

    These brookies with Oreos manage to do that on three fronts- the combination of a brownie, chocolate chip cookie, AND Oreo cookie is something magical. (Kind of like in the layered chocolate peanut butter brownies that you all love and the two layers in these cornflake brownies!)

    Chocolate lovers and cookie lovers alike will both love this easy brookie recipe!

    [feast_advanced_jump_to]

    What is a brookie?

    Before we tell you how to make one, I guess we should explain exactly what we’re talking about.

    “Brookie” simply refers to a recipe that combines brownies and cookies together in one pan. There have been many variations of this idea in the past, but we’re pretty excited about our version!

    Read on to see all the goodness we have to share…

    Hand holding Oreo Brookies.
    Brownie, Oreo and cookie layers.

    Ingredients for this Brookie recipe with Oreos

    You’re essentially making two separate recipes here and sandwiching some Oreos between them. Here’s what you’ll need…

    Chocolate Chip Cookie Layer

    • ½ cup unsalted butter, softened
    • ½ cup brown sugar
    • 1 egg
    • ½ teaspoon vanilla extract
    • 1 ¼ cups all purpose flour
    • ½ teaspoon baking soda
    • 1 cup chocolate chips

    Oreo Layer

    • 16 Oreo cookies

    Brownie Layer

    • ½ cup semi-sweet chocolate chips
    • ½ cup unsalted butter
    • 2 eggs
    • ¼ cup brown sugar
    • 3 tablespoons white sugar
    • ½ teaspoon vanilla extract
    • ¼ cup all purpose flour
    • ¼ teaspoon salt
    • ¼ cup unsweetened cocoa powder

    Toppings

    • 5 Oreos, roughly chopped
    • ¼ cup chocolate chips (some melted for drizzle on ice cream)
    Ingredients for Brookies.
    Ingredients

    How to Make Oreo Brookies

    1. Line a 9×9 inch square baking pan with parchment paper and spray the parchment with non stick cooking spray.

    Chocolate Chip Cookie Layer

    1. Beat the butter and sugar until it is light and fluffy in a large bowl or the bowl of a stand mixer. 
    First ingredients in mixing bowl for Oreo brookies.
    Cream butter & sugar.
    1. Once that’s nice and fluffy, add the egg and vanilla extract to the sugar mixture and beat again until smooth.
    Eggs and vanilla added to mixing bowl.
    Add eggs & vanilla, beat.
    1. Add the flour and baking soda and mix until combined.
    Flour and baking soda added to mixing bowl.
    Add flour & baking soda, mix.
    1. Dump in the chocolate chips and fold into the cookie dough with a spatula.
    Chocolate chips added in to mixing bowl.
    Fold in choc chips.
    1. Transfer the cookie dough into the lined baking pan. Use your hands to press it down into the bottom of the prepared pan in an even layer (anything else you try to use will get stuck). 
    2. Put the pan into the freezer for 20 minutes (if you don't have room in the freezer you can put the pan into the refrigerator while you make the brownie batter). Meanwhile, heat oven to 350 degrees f.
    Pressed cookie dough in pan.
    Press into pan.

    Brownie Batter Layer

    1. Put the butter and the chocolate in a microwave safe small or medium bowl. Microwave for short, 30 second bursts in the microwave, stirring well each time, until they are melted (it should only take a minute or two). 
    2. Add the eggs and sugar into a large bowl and whisk them until they are thick and frothy. 
    Eggs and sugar added to mixing bowl.
    Add eggs & sugar to bowl.
    1. Pour the melted butter and chocolate mixture to the large mixing bowl along with the vanilla extract. Use a rubber spatula to fold it all together in large looping movements. 
    Add melted butter and chocolate to sugar mixture.
    Add chocolate mixture to bowl.
    1. Add the flour, salt and cocoa powder. Fold into the mixture gently with the spatula, taking care not to over mix.
    Add flour, salt and cocoa powder and fold together.
    Add flour, salt and cocoa.

    Assembling

    1. Take the cold cookie layer out of the freezer. Arrange 16 Oreos on top of the cookie base then pour over the brownie mixture. Use a spatula to spread out the brownie batter so that it’s even. 
    Layer Oreo cookies over top of the cookie dough layer.
    Add Oreos.
    Spread brownie layer on top of Oreo cookie layer.
    Pour brownie batter over.
    1. Scatter chopped Oreos and chocolate chips over the top of the brownie batter. 
    Sprinkle chopped Oreos and chocolate chips on top.
    Add toppings & bake.
    1. Bake in the center of the preheated oven for 35-40 minutes or until a toothpick inserted into the middle comes out mostly clean.
    2. Allow to cool in the pan for a couple of hours before removing and slicing into 16 equal squares.
    3. Serve with vanilla ice cream and a drizzle of melted chocolate.
    Drizzling chocolate sauce on top of ice cream covered Oreo Brookies.
    Drizzle chocolate on top- YUM!

    🛒 Substitutions

    A few of the ingredients in this recipe can easily be changed.

    • Brown Sugar – You can substitute the brown sugar in this recipe for all white sugar if you prefer.
    • Chocolate Chips – We used a mixture or semi-sweet and milk chocolate chips. You can use whichever you prefer – white chocolate chips also work well.
    • White Sugar – you can use all brown or all white sugar in the brownie layer but we think brownies taste better with a mixture of both!

    📖 Variations

    Since we have three different parts of this recipe, we have three fun areas we can create variety in!

    • Brownie Layer – Mix things up and make something other than a fudge chocolate brownie for this layer! Maybe something like a strawberry brownie!
    • Oreo Layer – Oreo cookies come in a LOT of flavors these days, and each one would change the finished result of this recipe. So many possibilities!
    • Chocolate Chip Cookie Dough Layer – you could switch up the type of chocolate chip in the dough to create a slightly different cookie base for these cookie brownies. You could even try something like butterscotch chips or peanut butter chips!
    Oreo Brookies on parchment paper.
    Oreo Brookies

    Storage

    Store your Oreo brookies in an airtight container at room temperature for up to 4 days. If you refrigerate them, these Oreo brookies (aka slutty brownies…cheeky, we know) can last for a week or longer, just bring them to room temperature before eating for the best experience. 

    Expert Tips and FAQs

    Oreo Brookies, sliced in to squares on pink surface.
    Which kind of Oreo cookies should I use in these brookies?

    We used double stuff Oreos to get a really thick Oreo layer but any type of Oreos will work in this recipe. You can use the original cookies or get creative and use some of their fun new flavors!

    Could I use a boxed brownie mix and pre-made cookie dough for this recipe?

    You sure could! If you are short on time, you could definitely substitute the chocolate chip cookie dough and brownie batter in this recipe for quicker, store-bought versions.

    How do you reheat brookies?

    If you are storing these brookies in the fridge, you can just let them sit on the counter until they are room temperature.

    If you like a warm, gooey brookie though you could reheat them in the oven. Heat the oven to 350°F again and pop your brookie in on a cookie sheet for a few minutes until it’s warm.

    Related Recipes

    If you liked these Oreo brookies, check out some of the other fun Oreo recipes on the blog like these easy Oreo cupcakes or this quick no-bake Oreo dessert!

    Or if you’re a fan of brownies as much as we are, you’ll especially love these:

    • Condensed milk brownies on parchment paper with middle brownie turned up on it's side.
      Condensed Milk Brownies
    • Close up of chocolate peanut butter brownies
      Peanut Butter Chocolate Brownies Recipe
    • Three lemon blondies stacked on top of one another on a piece of parchment paper.
      Lemon Blondies
    • Instant Pot brownie on white plate.
      Instant Pot Brownies

    Recipe

    Oreo Brookies
    Print Pin
    5 from 11 votes

    Oreo Brookies Recipe

    Oreo Brookies: This tasty treat combines chocolate chip cookies, fudgy brownie, and Oreo cookies! These cookie-brownie hybrids are a dessert lovers dream!
    Course Dessert, Snack
    Cuisine American
    Prep Time 20 minutes minutes
    Cook Time 35 minutes minutes
    Total Time 55 minutes minutes
    Servings 16 squares
    Calories 324kcal
    Author Jessica Burgess

    Ingredients

    Chocolate Chip Cookie Layer

    • ½ cup unsalted butter softened
    • ½ cup brown sugar
    • 1 egg
    • ½ teaspoon vanilla extract
    • 1 ¼ cups all purpose flour
    • ½ teaspoon baking soda
    • 1 cup chocolate chips

    Oreo Layer

    • 16 Oreos

    Brownie Batter Layer

    • ½ cup semi-sweet chocolate chips
    • ½ cup unsalted butter
    • 2 eggs
    • ¼ cup brown sugar
    • 3 tablespoons white sugar
    • ½ teaspoon vanilla extract
    • ¼ cup all purpose flour
    • ¼ teaspoon salt
    • ¼ cup unsweetened cocoa powder

    Toppings

    • 5 Oreos roughly chopped
    • ¼ cup chocolate chips (some melted for drizzle on ice cream)

    Instructions

    • Line a 9×9 inch square baking pan with parchment paper and spray the parchment with non stick cooking spray.

    Chocolate Chip Cookie Layer

    • Beat the butter and sugar until it is light and fluffy in a large bowl or the bowl of a stand mixer.
    • Once that's nice and fluffy, add the egg and vanilla extract to the sugar mixture and beat again until smooth.
    • Add the flour and baking soda and mix until combined.
    • Dump in the chocolate chips and fold into the cookie dough with a spatula.
    • Transfer the cookie dough into the lined baking pan. Use your hands to press it down into the bottom of the prepared pan in an even layer (anything else you try to use will get stuck).
    • Put the pan into the freezer for 20 minutes (if you don't have room in the freezer you can put the pan into the refrigerator while you make the brownie batter). Meanwhile, heat oven to 350 degrees f.

    Brownie Batter Layer

    • Put the butter and the chocolate in a microwave safe small or medium bowl. Microwave for short, 30 second bursts in the microwave, stirring well each time, until they are melted (it should only take a minute or two).
    • Add the eggs and sugar into a large bowl and whisk them until they are thick and frothy.
    • Pour the melted butter and chocolate mixture to the large mixing bowl along with the vanilla extract. Use a rubber spatula to fold it all together in large looping movements.
    • Add the flour, salt and cocoa powder. Fold into the mixture gently with the spatula, taking care not to over mix.

    Assembling

    • Take the cold cookie layer out of the freezer. Arrange 16 Oreos on top of the cookie base then pour over the brownie mixture. Use a spatula to spread out the brownie batter so that it's even.
    • Scatter chopped Oreos and chocolate chips over the top of the brownie batter.
    • Bake in the center of the preheated oven for 35-40 minutes or until a toothpick inserted into the middle comes out mostly clean.
    • Allow to cool in the pan for a couple of hours before removing and slicing into 16 equal squares.
    • Serve with vanilla ice cream and a drizzle of melted chocolate.

    Video

    Notes

    NOTES:
    • We used a mixture or semi-sweet and milk chocolate chips. You can use whichever you prefer – white chocolate chips also work well.
    • You can substitute the brown sugar in this recipe for all white sugar if you prefer.
    • Likewise, you can use all brown or all white sugar in the brownie layer but we think brownies taste better with a mixture of both!
       
    STORAGE: Store your Oreo brookies in an airtight container at room temperature for up to 4 days. If you refrigerate them, these Oreo brookies (aka slutty brownies…cheeky, we know) can last for a week or longer, just bring them to room temperature before eating for the best experience. 

    Nutrition

    Serving: 1square | Calories: 324kcal | Carbohydrates: 38g | Protein: 4g | Fat: 18g | Saturated Fat: 10g | Polyunsaturated Fat: 1g | Monounsaturated Fat: 5g | Trans Fat: 1g | Cholesterol: 52mg | Sodium: 158mg | Potassium: 124mg | Fiber: 2g | Sugar: 23g | Vitamin A: 394IU | Vitamin C: 1mg | Calcium: 29mg | Iron: 3mg

    25+ Easy Air Fryer Recipes for Beginners

    May 31, 2023

    Easy air fryer recipes collage.

    Air Fryer Recipes: A collection of easy recipes for the air fryer for fish, chicken, pork, and more for beginners with an air fryer.


    Air fryer recipes collage and text overlay.

    Air Fryer Recipes

    If you are trying to cut back on the amount of oil you consume, an air fryer is a great option! I’m going to assume that you have an air fryer, but if not, head over to find out WHICH air fryer I chose after researching and looking for the very best, in my Air Fryer Reviews post!

    What is an Air Fryer?

    Air fryers allow you to still enjoy delicious fried foods, but without all the oil that comes with traditional frying!

    If you have never used an air fryer before, the concept can sometimes be a little tricky. Whether you are looking for a dessert, quick lunch, or dinner, the possibilities of what you can make are endless!

    25+ Air Fryer Recipes

    
A plate of fried shrimp with cocktail sauce and a lemon wedge.

    Air Fryer Fried Shrimp with Cocktail Sauce

    Shrimp with cocktail sauce is always a good idea. This recipe makes a favorite dish a little lighter by air frying it.

    Eggplant fries with red sauce.

    Eggplant Fries

    Make fries from eggplant for a crispy and delicious way to add more veggies to your day. This recipe is so tasty that everyone will want seconds of this easy dish. One of our favorite ways to cook eggplants.

    A platter with butternut squash cubes.

    Air Fryer Butternut Squash

    Make this easy air fryer butternut squash for an easy side everyone will love. This healthy option cooks in no time for tender and tasty flavor that compliments fall meals perfectly.

    Air fryer apples in a bowl, that are coated in cinnamon.

    Air Fryer Apple Chips

    Make an easy and healthy snack that the whole family can enjoy with these apple chips. Make these for a crunchy and flavorful treat that packs well in lunches, or hits the spot as you snack while watching your shows at night.

    Glazed apple fritters on a wire cooling rack.


    Air Fryer Apple Fritters

    No need to head to the bakery to get the fritter flavor you crave. You can make them in the air fryer for a healthier take on a breakfast classic.

    A plate stacked with venison meat.

    Air Fryer Venison

    If you want to make the best deer meat, you need to cook it in the air fryer. It turns out so tender and flavorful for a family meal everyone will enjoy.

    
Salmon patties with cucumbers and lemons on a plate.

    Air Fryer Salmon Patties

    Salmon patties make for a great dinner to make in your air fryer. This method is easy and has the best crunch!

    
Crispy tofu on a toothpick.

    Crispy Air Fryer Tofu

    Make this super crispy tofu in your air fryer for a 12 minute dish that everyone will want a second bite of.

    A platter of buns and air fried brats.

    Air Fryer Brats

    You can get great brat flavor without firing up the grill! This method cooks them in the air fryer for a fast and fuss free dinner option you can serve with sweet potato fries.

    A plate of crispy air fryer chicken legs.

    Air Fried Chicken Legs

    Skip the greasy mess of frying chicken legs. You can coat them and pop them in the air fryer for a fast and budget friendly dinner.

    Loaded turkey burgers on a white plate.

    Baked Turkey Burgers

    Pop these healthy and lean patties into the air fryer for a juicy turkey burger that tastes amazing and cooks in a flash.

    Air fryer asparagus

    Air Fryer Asparagus

    If you like crispy and crunchy asparagus, you are going to love it made in the air fryer. This is an easy and delicious side dish idea to go with so many meals.

    A plate of air fryer chicken wings.

    Air Fryer Chicken Wings

    Frozen wings come out of the freezer, and into the air fryer to make such a great appetizer, snack or addition to dinner.

    A plate of air fryer roasted potatoes.

    Air Fryer Potatoes

    If you have potatoes, a few seasonings and some olive oil you can make this easy side that goes well with most proteins.

    Slices of air fried turkey breast on a plate.

    Air Fryer Turkey Breast

    Get juicy turkey breast on the table for a satisfying meal. This recipe cooks in the air fryer for a fuss free method that is done in a flash.

    A plate of air fryer potatoes.

    Air Fryer Breakfast Potatoes

    Get home fry flavor on the table without having to fry on the stovetop. This method cooks potatoes in the air fryer for a hearty addition to your morning that everyone will enjoy.

    A plate with bacon strips.

    Air Fryer Bacon

    Did you know you can make the crispiest bacon in your air fryer? You are going to love that this fast and fuss free method can be replicated by anyone with an air fryer.

    A plate with pigs in a blanket stacked on it.

    Air Fryer Pigs in a Blanket

    Wrap some little franks in dough and make a classic dinner like pigs in a blanket. The whole family will enjoy these easy air fryer treats.

    A stack of melty s’mores from the air fryer.

    Air Fryer S'mores

    Make these s'mores in the air fryer for a fast way to get your sweet treat cravings cured without having to start a bonfire.

    A plate with hash browns, eggs and bacon.

    Air Fryer Hash Browns

    Make these hash browns in the air fryer for a fast addition to breakfast that fills you up with great flavor.

    
A platter of air fryer tilapia with lemon wedges.

    Air Fryer Tilapia

    Tilapia makes for such an easy air fryer meal. Make this with a salad and some crusty bread for a fast and filling dinner option. You will love how easy tilapia is to make in the air fryer.

    A casserole with cinnamon rolls with icing.

    Air Fryer Cinnamon Rolls

    Did you know you can make cinnamon rolls in the air fryer? This is perfect for a fast and flaky breakfast or dessert that everyone will love with a glass of milk or coffee.

    Tater tots with tomatoes, jalapenos and cheese.

    Loaded Tater Tots

    If you like tots with your meals, you are going to want to make this easy air fryer recipe asap. It is loaded with all of the best toppings for a side that you could totally make a meal of if you like.

    A platter of air fryer cheeseburgers.

    Air Fryer Burgers

    Make burgers the easiest way. Cooked in the air fryer, they turn out with such a juicy flavor that will pair great with a salad, or some fries.

    Garlic bread cooked in an air fryer.

    Frozen Garlic Bread

    Get buttery garlic bread on the table for a good side dish  in just a few minutes. You don't have to fire up the oven to get the flavor, you can use your air fryer!

    Do you have favorite recipes for an air fryer? Share them right here in the comments below so we can add them to the list!

    Need a New Air Fryer?

    My favorite air fryer, by FAR is the Bella air fryer! But I’ve also tried out the Cosori Toaster Oven Air Fryer and although it is a different style of air fryer than I prefer, it was a great small appliance too!

    You’ll Also Love These Fried Recipes:

    Although they’re not air-fried recipes, these fried recipes on the blog are favorites!

    • Easy Fried Mushrooms – Try these in the air fryer!
    • Fried Deer Meat Recipe
    • Fried Shrimp Recipe

    Love Our Recipe Collections?

    If you love these easy recipe ideas, you’ll love these other collections where we’ve gathered some of the best:

    • Unique charcuterie board ideas in an image collage.
      20 Unique Charcuterie Boards
    • Cold Pasta Salad Recipes Collage.
      Cold Pasta Salad Recipes
    • Easy air fryer recipes collage.
      25+ Easy Air Fryer Recipes for Beginners
    • Collage of apple salad recipes with text overlay.
      25 Apple Salad Recipes: Side Dishes, Desserts + More!

    Browse more of the easy recipes here on Fantabulosity, and pin them on Pinterest for later so you’re armed and ready for dinnertime!

    Easy Red Skin Potato Salad

    May 31, 2023

    Close up of red skin potato salad in white bowl, with wooden spoon.

    Red skin potato salad is one of those side dishes that shows up at almost every summer gathering for a reason. It's creamy, simple to make, and pairs with just about everything from burgers and hot dogs to grilled chicken and BBQ.

    This version uses red potatoes, eggs, relish, mustard, and a creamy dressing for that old-fashioned potato salad flavor people expect at cookouts and family dinners.

    Red skin potato salad in large white serving bowl with wooden spoon.

    Along with our Amish potato salad, one of the most popular variations of potato salad is this easy red skin potato salad, and it’s easy to make and full of flavor!

    This creamy potato salad dish is known for its texture, tangy flavor, and vibrant colors. This easy recipe is not only a great option for summer cookouts but it makes a delicious recipe to have on hand all year long to serve along with dishes like baked pork steaks or even when you’re baking bratwursts in the oven. The best part is the extra boost of vitamins you get from the creamy red potatoes.

    Looking for a hash brown casserole side dish too? I call these party potatoes but they’re often called hashbrown casserole too.

    A Creamy Potato Salad That Works for Cookouts and Holidays

    This red skin potato salad is one of those side dishes that disappears fast at summer barbecues, potlucks, and holiday dinners. The red potatoes stay creamy without falling apart, and cooking them in broth gives them way more flavor than boiling them in plain water.

    I also love that you don't have to peel the potatoes, which makes this recipe feel easy enough for busy weeknights but still good enough for gatherings.

    [feast_advanced_jump_to]

    Why You’ll Love This Recipe

    • The potatoes hold their shape well without becoming mushy
    • Cooking the potatoes in broth adds extra flavor
    • You don't have to peel the potatoes It can be made ahead for cookouts and potlucks
    • The creamy dressing tastes like classic deli-style potato salad

    Ingredients Needed

    Labeled ingredients on counter for red skin potato salad.
    • Chicken Broth - Cooking the potatoes in broth instead of water gives the potatoes extra flavor all the way through.
    • Pickle Relish - Dill relish gives the salad that classic tangy potato salad flavor.
    • Red Potatoes - Red potatoes hold their texture well and stay creamy without falling apart after mixing.

    Substitutions

    Sometimes substitutions are necessary because of ingredients that are unavailable or needed for dietary restrictions. Here are some suggestions that can help:

    • Potatoes – you can use russet potatoes or even Yukon gold potatoes in place of red potatoes if you prefer. Or, if you’re doing low carb, you may also like using cauliflower, like we did in our cauliflower potato salad.

    How to Make Creamy Red Potato Salad

    This creamy potato salad comes together with simple ingredients and only a few steps. The biggest flavor trick is cooking the potatoes in broth instead of plain water.

    *Be sure to see the recipe card below for the full ingredients list & instructions!*

    You’ll start your side dish recipe by washing and cutting your red potatoes into bite-sized pieces. 

    Steps 1-4 for how to make red skin potato salad.

    STEP 1. Dice the potatoes. Cut red potatoes into bite-sized pieces. (Image 1).

    Tip: If you’re in a hurry, I suggest making the hard-boiled eggs and cubed, cooked potatoes the day before and set them in the refrigerator overnight until you need them.

    STEP 2. Add the eggs & potatoes. Place the diced potatoes in a large pot, if using raw eggs place the eggs in the pot on top of the potatoes (Image 2).

    STEP 3. Add broth. Add all of the broth to the pot. If it does not cover the potatoes and eggs, add water until covered. You may need to wiggle the eggs down into the potatoes (Image 3).

    Steps 5-8 for how to make red skinned potato salad.

    STEP 4. Cook. Boil the potatoes and eggs until the potatoes are fork-tender and eggs are done. 25-30 min. 

    STEP 5. Drain. When the potatoes and eggs are done remove the eggs from the pot. Drain the hot potatoes and return them to the pot (Image 4). 

    STEP 6: Peel and dice the eggs. Set the diced hard-boiled eggs aside.

    STEP 7. Make the sauce. While the potatoes are boiling make the sauce. In a medium mixing bowl, add the mayonnaise (Image 5), mustard, relish, onion, salt, and pepper (Image 6); stir well to mix (Image 7).

    STEP 8. Add the sauce. While the potatoes are still hot, add the sauce to the potatoes, stirring well (Image 8).

    Sliced egg added to potato salad in pot.

    STEP 9. Add Eggs. Then fold in the diced eggs.

    Potatoes mixed with egg, creamy mixture and green onion in white stock pot.

    STEP 10. Garnish. Sprinkle with green onions to garnish if desired, and serve from the pot or in a large bowl.

    Recipe Pro Tips

    • Make it ahead. Potato salad actually tastes even better after it's chilled for a few hours because the flavors have more time to blend together.
    • Add flavor. To add extra flavor to the salad, you can add chopped fresh herbs like parsley, dill, or chives. You can also substitute Greek yogurt for some or all of the mayonnaise to make a lighter version of the dish.
    • Try different toppings. Additionally, you can add other ingredients like bacon, pickles, or roasted red peppers to customize the salad to your liking.

    Recipe FAQs

    What are red-skinned potatoes?

    Red-skinned potatoes, also called new potatoes, are small potatoes with thin red skins. They have a slightly sweet, earthy flavor and creamy texture.

    Do I need to peel the potatoes for potato salad?

    No, you don’t need to peel red skin potatoes since their thin skins are edible. However, if you prefer a smoother texture, you can peel the potatoes before cooking. 

    Are red or white potatoes better for potato salad?

    Both types of potatoes can be used for potato salad, but red skin potatoes tend to hold up better during cooking and have a slightly sweeter flavor than other types of potatoes.

    Can I boil potatoes for potato salad the night before?

    Yes, you can boil potatoes for potato salad the night before. Just make sure to cool them quickly in an ice bath and refrigerate until ready to use.

    What to Serve with Red Potato Salad

    • Main Dish Ideas – Red skin potato salad pairs well with grilled meats or smoked meats like smoked chicken tenders, steak, or these grilled BBQ ribs. It’s also a great side dish for oven-baked burgers or hot dogs, like buffalo chicken hot dogs.
    • Topping Options – You can cook bacon in the air fryer or cook turkey bacon in the oven, and toss some crispy bacon bits to the top. Or, you can even add a pinch of fresh dill for added flavor and a finished appearance for your potluck dish.
    Red skin potato salad in white serving bowl.

    Storage

    • Leftovers: Store red potato salad in an airtight container in the refrigerator to avoid accumulating water from condensation. 
    • How long: Potato salad will keep in the refrigerator for up to five days when stored in an airtight container. To prevent spoilage, make sure to cool the salad completely before storing it.
    • Can I freeze potato salad? No, you should not freeze potato salad as it will become watery and mushy when thawed.
    Wooden spoon holding serving of red skin potato salad.

    This is the kind of potato salad recipe that works for almost any gathering. It's simple, creamy, easy to make ahead, and has that classic old-fashioned flavor people always come back for.

    Whether you're making it for a backyard cookout, holiday meal, or weeknight dinner, this red skin potato salad is one of those dependable side dishes that fits almost anywhere.

    Serving of red skin potato salad on white plate.

    So next time you’re looking for a tasty and nutritious side dish, give this recipe a try! It’s sure to become your new favorite potato salad this summer!

    Bite of red skin potato salad on fork, holding above plate.

    More Salad Recipes You’ll Love

    If you’re looking for similar dishes, we think you’ll also love these salad recipes or even pasta salad recipes that are popular:

    • side salad on white plate drizzled with ranch
      The BEST Side Salad Recipe
    • two tuna salad sandwiches stacked on top of each other
      The BEST Tuna Salad Recipe
    • Chicken macaroni salad in a bowl.
      The BEST Chicken Macaroni Salad
    • Old fashioned ham salad on white bun, next to pickles and potato chips
      Ham Salad Recipe

    Did you make this? I’d be so grateful if you left a “star” rating below to let me know what you thought! Then, the next time you need a quick and easy recipe, come back to Fantabulosity to browse all of my easy recipes!

    Recipe

    Close up of red skin potato salad in white bowl, with wooden spoon.
    Print Pin
    5 from 5 votes

    Red Skin Potato Salad

    Easy to make and big on taste, you'll love this delicious red-skinned potato salad dish!
    Course Side Dish
    Cuisine American
    Prep Time 10 minutes minutes
    Cook Time 30 minutes minutes
    Total Time 40 minutes minutes
    Servings 10 Servings
    Calories 376kcal
    Author Jessica Burgess

    Ingredients

    • 3 pounds Red Potatoes
    • 6 Eggs Raw or Boiled
    • 4 cups Chicken Broth
    • 1 ½ cups Mayonnaise
    • 2 Tablespoons Coarse Dijon Mustard
    • ⅓ cup Pickle Relish
    • ¼ cup Green Onions Sliced
    • 1 teaspoons Salt
    • ½ teaspoons Black Pepper

    Instructions

    • Wash and cut red potatoes into bite-size pieces.
    • Place diced potatoes in a large pot, if using raw eggs place the eggs in the pot on top of the potatoes. Add all of the broth to the pot. If it does not cover the potatoes and eggs, add water until covered. You may need to wiggle the eggs down into the potatoes.
    • Boil the potatoes and eggs until potatoes are fork tender and eggs are done. 25-30 min.
    • While the potatoes are boiling make the sauce. In a medium mixing bowl, add the mayonnaise, mustard, relish, onion, salt, and pepper; stir well to mix.
    • When the potatoes and eggs are done remove the eggs from the pot
    • Drain the potatoes and return them to the pot.
    • Peel and dice the eggs.
    • While the potatoes are still hot, add the sauce to the potatoes, stirring well.
    • Then fold in the diced eggs. Sprinkle with green onions to garnish if desired.
    • Serve from the pot or in a serving bowl.
    • Refrigerate any leftovers. 

    Video

    Notes

    1. Chicken bouillon mixed with water (follow package instructions to make 4 cups) would work if you do not have chicken broth. 
    2. You can make this recipe up to a day ahead.
    3. Store leftovers in the refrigerator for up to five days.
    4. Since this contains mayonnaise, I do not recommend letting it sit out for more than an hour or two.

    Nutrition

    Serving: 0.5c | Calories: 376kcal | Carbohydrates: 25g | Protein: 7g | Fat: 28g | Saturated Fat: 5g | Polyunsaturated Fat: 16g | Monounsaturated Fat: 7g | Trans Fat: 0.1g | Cholesterol: 114mg | Sodium: 946mg | Potassium: 694mg | Fiber: 3g | Sugar: 3g | Vitamin A: 215IU | Vitamin C: 12mg | Calcium: 38mg | Iron: 2mg

    25 Apple Salad Recipes: Side Dishes, Desserts + More!

    May 31, 2023

    Collage of apple salad recipes with text overlay.

    Whether you’re looking for a side dish, dessert, or even salad recipes to use with apples, I think you’ll love these apple salad recipes that I’ve gathered for you!

    In the Fall, it’s easy to have a plentiful supply of apples, but the lovely part of recipes using apples is that apples can be found all year long to help keep your kitchen full of yummy recipes so these ideas should come in handy no matter when you’re finding them!

    Post originally published in August 2018, updated in May 2023.

    Collage of apple salad recipes with text overlay.

    Here you’ll find salads with apples, dessert dishes, and side dishes that are perfect for dinner or even to make for the potluck gathering that you’re attending soon!

    25 Apple Salad Recipes

    Cool Whip Fruit Salad  

    This fruity salad has the best cool and creamy dressing. Use cool whip and canned fruit with marshmallows. Add some fresh apples to give this salad a crispy texture that is delicious.

    Apple Raspberry Spring Mix

    Add berries and apples to  a simple spring mix for a fruity twist on a classic. You can make a meal of this or serve it on the side.

    Apple Salad with a Creamy Yogurt and Pudding Dressing

    The creamy yogurt and pudding dressing combined with the crunchiness of apples is a combo that’s hard to resist.

    Snickers Apple Salad

    This dessert salad has so much going for it! It has apples to make it a little healthier, but it has plenty of Snickers candy mixed in to keep it sweet and delicious!

    Pecan apple salad on plate next to fork and napkin.

    Harvest Chicken Salad

    Adding chicken and apples to a salad is one way to make for a fulfilling and healthy meal. This has a great combination of ingredients for unbeatable texture and flavor.

    Spinach Salad with Apple

    This apple salad has crunchy apples and nuts, and creamy cheese and healthy greens for a great meal.

    Arugula Apple Salad

    This simple salad is so satisfying! Make this with apples and arugula and be sure to add goat cheese and walnuts for texture and flavor.

    Shaved Brussels Sprouts Salad

    Shaved brussels sprouts and apples make such a good combination for a healthy salad. Serve this for lunch or dinner that hits the spot and doesn't weigh you down.

    grapes, apples, and walnuts atop greens

    Blue Cheese, Grape and Apple Salad

    Blue cheese, apples and grapes are such a good combination for a salad. Make this to enjoy for lunch, or serve it with grilled meat for dinner.

    Chicken Apple Salad

    Chicken and apples go together great in this easy and tasty salad. Make this for a fast and flavorful lunch you can pop in a picnic basket for a great summer meal.

    Fall Harvest Salad

    This salad has the best harvest flavors in every bite. With maple roasted squash, crispy apples, dried berries and a great dressing, this salad has a little something for everyone.

    Cucumber apple salad in bowl.

    Apple Cucumber Salad

    Make an apple salad with refreshing cucumbers for a unique and delicious flavor that pairs well with so many main meals.

    Classic Waldorf Salad

    Waldorf salad is a potluck staple. This recipe turns out perfectly every time for a crowd pleasing side or dessert option.

    Chopped apple salad.

    Apple Melon Pineapple Salad

    This fruity salad has all of the best flavors for a filling and refreshing healthy meal. This is great for a summer lunch to share with friends.

    Spinach Apple Salad

    Spinach and apples make for a delicious and easy combination for a healthy salad. You will love the crispy apples with walnuts and goat cheese.

    Apple salad in bowl with berries.

    Pomegranate and Brussels Sprouts Salad

    This salad starts with brussels sprouts sliced thin, and adds crunchy nuts, juicy pomegranate and crisp apples to make a really good salad with plenty of honey mustard dressing!

    Rainbow Broccoli Salad

    Bring the colors of the rainbow to the table with this crunchy and delicious salad. It has plenty of apples, broccoli, nuts, carrots and grapes to offer a medley of tasty flavors for your next potluck or party.

    Apple chicken walnut salad on lettuce leaves.

    Apple Walnut Chicken Salad

    Adding fruit and nuts is an easy way to make your chicken salad pop with great flavor. This will be a favorite fall lunch that is easy to meal prep ahead of time.

    Walnut apple salad on plate.

    Walnut Salad

    Walnuts are the star of this salad, but it has plenty of apples, greens and onions to give it texture, crunch and so much flavor!

    Simple Cabbage and Apple Salad

    Simple is always a good idea on a busy night. This recipe uses cabbage and apples to make a great side for grilled meats, or sandwiches.

    Green apple salad in bowl.

    Apple Gorgonzola Salad

    You can skip the trip to Buca di Beppo and get the iconic flavors of their apple gorgonzola salad at home with this easy to recreate dish.

    Apple salad with avocado - Harvest salad.

    Pomegranate and  Apple Harvest Salad

    Pecans, apples, avocado and pomegranate make this salad burst with fresh flavor in every bite.

    Cranberry Apple Salad

    Cranberries and apples come together to make a fresh and flavorful salad that you can serve all fall long for the best healthy lunches.

    Broccoli apple salad in bowl next to apples.

    Broccoli Apple Salad 

    Crispy apples, crunchy broccoli, and plenty of dressing come together in under 15 minutes to make a colorful and flavorful salad.

    Arugula and apple salad.

    Fall Panzanella Salad 

    This fresh salad has ample fall flavors in an easy to assemble form. You will want to pack this and take it along on a picnic with someone special on a pretty fall day.

    Apple salad in platter.

    Fall Harvest Salad

    Thinly sliced apples atop of leafy green lettuce with nuts, cheese and dressing make for a salad that captures the best flavors of the fall harvest in one easy to make salad.

    Love our Recipe Collections?

    If you love having themes for some of your favorite types of food, you’ll love these other recipe collections:

    • Image collage of picnic food ideas for couples.
      20 Picnic Food Ideas for Couples
    • Summer snack ideas photo collage with text overlay.
      35 Easy Summer Snacks Ideas
    • Easy Summer Dinner Ideas image collage with text overlay.
      Summer Dinner Ideas
    • Image collage of no bake desserts
      20+ No-Bake Desserts

    Ice Cream Sandwich Cake

    May 28, 2023

    Ice cream sandwich cake on white plate, with cherries on top.

    This ice cream sandwich cake is different from others because of its special middle layer of smooth fudge and crunchy Oreos (similar to the Dairy Queen ice cream cake that we all love so much)! Note: Make sure to allow enough time for the cake to chill before serving! See more below. If you’re in a time crunch, you may prefer this peanut buster parfait!

    If you saw my son’s Nautical Birthday party, then you probably noticed the ice cream bar that I incorporated. Ice cream is the perfect summer treat for a party or just as an easy dessert idea; not to mention an ice cream birthday party!

    Slice of ice cream sandwich cake on white plate with cherries on top.

    If you're looking for make-ahead desserts for sharing, take a look at my potluck dessert ideas.

    No-bake desserts are a popular treat during the summer so you’re not heating up the kitchen. This ice cream sandwich cake is one that can be made easily (with enough time in advance) that everyone seems to love. If you don’t want to work with ice cream though, this no-bake strawberry icebox cake is a great option!

    If you’re craving Oreo ice cream desserts but don’t have enough time to make a cake, you’ll also love this cookies and cream milkshake which uses similar ingredients.

    [feast_advanced_jump_to]

    Why You’ll Love This Recipe

    • Similar to Dairy Queen’s Ice Cream Cake: If you love the popular ice cream cake, but don’t want to try to make that extensive cake, this recipe is similar, using ice cream sandwiches to make it so much easier!
    • Crunchy cookie layer: An ice cream sandwich cake is delicious anyway but when you add the buttery, crispy Oreo cookie crumbs layer in the fudge layer, it takes it to a whole new level.
    • Kid-friendly recipe: If you love the kids helping you in the kitchen, this is the perfect recipe to have them get involved with. They’ll be so excited to see the progress of the steps, and of course, eat the finished result.

    Ingredients Needed

    The ingredients for this recipe are basic, and you should be able to find them at your local grocery store.

    Labeled ingredients on counter for ice cream sandwich cake.
    • Ice cream – I had never been a fan of ice cream until I had a “good” ice cream. I would usually buy the off-brands until I had Tillamook, and now I’m hooked. But any good brand of chocolate ice cream will do!
    • Corn Syrup – The corn syrup is used to give that ganache/chocolate layer a shine and to help the crushed Oreo cookies stick to one another.
    • Butter – the butter helps toast the cookie crumbs in the oven, so they don’t get soggy in the ice cream cake, so they maintain their crunch.

    Substitutions

    If you find that you need to substitute any ingredients because you don’t have them, or need to for dietary reasons, here are some suggestions that can help:

    • Butter – you can use salted or unsalted
    • Vanilla extract – this isn’t mandatory and you can leave this out if needed but if you have it, I highly recommend adding it to the ganache.
    • Toppings – we love crushing more Oreos (in larger pieces) to sprinkle on top but feel free to use other toppings such as sprinkles, chocolate syrup/hot fudge sauce (or more ganache), chocolate chips, etc.
    • Chocolate ice cream – if you prefer vanilla or a different flavor of ice cream, you can substitute this for chocolate.
    • Cool Whip – you can make your own whipped cream if you prefer that over Cool Whip.

    How to Make an Ice Cream Sandwich Cake

    There is a process to making this ice cream cake but it’s an easy process!

    This is broken into 3 components:

    • make Oreo crunchies
    • prepare ganache
    • build ice cream cake

    I suggest making the cookie crumbs and the ganache first, so they both have time to cool before adding to the ice cream cake layers. Then, set any extra Oreos aside for the topping if you’d like, or to even save them to make Chocolate Sandwich Cookie Pancakes tomorrow morning!

    *Be sure to see the recipe card below for the full ingredients list & instructions!*

    Before starting: Preheat your oven to 350° F. and remove chocolate ice cream and Cool Whip from the freezer so it begins to soften slightly to make spreading easier.

    Steps 1-4 for making ice cream sandwich cake.

    STEP 1. Crush Oreos and add to butter. Crush about 10 Oreos, to get about 1 cup of crushed crumbs. In a small bowl, mix with melted butter (Image 1).

    STEP 2. Bake cookie crumbs. Spread buttery Oreo crumbs on a baking sheet that’s covered with parchment paper and bake at 350 degrees for 6-7 minutes (Image 2).

    STEP 3. Make ganache. In a small, microwavable bowl, add chocolate chips, corn syrup, and vanilla (Image 3).

    STEP 4. Heat heavy cream. Next, warm your heavy cream until just boiling, and then pour over the chocolate chips. Allow it to sit for 2-3 minutes and then whisk until smooth, chocolate ganache forms (Image 4).

    Tip: Allow the ganache to sit and cool while making the first layer of ice cream sandwiches and chocolate ice cream. If your ganache hardens, you can microwave it for about 30 seconds to smooth it out again.

    Steps 5-8 how to make ice cream sandwich cake.

    STEP 5. First layer. In a loaf pan, add parchment paper to completely cover the pan. (You want to do this so when the entire cake is frozen, it’s easy to pull up out of the pan, to slice.) Make sure the entire loaf pan is covered with paper before filling. Add 5 ice cream sandwiches on top of parchment paper (Image 5).

    NOTE: Depending on the size of your loaf pan, you may want to trim your sandwiches to fit in the pan better, or you can scrunch them down to fit (this is what I do).

    STEP 6. Add chocolate ice cream layer. In a medium-sized mixing bowl, stir chocolate ice cream until it is smooth enough to spread on top of the ice cream sandwiches, and then freeze loaf pan of ice cream for 20 minutes (Image 6).

    STEP 7. Add ganache. Remove the loaf pan from the freezer and pour on cooled ganache on top of the chocolate ice cream, and then freeze for about 10 minutes. (Image 7).

    STEP 8. Add crunchies. Sprinkle on the crushed, baked Oreo cookie crumbs on top of the fudgy layer and then freeze for 2 hours (Image 8).

    Steps 9-11 for how to make ice cream cake.

    STEP 9. Add 2nd ice cream sandwich layer. Next, add 5 more ice cream sandwiches on top of the crunchy cookie layer (Image 9).

    STEP 10. Top with Cool Whip. Spread Cool Whip layer on top of the ice cream sandwiches (Image 10).

    STEP 11. Garnish with Oreos. If desired, crush (in to small pieces) about 4-5 Oreo cookies and sprinkle on top of ice cream sandwich cake. Cover with plastic wrap and freeze for 3-4 hours (or overnight to be safe) until cake is fully frozen and thick enough to slice (Image 11).

    Layered ice cream sandwiches with ice cream for an ice cream cake.

    STEP 12. Slice and serve. Remove the cake from the loaf pan by grabbing parchment paper and lifting it out. Peel the parchment paper from the sides of the cake and slice.

    Ice cream sandwich cake on white platter.

    Recipe Pro Tips

    • Warm knife. When the ice cream cake is so frozen, it helps to warm your knife under hot water before slicing. This makes slicing a lot easier.
    • Slice only at serving. Slice as needed, rather than slicing the entire cake at once. This will help keep the cake from thawing out too quickly and makes storing leftover cake easier.
    Sliced ice cream cake sandwich on white plate with fork.

    Recipe FAQs

    How do you store leftover ice cream cake?

    Do not slice the cake until serving. This makes it easier to store. You can place the ice cream cake back in the parchment paper and back in to the loaf pan if desired. Or, you can wrap the cake in plastic wrap and place in the freezer. (Make sure it’s fully wrapped so if it does thaw a bit, it will not leak.)

    Can you use chocolate ice cream sandwiches or different flavors of ice cream for ice cream cake?

    Yes absolutely. Feel free to use your favorite flavors to mix things up in this recipe.

    Bite of ice cream cake sandwich on fork.

    More Summer Recipes You’ll Love

    If you love no-bake desserts like this one for the summer months, you’ll also love these reader favorites:

    • Slice of no bake Oreo dessert on plate.
      The BEST Oreo Dessert
    • Slice of no bake chocolate pie on white plate.
      No Bake Chocolate Pie
    • A bowl of Oreo dip with an Oreo in it and crumbled Oreos on top.
      Oreo Dip
    • Slice of possum pie on a white plate with a fork sitting next to it with a bite on it.
      Possum Pie

    Recipe

    Ice cream sandwich cake on white plate, with cherries on top.
    Print Pin
    5 from 1 vote

    Ice Cream Sandwich Cake

    A no bake summer dessert recipe that uses ice cream sandwiches, chocolate ice cream, and has an incredibly layer of fudge and chocolate cookie crumbs!
    Course Dessert
    Cuisine American
    Prep Time 30 minutes minutes
    Freeze Time 6 hours hours
    Total Time 6 hours hours 30 minutes minutes
    Servings 8 servings
    Calories 899kcal
    Author Jessica Burgess

    Equipment

    • loaf pan
    • parchment paper
    • mixing bowls

    Ingredients

    • 10 ice cream sandwiches
    • 24 ounces chocolate ice cream

    Oreo Crunchy Layer

    • 10 Oreo cookies
    • 2 Tablespoons melted butter

    Chocolate Ganache Layer

    • 3 Tablespoons corn syrup
    • 1 cup milk chocolate chips
    • ½ teaspoons vanilla extract
    • ½ cup heavy cream

    Topping

    • 8 ounces Cool Whip
    • 5 Oreo cookies
    • cherries if desired

    Instructions

    Prep:

    • Before starting: Preheat your oven to 350° F. and remove chocolate ice cream and Cool Whip from the freezer so it begins to soften slightly to make spreading easier.

    Crunchy Cookie Layer:

    • Crush Oreos and add to butter. Crush about 10 Oreos, to get about 1 cup of crushed crumbs. In a small bowl, mix with melted butter.
    • Bake cookie crumbs. Spread buttery Oreo crumbs on a baking sheet that's covered with parchment paper and bake at 350 degrees for 6-7 minutes.

    Make Ganache:

    • Make ganache. In a small, microwavable bowl, add chocolate chips, corn syrup, and vanilla.
    • Heat heavy cream. Next, warm your heavy cream until just boiling, and then pour over the chocolate chips. Allow it to sit for 2-3 minutes and then whisk until smooth, chocolate ganache forms.

    Build Ice Cream Cake:

    • First layer. In a loaf pan, add parchment paper to completely cover the pan. (You want to do this so when the entire cake is frozen, it's easy to pull up out of the pan, to slice.) Make sure the entire loaf pan is covered with paper before filling. Add 5 ice cream sandwiches on top of parchment paper.
    • Add chocolate ice cream layer. In a medium-sized mixing bowl, stir chocolate ice cream until it is smooth enough to spread on top of the ice cream sandwiches, and then freeze loaf pan of ice cream for 20 minutes.
    • Add ganache. Remove the loaf pan from the freezer and pour on cooled ganache on top of the chocolate ice cream, and then freeze for about 10 minutes.
    • Add crunchies. Sprinkle on the crushed, baked Oreo cookie crumbs on top of the fudgy layer and then freeze for 2 hours.
    • Add 2nd ice cream sandwich layer. Next, add 5 more ice cream sandwiches on top of the crunchy cookie layer.
    • Top with Cool Whip. Spread Cool Whip layer on top of the ice cream sandwiches.
    • Garnish with Oreos. If desired, crush (in to small pieces) about 4-5 Oreo cookies and sprinkle on top of ice cream sandwich cake. Cover with plastic wrap and freeze for 3-4 hours (or overnight to be safe) until cake is fully frozen and thick enough to slice.
    • Slice and serve. Remove the cake from the loaf pan by grabbing parchment paper and lifting it out. Peel the parchment paper from the sides of the cake and slice.

    Nutrition

    Serving: 1serving (⅛ cake) | Calories: 899kcal | Carbohydrates: 135g | Protein: 10g | Fat: 38g | Saturated Fat: 18g | Polyunsaturated Fat: 3g | Monounsaturated Fat: 10g | Trans Fat: 0.1g | Cholesterol: 48mg | Sodium: 547mg | Potassium: 525mg | Fiber: 3g | Sugar: 84g | Vitamin A: 577IU | Vitamin C: 0.3mg | Calcium: 180mg | Iron: 4mg

    Air Fryer Apple Fritters

    May 27, 2023

    Air fryer apple fritters on cooling rack.

    Air Fryer Apple Fritters: If you like apples, you’ll LOVE this sweet treat. This easy dessert or breakfast treat, uses fresh apples and can be on the table in under 30 minutes!

    This is by far one of our favorite air fryer recipes we have on the blog, along with our air fryer cinnamon rolls. This also ranks right up there with our apple pie nachos.

    Originally published in November 2021 and recipe was re-tested and updated in May 2023.

    Air fryer apple fritters on cooling rack.

    Why You’ll Love This Recipe

    Although pumpkins steal a lot of the spotlight in the fall, this time of year is also apple season!

    With an abundance of fresh apples around, now is the perfect time to test out these great apple fritters. This easy recipe uses simple ingredients you most likely have on hand and comes together in under 30 minutes!

    They’re delicious as a breakfast idea or even as a fun snack recipe to use up any extra apples!

    [feast_advanced_jump_to]

    Ingredients

    These easy air fryer apple fritters use simple ingredients you probably have in your house already.

    Labeled ingredients for air fryer apple fritters.

    Substitutions

    • You can substitute the brown sugar for extra white sugar of the same measurements.
    • Feel free to leave the nutmeg out of the recipe if desired. 
    • Substituting the whole milk with heavy cream for a thicker texture is an option.
    • You can substitute the gala apples with any flavor or sweet apple you'd like.

    Instructions

    Steps 1-4 for air fryer apple fritters.
    1. Whisk together the flour, baking soda, sugars, salt, cinnamon, and nutmeg in a medium-sized mixing bowl. Set aside. 
    2. In a separate bowl, whisk together the whole milk, lemon juice, and eggs until smooth. 
    3. Fold the dry ingredients into the wet ingredients (careful not to overmix unless you want tough, dense fritters). 
    4. Fold the apples into the batter. 
    Apples and fritter batter in glass mixing bowl.

    Pro Tip: Make sure you line the basket with parchment paper or an air fryer liner. Most air fryer baskets have holes in them. If you do not line the basket, the batter will seep through the holes and make a mess. 

    Steps 5-8 on how to make air fryer apple fritters.
    1. Line the basket of an air fryer with parchment paper and scoop dollops of the fritter batter onto the parchment paper using a ¼ cup measure. 
    2. Air fry the apple fritters at 400 degrees F for 7 minutes. Flip the fritters and fry for an additional 4 minutes. 
    3. While the fritters are frying, whisk together the powdered sugar, vanilla, whole milk, and cinnamon. (If you prefer a thicker glaze, you can add more powdered sugar.)
    4. As soon as the fritters come out of the air fryer, spoon the glaze over them. 
    5. Serve warm or at room temperature.
    Spoon pouring glaze over the top of apple fritters.

    Storage

    Leftovers: To store these air fryer apple fritters, allow these air fryer fritters to cool to room temperature before sealing them in an airtight container. Keep them at room temperature for up to 2 days or in the refrigerator for up to 1 week.

    Freezing: You can make these air fryer fritters ahead of time and freeze them. Allow the fritters to cool to room temperature before sealing them in an airtight container and storing them in the freezer. You can keep them there for up to 3 months.

    To Thaw: If you choose to freeze these air fryer apple fritters, allow them to thaw on the countertop or in your refrigerator before serving.

    Reheat: If you want to enjoy your apple fritters warm, place them in the microwave in 10-second intervals until they reach the desired temperature. You can also arrange them on a parchment paper-lined baking sheet and bake in the oven at 325 degrees F for 10 minutes or until heated through. 

    Bite taken out of air fryer apple fritters, that are stacked on top of one another.

    Expert Tips and FAQs

    Why are my apple fritters soggy?

    The most likely answer to this question is that you have made your dough scoops too large. If you make your dough scoops larger than the ¼ cup recommended in the recipe, you will risk having a soggy center or a soggy bottom on your apple fritter.

    (Don’t make them too small though- if you don't add enough batter, you will risk burning the tops of your apple fritters!)

    How do you reheat apple fritters in the air fryer?

    The best way to reheat your apple fritters is in the oven or air fryer. Preheat your air fryer to 400°, heat your apple fritters for 2 minutes, and voila!

    Expert Tip: Never microwave an air fryer apple fritter to warm it up. It will turn out soggy and chewy every time. It’s well worth it to take the extra few minutes and warm them up in the air fryer!

    Why are my apple fritters doughy in the middle?

    This could be a common case of dropping too much batter into the air fryer. ¼ cup of batter is the perfect amount to get a nice golden-brown crisp on the top of the fritter, and a soft chewy center.

    Do I have to use peeled apples or can I leave them whole?

    I prefer peeling the apples for this recipe but you do not have to. It really is a matter of personal preference. Some people enjoy the texture of the skins. Others do not.

    How do I make the glaze for apple fritters thicker?

    Make sure to use whole milk when making the glaze! You can also add more powdered sugar in tablespoon increments until the glaze thickens if preferred.

    Glazed air fryer apple fritters next to cinnamon sticks.

    Related Recipes

    Love apple fritters as much as we do? Then you’ll also want to check out these old fashioned apple fritters too!

    If you love apples, then you’ll also love this Snicker apple salad and this caramel apple dump cake!

    Recipe

    Air fryer apple fritters on cooling rack.
    Print Pin
    4.93 from 26 votes

    Air Fryer Apple Fritters

    If you like apples, you'll LOVE this easy sweet treat for breakfast or for a warm and comforting snack or dessert.
    Course Breakfast, Dessert
    Cuisine American
    Prep Time 15 minutes minutes
    Cook Time 11 minutes minutes
    Total Time 26 minutes minutes
    Servings 8 fritters
    Calories 179kcal
    Author Jessica Burgess

    Equipment

    • air fryer

    Ingredients

    Fritter

    • 1 ½ cups all-purpose white flour
    • 3 Tablespoons white granulated sugar
    • 2 teaspoons baking soda
    • 1 Tablespoon brown sugar
    • ½ teaspoon salt
    • 2 teaspoons ground cinnamon
    • 1 teaspoons ground nutmeg
    • ½ cup whole milk
    • 1½ Tablespoons lemon juice
    • 2 large eggs cold
    • 2 gala apples diced

    Glaze

    • ½ cup powdered sugar
    • 2 teaspoons vanilla extract
    • ¼ cup whole milk
    • ½ teaspoon cinnamon

    Instructions

    • Combine the dry ingredients. Whisk together the flour, baking soda, sugars, salt, cinnamon, and nutmeg in a medium-sized mixing bowl. Set aside. 
    • Combine the wet ingredients. In a separate bowl, whisk together the whole milk, lemon juice, and eggs until smooth.
    • Mix together. Fold the dry ingredients into the wet ingredients (careful not to overmix unless you want tough, dense fritters). 
    • Add apples. Fold the apples into the batter. 
    • Prep. Line the basket of an air fryer with parchment paper and scoop dollops of the fritter batter onto the parchment paper using a ¼ cup measure. 
    • Air Fry. Air fry the apple fritters at 400 degrees F for 7 minutes. Flip the fritters and fry for an additional 4 minutes. 
    • Make Glaze. While the fritters are frying, whisk together the powdered sugar, vanilla, whole milk, and cinnamon. 
    • Glaze Fritters. As soon as the fritters come out of the air fryer, spoon the glaze over them. 
    • Serve warm or at room temperature.

    Notes

    HINT: When picking an apple to use for your air fryer apple fritters, you want to make sure you choose a nice, crunchy apple. Gala apples work perfectly for apple fritters; however, you can also use honey crisp apples, granny smith apples, etc.
    Glaze: Make sure to use whole milk when making the glaze! You can also add more powdered sugar in tablespoon increments until the glaze thickens if preferred.
    Storage: Cool to room temperature before sealing them in an airtight container. Keep them at room temperature for up to 2 days or in the refrigerator for up to 1 week.
    Reheat: Place in the microwave in 10-second intervals until they reach the desired temperature. You can also arrange them on a parchment paper-lined baking sheet and bake in the oven at 325 degrees F for 10 minutes or until heated through. 

    Nutrition

    Serving: 1fritter | Calories: 179kcal | Carbohydrates: 36g | Protein: 4g | Fat: 2g | Saturated Fat: 1g | Polyunsaturated Fat: 0.3g | Monounsaturated Fat: 1g | Trans Fat: 0.004g | Cholesterol: 44mg | Sodium: 155mg | Potassium: 166mg | Fiber: 2g | Sugar: 17g | Vitamin A: 117IU | Vitamin C: 3mg | Calcium: 64mg | Iron: 1mg

    Smoked Burger Recipe

    May 26, 2023

    Smoked burger on a white plate, topped with pickles, cheese and tomato.

    This smoked burger recipe only takes one hour on the smoker and is an easy recipe, creating the best, juiciest, smoked burgers, or cheeseburgers.

    Burger recipes are one of our favorite easy dinners here because they can be customized with your favorite burger toppings, and can be made in so many different ways. You can cook burgers on the stove, air fry burgers, cook burgers in an electric skillet, and even grill burgers from frozen. Now, this burger recipe on the smoker may be your go-to during the summer months.

    Originally published December 2020, updated May 2023.

    Smoked burger on white plate, topped with pickles, tomato, and cheese.

    Whether you just love using your smoker or absolutely adore that smoky flavor, smoking hamburgers is a great way to cook those beef patties! I’ve even smoked a large beef patty for smoked cheeseburger sliders.

    I’ll be honest… I DESPISED making hamburgers for the longest time. They were dry, lacked flavor, and made a huge mess in the kitchen…until I started making hamburgers in the oven. That was the day my life was changed and since then, it has changed the lives of so many other hamburger lovers out there too!

    Here’s what one Fantabulosity reader said recently,

    “Made burgers this way the last 2 nights. I will be making burgers this way from now on! They came out great!”

    – Cammy

    Why You’ll Want to Make These

    Once I had my oven-baked hamburger skill down, and my husband had his elk burger recipe down, I knew it was time to branch out and try my hand at smoking burgers on the pellet grill too, since we’ve been really having fun creating smoked meats and recipes lately!

    And let me tell ya… talk about a burger with a flavor punch. That natural “smoke” flavor from the wood chips, combined with an easy salt & pepper seasoning, creates a delicious taste to go along with the crispy edges and great char flavor.

    Can You Smoke Burgers?

    I wondered the same thing. Short answer… yes. Long answer, keep reading:

    We’ve been on a kick lately using our smoker so when my meal planner had “cheeseburgers” on it the other day, I wanted to shake things up a bit and throw these bad boys on the smoker for the first time to see how they did.

    We had friends coming over so I was a little nervous but when they bit in to them and said they were juicy, flavorful, and “really good”… I knew we were on to something.

    So I made them again the next day and had one and I have to say I was pleasantly surprised too. Now, they’re on our weekly meal plan rotation!

    Considering we have been smoking a LOT of different meats at 225°, I wanted to keep this recipe the same because the results of low and slow have been phenomenal… and this one is no different.

    How long does it take to smoke burgers at 225°

    We found that smoking the burgers (we did about 3-4 burgers per pound if that helps you determine thickness) for 1 hour was the perfect time. Now, the time can vary depending on how DONE you want your burger but for us, this was “done” and no longer had blood running through it.

    However, if you don’t have a lot of experience with smoking foods, keep in mind that the middle may still resemble a pink color even if it’s fully cooked.

    “What should the internal temperature of a hamburger be?”

    If you want to get technical, you can take the internal temperature of your burgers and stop the cooking process when you’re comfortable with the temp. The USDA recommends the internal temp of a hamburger reach 160°.

    What Kind of Pellets to Use for Smoked Burgers

    We love experimenting with different pellets (or chips) for our smoker but we’ve found that hickory is always a winner for burgers. But feel free to switch things up!

    Do you flip burgers when smoking?

    No. But feel free to do so if you’re used to doing so. The pellet grill we use cooks pretty evenly so there hasn’t been a need to flip them for us, which makes things easier because there’s no need to babysit them for the one-hour cook time.

    How to Smoke Burgers

    Patty out burgers to desired thickness. For 1 lb. of ground beef I usually make 3 thick burgers but sometimes stretch it to 4.

    Steps 1-4 to make smoked burgers.

    If you need to make more for your entire family or for friends, feel free to double the recipe as needed!

    Also keep in mind that the thickness of burgers can make the cook time vary, especially if you want to stay away from a rare burger so extra time may be necessary if really thick patties are more your style

    For the photos that you see, I used 2 lbs. of ground beef and it made 7 burgers. If you have more ground beef, you’ll love these other ground beef dinner ideas.

    How to Season Hamburgers

    Salt and black pepper. Sure, I’ve tried all of my favorite ingredients… Montreal Steak Seasoning, garlic powder, Worcestershire sauce, onion powder… you name it. But I’m telling ya… there is something about just using salt and pepper, allowing the flavor of the meat (and smoke flavor in this case) to really shine through for the best results.

    However, feel free to use your favorite seasoned patties recipe or combo of spices too!

    I just sprinkle a little bit of salt (kosher is our favorite) and cracked peppercorn medley on the top of each patty. Use these as desired. I typically free hand it… but if you’re looking for some guidance I’d say it’s safe to say at least a teaspoon of KOSHER (maybe less for regular table salt), and a ½ teaspoon of cracked peppercorn medley (or ground black pepper).

    Place burgers on the preheated smoker at 225° for one hour, or until your desired “doneness”, preferably until the internal temperature reaches at least 160 degrees. No flipping needed!

    Smoked Cheeseburgers

    If you want to make cheeseburgers, simply lay a cheese slice (American, pepper jack cheddar cheese, or your favorite kind) on the burgers after the cook-time and let it rest (with the smoker turned off and the lid closed) for a few more minutes, for the perfect melted cheese.

    Remove from the smoker and they’re ready for your favorite condiments if desired!

    Now, if you love cheese on a burger, these juicy lucy burgers are going to blow your mind!

    Tips for Juicy Burgers – Dimple in the Middle to Trap Juices

    A little trick I learned from the Pioneer Woman a long time ago was to press a little dimple in to the middle of a burger patty when you’re forming them in to hamburger patties. This helps traps the juices so they don’t run out and go to waste.

    You can see in the photo below that this one did the job!

    Cooked smoked burgers on parchment paper, showing how the juices are trapped.

    Burger Toppings

    For this recipe, I kept the toppings pretty simple and just used what we had on hand: Cheese, tomato and pickles.

    But if you want to get in to a heck of a lot of fun and top the burgers, here are some of our other favorite topping ideas:

    • Barbecue Sauce
    • Mustard
    • Ketchup
    • Hot Sauce
    • Steak Sauce
    • Slice of Bacon
    • Onion
    • Onion Rings (Like in this bbq burger!)

    Make sure you check out an extensive list of topping ideas that I shared in “Burger Bar Ideas” post.

    Smoked burger on white plate, next to french fries.

    What to Serve with Smoked Burgers

    If you’re smoking burgers, and looking for side dishes to throw on the smoker too, you’ll LOVE these smoked stuffed mushrooms!

    When I’m having a cookout, I love pairing these burgers with a fresh Summer Side Salad, a BBQ Ranch Cornbread Salad, or even this Creamy Crunchy Cucumber Salad, which would complement the smoky flavors. And nothing tops the burgers as well as a dollop of guacamole. Really, any of these side dishes would taste great with these smoked burgers.

    More Hamburger Recipes You’ll Love:

    If you love hamburgers as much as we do, you’ll also love these burger recipes:

    • Waffle Burger on white plate with small bowl of syrup
      Waffle Burger
    • Venison burger on white plate, sitting next to french fries.
      Venison Burgers
    • Cheeseburger Sliders
      Cheeseburger Sliders with Hawaiian Rolls
    • Baked turkey burger on bun with lettuce, tomato, cheese and fiesta mayo.
      Baked Turkey Burgers

    More Smoker Recipes You’ll Love:

    If you’re like us, if we have the smoker hot and ready, we like to throw other items on it to help meal plan for the week, like our Smoked Chicken Tenderloins and our Smoked Cornish Game Hens!

    Traeger brisket is an amazing thing to make on a holiday weekend or just for fun!

    Or, if you have a beef roast on hand, you’ll love making this pulled beef!

    Smoked Luther Burger

    Ready to uplevel your smoked burger game? Top it with smoked candied bacon and use glazed donuts as buns to make Luther burgers!

    Did You Make This?
    Snap a pic and hashtag it #Fantabulosity - I love to see your creations on Instagram and Facebook.

    Recipe

    Smoked burger on a white plate, topped with pickles, cheese and tomato.
    Print Pin
    5 from 6 votes

    Smoked Burgers

    Smoked Burgers: How & how long to cook burgers on the smoker, creating a JUICY, flavorful burger with salt & pepper and natural smoke flavor!
    Course Main Course
    Cuisine American
    Prep Time 5 minutes minutes
    Cook Time 1 hour hour
    Total Time 1 hour hour 5 minutes minutes
    Servings 4 burgers
    Calories 244kcal
    Author Jessica Burgess

    Equipment

    • smoker

    Ingredients

    • 1 pound ground beef
    • salt as desired – see blog post for tips
    • pepper as desired – see blog post for tips
    • sliced cheese if desired

    Instructions

    • Preheat smoker to 225°
    • Patty out burgers – with one pound, sometimes I make 3 thicker burgers and sometimes I make 4 thinner. Either way, the cook time will be the same.
    • Salt and pepper the tops of your burgers. You can salt/pepper as desired. See blog post for tips on what type of salt/pepper and how much depending on type.
    • Place the burgers on the smoker racks (directly, no pan needed) and cook for one hour or until the desired doneness. (USDA recommends the internal temperature of burgers should be 160°.) NOTE: No need to flip the burgers.

    Notes

    Tip for the Juciest Burgers – A little trick I learned from the Pioneer Woman a long time ago was to press a little dimple in to the middle of a burger patty when you’re forming them in to hamburger patties. This helps traps the juices so they don’t run out and go to waste.
    What kind of pellets to use for the smoker?
    We love experimenting with different pellets (or chips) for our smoker but we’ve found that hickory is always a winner for burgers. But feel free to switch things up!

    Nutrition

    Serving: 1burger | Calories: 244kcal | Protein: 21g | Fat: 17g | Saturated Fat: 7g | Polyunsaturated Fat: 0.5g | Monounsaturated Fat: 7g | Trans Fat: 1g | Cholesterol: 77mg | Sodium: 75mg | Potassium: 335mg | Calcium: 17mg | Iron: 2mg

    Lemon Puppy Chow

    May 21, 2023

    Lemon Puppy Chow in white bowl.

    Lemon Puppy Chow: If you love the classic muddy buddies recipe and lemon, then you’re going to love this easy recipe too! Using white chocolate instead of milk chocolate, add lemon juice and zest, and a few other ingredients and this easy snack recipe is ready in just 20 minutes!

    Lemon puppy chow in white bowl, sitting next to lemons.

    We absolutely love the classic puppy chow recipe, but we also have so much fun coming up with different versions like this one. This hot chocolate muddy buddies recipe is perfect in the winter, while the lemon muddy buddies are perfect in the summer. And, I love making this Butterfinger puppy chow for the holidays.

    Using cereal to make no-bake desserts is very common, and we love using different kinds for different recipes. These Fruity Pebbles Rice Krispie Treats are a fruity version of the classic rice krispy treat, and these Lucky Charms Treats are such a fun twist too.

    [feast_advanced_jump_to]

    Why You’ll Love This Recipe

    • Refreshing: With the lemon flavor, it’s so refreshing for the warmer months. It’s still a sweet treat but not too heavy and has the perfect amount of lemon flavor.
    • Easy recipe: Zesting your lemon may be the most work that you have to put in to this recipe, and even that is easy!
    • Ready in only 20 minutes: In just a few minutes, you can have a snack, ready to conquer that sweet tooth!

    Ingredients Needed

    Nothing fancy is needed for this recipe! These simple ingredients can be found at most grocery stores. But if you stock up on lemons, make this classic lemon meringue pie for dessert, too!

    Labeled ingredients for lemon puppy chow.
    • Butter – We use unsalted for this recipe but honestly, you can use salted if that’s what you have on hand.
    • Cereal – We usually use rice square cereal (such as Rice Chex) but we’ve also used Corn Chex and those taste amazing as well.
    • White Chocolate Chips – There are many different brands of white chocolate chips but we prefer using Guittard or Ghirardelli because they’re a great quality of chocolate when melted and for taste.

    Note: You may not need all 4 lemons. (It can depend on the size of your lemons and if you’ll be using the lemon juices from the same lemons you’ll be zesting.) You can zest first, and then slice the lemons to get the 2 Tablespoons of juice. If you have lemons left over, this lemon blondies recipe is another one to try.

    Substitutions

    • Lemons – if you don’t have enough lemons to get the lemon juice from, you can use store-bought lemon juice. But remember, you’ll still want the lemon zest and even though it doesn’t sound like it’s enough to matter, it’s important.

    How to Make Lemon Puppy Chow

    Grab a couple of bowls, one medium-sized, and one large bowl. You’ll be melting the chocolate, butter, and lemon together in the medium bowl and pouring it over the cereal that will be in the biggest bowl. So make sure to use a large bowl that will hold and allow room to stir 9 cups of cereal.

    *Be sure to see the recipe card below for the full ingredients list & instructions!*

    Recipe Prep – Important!

    First, you’ll want to zest at least 4 Tablespoons of lemon zest and make at least 2 Tablespoons of lemon juice from your lemons.

    Next, pour cereal in to large bowl, so when the chocolate has melted, you can quickly pour over the cereal before it hardens.

    Steps 1-4 lemon puppy chow.

    STEP 1. Lemon coating. Pour white chocolate chips, lemon juice, zest, and butter in a medium-sized, microwavable bowl.

    STEP 2. Melt chocolate. In 30-second intervals, melt the chocolate in the microwave, stirring well after each time, until melted. (This was a total of 3 times for us.)

    STEP 3. Pour over cereal. Next, pour melted chocolate over cereal and gently stir until combined.

    STEP 4. Add half the powdered sugar. Next, pour half of the sugar on top of the melted chocolate-covered cereal and stir again, gently.

    Tip: When stirring, stir slowly and be careful not to mash the cereal so it breaks. You want to try and keep the pieces whole for easy snacking.

    You can also add the chocolate-covered cereal to a brown paper bag or ziptop bag, and then shake to coat with powdered sugar if you prefer.

    STEP 5. Add remaining sugar. Then, pour the remaining powdered sugar on top of the cereal and stir until coated again. Serve!

    Recipe Pro Tips

    • Spread and Cool. You can pour the lemon puppy chow on a baking sheet after coating for it to fully cool before serving, if desired.
    • Extra Powdered Sugar. Feel free to sprinkle extra powdered sugar on top just before serving if the chocolate has consumed a lot of the sugar and you prefer a dusting.
    • Crunchy/Chewy Texture. The combination of the lemon juice and the white chocolate can create a chewy texture to this snack recipe, yet there’s still crunch in some areas too! It’s the perfect texture combo! If yours has this texture, you’ve made the recipe correctly!
    Lemon puppy chow in white bowl, sitting next lemons.

    Serving Suggestions

    • Laid-back snacking: This recipe is great for snacking on the weekends or for a movie night.
    • Party snack: Serving this at a party is a crowd-pleaser and everyone loves the lemon twist to a classic favorite.
    • Serve on top: Take things to a whole other level and add on top of a bowl of ice cream for a crunch snack with a creamy soft serve.

    Storage

    • Store any leftovers in an airtight container or it can get stale.
    • You can also freeze any leftovers if needed. Place in a freezer-safe container and freeze for up to 3 months.

    More Lemon Recipes You’ll Love

    If you have lemons and are looking for other recipes to use them in, these are our most popular lemon recipes that you’ll love:

    • lemon bundt cake on wood stand
      Creamy Lemon Pound Cake (Bundt Cake)
    • Lemon Brownies Recipe with cake mix
      Lemon Cake Mix Brownies
    • Slice of 7up cake on white plate, sitting next to a can of 7up.
      7UP Cake
    • Slice of lemon poke cake on white plate, with lemon wedge on top.
      Lemon Poke Cake

    Recipe

    Lemon Puppy Chow in white bowl.
    Print Pin
    5 from 3 votes

    Lemon Puppy Chow

    This recipe is a delicious twist on classic Muddy Buddies. The lemon flavors shine through so wonderfully and this recipe is refreshing on a hot day!
    Course Snack
    Cuisine American
    Diet Vegetarian
    Prep Time 20 minutes minutes
    Total Time 20 minutes minutes
    Servings 9 cups
    Calories 518kcal
    Author Jessica Burgess

    Ingredients

    • 9 cups rice square cereal or corn square cereal (such as Chex)
    • 12 ounces white chocolate chips
    • ¼ cup or 4 Tablespoons unsalted butter
    • 4 Tablespoons lemon zest
    • 2 Tablespoons fresh lemon juice
    • 1 cup powdered sugar plus extra for garnish

    Instructions

    • Prep cereal: Pour cereal into a large mixing bowl.
    • Make lemon chocolate: In a separate microwaveable bowl, add white chocolate chips, butter, lemon zest, and juice. Microwave in 30-second intervals, until the chips are melted and you are able to mix completely.
    • Cover cereal: Pour the melted mixture, over the top of the cereal, and gently stir to coat.
    • Mix: Once evenly mixed, pour cereal mixture in to a large, resealable bag. (You can also stir in bowl if you don't have a bag but only be gentle so you don't break the pieces.)
    • Sugar: Pour about ½ cup powdered sugar on top of cereal, seal bag & shake.
    • More sugar: Once coated, open bag, and pour remaining powdered sugar over cereal.
    • Coat: Seal bag & shake again, or if stirring in bowl, stir until evenly covered. You can sprinkle on more powdered sugar if desired, as a garnish. Enjoy!

    Notes

    Note: When mixing lemon juice and chocolate, and covering the crunchy cereal, it can make the puppy chow have a chewier texture than a full-on crunch. This is one of our favorite parts!
    Storage: Store leftovers in an airtight container and keep at room temperature.

    Nutrition

    Serving: 1cup | Calories: 518kcal | Carbohydrates: 87g | Protein: 8g | Fat: 19g | Saturated Fat: 11g | Polyunsaturated Fat: 1g | Monounsaturated Fat: 5g | Trans Fat: 0.2g | Cholesterol: 22mg | Sodium: 388mg | Potassium: 344mg | Fiber: 8g | Sugar: 42g | Vitamin A: 836IU | Vitamin C: 11mg | Calcium: 210mg | Iron: 19mg

    Banana Pudding Brownies

    May 19, 2023

    banana pudding brownie on white plate

    Banana Pudding Brownies: A combination of simple ingredients, that combines the flavors of brownies with an old-fashioned dessert, makes this an easy dessert recipe and brownie recipe to remember!

    Banana Pudding Brownie on spatula

    Why You’ll Love These Banana Pudding Brownies

    If you love old-fashioned desserts like banana cream pie or just the classic banana pudding flavor in almost anything, then you will absolutely love these! Some may even say they should be called banana pudding blondies but we like to call them whatever rolls off the tongue! So feel free to call them what you like!

    We’ve had so much fun experimenting with bananas around here lately, especially with this banana bread pudding, this banana pudding dip, and these peanut butter banana brownies, and not to mention the best banana bread that has been shared thousands of times on Facebook!

    [feast_advanced_jump_to]

    Ingredients

    You know the best thing about this recipe? It uses only a few, simple ingredients and you probably even have most of them on hand already! We love easy around here, as you can tell from some of our other brownie recipes that are made with cake mixes like these red velvet brownies.

    ingredients on table for banana pudding brownies
    Ingredients

    For the Brownies:

    • 2 ¼ cup packed light brown sugar
    • 11 tablespoons unsalted butter, melted
    • 3 eggs
    • 2 ⅔ cups all purpose flour
    • 2 ½ teaspoons baking powder
    • ½ teaspoon salt

    For the Filling:

    • 8 ounces softened cream cheese
    • 3.4-ounce box banana instant pudding mix (or you can use instant vanilla pudding mix and extract in a banana flavor)
    • 2 eggs
    • ⅓ cup whole or 2% milk
    • Vanilla wafers for topping (15 or so, or more if you prefer!)

    Substitutions

    To keep things easy, you can use a banana pudding mix for this recipe but if you have trouble finding it, you can also use vanilla pudding mix, and use 2 tablespoons of banana extract or flavoring! Mix the flavoring in with the pudding mix.

    Variations

    • Although I know you’ll love these delicious banana pudding brownies, have fun experimenting and try different flavors of pudding mixes, to come up with new brownie recipes!
    • Also feel free to slice bananas and put those on top – but do know that they can turn brown quickly so you may want to be cautious of that.
    • For fudgy brownies, more like traditional brownies, you may want to consider adding a little cocoa powder as well, to the brownie mix. Please note that I have not tried this yet so I’m not sure how much to advise you on trying, so you may want to experiment!
    • Love Cool Whip? Try a dollop of whipped cream on top of the brownie when serving for some added goodness!
    • Get wild and crumble up some of your favorite cookies, like Oreo Cookies or even ice cream toppings for more pizzazz!

    How to Make Banana Pudding Brownies

    1. Preheat the oven to 350 degrees and spray a 9×13 baking dish with cooking spray. (Or if you prefer using parchment paper to bake, that’s ok too!) Set aside.
    Steps 1-4 for banana pudding brownies.
    1. In a large mixing bowl, stir together the brown sugar and melted butter. Add the eggs one at a time and mix well. (You can use a hand mixer or an electric mixer but a spoon should work just as well.)
    2. In a separate bowl, combine the flour, baking powder, and salt.
    3. Then add the dry ingredients to the wet ingredients. Mix together until a dough forms.
    4. Place the dough into the baking dish and spread it evenly to all corners. Set the baking dish in the oven and bake for 25 minutes.
    Steps 5-8 of banana pudding brownies.
    1. Meanwhile, blend together the cream cheese and the pudding mix. Then slowly add the eggs and milk. You'll want to blend it for 3-5 minutes to get it nice and thick. 
    2. After 25 minutes, remove the brownies and pour the pudding mixture on top of the brownie, spreading it in to an even layer.
    3. Add Vanilla Wafers on top of the pudding layer. (We used about 15 but feel free to use more!)
    4. Place the baking dish back into the oven and bake for another 25 to 30 minutes.
    5. Remove the baking dish from the oven and let the brownies completely cool before serving.

    Top Tip

    The brownies may be a bit soft in the middle when they first come out. After the brownies have cooled, they should "firm up" a bit, so make sure the brownies are completely cooled before serving. You can place the pan on a wire rack to help cool things off faster, as well!

    I have a feeling this ultimate banana pudding brownie recipe, may just become a new delicious dessert recipe to take to any get-together or to enjoy when a sweet tooth strikes, even as much as this banana pudding poke cake recipe.

    Slice of banana pudding brownie on white plate

    Storage

    Have leftover brownies? Rather than room temperature, we prefer placing them in the refrigerator, in an airtight container, or cover with plastic wrap, so they’ll last longer. (But they don’t really last long around our house anyway.)

    You can eat them cold or you can warm them slightly in the microwave the next time you’re ready to enjoy them! Best to be enjoyed within 4-5 days.

    More Dessert Recipes

    If you loved this recipe, then you’re also going to love all of our other brownie recipes, especially these chocolate peanut butter brownies and these brownies with frosting! Or, these popular dessert recipes are going to be some of your favorites too:

    • Peach cobbler that was made with cake mix in a white baking pan.
      Peach Cobbler with Cake Mix
    • Slice of ugly duckling cake on white plates.
      Ugly Duckling Cake
    • Cut out and baked sugar cookies that hold their shape, sitting on cutting board.
      Easy Sugar Cookie Recipe
    • Vanilla sauce drizzled on to bread pudding, in a small white dish.
      Vanilla Sauce Recipe

    Did you make this? I’d be so grateful if you left a “star” rating below to let me know what you thought! Then, the next time you need a quick and easy recipe, come back to Fantabulosity to browse all of my easy recipes!

    Recipe

    banana pudding brownie on white plate
    Print Pin
    5 from 38 votes

    Banana Pudding Brownies

    Banana Pudding Brownies: A combination of simple ingredients, that combines the flavors of brownies with an old-fashioned dessert, makes this an easy dessert recipe to remember!
    Course Dessert
    Cuisine American
    Prep Time 10 minutes minutes
    Cook Time 50 minutes minutes
    Total Time 1 hour hour
    Servings 15 brownies
    Calories 395kcal
    Author Jessica Burgess

    Equipment

    • 9×13 Baking dish
    • 3 mixing bowls
    • hand mixer

    Ingredients

    Brownies

    • 2 ½ cups packed light brown sugar
    • 11 tablespoons unsalted butter melted
    • 3 eggs
    • 2 ⅔ cups all purpose flour
    • 2 ½ teaspoons baking powder
    • ½ teaspoon salt

    Topping

    • 8 ounces softened cream cheese
    • 3.4 ounce boxed instant banana pudding mix or you can use instant vanilla pudding mix and 2 Tablespoons of banana extract flavoring
    • 2 eggs
    • ⅓ cup milk whole or 2%
    • Vanilla Wafers for topping (about 15 or more if you like!)

    Instructions

    To make the brownies:

    • Preheat the oven to 350 degrees and spray a 9×13 baking dish with cooking spray. Set aside.
    • In a large bowl, stir together the brown sugar and melted butter. Add the eggs one at a time and mix well. 
      2 ½ cups packed light brown sugar, 11 tablespoons unsalted butter, 3 eggs
    • In a separate bowl, combine the flour, baking powder, and salt.
      2 ⅔ cups all purpose flour, 2 ½ teaspoons baking powder, ½ teaspoon salt
    • Then add the dry ingredients to the wet ingredients. Mix together until a dough forms.
    • Place the dough into the baking dish and spread it evenly to all corners.
    • Set the baking dish in the oven and bake for 25 minutes.

    How to Make Banana Topping

    • Meanwhile, with a mixer, mix together the cream cheese and the pudding mix. Then slowly add the eggs and milk. You'll want to blend it for 3-5 minutes to get it nice and thick. 
      8 ounces softened cream cheese, 3.4 ounce boxed instant banana pudding mix, 2 eggs, ⅓ cup milk
    • After baking the brownies for 25 minutes, remove the brownies and pour the pudding mixture on top, spreading to an even layer and then add the Vanilla Wafers on top.
      Vanilla Wafers
    • Place the baking dish back into the oven and bake for another 25 to 30 minutes.
    • Remove the baking dish from the oven and let the brownies completely cool before serving.
    • NOTE: The brownies may be a bit soft in the middle when they first come out. After the brownies have cooled, they should "firm up" a bit, so make sure the brownies are completely cooled before serving. 

    Notes

    Storage:
    Have leftover brownies? We prefer placing them in the refrigerator so they’ll last longer. (But they don’t really last long around our house anyway.) You can eat them cold or you can warm them slightly in the microwave the next time you’re ready to enjoy them! Best to be enjoyed within 4-5 days.

    Nutrition

    Serving: 1brownie | Calories: 395kcal | Carbohydrates: 60g | Protein: 5g | Fat: 15g | Saturated Fat: 9g | Polyunsaturated Fat: 1g | Monounsaturated Fat: 4g | Trans Fat: 1g | Cholesterol: 93mg | Sodium: 257mg | Potassium: 192mg | Fiber: 1g | Sugar: 41g | Vitamin A: 548IU | Calcium: 95mg | Iron: 2mg

    American Flag Fruit Pizza

    May 17, 2023

    American flag fruit pizza on marble counter

    This American Flag Fruit Pizza is an eye-catching red, white, and blue dessert recipe, that features a soft sugar cookie dough base, a luscious frosting layer, and vibrant blueberries and raspberries artfully arranged to resemble the American flag for the Fourth of July!

    If you’re making desserts for the 4th of July, you’re also going to love our 4th of July cupcakes and our mini trifle cups that use a lot of the same ingredients as this flag pizza!

    American flag fruit pizza on marble counter with red, white and blue stars surrounding it.

    Not only is this fruit pizza visually stunning, but it’s also bursting with bright, fruity flavors that will delight your guests. Read on to discover how easy it is to create this fantastic recipe that’s sure to become the star of your festive spread for occasions such as Memorial Day or to celebrate Independence Day on July 4th.

    If you love the idea of fruit pizza and want to try another sweet pizza idea, check out this Oreo Pizza Recipe for a chocolate lovers version. Or you could go for a simple fruit salad to keep up the healthy theme with this Honey Lime Fruit Salad recipe.

    [feast_advanced_jump_to]

    ❤️ Why You’ll Love This Recipe

    • It uses a few ingredients: With only 5 ingredients, this recipe doesn’t need anything too complicated to make.
    • Colorful and fun: The recipe looks as amazing as it tastes and is great for holidays such as serving a 4th of July fruit pizza on a themed party table.
    • Ready in only 60 minutes: With just 15 minutes cooking and the same for prep then 30 minutes to cool, the recipe is ready in only an hour.

    🧾 Ingredients Needed

    I’ve highlighted a couple of ingredients below with some relevant notes. Aside from this, the ingredients needed are pretty basic.

    Ingredients for American flag fruit pizza, labeled on white marble.
    • Dough – We used a 16.5 ounce roll of refrigerated sugar cookie dough for this recipe as it is easy to use and very tasty.
    • Frosting – The best frosting for the recipe that we found was a simple store-bought white tub. A 16 ounce tub will work perfectly. Or you can make it from scratch if you prefer.
    • Marshmallows – We love to add Marshmallow Stars to the fruit pizza but they are optional.

    📖 Substitutions

    Need to trade out some ingredients? Here are some suggestions that can help:

    • Sugar Cookie Dough: Instead of refrigerated sugar cookie dough, you can make your own from scratch or use any other type of cookie dough such as shortbread or even a pre-made pie crust.
    • Blueberries: If you don’t have fresh blueberries, you can substitute them with blackberries, black grapes, or even small pieces of dark purple plums to maintain the color contrast in the flag design.
    • Raspberries: In place of raspberries, you can use halved strawberries, red currants, pitted cherries, or small pieces of red plums for the red stripes on your fruit pizza.

    📖 Variations

    Store-bought cookie dough is a great option for this recipe. But if you feel adventurous and want to make your own, you definitely can.

    Homemade Sugar Cookie Dough: To make your own sugar cookie dough, combine 2 ¾ cups all-purpose flour, 1 teaspoon baking soda, ½ teaspoon baking powder, 1 cup unsalted butter (softened), 1 ½ cups white sugar, 1 egg, and 2 teaspoons vanilla extract in a bowl. Mix until a dough forms and then refrigerate for at least 1 hour before using.

    👩🏻‍🍳 How to Make American Flag Fruit Pizza

    This fruit pizza recipe is broken into 3 components:

    1. Create the pizza base
    2. Add the frosting
    3. Finish with fruit

    Be sure to allow your sugar cookie crust cool completely before decorating! 

    *Be sure to see the recipe card below for the full ingredients list & instructions!*

    Steps 1-4 to make American flag fruit pizza.

    STEP 1. Prepare the equipment. Set your oven to 350F or 325F if using a non-stick baking sheet. Take a 13 x 9-inch baking pan and cover it with parchment paper.

    STEP 2. Slice the cookie dough. Slice the cookie dough roll into slices around ¼-inch thick. Press them into the baking pan evenly.

    STEP 3. Cook the dough. Cook the dough for 15 minutes until it is golden brown then remove it and allow it to cool completely on the cooking rack. (Image 1).

    STEP 4. Add the frosting. Take the tub of frosting and spread it across the whole of the cooled pizza base. (Image 2).

    STEP 5. Add the berries. Start with 5 rows of blueberries from the top left corner where the stars would be on the blue portion of the flag pattern. (Image 3).

    Then add the raspberry stripes starting at the top and leave a space between each row to create the red and white stripes. (Image 4).

    Slice of 4th of July fruit pizza on white plate.

    STEP 6. Pipe the frosting stripes. Now take a #1M star piping tip and add a row of stars on the white areas between each row of raspberries. If you are adding the marshmallow stars, add these on top of the blueberries.

    Star marshmallows added to American flag fruit pizza.

    STEP 7. Cool and serve. Allow the pizza to chill in the refrigerator then serve!

    American flag fruit pizza on sugar cookie crust with slice taken out.

    💭 Recipe Pro Tips

    • Let the dough soften first. Be sure to set the tube of dough out 10 minutes ahead to allow time to soften so you can press the dough onto a baking sheet.
    • Pat dry your fruits: To prevent your fruit pizza from becoming soggy, make sure to wash and thoroughly pat dry your fruits with a paper towel before arranging them on the pizza.
    • Add a glaze: To give your fruit pizza a glossy finish and prevent the fruit from drying out, you can brush a simple glaze made of fruit preserves or apricot jam (heated and strained) over the top of the fruit.
    • Use a pizza cutter or sharp knife: When cutting your fruit pizza, use a pizza cutter or a sharp knife to ensure clean, even slices. Be sure to cut through the crust and fruit layers in one motion to avoid tearing the toppings.

    📋 Recipe FAQs

    Can you make the fruit pizza recipe ahead of time?

    To ensure the best texture and taste, assemble your fruit pizza as close to serving time as possible. This will help prevent the crust from getting soggy and keep the fruits looking fresh.

    Do I have to use sugar cookie dough for the base?

    No, you don’t have to use sugar cookie dough. You can substitute it with other types of cookie dough, like shortbread or even a pre-made pie crust.

    Can I make a fruit pizza with gluten-free or vegan sugar cookie dough?

    You can use a gluten-free or vegan sugar cookie dough recipe to create a fruit pizza that meets your dietary needs. Just make sure to adjust the frosting and fruit toppings accordingly to maintain a gluten-free or vegan dessert.

    🍽 What to Serve with American Flag Fruit Pizza

    American flag fruit pizza is a fun and delicious dessert on its own, but you can also serve it with additional treats to make your celebration even more special. Here are some ideas:

    • Ice cream or frozen yogurt: A scoop of vanilla ice cream or frozen yogurt pairs well with the fruity flavors of the fruit pizza and adds a cool, creamy contrast.
    • Whipped cream: Serve a dollop of whipped cream on the side for an extra touch of indulgence, or do a Cool Whip Fruit Dip!
    • Fruit salad: Prepare a simple fruit salad with a mix of seasonal fruits to complement the fruit pizza and offer a lighter, refreshing option.
    • Grilled fruit skewers: For a fun and interactive dessert option, grill fruit skewers with a variety of fruits like pineapple, peaches, and strawberries. This can be a great addition to a summer barbecue alongside the fruit pizza.
    • Patriotic-themed treats: Offer another patriotic dessert like red, white, and blue rice krispie treats, cake pops, or decorated sugar cookies to enhance the celebratory atmosphere. Or this 4th of July Dip, looks adorable sitting right next to it!
    • Cheese platter: Assemble a cheese platter with a variety of cheeses, crackers, and nuts for guests who prefer a savory option alongside their dessert.
    • Chocolate fondue: Set up a chocolate fondue station with marshmallows, pretzels, and additional fruits like strawberries and bananas for dipping.
    • Snack Mix: I mean, these Patriotic Muddy Buddies would look adorable, and be delicious sitting next to this fruit pizza, don’t you think?

    ❄️ Storage

    Store any leftover fruit pizza covered in the refrigerator for up to 2 days. The crust may become soft over time due to the moisture from the fruit and cream cheese layer.

    It’s not recommended to freeze a fruit pizza, as the texture of the fruits and frosting may be compromised once thawed. However, you can freeze the sugar cookie dough base separately for up to 3 months.

    🫐 More Fruit Recipes You’ll Love

    If you have some blueberries left, why not try this simple Blueberry Waffles Recipe as a tasty breakfast idea? Or you could pop the raspberries into a Spring Mix Apple Raspberry Salad.

    • fruit board with crackers and dip
      Fruit Board
    • Fruit dip with marshmallow fluff in a white bowl
      Fruit Dip with Marshmallow Fluff
    • fruit salad in gray bowl
      Fruit Salad with Cool Whip
    • Apple salad with pudding.
      Apple Salad with Fruit

    Did you make this? I’d be so grateful if you left a “star” rating below to let me know what you thought! Then, the next time you need a quick and easy recipe, come back to Fantabulosity to browse all of my easy recipes!

    Recipe

    American flag fruit pizza on marble counter
    Print Pin
    5 from 5 votes

    American Flag Fruit Pizza

    This red, white and blue dessert pizza, is a delicious and simple patriotic dessert for your next holiday party!
    Course Dessert
    Cuisine American
    Prep Time 10 minutes minutes
    Cook Time 30 minutes minutes
    Cooling Time 30 minutes minutes
    Total Time 1 hour hour 10 minutes minutes
    Servings 24 servings
    Calories 192kcal
    Author Jessica Burgess

    Ingredients

    • 16.5 ounce roll refrigerated sugar cookie dough
    • 2 x 16 ounce tub store-bought frosting white
    • 1 pint blueberries washed and dried
    • 12 ounces raspberries washed and dried
    • star marshmallows (optional)

    Instructions

    • Preheat your oven to 350°F (or 325°F if using a nonstick baking sheet). Prepare a 13 x 9-inch baking pan with parchment paper.
    • Slice your roll of cookie dough into ¼-inch thin slices, and then press the slices of sugar cookie dough into the pan evenly.
    • Bake for 15 minutes or until the cookie is beginning to turn golden brown. Allow the cookie to cool completely on a cooling rack.
    • Once cool, take (1) 16-ounce tub of icing and spread it evenly over the entire cookie.
    • Now let's create 5 rows of blueberries in the top left corner where the stars would be on the flag.
    • Next, use the raspberries as the stripes on the flag. Starting at the top, place a row of raspberries, leave about an inch of space, and create another row. Repeat until you reach the bottom of the "flag.".
    • Place your other frosting tub in a piping bag with a #1M star piping tip. Pipe a row of stars in between each row of raspberries.
    • Serve chilled, and enjoy!

    Notes

    See blog post for more tips to help make this recipe a success!
    Top Tip: Be sure to allow your sugar cookie base to cool completely before decorating!
    Storage: Store any leftovers in the refrigerator for up to 2 days. Do note that the crust may become soft over time due to the moisture from the fruit and cream cheese layer.

    Nutrition

    Serving: 1slice | Calories: 192kcal | Carbohydrates: 31g | Protein: 1g | Fat: 7g | Saturated Fat: 2g | Polyunsaturated Fat: 2g | Monounsaturated Fat: 3g | Cholesterol: 2mg | Sodium: 96mg | Potassium: 72mg | Fiber: 2g | Sugar: 23g | Vitamin A: 23IU | Vitamin C: 6mg | Calcium: 7mg | Iron: 1mg

    Brownie Mix Cookies

    May 16, 2023

    Brownie mix cookies stacked on top of one another

    Brownie Mix Cookies: An easy cookie recipe that brownie lovers will adore! Who knew a box of brownie mix was the secret to delicious cookies?

    This easy recipe is similar to our red velvet cake mix cookies but uses a boxed brownie mix to create the perfect cookie for all you chocolate lovers!

    Stack of brownie mix cookies.

    ❤️ Why You’ll Love This Recipe

    I’m a big fan of a simple cookie; something you can whip up without much preparation. (Like these funfetti cake mix cookies too!) I’m also a big fan of chocolate…specifically anything with a chewy fudge center, like this brownie recipe with cream cheese frosting! Add some cherries to the too, like in our chocolate cherry cookies, and I’m in love.

    This easy brownie mix cookies recipe is exactly what I’m all about- it only needs 6 ingredients (one of which is a brownie box mix), it can be made super quickly, and it gives you all the yummy goodness of gooey brownies in cookie form! 

    If that isn’t the best thing since chocolate chip cookies were invented, I don’t know what is. It might sound a little bit dramatic but these easy brownie cookies really might be some of the best cookies ever. 

    The best part is that you can customize them to fit your personal preference- see the variations listed below!

    [feast_advanced_jump_to]

    🛒 Ingredients

    You can make cookies with brownie mix…who knew? All you need is a box brownie mix and a few other simple ingredients you can find at your grocery store! You can skip to the recipe card if you’re ready to get started.

    • 1- 18.3 ounce Brownie Mix box (I used Duncan Hines Chewy Fudgy Brownies)
    • ½ cup butter (1 stick) softened (or ½ cup oil)
    • 2 large eggs
    • 1- 3.4 oz box vanilla Jell-O instant pudding
    • 3 tablespoons water room temperature
    • 1 cup chocolate chips
    Ingredients for brownie mix cookies.

    👩🏻‍🍳 How to Make Brownie Mix Cookies

    1. Heat oven to 350 degrees F.
    2. Line a baking sheet with parchment paper and set aside (you can also use a silicone mat in place of the parchment paper).
    3. In a large bowl, mix the butter and half of the brownie mix with an electric mixer. Mix until combined.
    Brownie mix and butter in glass mixing bowl.
    1. Add eggs and water and mix until incorporated.
    Brownie mix with egg, milk and other ingredients in glass bowl.
    1. Add the remaining brownie mix and the Jell-O instant pudding. Mix until all ingredients are combined. You will have a thick batter at this point (almost closer to a thick dough).
    2. Add the chocolate chips and fold them into your brownie mix cookie batter with a spatula.
    Chocolate chips poured in to brownie batter cookie mix.
    1. Using a medium cookie scoop, scoop 1.5 tablespoons of brownie batter like a scoop of ice cream and place it onto the prepared baking sheet. Be sure to keep the dough balls 1 ½ inch apart as they will spread.
    Scoop dough onto prepared cookie sheet.
    Brownie mix cookie batter balls on cookie sheet.
    1. Bake in your 350 degree oven for 11 -12 minutes or until the edges are set. The cookies will have a fudgy center and crispy edges.
    Baked brownie mix cookies on cookie sheet.
    1. Let it cool on the cookie sheet for 2-3 minutes. They are still very soft when they come out of the oven. Waiting an extra minute or two before transferring them will help them keep their shape!
    2. Transfer to a wire rack to cool completely.
    Baked brownie mix cookies on cooling rack.
    1. Serve and enjoy! Note: Try serving these while they are warm with a scoop of vanilla ice cream on the side- yum!

    Don’t they look so similar to my Devil’s Food cake mix cookies?

    Brownie Mix Cookies on black cooling rack.

    🧾 Substitutions

    Here are a few helpful substitutions you can make if you find yourself missing an ingredient:

    Butter – can be replaced with vegetable oil or coconut oil

    Brownie Mix- I used Duncan Hines Chewy Fudgy Brownie Mix, but you could easily replace this with a Betty Crocker, Pillsbury or Ghiradelli brownie mix. Any fudge brownie mix would do the trick! If you have chocolate cake mix though, you can use it to make these cake mix turtle cookies!

    📖 Variations

    This brownie mix cookies recipe is a pretty great recipe as it is, but if you’re the creative type there are SO many ways you can personalize it to make the best cookies for you. Next time you make these, why not try…

    • Baking Chips: Adding an additional ¼ cup of a second type of chip to your cookie dough. You could try peanut butter chips, white chocolate chips, butterscotch chips, or extra chocolate chips/morsels (this is my favorite variation as it gives these rich cookies an extra fudgy brownie texture).
    • Salt: Sprinkle the top of the cookie with flaky sea salt while it is still warm.
    Brownie Mix Cookies

    ❄️ Storage

    Since these are basically the best brownie mix cookies ever, chances are there won’t be any left to store. BUT, on the off chance that you do have some extras, store them in an airtight container on the counter for 3-4 days or in the fridge for up to a week. 

    Side note: These chocolate cookies will freeze well after baking. You can store them in a freezer-safe, airtight container in the freezer for up to a month. 

    💡 Expert Tips and FAQs

    What’s the best way to serve these cookies?

    These cookies are versatile! You could serve them just as they are with a glass of milk on the side, serve them warm with a scoop of ice cream beside them, or even get creative and turn them into ice cream sandwiches (soften a bit of vanilla ice cream, place a scoop between two cookies and refreeze)!

    Does it matter which type of boxed brownie mix I use?

    No, any brownie mix will work! The ones that say they make “fudgy” brownies will probably give you the most fudgy cookies.

    Can I freeze these cookies BEFORE baking so I have the dough ready and can make freshly baked cookies in a pinch?

    We think you could, yes! We haven’t tried it yet, but this is what we would do…

    Make your cookie dough, scoop it onto a cookie sheet as the recipe calls for and then freeze in the freezer until the dough scoops are solid (this keeps them from sticking together). Once frozen, take them off the cookie sheet and place them in an airtight and freezer-safe container or bag.

    When you are ready to bake them, place them on a parchment-lined baking sheet and either let them thaw out before baking or add a few minutes to the baking time (2-4 should do it). Just watch the cookies near the end of the baking time and when the edges look golden brown and the center looks “set” (not wiggly) they should be done. Then let them cool as the recipe directs.

    🍫Brownie Desserts

    If you love anything brownie, you’ll also love these brownie recipes that are popular:

    • Hot fudge cake sitting on white plate, with a scoop of vanilla ice cream on top.
      Hot Fudge Cake
    • Red velvet brownies stacked on top of one another.
      Red Velvet Cake Brownie Recipe
    • A pan of frosted brownies are topped with strawberries dipped in orange chocolate to look like pumpkins
      Pumpkin Patch Brownies with Strawberry Pumpkins
    • A brownie with cream cheese frosting, tipped on it's side, in the middle of other brownies.
      Brownies with Cream Cheese Frosting

    If you love short-cuts in the kitchen, then you’ll also love these 3-Ingredient Brown Sugar Cookies!

    Recipe

    Brownie mix cookies stacked on top of one another
    Print Pin
    5 from 9 votes

    Brownie Mix Cookies

    Brownie Mix Cookies: An easy cookie recipe that brownie lovers will adore! Who knew a box of brownie mix was the secret to delicious cookies!
    Course Dessert, Snack
    Cuisine American
    Prep Time 5 minutes minutes
    Cook Time 11 minutes minutes
    Total Time 16 minutes minutes
    Servings 28 cookies
    Calories 67kcal
    Author Jessica Burgess

    Ingredients

    • 1- 18.3 oz box Brownie Mix I used Duncan Hines Chewy Fudgy Brownies
    • ½ cup butter (1 stick) softened at room temperature (or ½ cup oil)
    • 2 large eggs
    • 3.4 oz box vanilla Jell-O instant pudding
    • 3 Tablespoons water room temperature
    • 1 cup chocolate chips

    Instructions

    • Heat oven to 350 degrees F.
    • Line a baking sheet with parchment paper and set aside (you can also use a silicone mat in place of the parchment paper).
    • In a large bowl, mix the butter and half of the brownie mix with an electric mixer. Mix until combined.
    • Add eggs and water and mix until incorporated.
    • Add the remaining brownie mix and the Jell-O instant pudding. Mix until all ingredients are combined. You will have a thick batter at this point (almost closer to a thick dough).
    • Add the chocolate chips and fold them into your brownie mix cookie batter with a spatula.
    • Using a medium cookie scoop, scoop 1.5 tablespoons of brownie batter like a scoop of ice cream and place it onto the prepared baking sheet. Be sure to keep the dough balls 1 ½ inch apart as they will spread.
    • Bake in your 350 degree oven for 11 -12 minutes or until the edges are set.
    • Let it cool on the cookie sheet for 2-3 minutes. They are still very soft when they come out of the oven. Waiting an extra minute or two before transferring them will help them keep their shape!
    • Transfer to a wire rack to cool completely.
    • Serve and enjoy!
      Note: Try serving these while they are warm with a scoop of vanilla ice cream on the side- yum!

    Notes

    Storage: Store cookies in airtight container on the counter for 3-4 days or in the fridge for up to a week. 
    Freezing: These chocolate cookies will freeze well after baking. You can store them in a freezer-safe, airtight container in the freezer for up to a month. 

    Nutrition

    Serving: 1cookie | Calories: 67kcal | Carbohydrates: 4g | Protein: 1g | Fat: 5g | Saturated Fat: 3g | Polyunsaturated Fat: 1g | Monounsaturated Fat: 1g | Trans Fat: 1g | Cholesterol: 23mg | Sodium: 39mg | Potassium: 6mg | Fiber: 1g | Sugar: 4g | Vitamin A: 135IU | Vitamin C: 1mg | Calcium: 10mg | Iron: 1mg
    • « Go to Previous Page
    • Page 1
    • Interim pages omitted …
    • Page 9
    • Page 10
    • Page 11
    • Page 12
    • Page 13
    • Interim pages omitted …
    • Page 25
    • Go to Next Page »

    Primary Sidebar

    Jessica Burgess of Fantabulosity, slicing an avocado.

    Hi, I'm Jessica! - Owner and Creator of the blog and brand, Fantabulosity.

    I’m here to help you make easy comfort food and nostalgic recipes, using simple ingredients, that everyone will love.

    More about me →

    Potluck Recipes

    • A slice of strawberry jello cake, topped with a strawberry slice, sitting on a round plate.
      Strawberry Jello Cake (Easy, Moist Strawberry Cake)
    • Crack green beans on wooden spoon.
      Crack Green Beans
    • Old fashioned potluck cake recipes collage.
      Old-Fashioned Cakes That Still Show Up at Every Potluck
    • Collage of potluck desserts.
      Easy Potluck Desserts (Simple Recipes That Always Get Asked For)
    • Cold Pasta Salad Recipes Collage.
      Cold Pasta Salad Recipes
    • Chicken Casserole recipes image collage.
      20 Chicken Casserole Recipes

    Popular Recipes

    • bread pudding in baking dish
      Bread Pudding Recipe: Easy Old Fashioned Recipe (With Video!)
    • Burger baked in the oven, steamed in aluminum foil, and placed on white plate.
      Burgers in the Oven
    • two tuna salad sandwiches stacked on top of each other
      The BEST Tuna Salad Recipe
    • Sliced banana bread on white platter
      Best Banana Bread
    • Strawberry brownies on white marble cutting board.
      Strawberry Brownies Recipe
    • Cheeseburger Sliders
      Cheeseburger Sliders with Hawaiian Rolls

    Footer

    ↑ back to top

    Featured In

    About

    • About Jessica
    • Contact
    • Collaborate
    • Dinner System

    Easy Recipes

    • All Recipes
    • Vintage Recipes
    • Dinner Recipes
    • Desserts

    How to Cook

    • Oven-Baked
    • Stove-Top
    • No Bake
    • Cooking Basics

    Privacy Policy |Accessibility Copyright © 2026 Fantabulosity | Terms & Conditions | FTC
    All recipes, photos, and content are copyrighted and may not be reproduced, republished, or distributed without written permission.

    Rate This Recipe

    Your vote:


    A rating is required
    A name is required
    An email is required